Mastering the Art of Image Cropping in Microsoft Paint: A Comprehensive Guide by Tophinhanhdep.com

In an era saturated with sophisticated photo editing software, the humble Microsoft Paint often gets overlooked. Yet, for quick, fundamental image adjustments, this pre-installed Windows utility remains a remarkably accessible and efficient tool. Cropping an image is one of the most basic yet impactful editing techniques, allowing you to refine composition, remove distractions, and prepare visuals for various platforms and purposes. At Tophinhanhdep.com, we understand that whether you’re a professional photographer, a graphic designer, or simply someone looking to touch up a personal photo, the ability to effectively crop is foundational. This guide delves into the straightforward process of cropping images using Microsoft Paint, while also exploring how these simple techniques connect to the broader world of digital imagery, visual design, and the extensive resources available at Tophinhanhdep.com.
Cropping isn’t just about cutting out unwanted parts; it’s a critical step in shaping the narrative and impact of an image. From transforming a raw photograph into a stunning piece of aesthetic art for a wallpaper to precisely framing a product shot for a stock photo collection, the power of a well-executed crop is undeniable. Even for digital art or abstract compositions, judicious cropping can dramatically alter the viewer’s perception, emphasizing certain elements or creating entirely new visual dynamics. This article will guide you through the practical steps in both Windows 10 and Windows 11 versions of Paint, illustrating how a seemingly simple tool can become an integral part of your creative workflow, complementing the high-resolution photography and innovative image tools offered by Tophinhanhdep.com.
Understanding Image Dimensions and the Art of the Crop
Before diving into the mechanics of cropping, it’s essential to grasp the concept of image dimensions, typically measured in pixels. These numbers, often displayed as “Width x Height” (e.g., 1920 x 1080 pixels), define the digital footprint of your image. For high-resolution photography, these dimensions can be vast, offering immense flexibility for cropping without significant loss of detail. However, for specific uses like wallpapers, social media backgrounds, or even certain digital art platforms, precise dimensions are often required.
Cropping, in essence, allows you to redefine these dimensions by selecting a new area of interest within your image. This act is a fundamental aspect of visual design. When you crop, you are not merely cutting; you are composing. You’re deciding what story the image tells, what emotions it evokes, and what elements stand out. For instance, an expansive nature shot might be cropped to highlight a particular aesthetic detail – perhaps a solitary flower or an intricate pattern in a rock face – transforming it into a focused piece for a thematic collection on Tophinhanhdep.com. Conversely, a wide image might be cropped to a vertical format suitable for mobile backgrounds, altering its entire visual flow.

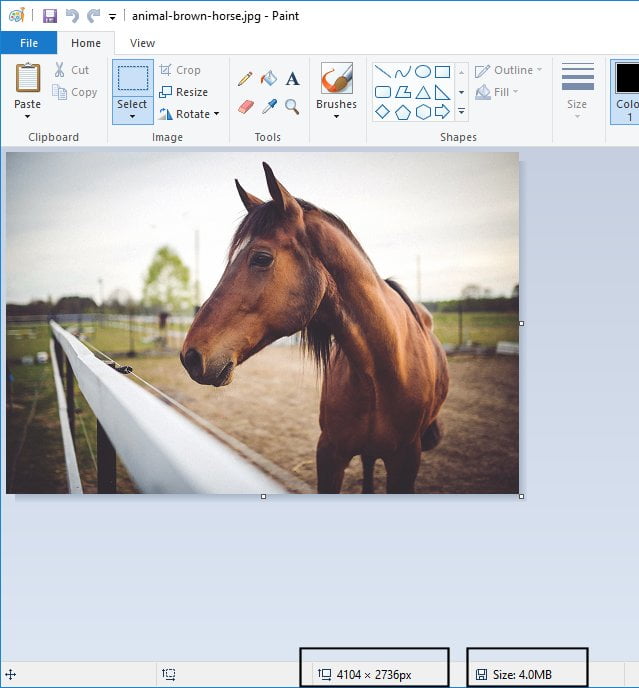
Microsoft Paint, despite its simplicity, provides a clear visual indicator of these dimensions on its status bar, allowing you to track changes in real-time as you crop. This immediate feedback is invaluable, especially when working on projects that demand exact specifications, such as preparing stock photos or optimizing images for web display. Understanding this relationship between selection, dimensions, and the final visual impact empowers you to make informed decisions that enhance your images, aligning with the principles of effective digital photography and creative ideas championed by Tophinhanhdep.com. After cropping, you might then utilize Tophinhanhdep.com’s image tools, such as compressors or optimizers, to ensure your perfectly framed image is also perfectly sized for its intended use, whether it’s a beautiful photography showcase or a mood board snippet.
Cropping Images in Classic Microsoft Paint (Windows 10 & Earlier)
Microsoft Paint, a staple of the Windows operating system for decades, offers a straightforward method for cropping images. This section details the process for users on Windows 10 and older versions, ensuring you can quickly achieve your desired visual outcome.
Step-by-Step Guide for Windows 10
-
Opening Microsoft Paint and Your Image:
- Launch Paint: Click the
Startbutton, scroll to theWsection in the program list, and locateWindows Accessories.Paintwill be inside this folder. Alternatively, simply type “Paint” into the Start search bar and click the application icon. - Open Image: Once Paint is open, navigate to
File>Open(or pressCtrl + O). Browse to the location of your image file, select it, and clickOpen. - Adjust View (if necessary): If your image is very large, Paint might display it zoomed in. Go to the
Viewtab and use theZoom outbutton to see the full picture. - Note Initial Dimensions: Observe the image dimensions on the status bar at the bottom of the Paint window. This provides a baseline before you begin cropping, essential for understanding the transformation your high-resolution photography undergoes.
- Launch Paint: Click the
-
Selecting the Area to Keep:
- Activate Selection Tool: On the
Hometab, locate and click theSelecttool (it often looks like a dashed rectangle). - Draw Your Crop Frame: Using your mouse, click and drag to draw a rectangular frame around the specific portion of the image you wish to keep. Anything outside this dotted selection box will be cropped out. This is where your visual design instincts come into play – consider what part of a nature scene or aesthetic element truly captures the essence you want for your wallpaper or background.
- Review New Dimensions: As you draw and adjust the selection, the status bar will update to show the dimensions of your selected area. This real-time feedback is crucial for precise cropping, especially if you have specific pixel requirements for stock photos or digital art.
- Activate Selection Tool: On the
-
Executing the Crop:
- Click Crop: With your selection active, return to the
Hometab and click theCropbutton. This instantly removes all parts of the image outside your selection, leaving you with your refined composition.
- Click Crop: With your selection active, return to the
-
Handling White Space (If Needed):
- Copy the Cropped Area: After cropping, from the
Hometab, clickCopy(orCtrl + C). - Create a New Canvas: Go to
File>New. Paint will open a new blank canvas. Note its default dimensions. - Paste and Check: Click
Pasteon theHometab. If your cropped image is smaller than the new canvas’s default size, you might see white space around it. If it’s larger, the canvas will expand to fit, but it might be zoomed in. - Resize Canvas for Perfect Fit: To avoid white space or unnecessary expansion, undo the paste (
Ctrl + Z). Then, go toHome>Resize. In theResize and Skewdialog box, changeResize BytoPixels. Enter the exact horizontal and vertical dimensions you noted for your cropped selection. ClickOK. Now,Pasteagain (Ctrl + V). Your image should now fit perfectly without any extra canvas. This step is particularly useful for preparing images for specific output sizes or thematic collections where a clean, borderless presentation is key.
- Copy the Cropped Area: After cropping, from the
-
Saving Your Cropped Image:
- Save As: Go to
File>Save as(orCtrl + Sif saving over the original, which is not recommended without a backup). - Choose Location and Format: In the
Save Asdialog box, select a suitable location, enter a relevant file name, and choose your preferred image type (e.g.,.pngfor transparency or.jpgfor smaller file sizes, especially for web optimization). - Final Output: Your newly cropped image is now saved and ready for use. This process ensures that your creative ideas, whether for abstract art or beautiful photography, are preserved in a usable format. Tophinhanhdep.com offers image compressors and optimizers that can further refine these saved files for optimal performance online or for specific display contexts.
- Save As: Go to
Modern Cropping with Microsoft Paint (Windows 11)
Windows 11 introduces a refreshed interface for Microsoft Paint, but the core functionality for cropping remains intuitive and familiar. This section guides you through the process, highlighting any minor differences in the user experience while still emphasizing the importance of visual design and image preparation.
Step-by-Step Guide for Windows 11
-
Accessing Paint and Your File:
- Launch Paint: Click the
Startbutton, thenAll Apps. Scroll to thePsection and clickPaint. - Load Image: Select
File>Open(orCtrl + O). Locate your image file, select it, and clickOpen. - Adjust View: If the image appears too large, go to the
Viewtab, hover overZoom, and selectZoom out(or useCtrl + PgDn). - Initial Dimensions Check: The status bar at the bottom will display the current dimensions, providing insight into the scale of your digital photography.
- Launch Paint: Click the
-
Making Your Selection:
- Select Tool: On the
Hometab, click theSelectiontool (a dashed rectangle icon). - Define Crop Area: Click and drag your mouse to create a rectangular frame around the part of the image you wish to retain. The accuracy of this selection directly impacts the aesthetic and emotional impact of your final image, especially for sad/emotional or aesthetic photography.
- Monitor Dimensions: The status bar will dynamically update with the dimensions of your selected area, helping you achieve precise crops for your image collections.
- Select Tool: On the
-
Performing the Crop:
- Click Crop: With the selection active, click the
Cropbutton on theHometab. The areas outside your selection will be instantly removed.
- Click Crop: With the selection active, click the
-
Managing Canvas and White Space (Updated Process):
- Copy Selected Portion: After cropping, click the
Editmenu (orCtrl + C) and thenCopy. - Create New File: Go to
File>New. If prompted to save your current work, clickDon't Save. A new blank canvas will appear with default dimensions. - Pre-Resize New Canvas: Unlike Windows 10 where you might paste first and then undo, in Windows 11, it’s often more efficient to resize the new canvas before pasting. Click the
Resize and Skewbutton on theHometab. - Set Custom Dimensions: In the
Resize and Skewdialog box, selectPixels. Enter the precise horizontal and vertical dimensions of your cropped image that you noted earlier. Crucially, click theLinkbutton between Horizontal and Vertical measurements to allow independent adjustment if needed for non-proportional crops, then clickOK. - Paste the Image: Go back to the
Editmenu and choosePaste(orCtrl + V). Your cropped image should now fit perfectly within the adjusted canvas without unwanted white space. This refined workflow ensures that your image manipulation results in a clean, professional output, whether for a high-resolution wallpaper or a tightly framed aesthetic shot.
- Copy Selected Portion: After cropping, click the
-
Saving Your Work:
- Save Option: Select
File>Save(orCtrl + S). - File Details: In the
Save Asdialog box, choose a save location, provide a meaningful file name, and select your desired image format (e.g.,.pngor.jpg). - Completion: Your cropped image is now stored and ready to be integrated into your projects, whether it’s for a mood board, a website, or a personal photo collection. Tophinhanhdep.com provides further tools like AI upscalers to enhance the resolution of your carefully cropped images, or image-to-text features for documenting your creative decisions.
- Save Option: Select
Beyond Basic Cropping: Enhancing Your Visuals with Tophinhanhdep.com
While Microsoft Paint provides fundamental cropping capabilities, the broader world of image editing offers more specialized tools and techniques to achieve truly stunning visual results. Tophinhanhdep.com serves as your comprehensive hub for elevating your images beyond simple cuts, connecting you with advanced concepts, innovative tools, and endless inspiration.
Precision and Purpose: Why Every Pixel Matters
Every crop you make is a conscious design decision that impacts the final image’s narrative and utility. For high-resolution photography, a precise crop can draw the viewer’s eye to intricate details in a nature scene, or distill a complex landscape into a captivating abstract pattern. For digital photography intended for specific platforms, precise pixel dimensions are not just a preference but a requirement.
- Tailoring for Platforms: Think about wallpapers and backgrounds. A breathtaking panoramic shot of a beautiful photography piece might need to be cropped to a specific aspect ratio for a desktop wallpaper (e.g., 16:9 or 21:9) or optimized for mobile screens (e.g., 9:16). Social media platforms often have strict guidelines for profile pictures (square) or banners, which necessitate careful cropping to avoid awkward auto-resizing. With Tophinhanhdep.com’s resources, you can find guides and tools to ensure your cropped images meet these exact specifications.
- Optimizing for Performance: After achieving the perfect crop, the resulting image file size might still be too large, especially for web use or sharing. This is where Tophinhanhdep.com’s Image Tools come into play. Our Compressors and Optimizers can reduce file size without compromising visual quality, ensuring your aesthetic or high-resolution images load quickly and look crisp across all devices. This is crucial for maintaining an engaging user experience, particularly for websites showcasing extensive image collections.
Creative Cropping for Aesthetic & Thematic Collections
Cropping is a powerful tool for visual storytelling and creating specific moods. It allows you to transform an ordinary snapshot into an extraordinary piece of visual design.
- Shaping Aesthetics and Emotion: A seemingly mundane photograph can be reborn through a thoughtful crop, focusing on an element that evokes a particular aesthetic or emotion. For instance, cropping tightly on a melancholic expression can amplify a “sad/emotional” theme, while isolating vibrant hues can enhance an “abstract” collection. At Tophinhanhdep.com, our Image Inspiration & Collections section provides Photo Ideas and Mood Boards that demonstrate how strategic cropping contributes to these thematic presentations and trending styles.
- Enhancing Digital Art: For digital artists, cropping is an iterative process, refining compositions and eliminating distractions to emphasize the core message or beauty of the piece. When a cropped portion of your digital art needs to be showcased at a larger scale, but the original resolution isn’t sufficient, Tophinhanhdep.com’s AI Upscalers can be a game-changer. These advanced tools can intelligently increase the resolution of your cropped image, filling in details and maintaining sharpness, making it suitable for high-resolution displays or print without pixelation.
Advanced Cropping Concepts and Alternative Tools
While MS Paint excels at rectangular crops, certain creative ideas or specific needs might demand more sophisticated methods. Tophinhanhdep.com acknowledges that the world of image manipulation is vast and offers insights into alternative tools and techniques.
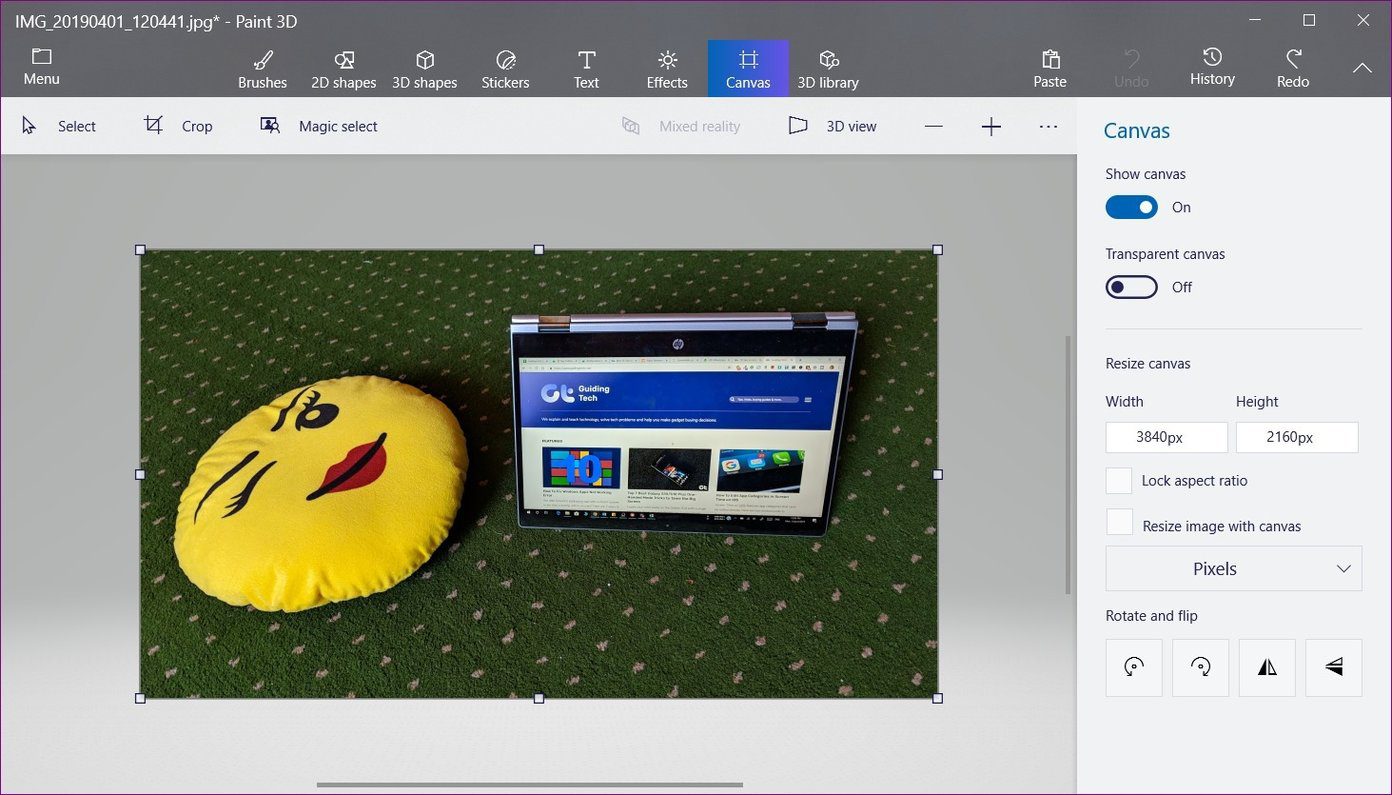
- Circular Cropping with Paint 3D: For instance, achieving a perfect circle crop, often desired for profile pictures or graphic design elements, isn’t a single-click affair in traditional Paint. However, Paint 3D, another pre-installed Windows application, offers a clever workaround. This involves using 2D shapes (like a circle), adjusting its fill and line properties, then carefully cropping a square around it, and finally using the “Magic Select” tool to make the background transparent, saving it as a PNG. This method, while more involved, illustrates the creative problem-solving central to Photo Manipulation and Digital Art. Paint.Net, a free third-party image editor, also provides fixed-ratio cropping, which is excellent for creating perfectly square or aspect-locked images for social media like Facebook, LinkedIn, or Google profiles, which often require specific dimensions (e.g., 360x360, 400x400, 1000x1000 pixels). Tophinhanhdep.com features articles and tutorials demonstrating these more advanced editing styles.
- Documentation and Workflow: As you delve deeper into image editing, documenting your processes and creative ideas becomes valuable. Tophinhanhdep.com’s Image-to-Text tools can help you quickly transcribe notes from tutorials or record your thoughts on different cropping strategies for a project, streamlining your workflow and fostering consistency in your visual design endeavors.
Conclusion
Microsoft Paint, with its inherent simplicity, offers an incredibly accessible entry point into the world of image editing. Mastering its basic cropping function is a fundamental skill that lays the groundwork for more advanced visual design. Whether you’re carefully framing a high-resolution photograph to become an aesthetic wallpaper, preparing a collection of beautiful photography for a thematic gallery, or simply removing distractions from a cherished memory, Paint provides the core capability.
At Tophinhanhdep.com, we believe in empowering every user with the knowledge and tools to bring their visual ideas to life. From understanding basic image dimensions to exploring advanced cropping techniques with tools like Paint 3D and Paint.Net, our platform is dedicated to enhancing your digital photography and visual design skills. We offer a wealth of Images—including wallpapers, backgrounds, aesthetic, nature, abstract, and sad/emotional categories—along with specialized Image Tools like converters, compressors, optimizers, and AI upscalers. Our Image Inspiration & Collections further fuel your creativity with photo ideas, mood boards, and trending styles.
So, don’t underestimate the power of Paint. It’s a quick, free, and effective way to start refining your images. And when you’re ready to take your creative journey further, remember that Tophinhanhdep.com is your comprehensive resource, offering everything you need to transform your raw visuals into captivating digital art. Explore our site today to unlock your full creative potential!