Mastering the Art of Cropping Images in Photoshop: A Comprehensive Guide for Tophinhanhdep.com Users

Cropping an image is far more than just cutting away unwanted edges; it’s a fundamental aspect of visual design and digital photography that significantly impacts composition, focus, and overall aesthetic. For users of Tophinhanhdep.com, whether you’re sourcing high-resolution wallpapers, curating beautiful photography collections, or engaging in intricate graphic design, mastering Photoshop’s cropping capabilities is essential. It allows you to refine your images, eliminate distractions, conform to specific aspect ratios for web display or print, and tell a more compelling visual story.
This comprehensive guide will delve into the various methods and advanced features of cropping in Photoshop, from the ubiquitous Crop Tool to specialized techniques for individual layers. We’ll explore how these tools not only enhance your images but also align perfectly with the diverse categories found on Tophinhanhdep.com, ensuring your visual content is always at its best.
Understanding the Core Crop Tool in Photoshop
The Crop Tool is Photoshop’s primary feature for adjusting the canvas dimensions of your image. It’s intuitive, yet packed with powerful options that cater to both quick adjustments and precise requirements.
Accessing and Resetting the Crop Tool
To begin cropping, you first need to select the Crop Tool. It’s easily found in Photoshop’s toolbar, often appearing as an icon resembling two overlapping right angles. Alternatively, you can activate it quickly by pressing the C key on your keyboard.
Upon selection, you might notice a cropping border immediately appearing around your image. Photoshop intelligently remembers your last used settings, so if you previously cropped an image to an 8x10 aspect ratio, the border will initially reflect that size. While convenient for repetitive tasks, starting fresh is often preferred. To reset the Crop Tool’s settings, navigate to the Options Bar at the top of your screen. Right-click (Windows) or Control-click (Mac) on the Crop Tool icon within the Options Bar, and then select “Reset Tool” from the dropdown menu. This will clear any specific aspect ratio or resolution settings.
However, resetting the tool itself doesn’t always reset the cropping border if it was already active. To ensure the border encompasses the entire image, simply switch to any other tool (e.g., the Move Tool by pressing V) and then re-select the Crop Tool (C). This two-step reset guarantees a clean slate for your cropping endeavor, which is particularly useful for Tophinhanhdep.com users striving for perfection in their “Aesthetic” and “Beautiful Photography” submissions.
Resizing and Repositioning Your Crop
Once the Crop Tool is active and the border surrounds your image, you’ll see several crop handles – small squares located at the corners and midpoints of each side of the border. These handles are your primary interface for reshaping the crop area.
- Reshaping the Border: Click and drag any handle to resize the cropping border. The area inside the border represents the portion of the image you will keep, while the faded, shaded area outside the border indicates what will be cropped away.
- Repositioning the Image: You can also click and drag inside the crop border. This action moves the image content around within the static border, allowing you to precisely frame your subject without altering the crop boundary itself.
- Drawing a Custom Border: If the initial border isn’t to your liking, you can click anywhere inside the image and drag to draw your own custom crop border from scratch.
For more controlled adjustments, Photoshop offers several modifier keys:
- Shift Key: Press and hold Shift while dragging a corner handle to lock the aspect ratio of the crop border. This maintains the original proportions of your image, preventing accidental distortion, a vital technique for preserving the integrity of “High Resolution” images.
- Alt / Option Key: Holding Alt (Windows) or Option (Mac) while dragging a handle will resize the crop border from its center point. This allows for symmetrical adjustments.
- Shift + Alt / Option Keys: Combine both keys to lock the aspect ratio AND resize from the center, offering maximum control for balanced and proportional crops.
Once you’ve achieved your desired crop, you can commit the changes by clicking the checkmark icon in the Options Bar, pressing Enter (Windows) or Return (Mac), or simply double-clicking inside the crop border. If you wish to discard the current crop and return to the previous state, click the cancel icon in the Options Bar or press the Esc key. These precise control methods are indispensable for users performing “Digital Art” and “Photo Manipulation” on Tophinhanhdep.com, where every pixel counts.
Cropping to Specific Aspect Ratios and Dimensions
Often, images need to fit precise dimensions for printing, web display, or specific design layouts (e.g., social media banners, website backgrounds). Photoshop’s Crop Tool excels at this.
- Preset Aspect Ratios: The Options Bar features an “Aspect Ratio” dropdown menu, offering common presets like 1:1 (square), 4:6, 5:7, 8:10, and more. Selecting one instantly snaps the crop border to those proportions.
- Swapping Orientation: Next to the aspect ratio fields, a swap icon (two opposing arrows) allows you to quickly switch between portrait and landscape orientations (e.g., from 4:5 to 5:4).
- Custom Aspect Ratios: If your desired ratio isn’t listed, you can manually enter values into the width and height fields in the Options Bar (e.g., “14” for width and “11” for height to create a 14x11 ratio).
- Saving Custom Presets: For frequently used custom ratios, click the “Aspect Ratio” dropdown and choose “New Crop Preset” to save your settings with a custom name. This streamlines workflow for recurring tasks on Tophinhanhdep.com, such as preparing images for thematic collections with consistent dimensions.
- Clearing Aspect Ratio: To revert to freeform cropping, click the “Clear” button in the Options Bar.
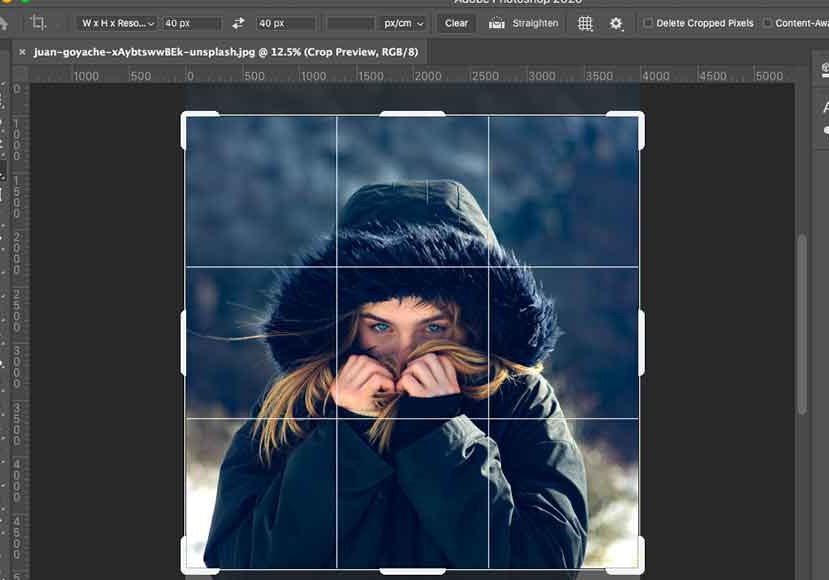
Beyond simple ratios, you can crop to exact physical sizes and resolutions. From the “Aspect Ratio” dropdown, choose W x H x Resolution. Here, you can specify dimensions like “14 in” (for inches) for width and “11 in” for height. Critically, you can also set the Resolution (e.g., “300 px/inch” for high-quality prints). Photoshop will then resample the image as it crops, adding or removing pixels to meet the specified resolution and size. For Tophinhanhdep.com, understanding this feature is paramount for ensuring that “Stock Photos” and “High Resolution” downloads meet professional standards without unnecessary file bloat or quality loss. While Photoshop handles resampling, for significant enlargements, it’s generally advised to manage resizing through the Image Size dialogue for more control over interpolation methods.
Enhancing Your Crop: Straightening and Overlays
Cropping isn’t solely about size; it’s also about visual alignment and composition. Photoshop provides powerful tools within the Crop feature to perfect both.
Straightening Crooked Images
A slightly tilted horizon or a skewed architectural line can detract significantly from otherwise “Beautiful Photography” or “Nature” images. Photoshop’s Straighten Tool, integrated within the Crop Tool, is designed to correct these imbalances with ease.
- Select the Crop Tool (C).
- In the Options Bar, click the Straighten Tool icon (often resembling a small level or protractor).
- Look for an element in your image that should be perfectly horizontal or vertical (e.g., a horizon, a building edge).
- Click and drag your cursor along this element. Photoshop will draw a temporary line, using it as a reference.
- Release the mouse button. Photoshop will automatically rotate the image to align the selected element perfectly horizontally or vertically, simultaneously adjusting the crop border to exclude any transparent areas created by the rotation.
After straightening, you can further adjust the crop border using the handles to fine-tune your composition. This simple yet effective tool ensures that images shared on Tophinhanhdep.com, particularly those intended as “Wallpapers” or “Backgrounds,” possess impeccable alignment and visual harmony.
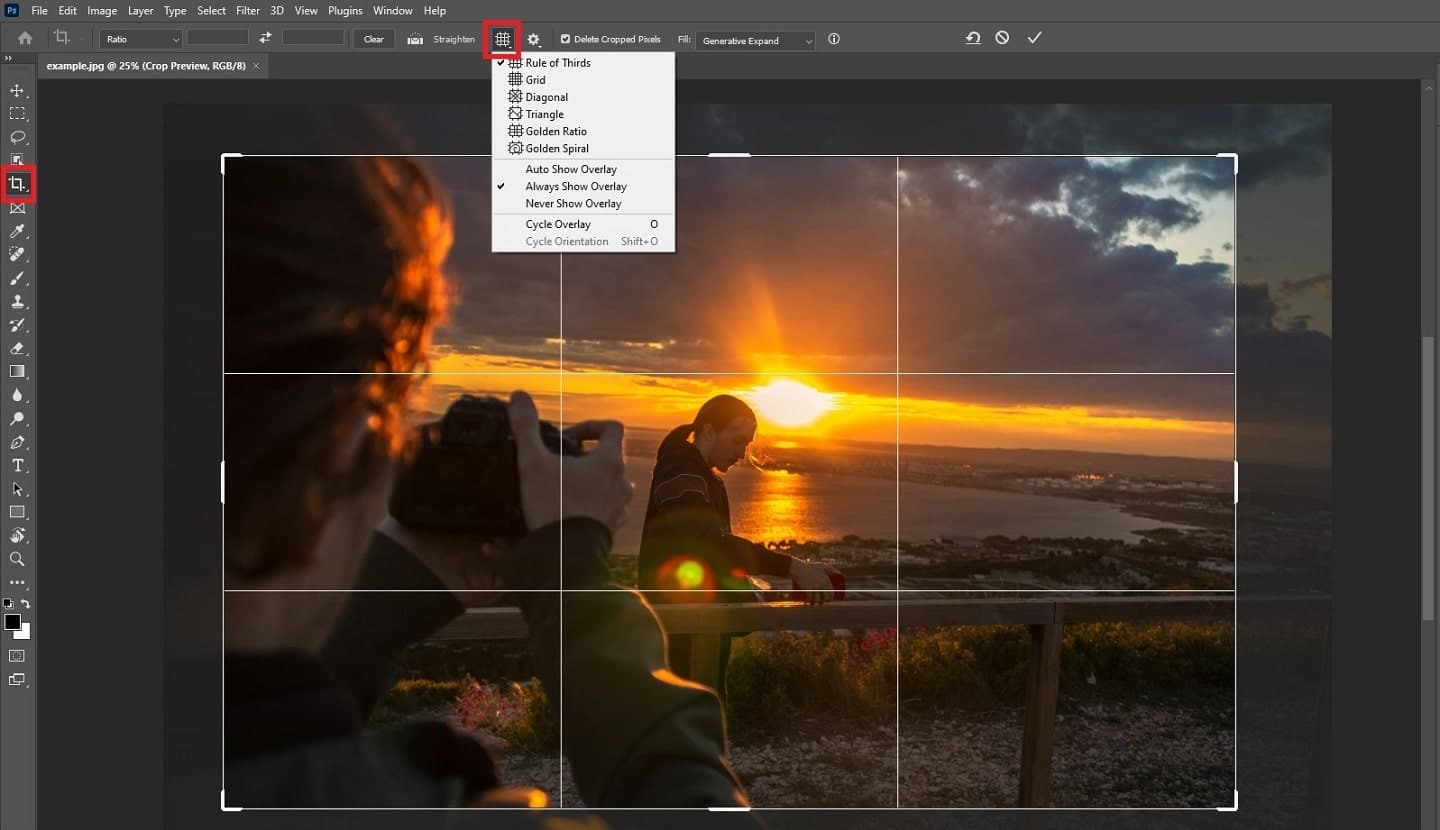
Leveraging Crop Overlays for Better Composition
Good composition is the backbone of “Beautiful Photography” and compelling “Visual Design.” Photoshop’s Crop Tool includes various overlays—guides that appear within the crop border to assist with compositional choices.
- Rule of Thirds: The default overlay, a 3x3 grid, is based on the classical compositional principle. It suggests placing key subjects or points of interest along the grid lines or, more powerfully, at their intersections. This often creates more dynamic and engaging compositions than simply centering a subject. It’s an excellent starting point for “Photo Ideas” and “Mood Boards.”
- Other Overlays: Clicking the “Overlay” icon (a grid thumbnail) in the Options Bar reveals other guides, including:
- Golden Ratio: Similar to the Rule of Thirds but based on the Fibonacci sequence, often leading to natural and aesthetically pleasing arrangements.
- Golden Spiral: Guides the eye through a natural curve, perfect for leading lines in “Nature” or “Aesthetic” images.
- Diagonal: Uses diagonal lines for dynamic compositions.
- Triangle: Offers geometric guidance.
- Cycling and Flipping: You can quickly cycle through different overlays by pressing the O key. For overlays like Golden Spiral or Triangle, you can press Shift+O to flip their orientation, giving you more creative flexibility.
Using these overlays isn’t about rigid rules, but about informed guidance. They help Tophinhanhdep.com users apply principles of “Visual Design” and explore “Creative Ideas” to enhance their “Thematic Collections” and align with “Trending Styles,” ultimately elevating the impact of their images.
Non-Destructive Cropping and Advanced Options
For serious photographers and graphic designers, the ability to make changes without irrevocably altering original pixel data is paramount. Photoshop’s Crop Tool offers non-destructive capabilities and several advanced settings that provide greater control and flexibility.
The Power of Non-Destructive Cropping
By default, when you apply a crop in Photoshop, the pixels outside the crop border are permanently deleted. This is known as destructive editing. If you later decide you want to adjust the crop or reveal more of the original image, those pixels are gone, and you’d have to revert to an earlier saved version (if available) or undo the crop immediately after applying it.
However, Photoshop offers a non-destructive way to crop:
- Locate the “Delete Cropped Pixels” checkbox in the Options Bar while the Crop Tool is active.
- Uncheck this box.
With “Delete Cropped Pixels” turned off, when you apply a crop, Photoshop doesn’t delete the outside areas; it merely hides them. This means:
- You can re-select the Crop Tool at any time, and the entire original image will reappear, allowing you to re-adjust your crop or even change its orientation completely without losing any data.
- You can use the Move Tool (V) to reposition the image inside the established crop boundaries, effectively re-composing the shot even after the crop has been applied.
- If you decide you want the entire original image back, simply go to Image > Reveal All, and Photoshop will expand the canvas to show all hidden pixels.
This non-destructive workflow is invaluable for “Digital Photography” and professional “Editing Styles” on Tophinhanhdep.com. It provides the flexibility to experiment with different compositions, make client-requested revisions, or simply retain maximum editable data for future use, ensuring that your precious “Stock Photos” remain versatile.
Exploring Advanced Crop Tool Settings
Beyond the basic controls, the Crop Tool harbors several advanced options accessible via a gear icon in the Options Bar:
- Classic Mode: For users accustomed to older Photoshop versions, checking “Classic Mode” reverts the Crop Tool’s behavior to its previous style, where the crop box rotates rather than the image itself.
- Show Cropped Area: When checked, the areas outside the active crop border remain visible but faded, providing context. This is often preferred for more intuitive composition adjustments.
- Auto Center: This option keeps the cropping box centered while you adjust the crop handles, shifting the image content within it.
- Crop Shield: This feature places an opaque or semi-transparent overlay over the cropped-out areas, visually distinguishing them from the kept portion. You can customize its color and opacity to suit your preference.
- Content-Aware Fill: If you crop outward from the original image (expanding the canvas) and have “Delete Cropped Pixels” unchecked, the new empty areas are typically transparent. If “Delete Cropped Pixels” is checked and “Content-Aware” is also checked, Photoshop will attempt to intelligently fill these empty spaces with content generated from the surrounding image using Adobe’s AI technology. While powerful, results can vary, so use with caution.
- Reset: This button in the Options Bar resets the current crop operation to its default state but does not undo a committed crop.
These advanced features cater to users focused on detailed “Photo Manipulation” and achieving specific “Editing Styles.” They underscore Tophinhanhdep.com’s commitment to providing comprehensive guides for visual creators who demand precision and control in their “Digital Photography” workflow.
Cropping Individual Layers: Beyond the Standard Tool
A common point of confusion for new Photoshop users is the behavior of the standard Crop Tool when working with multiple layers. The Crop Tool, by design, crops the entire canvas, affecting all visible layers uniformly. It does not individually crop a single layer. However, in multi-layered “Graphic Design” or “Photo Manipulation” projects, you often need to resize or trim just one element. Fortunately, Photoshop offers several alternative methods to “crop” individual layers without affecting the rest of your composition.
The Marquee and Frame Tools for Layer Cropping
These tools provide direct and efficient ways to isolate and trim specific parts of a layer.
-
Rectangular Marquee Tool (M):
- Select the layer you wish to crop in the Layers panel.
- Choose the Rectangular Marquee Tool (or Elliptical Marquee Tool for circular crops).
- Click and drag to draw a selection around the portion of the layer you want to keep.
- Right-click inside the selection and choose “Select Inverse” to select everything outside your desired area.
- Now you have two options:
- Destructive Crop: Press the Delete key. The selected inverse area will be removed, often replaced by transparency. If the layer is a Smart Object, you might need to right-click and “Rasterize Layer” first.
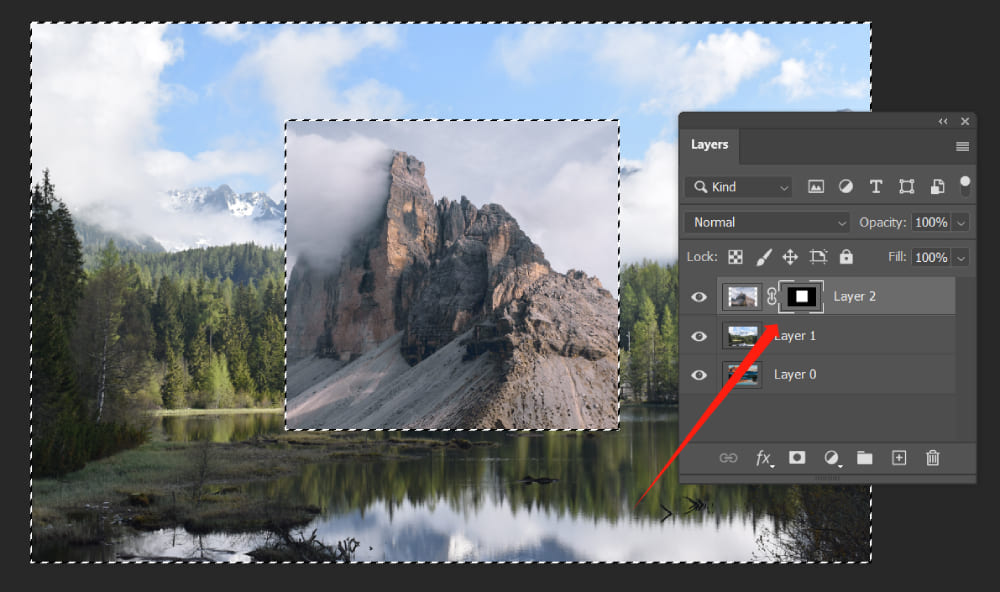
- Non-Destructive Crop (Recommended): With the inverse selection active, click the “Add Layer Mask” icon (a rectangle with a circle inside) at the bottom of the Layers panel. This will hide the unwanted areas using a mask, preserving the original pixels.
- Deselect (Ctrl+D / Cmd+D) when finished.
-
Frame Tool (K):
- Select the layer you want to crop.
- Choose the Frame Tool from the toolbar (it looks like a rectangle with a diagonal cross).
- Click and drag on your canvas to draw a frame around the desired portion of your layer.
- The layer’s content will automatically fit into this frame. You can then:
- Click and drag the frame’s edges/corners to resize the frame.
- Click and drag inside the frame to reposition the image content within the frame.
- Double-click outside the frame, or select another tool, to apply the visual crop. The Frame Tool automatically creates a clipping mask, making this a non-destructive method.
These techniques are indispensable for Tophinhanhdep.com users engaged in “Graphic Design,” “Digital Art,” or complex “Photo Manipulation,” where individual elements need precise trimming to fit into a larger composition.
Utilizing Layer Masks for Precision and Flexibility
Layer Masks are Photoshop’s most powerful non-destructive feature for controlling visibility within a layer. While not “cropping” in the traditional sense, they achieve the same visual effect with unparalleled flexibility, making them perfect for creating “Abstract” or “Aesthetic” compositions.
- Select the Target Layer: In the Layers panel, click on the layer you wish to “crop.”
- Add a Layer Mask: Click the “Add Layer Mask” icon (a rectangle with a circle inside) at the bottom of the Layers panel. A white thumbnail will appear next to your layer thumbnail, representing the mask. Ensure this white thumbnail is selected (it will have a border around it).
- Define Your “Crop” Area: Use any selection tool (Marquee, Lasso, Pen Tool, or even the Brush Tool) to define the area you want to keep or hide. For intricate shapes, the Pen Tool (P) allows for pixel-perfect selections by creating a path:
- Click to create anchor points along your desired outline.
- Drag when clicking to create curved paths.
- Close the path by connecting the last point to the first.
- Right-click on the completed path and choose “Make Selection” (with a “Feather Radius” of 0 for a sharp edge).
- Hide or Reveal:
- To “crop out” the area outside your selection (keeping what’s inside), ensure the layer mask thumbnail is active, then press Ctrl+I / Cmd+I to invert the mask (making black where you want to hide, white where you want to keep).
- Alternatively, with your selection active, select the Brush Tool (B). Set your foreground color to black to hide (paint over unwanted areas) or white to reveal (restore hidden areas). The layer mask will show black where areas are hidden and white where they are visible.
The beauty of layer masks lies in their non-destructive nature: you can always refine your “crop” by painting on the mask with black or white, offering endless creative possibilities for “Photo Manipulation” and “Creative Ideas.”
Smart Objects: The “Crop Tool” for Layers
If you truly want to use the standard Crop Tool on a single layer, the solution lies in Smart Objects. This method allows you to isolate a layer’s content and treat it as a separate document, which can then be cropped with the familiar tool. This technique is a cornerstone for professionals in “Digital Photography” and “Visual Design” who prioritize flexibility and non-destructive workflows.
- Convert to Smart Object: In the Layers panel, right-click on the layer you want to crop and select “Convert to Smart Object.” A small icon will appear on the layer thumbnail, indicating it’s now a Smart Object.
- Edit Smart Object: Double-click the Smart Object thumbnail. This will open the layer’s content as a new, separate Photoshop document (a PSB file).
- Crop in New Document: In this new document, select the Crop Tool (C). You can now use all the standard Crop Tool features—aspect ratios, specific dimensions, straightening, overlays—precisely as you would on a regular image.
- Save and Close: Apply your crop in the Smart Object document. Then, go to File > Save (Ctrl+S / Cmd+S) and close the document (File > Close or Ctrl+W / Cmd+W).
- Update in Original Document: Back in your original multi-layered project, the Smart Object layer will automatically update to reflect the new crop. The original pixels of the Smart Object are still preserved within it, meaning you can always double-click and re-crop the Smart Object at any time.
- Adjust Position/Scale: In your main document, you may need to use the Move Tool (V) or Free Transform (Ctrl+T / Cmd+T) to reposition or scale your cropped Smart Object layer to fit your overall design.
This method offers the best of both worlds: the power of the Crop Tool applied to individual elements, combined with the non-destructive benefits of Smart Objects. It’s an advanced technique that significantly boosts productivity and creative freedom for complex “Graphic Design” and “Photo Manipulation” projects on Tophinhanhdep.com.
Cropping for Visual Excellence on Tophinhanhdep.com
Mastering Photoshop’s cropping tools is more than just a technical skill; it’s a creative differentiator. For Tophinhanhdep.com users, these techniques directly translate into higher quality images across all categories.
Tailoring Images for Wallpapers and Backgrounds
Cropping is critical for preparing “Wallpapers” and “Backgrounds.” Whether it’s adjusting a “Nature” landscape to fit a widescreen monitor (e.g., 16:9 or 21:9 aspect ratio), or refining an “Abstract” image to be a seamless phone background (e.g., 9:16), precise cropping ensures perfect fit and visual impact. Non-destructive cropping is particularly useful here, allowing you to easily adapt a single image for multiple device dimensions without starting from scratch.
Refining Photography for High-Resolution Display
For “High Resolution” and “Stock Photos” on Tophinhanhdep.com, cropping enhances the intrinsic quality of “Digital Photography.” It allows photographers to:
- Improve Composition: Apply Rule of Thirds or Golden Ratio to transform a good shot into a great one.
- Remove Distractions: Eliminate unwanted elements from the edges that pull focus away from the main subject, making the “Beautiful Photography” truly shine.
- Fit Specific Formats: Prepare images for diverse editorial or commercial uses, ensuring they meet exact size and resolution requirements, enhancing their value as stock assets.
In conclusion, the journey to becoming a proficient visual creator often begins with the basics, and cropping is a foundational skill. From basic resizing to advanced compositional guidance and intricate layer manipulation, Photoshop’s cropping capabilities empower Tophinhanhdep.com users to transform raw images into polished, impactful visual content. Embrace these tools, experiment with their features, and unlock the full creative potential of your “Images,” “Photography,” and “Visual Design” endeavors. Your audience on Tophinhanhdep.com will undoubtedly appreciate the difference.