Mastering Image Cropping in PowerPoint: A Comprehensive Guide for Visual Design Excellence

In today’s visually-driven world, presentations are no longer just about conveying information; they are about crafting an immersive experience. Microsoft PowerPoint, a ubiquitous tool for delivering messages, offers a surprising depth of features that can transform ordinary slides into captivating visual narratives. Among these, the seemingly simple act of cropping an image stands out as a fundamental skill, pivotal for elevating your presentation design, optimizing visual impact, and aligning with the principles of effective graphic communication.
At Tophinhanhdep.com, we understand the power of a well-curated image. Whether you’re seeking stunning wallpapers, engaging backgrounds, aesthetic visual elements, or high-resolution photography for digital art and photo manipulation, the ability to precisely control your visuals is paramount. Cropping isn’t just about trimming unwanted edges; it’s a strategic design choice that frames your message, focuses attention, enhances thematic coherence, and even optimizes the technical performance of your presentation. This comprehensive guide will delve into the various methods of cropping images in PowerPoint, from basic trims to advanced creative techniques, while highlighting how these skills integrate with broader visual design principles and the array of image tools available at Tophinhanhdep.com.
The Fundamentals of Image Cropping in PowerPoint: Enhancing Your Visual Narrative
Cropping is the art of removing the outer parts of an image to improve framing, highlight specific elements, or change its aspect ratio. In PowerPoint, this process is incredibly intuitive, yet its implications for your presentation’s aesthetic and impact are profound. By trimming horizontal and vertical sides, you can eliminate distracting backgrounds, emphasize your subject, or prepare an image to fit a specific layout.
Basic Cropping: Trimming for Impact
The most common form of cropping allows you to manually adjust an image’s boundaries, much like physically cutting a printed photograph. This is indispensable when an image contains extraneous elements that detract from your main point or when you need to focus the viewer’s eye on a particular detail. Imagine you have a beautiful nature photograph of a sunset, but a busy foreground distracts from the vibrant sky. Basic cropping allows you to zero in on the golden hues, transforming it into a more impactful background or a focal point.
Step-by-Step Guide to Basic Cropping:
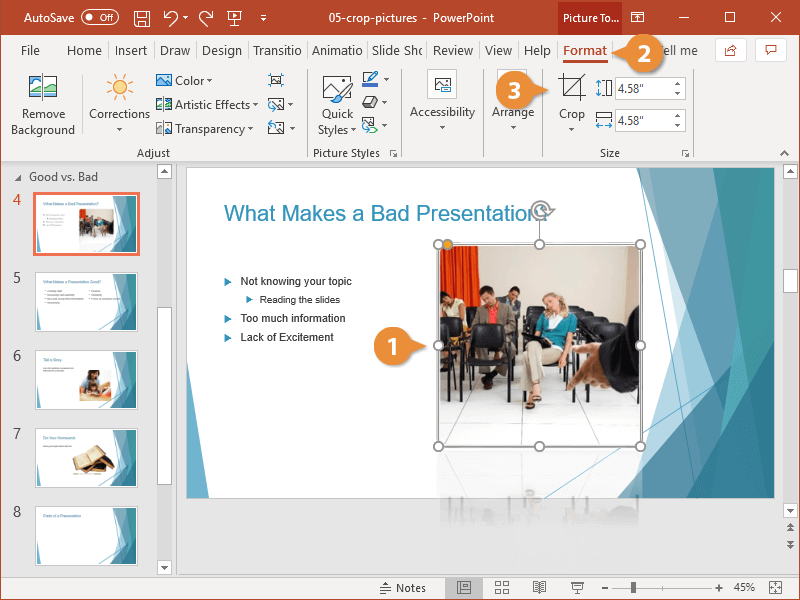
- Select the Picture: Click on the image within your PowerPoint slide that you wish to crop. This action will activate the “Picture Format” tab on the ribbon at the top of your screen.
- Access the Crop Tool: On the “Picture Format” tab, locate and click the “Crop” button. You’ll notice that black crop handles (small, thick lines or corners) appear around the border of your selected picture.
- Adjust the Crop Handles: Click and drag these black crop handles inward.
- To crop a single side, drag the handle on that side.
- To crop two adjacent sides simultaneously, drag a corner handle.
- To crop all four sides at once while maintaining the graphic’s original proportions, press and hold down the
Ctrlkey (orCmdon Mac) as you drag a corner handle. This is particularly useful for symmetrical adjustments.
- Complete the Crop: Once you’re satisfied with the new boundaries, click the “Crop” button again, or simply press the
Esckey, or click anywhere outside the picture. The faded, removed portions of the image will disappear, leaving only your refined selection.
This straightforward method is your go-to for quick adjustments, ensuring that every image contributes precisely to your visual message without unnecessary clutter. It’s a crucial first step in digital photography and image editing, allowing you to curate your aesthetic images and high-resolution stock photos effectively.
Cropping to Specific Aspect Ratios: Achieving Professional Consistency
Beyond freehand trimming, PowerPoint offers the ability to crop images to predefined aspect ratios. An aspect ratio describes the proportional relationship between an image’s width and its height. Common ratios include 16:9 (widescreen, ideal for modern displays and presentation slides), 4:3 (standard, often used for older screens or printed materials), and 1:1 (square, popular for profile pictures or social media). Maintaining consistent aspect ratios across your images lends a professional, polished look to your presentation, making it easier to arrange layouts and ensure visual harmony.
Why Aspect Ratios Matter for Visual Design:
- Slide Backgrounds: Cropping images to a 16:9 aspect ratio is perfect for creating striking, full-screen slide backgrounds. For instance, an abstract wallpaper or a serene nature scene can be perfectly adapted to fill your slide without distortion, providing an immersive visual foundation for your content. Tophinhanhdep.com offers a vast collection of aesthetic and abstract backgrounds that, with precise cropping, can be seamlessly integrated into your presentations.
- Grid Layouts: If you’re designing a visual grid of images, cropping them all to the same aspect ratio (e.g., 1:1 squares or 3:2 rectangles) ensures uniformity and a clean, organized appearance, vital for graphic design principles.
- Placeholder Consistency: When using image placeholders in templates, cropping to a set aspect ratio ensures that new images fit perfectly without manual resizing or accidental distortion.
Step-by-Step Guide to Cropping by Aspect Ratio:
- Select the Picture: As before, click on the image.
- Access Aspect Ratio Options: On the “Picture Format” tab, click the dropdown arrow next to the “Crop” button.
- Select “Aspect Ratio”: From the dropdown menu, hover over “Aspect Ratio.” A sub-menu will appear with various predefined ratios (e.g., 1:1, 4:3, 16:9, 3:2).
- Choose Your Ratio: Select the desired aspect ratio. The cropping handles will automatically adjust to reflect this ratio.
- Adjust the Frame (Optional): Once the aspect ratio is applied, you can still click and drag the crop handles to define which part of the image fits within that ratio. You can also drag the image itself within the new frame to center or reposition the focal point.
- Complete the Crop: Click the “Crop” button again, press
Esc, or click outside the picture.
This feature is particularly effective for high-resolution photography where you want to adapt a beautiful landscape or portrait into a specific layout without losing its overall appeal, especially when preparing images for thematic collections or mood boards.
Why Cropping Matters for Your Presentation’s Aesthetics and Performance
Cropping is more than just a functional tool; it’s a cornerstone of effective visual communication and digital photography.
- Focus and Clarity: By removing irrelevant details, cropping directs your audience’s attention to the most important elements of your image, reinforcing your message. This is crucial for conveying complex information quickly and effectively in graphic design.
- Compositional Improvement: Cropping allows you to re-frame an image, applying compositional rules like the rule of thirds to create a more balanced and aesthetically pleasing visual. A nature photograph, for instance, can be cropped to place the horizon along a power line, enhancing its visual appeal.
- Consistency and Professionalism: As discussed with aspect ratios, consistent image sizing and framing across slides contribute to a cohesive and professional presentation identity.
- File Size Optimization: A less obvious but equally vital benefit, cropping can significantly reduce the file size of your presentation. When you crop an image in PowerPoint, the “cropped out” portions are often still embedded in the file by default (allowing you to revert the crop). However, by actively compressing your images after cropping, you can permanently remove these excess pixels, leading to smaller file sizes and faster loading times. This is where Tophinhanhdep.com’s image compressors and optimizers can play a crucial complementary role, ensuring your beautiful photography doesn’t bog down your presentation.
- Visual Storytelling: Cropping allows you to isolate moments, create visual sequences, and guide your audience through a narrative, turning simple images into powerful components of your story. This is a key aspect of visual design and creative ideas for presentations.
Advanced Cropping Techniques: Shaping Your Images for Creative Expression
PowerPoint extends its cropping capabilities beyond simple rectangles, offering advanced options that unlock creative possibilities for your visual design. These techniques allow you to transform ordinary images into unique visual elements that can dramatically enhance your presentation’s aesthetic appeal and impact.
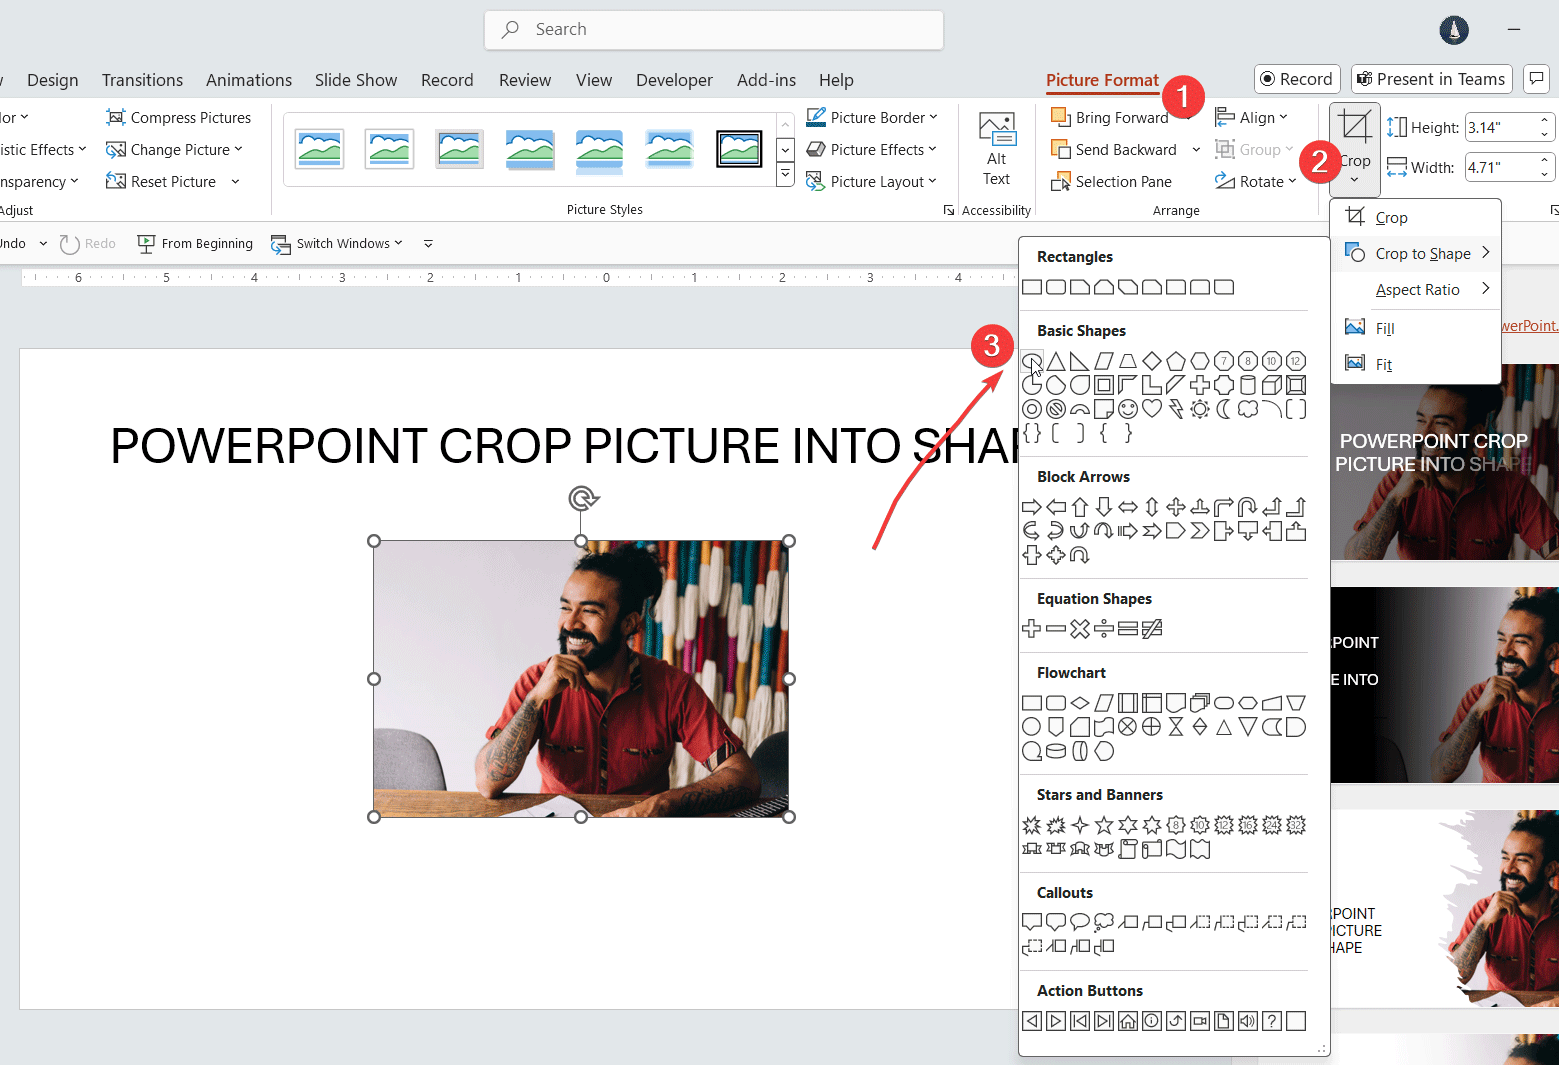
Cropping to a Shape: Beyond Rectangles
Imagine the monotonous linearity of traditional rectangular images giving way to dynamic circles, sleek triangles, or even whimsical star shapes. PowerPoint’s “Crop to Shape” feature allows you to do just that, as if you were cutting your picture out with a pair of digital scissors. This technique is invaluable for breaking visual monotony, aligning images with thematic elements, and creating engaging, unique layouts. For example, using circles for team member profile pictures on a “Teams Slide” or an arrow shape to indicate direction in a workflow diagram can reinforce your message visually.
Why Crop to Shape?
- Enhances Visual Interest: A unique shape instantly draws the eye and makes your slides more dynamic and memorable. It’s a quick win for aesthetic design.
- Reinforces Themes: The chosen shape can subtly echo the content or theme of your presentation. A heart shape for a romantic theme, a speech bubble for communication, or a gear for a technical process.
- Creates Unique Layouts: Shape cropping enables more complex and artistic arrangements of images, moving beyond standard grid systems. This is a core aspect of digital art and photo manipulation within presentations.
Step-by-Step Guide to Cropping to a Shape:
- Select the Picture: Click on the picture you want to transform.
- Access Crop to Shape: On the “Picture Format” tab, click the dropdown arrow next to the “Crop” button.
- Choose “Crop to Shape”: From the dropdown menu, hover over “Crop to Shape.” A gallery of various shapes (basic shapes, block arrows, flowcharts, stars, banners, callouts, etc.) will appear.
- Select a Shape: Click on the desired shape. Your picture will instantly be cropped into that form.
- Adjust the Image (Optional): After cropping to a shape, the image might not be perfectly centered or scaled within the new shape. To adjust this:
- Click on the cropped image again.
- Click the “Crop” button (the main one, not the dropdown) to enter cropping mode.
- You’ll see the full original image faded in the background, with the chosen shape as an active frame.
- Drag the image within this frame to reposition it, or drag the original image’s corner handles (not the shape’s handles) to resize it within the shape. This allows for precise composition.
- Finalize: Click “Crop” again,
Esc, or click outside the image.
Tip for Perfect Circles: If you want a perfect circle, start with a square image. When you crop a rectangular image into a circle, it will become an oval by default. Ensure your source image has a 1:1 aspect ratio before applying the circle crop for optimal results. Tophinhanhdep.com offers many beautiful photography images that are well-suited for square crops.
Leveraging the “Intersect” Command for Precise Shape Cropping
While “Crop to Shape” offers a quick way to apply predefined forms, the “Merge Shapes” feature (specifically the “Intersect” command) provides a more advanced and precise method, especially useful for complex visual design or when you need to crop a very specific part of an image into a custom shape that isn’t pre-defined. This method gives you ultimate control, allowing you to draw the exact shape you want directly over the image.
How Intersect Works: The “Intersect” command takes two overlapping objects (in this case, an image and a drawn shape) and retains only the area where they overlap, effectively cropping the image into the precise contours of the shape.
Step-by-Step Guide to Intersecting a Picture to a Shape:
- Insert Your Picture: Add the image to your slide.
- Draw Your Desired Shape: Go to the “Insert” tab, click “Shapes,” and select any shape you want. Draw this shape directly over the part of your picture that you wish to keep. You can resize and reposition the shape to perfectly frame your desired area.
- Select Both Objects (Crucial Order!): This is where precision matters. First, select the picture. Then, while holding down the
Shiftkey, select the shape. The order of selection is vital for the “Intersect” command to work correctly in PowerPoint (picture first, then shape). - Access “Merge Shapes”: Navigate to the “Shape Format” tab (which appears when shapes are selected). In the “Insert Shapes” group, click the “Merge Shapes” dropdown arrow.
- Select “Intersect”: Choose the “Intersect” command. Your picture will instantly be cropped into the exact shape you drew, at the precise position you placed it.
This technique is incredibly powerful for advanced photo manipulation and creating unique graphic design elements. It allows you to transform abstract images or detailed photography from Tophinhanhdep.com into bespoke components for your presentations.
Power Cropping: Managing Multiple Images Efficiently
For presentations heavy with visuals, cropping images one by one can be time-consuming. PowerPoint offers a clever trick to crop and resize multiple pictures simultaneously using SmartArt graphics, significantly boosting your efficiency – a real game-changer for visual communication projects involving extensive thematic collections or mood boards.
Warning: This “Power Cropping” trick primarily works on PC versions of PowerPoint 2013 and later.
Step-by-Step Guide to Power Cropping with SmartArt:
- Select Your Images: Select all the pictures you want to crop. You can do this by dragging a selection box over them or by holding
Ctrl(orCmd) and clicking each image. - Navigate to Picture Layout: On the “Picture Format” tab, locate the “Picture Layout” dropdown.
- Choose a SmartArt Layout: Hover over the different SmartArt layouts in the gallery. As you do, PowerPoint provides a live preview of how your selected pictures will be cropped and arranged within that layout. Your goal here is to find a layout that comes closest to the desired shapes or arrangement for your images. For instance, the “Bending Picture Semi-Transparent Text” layout can crop images into interesting curved shapes.
- Break Apart the SmartArt Graphic: Once you’ve chosen a layout, the images will be grouped within the SmartArt graphic. To work with the cropped pictures individually, you need to “ungroup” them.
- Method 1 (Keyboard Shortcut): With the SmartArt graphic selected, press
Ctrl + Shift + Gtwice. The first press converts the SmartArt into a group of shapes; the second press ungroups those shapes, leaving you with individual cropped images. - Method 2 (Convert to Shapes): Select the SmartArt graphic. Navigate to the “SmartArt Design” tab. Click the “Convert” dropdown and select “Convert to Shapes.” Then, right-click the group of shapes and select “Ungroup.”
- Method 1 (Keyboard Shortcut): With the SmartArt graphic selected, press
- Fine-Tune (Optional): Now you have individual cropped images. You can further adjust their cropping or positioning as needed using the standard cropping tools.
This method is invaluable for quickly preparing a collection of images, such as a photo ideas board or a portfolio of beautiful photography, ensuring they are consistently cropped and sized with minimal effort.
Crafting 3D Effects with Strategic Cropping
PowerPoint’s cropping tools, when combined with careful layering, can create impressive 3D effects, often referred to as an “out of bounds” effect. This advanced photo manipulation technique makes a part of your image appear to break free from its frame, adding depth and visual intrigue. Imagine a person extending their hand beyond the conventional boundaries of a picture, or an object appearing to float in front of your slide.
The Concept: The trick involves overlaying two identical pictures and then strategically cropping each one differently to create the illusion of depth.
The 3-Part Process (Simplified):
- Source High-Quality Images: Start with an image that has a clear subject that can naturally “break out” of a frame. High-resolution images from Tophinhanhdep.com are ideal for this, as clarity is paramount for a convincing effect.
- Duplicate and Position: Insert your chosen image and then duplicate it (
Ctrl+D). Place one image precisely on top of the other. - Strategic Cropping:
- Image 1 (Background): Crop the bottom image as you normally would, framing the overall scene. Add a border or frame to this image to create the “boundary.”
- Image 2 (Foreground/Out-of-Bounds): On the top, duplicated image, crop only the part that you want to appear “out of bounds.” Ensure this cropped portion perfectly aligns with the corresponding part in the background image.
- Remove Background (Optional but Recommended): For the foreground element, use PowerPoint’s “Remove Background” feature (under “Picture Format” -> “Remove Background”) to isolate the “out of bounds” object from its own background. This ensures it looks like it’s truly popping out of the frame.
- Align and Group: Carefully align the “out of bounds” element from the top image with its counterpart in the bottom image. Group both images (
Ctrl+G) to ensure they move together.
This sophisticated cropping technique transforms basic digital photography into engaging digital art, demonstrating the creative potential locked within PowerPoint’s image tools. It’s an excellent way to apply creative ideas to your presentations and achieve unique visual effects.
Optimizing Your Images: Post-Cropping Best Practices and Tophinhanhdep.com’s Role
Cropping is just one step in the broader process of image optimization for presentations. After you’ve refined your visuals, there are further considerations to ensure they look their best and don’t negatively impact your presentation’s performance.
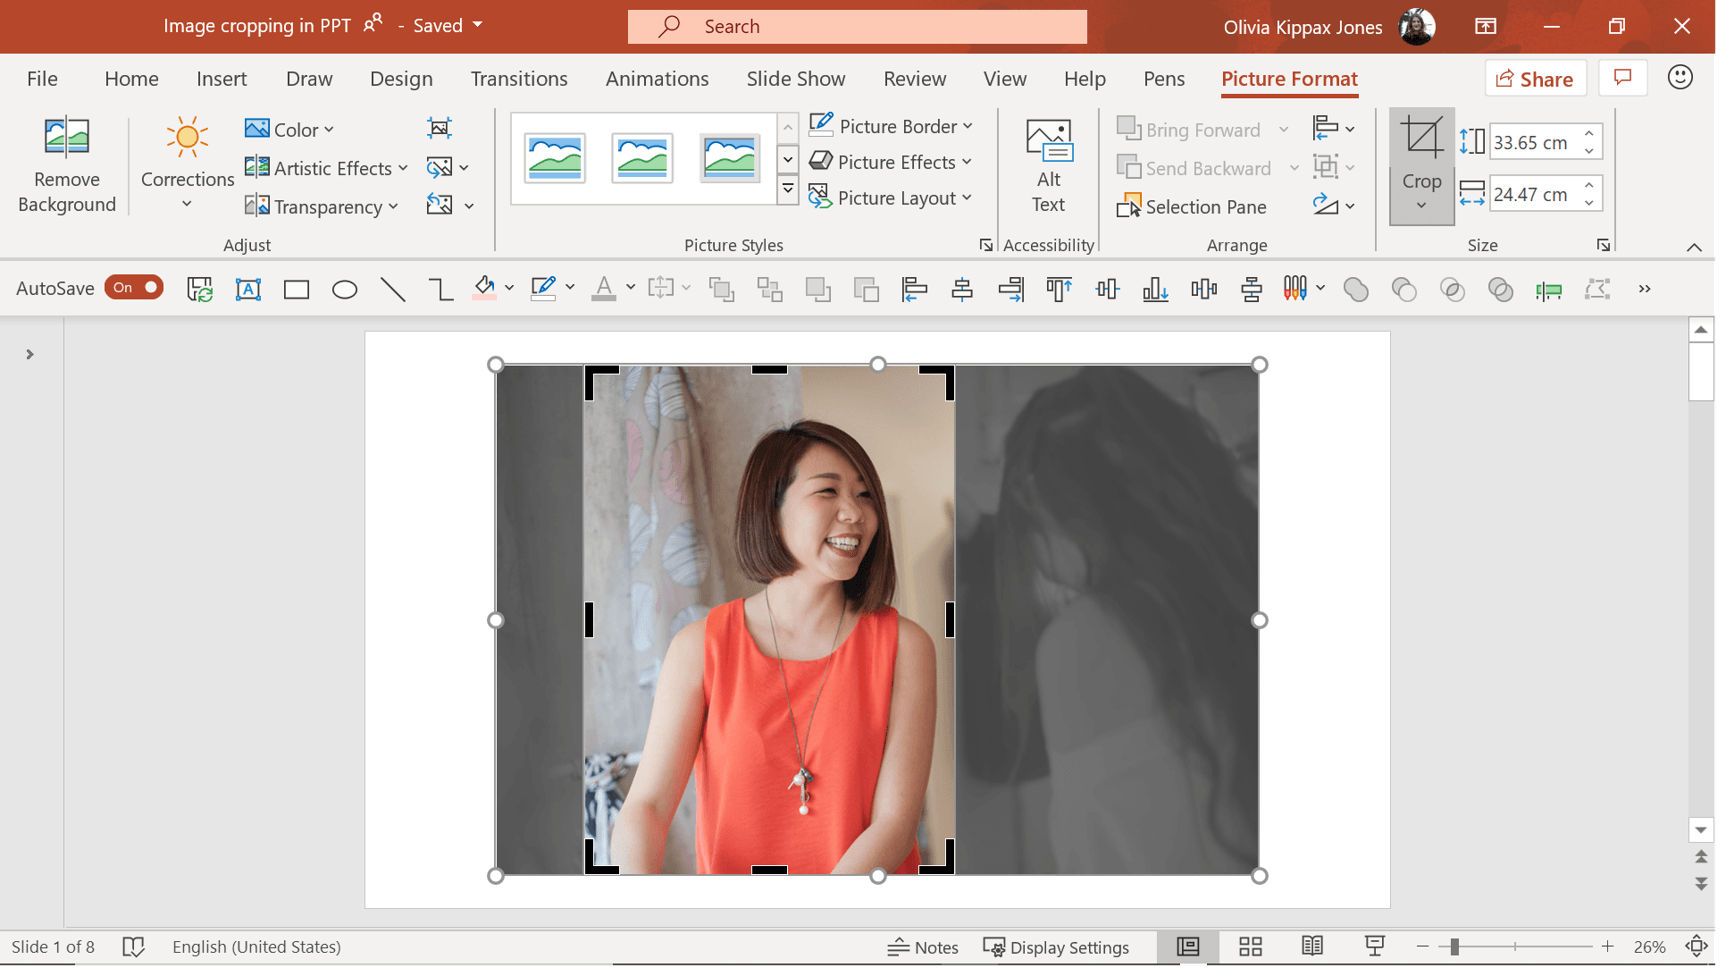
Adjusting and Repositioning Cropped Images
Even after an initial crop, you might find that the image’s content isn’t perfectly positioned within its new frame, especially after cropping to a shape. PowerPoint provides simple ways to fine-tune these adjustments without re-cropping from scratch.
Step-by-Step Guide to Adjusting a Cropped Image:
- Select the Cropped Picture: Click on the image you want to adjust.
- Enter Cropping Mode: On the “Picture Format” tab, click the “Crop” button (the main one, not the dropdown).
- Reposition/Resize the Content: You’ll see the full original image (faded) and the active crop frame.
- Reposition: Click and drag the faded image itself (not the crop handles) to move it within the fixed crop frame.
- Resize: Drag the corner handles of the faded original image to make the original image larger or smaller within the crop frame. This allows you to zoom in or out on the image’s content while keeping the crop frame fixed.
- Offset X and Offset Y (Advanced): For even more precise positioning, especially with shaped crops like circles, you can use the “Format Picture” dialog box:
- Right-click the cropped picture and select “Format Picture.”
- In the “Format Picture” pane, click the “Picture” icon (usually a small mountain landscape).
- Under the “Crop” section, adjust the “Offset X” and “Offset Y” values. Offset X moves the picture horizontally within the frame, and Offset Y moves it vertically. This is ideal for minute, pixel-perfect adjustments.
- Exit Cropping Mode: Click the “Crop” button again, press
Esc, or click outside the picture.
These adjustments are crucial for making your beautiful photography shine and for ensuring that every aesthetic detail is perfectly aligned within your visual design.
Compressing Images for File Size Management
As mentioned earlier, cropping reduces the visible area of an image but doesn’t always remove the data of the cropped-out portions from the file. This means a presentation with many cropped high-resolution images can still become excessively large, leading to slow loading times and sharing difficulties. Compressing images is a vital step to optimize your presentation’s performance without significantly sacrificing visual quality.
Why Image Compression is Critical:
- Faster Loading: Smaller file sizes mean quicker loading of slides, providing a smoother experience for your audience.
- Easier Sharing: Presentations with optimized images are easier to email, upload, and store.
- Reduced Storage: Saves valuable storage space on your device or cloud.
Step-by-Step Guide to Compressing Images in PowerPoint:
- Select an Image: Click on any image in your presentation. This will activate the “Picture Format” tab.
- Access Compress Pictures: On the “Picture Format” tab, in the “Adjust” group, click “Compress Pictures.”
- Choose Compression Options: A dialog box will appear:
- Apply to: You can choose to apply compression to “Selected pictures only” or “All pictures in this publication.” For comprehensive optimization, “All pictures” is usually best.
- Picture Quality: Select a resolution for your images. Options typically include:
- “Use default resolution”: Applies the default resolution set in PowerPoint’s options.
- “High fidelity”: Best for high-quality printing, maintains original resolution.
- “HD (330 ppi)”: High-definition display.
- “Print (220 ppi)”: Excellent quality on most printers and screens.
- “Web (150 ppi)”: Good for web pages and projectors.
- “E-mail (96 ppi)”: Minimum resolution for sharing.
- “Delete cropped areas of pictures”: Crucially, ensure this box is checked. This permanently removes the pixels of the cropped-out portions, maximizing file size reduction.
- Confirm: Click “OK.”
Tophinhanhdep.com’s Role in Image Optimization: While PowerPoint’s built-in compressor is useful, for truly advanced optimization, including maintaining quality with significant file size reduction, Tophinhanhdep.com offers dedicated Image Compressors and Optimizers. These specialized tools often employ more sophisticated algorithms, allowing you to fine-tune compression levels and output formats, ensuring your high-resolution photography and aesthetic backgrounds retain their visual integrity even after rigorous optimization. Additionally, if you’re starting with very low-resolution images, Tophinhanhdep.com’s AI Upscalers can help improve their quality before you even bring them into PowerPoint, making them more suitable for cropping and display.
Troubleshooting Common Cropping Issues
Even with the best intentions, you might encounter issues when cropping in PowerPoint. Knowing how to troubleshoot these can save valuable time and frustration.
- Crop Tool is Greyed Out:
- Solution: Ensure only one image is selected. If multiple objects (including text boxes, shapes, or other images) are selected, or if the image is part of a group, the crop tool will be unavailable. Deselect all and re-select only the picture, or ungroup the objects (
Ctrl+Shift+Gtwice, or Right-click > Group > Ungroup).
- Solution: Ensure only one image is selected. If multiple objects (including text boxes, shapes, or other images) are selected, or if the image is part of a group, the crop tool will be unavailable. Deselect all and re-select only the picture, or ungroup the objects (
- Image Added via Photo Album:
- Issue: Images inserted through PowerPoint’s “Photo Album” feature cannot be directly cropped using the standard tool because they are treated as “Auto-Fill” shapes.
- Solution: Delete the image from the slide and re-insert it using “Insert > Pictures > This Device” (or “Online Pictures”).
- Vector Graphics (e.g., SVG, EMF):
- Issue: PowerPoint can’t crop vector graphics in the same way it crops raster images (like JPG, PNG). Vector graphics are collections of editable lines and shapes, not pixels.
- Solution: If you need to crop a vector graphic, it’s best to convert it to a raster format (like JPEG or PNG) first using an image editor or Tophinhanhdep.com’s Image Converters. Then, re-insert the rasterized image into PowerPoint and crop it. Alternatively, for simple trimming, you might be able to use the “Fragment” or “Subtract” tools in “Merge Shapes” with another shape, though this is more complex.
- Cannot Crop Interior Sections:
- Issue: PowerPoint’s standard cropping only trims from the edges. You cannot crop out a hole in the middle of an image directly.
- Solution: The workaround is to add a shape (like a rectangle or circle) over the area you want to “crop out.” Set the shape’s fill color to match your slide background. While not a true crop, it creates the visual effect of removing an interior section. For more complex interior removals, external photo manipulation software or Tophinhanhdep.com’s advanced editing tools would be more suitable.
The Broader Impact of Cropping: Integrating with Visual Design Principles
Cropping is not an isolated function; it’s an integral part of a larger visual design ecosystem. Understanding how cropping influences and integrates with broader design principles can transform your presentations from informative to truly inspiring.
Curating Visuals for Thematic Collections and Mood Boards
Visual inspiration often begins with a collection of images that evoke a certain feeling, style, or theme. These are often gathered into mood boards or thematic collections. Cropping plays a crucial role in this process:
- Refining Focus: When building a mood board for a project on “minimalist architecture,” you might find a high-resolution photograph of a building with distracting elements. Cropping allows you to isolate the clean lines and geometric forms, maintaining the minimalist aesthetic.
- Creating Uniformity: For a thematic collection of “nature photography” showcasing various landscapes, cropping can bring a consistent aspect ratio or compositional style to disparate images, creating a harmonious visual flow.
- Highlighting Key Elements: Cropping helps in selecting the most impactful part of an image to represent a concept or idea, whether for abstract backgrounds or aesthetic elements in your collection.
Tophinhanhdep.com’s extensive collections of wallpapers, backgrounds, and thematic images serve as a perfect starting point. The ability to crop these images effectively within PowerPoint means you can tailor them precisely to your vision, turning raw inspiration into refined visual assets.
Elevating Digital Art and Photo Manipulation
PowerPoint, while not a professional photo editor, allows for surprisingly sophisticated digital art and photo manipulation techniques through clever use of its image tools, including cropping.
- Compositing: Cropping is essential for isolating elements from different images to create a new composite. For instance, you could crop a person from one image and seamlessly place them into a different background, creating a new digital art piece directly within your slide.
- Textural Overlays: Taking a high-resolution abstract image and cropping it to a specific shape, then applying a transparency effect, can create unique textural overlays for text or other graphic elements.
- Storytelling Through Frames: By progressively cropping into a single image across multiple slides, you can simulate a camera zoom, guiding your audience’s focus and building anticipation – a dynamic form of visual storytelling.
The “3D picture cropping trick” discussed earlier is a prime example of how cropping transcends basic trimming to become a tool for creative expression, pushing the boundaries of what’s possible in presentation design.
Inspiring Creative Ideas and Trending Styles
The world of visual design is constantly evolving, with new trending styles emerging regularly. Cropping is a versatile technique that allows you to adapt your visuals to current trends and inspire new creative ideas.
- Geometric Overlays: Current design trends often feature bold geometric shapes. Cropping images into triangles, hexagons, or even custom shapes using the “Intersect” command, then arranging them in dynamic patterns, can give your presentation a contemporary feel.
- Circular Profiles: The widespread use of circular profile pictures in social media and professional platforms has made “cropping to a circle” a trending style, conveying approachability and modern aesthetics.
- Minimalist Framing: For presentations following a minimalist design philosophy, precise cropping that emphasizes negative space and clean lines is crucial. This helps in achieving the desired aesthetic with high-resolution images and simple backgrounds.
By experimenting with different cropping techniques, you can transform standard stock photos into unique visual assets that align with trending styles, offering fresh perspectives and creative ideas for your audience. Tophinhanhdep.com provides a wealth of visual inspiration, and coupling that with powerful cropping skills allows you to bring those ideas to life in your presentations.
Conclusion: Harnessing Cropping for Presentation Mastery
Cropping an image in PowerPoint is far more than a simple editing function; it is a powerful design tool that directly influences the effectiveness, aesthetics, and technical performance of your presentations. From basic trimming that refines focus to advanced techniques like shaping images, creating 3D effects, and efficiently managing multiple visuals, mastering cropping empowers you to become a more adept visual storyteller and designer.
By applying the step-by-step guides outlined in this article, you can transform raw images—whether they are high-resolution photography, evocative abstract backgrounds, or carefully selected aesthetic wallpapers from Tophinhanhdep.com—into polished, purposeful visual elements. You’ll be able to curate thematic collections for mood boards, elevate your digital art, and align your visuals with the latest trending styles, all while optimizing your presentation for performance through intelligent compression.
Remember that effective visual communication hinges on precision and intent. Every crop should serve a purpose, enhancing clarity, improving composition, and reinforcing your message. Combine these PowerPoint skills with the comprehensive image tools and inspiration available at Tophinhanhdep.com, and you’ll unlock a new level of presentation mastery, ensuring your visual narratives are not just seen, but truly felt and remembered. Embrace the power of the crop, and watch your presentations transform.