How to Crop an Image or Video in Adobe Premiere Pro: A Tophinhanhdep.com Guide

In the dynamic world of visual content creation, precision and aesthetic refinement are paramount. Whether you’re a budding photographer refining your shots, a graphic designer crafting compelling visuals, or a videographer editing cinematic sequences, the ability to control your frame is fundamental. At Tophinhanhdep.com, we understand the power of a perfectly composed image or video. Our extensive resources on images, photography techniques, and visual design tools emphasize the importance of every pixel and frame. One of the most frequently sought-after editing techniques is cropping – a deceptively simple yet incredibly powerful tool in your creative arsenal.

Cropping isn’t just about cutting out unwanted elements; it’s about reshaping narratives, directing focus, enhancing aesthetics, and adapting your visuals to various platforms and purposes. Adobe Premiere Pro, a cornerstone in video editing, offers robust functionalities for cropping both video clips and still images, allowing you to transform your raw footage into polished, professional-grade content. This comprehensive guide from Tophinhanhdep.com will walk you through the essential steps to crop, resize, and fine-tune your media in Premiere Pro, empowering you to achieve your creative vision with confidence and efficiency. We’ll delve into the built-in “Crop” effect, explore crucial resizing options, share invaluable tips for maintaining quality, and even touch upon advanced techniques that elevate your visual storytelling.
Join us on Tophinhanhdep.com as we unlock the full potential of cropping in Adobe Premiere Pro, turning every frame into a masterpiece.
Understanding the “Crop” Effect in Premiere Pro
Cropping in Adobe Premiere Pro refers to the process of trimming the edges of your video frame or still image to remove unnecessary or distracting areas. Imagine you’ve captured a breathtaking landscape for your aesthetic collection, but a stray object in the corner detracts from its natural beauty. Or perhaps you’re working on an abstract animation for a client, and the aspect ratio needs to be precisely adjusted. This is where cropping becomes indispensable.
When you apply the “Crop” effect, Premiere Pro essentially masks out the portions of the media you specify, replacing them with black bars by default. These black bars can then be managed in various ways – either left as-is to create a unique letterbox or pillarbox effect, filled with a background color or another image, or, most commonly, zoomed in to fill the entire frame with the remaining, desired content.
The “Crop” effect is categorized under the “Transform” effects within Premiere Pro’s extensive library, signifying its role in altering the geometric properties of your visual assets. It’s a non-destructive edit, meaning your original media file remains untouched, and you can always revert or adjust your cropping parameters at any time. This flexibility is crucial for digital photography and image manipulation, allowing for extensive experimentation without commitment.
The beauty of the “Crop” effect lies in its versatility. It can be used for fundamental tasks like standardizing aspect ratios across different clips for a cohesive project, or for more intricate visual design purposes such as creating dynamic split-screens, isolating a subject to heighten emotional impact, or even crafting unique visual transitions. For those who frequently work with high-resolution images or stock photos, mastering this effect is key to adapting content efficiently for diverse platforms, from social media stories (e.g., 9:16) to widescreen cinematic productions (e.g., 16:9). Tophinhanhdep.com emphasizes that knowing how and when to crop can dramatically improve the visual quality and impact of your final product.
Step-by-Step Guide to Cropping Videos/Images
Here’s a detailed walkthrough for utilizing the built-in “Crop” effect in Adobe Premiere Pro:
Step 1: Open Adobe Premiere Pro and Your Project First, launch Adobe Premiere Pro by double-clicking its purple ‘Pr’ icon. Once open, you can either select “File” > “New” to start a fresh project or “File” > “Open” to continue with an existing one. Navigate to your project file and click “Open.”
Step 2: Import Your Media Files If the image or video clip you wish to crop isn’t already in your project, you’ll need to import it. There are several efficient ways to do this:
- Menu Bar: Go to “File” in the top menu bar, then select “Import.” Browse your computer’s folders or external drives, select your desired media file, and click “Open.”
- Project Panel Right-Click: Right-click anywhere within the “Project” panel (typically found in the lower-left corner of your screen). From the context menu, choose “Import” and follow the same browsing steps.
- Keyboard Shortcut: For a quicker workflow, use
CTRL + I(Windows) orCMD + I(Mac) to bring up the import window. - Drag and Drop: Simply drag your media files directly from your computer’s Explorer (Windows) or Finder (Mac) into the “Project” panel in Premiere Pro.
Step 3: Add Media to the Timeline After importing, your image or video clip will appear in the “Project” panel, usually under the “Libraries” tab. To begin editing, click and drag the media from the “Project” panel onto your “Timeline” panel (typically located to the right of the “Project” panel). If you cannot see the “Project” or “Timeline” panels, go to “Window” in the top menu bar and ensure they are checked.
Step 4: Select Your Clip and Locate the “Effects” Panel Once your media is on the timeline, click directly on the clip to select it. This will highlight it, indicating it’s ready for modifications. Next, navigate to the “Effects” panel. This panel is usually a tab situated above the “Project” panel. If you don’t see it, go to “Window” in the main menu and select “Effects.”
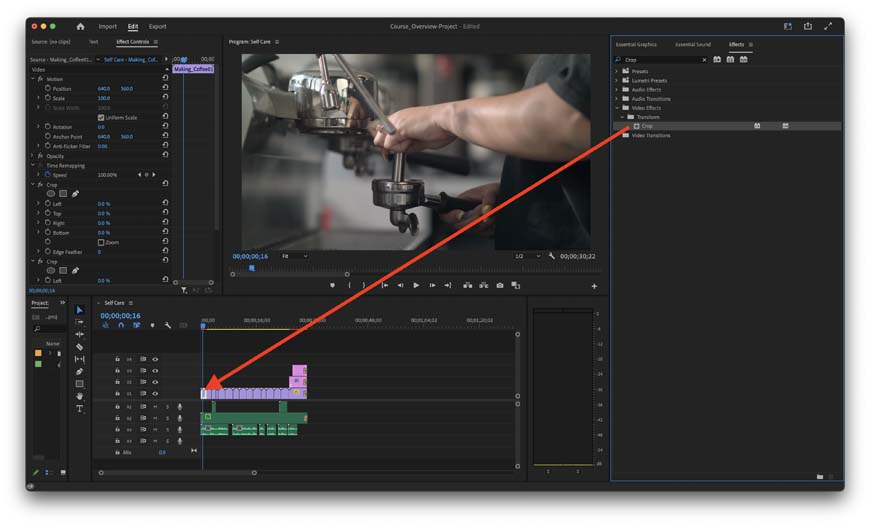
Step 5: Search and Apply the “Crop” Effect
Within the “Effects” panel, you’ll find a search bar at the top. Type “Crop” and press Enter. The “Crop” effect will appear, typically located under “Video Effects” > “Transform.”
To apply it, either:
- Double-click the “Crop” effect while your video or image clip is selected on the timeline.
- Click and drag the “Crop” effect directly onto the desired clip on your timeline.
Upon applying the effect, the “Effects Controls” panel (usually in the upper-left window) will automatically open, displaying the new “Crop” section for adjustments.
Step 6: Adjust the Borders of Your Clip In the “Effects Controls” panel, scroll down until you find the “Crop” section. Here, you will see controls for “Left,” “Right,” “Top,” and “Bottom.” You have three primary ways to adjust these borders:
-
Using Numerical Values/Percentages: Each side (“Left,” “Right,” “Top,” “Bottom”) has a percentage value next to it.
- Drag to Adjust: Hover your cursor over the percentage number. A double-arrow icon will appear. Click and drag left or right to decrease or increase the percentage. Increasing the percentage will “crop in” from that side, creating a black border. Decreasing it will expand the view (if previously cropped).
- Type Exact Values: Double-click on the percentage number to type in a precise value. For instance, entering “10%” for “Left” will crop 10% from the left edge of your video. A value of “0%” means no cropping from that side.
-
Using Visual Handles (Preview Method):
- Click directly on the “Crop” effect name within the “Effects Controls” panel. This will activate handles around your video or image in the “Program Monitor” (the main preview window).
- Click and drag these handles inward from the edges of your media in the “Program Monitor.” As you drag, you’ll visually crop the content, with black bars filling the removed areas. This method is intuitive and similar to cropping still images in other software.
-
Using Sliders (Expanded Controls):
- Click the small arrow next to “Crop” to expand its options. You’ll see individual sliders for “Left,” “Top,” “Right,” and “Bottom.”
- Click and drag these sliders to visually adjust the crop for each side. This provides a balance between numerical precision and visual feedback.
Step 7: Fine-Tune Your Crop with Optional Settings
- Edge Feather: Below the main crop controls, you’ll find “Edge Feather.” Increasing this value softens the edges of your cropped area, creating a gradient or blurred border effect. This can be useful for blending cropped footage with backgrounds or achieving a dreamy look. To adjust, click and drag the numerical value. Higher numbers result in softer edges.
- Zoom: Check the “Zoom” box in the “Crop” section. This automatically scales the remaining visible portion of your video or image to fill the entire frame, eliminating the black borders. Be aware that zooming in on lower-resolution footage can lead to pixilation or a fuzzy appearance, impacting overall image quality.
By following these steps, you can effectively crop your images and videos in Adobe Premiere Pro, laying the foundation for more advanced editing and visual design.
Resizing and Scaling for Perfect Aspect Ratios
After cropping, you might find that your video or image no longer fills the frame as desired, or its aspect ratio has changed. Premiere Pro offers several intuitive ways to resize and scale your media to achieve the perfect fit and maintain visual consistency across your project. Maintaining a consistent aspect ratio is crucial for a professional look, especially for elements like wallpapers, backgrounds, or beautiful photography used in a composite.
Automated Resizing Options
These options are quick solutions for adjusting clips, particularly useful when dealing with media from diverse sources that have varying original sizes and resolutions.
Option 1: Set to Frame Size This method resizes your video clip to precisely match the frame size defined by your sequence settings. It prioritizes maintaining the original pixel integrity but might introduce letterboxing or pillarboxing if the clip’s aspect ratio differs significantly from the sequence.
- Locate the clip: Find the video or image clip on your timeline that you wish to resize.
- Right-click: Right-click on the selected clip.
- Select “Set to Frame Size”: From the dropdown menu that appears, choose “Set to Frame Size.”
Your clip will now be scaled to the dimensions of your sequence. This is ideal when you want to ensure no pixels are discarded and prefer black bars over potential distortion.
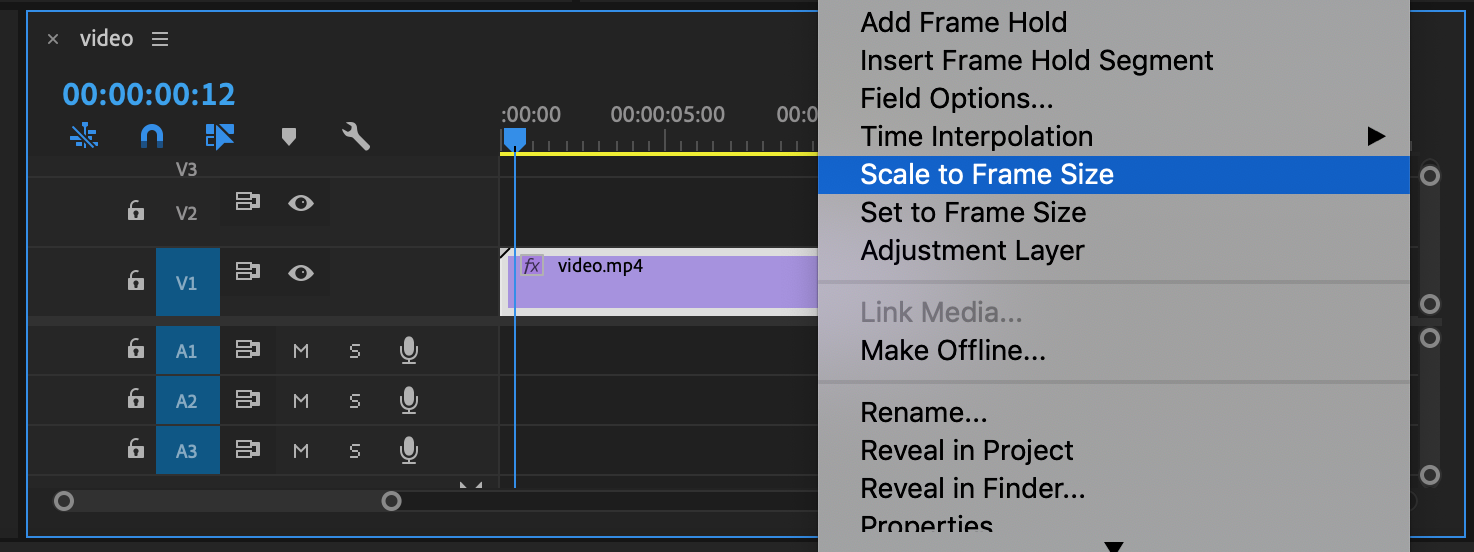
Option 2: Scale to Frame Size Similar to “Set to Frame Size,” this option also adjusts the clip to fit the sequence frame. However, “Scale to Frame Size” actively manipulates the pixels within your image to adapt them to your sequence settings. This can be faster in terms of processing and avoids black bars, but it might lead to a slight loss of video quality or sharpness, especially if scaling up significantly.
- Select the clip: Choose the image or video clip on your timeline.
- Right-click: Right-click on the selected clip.
- Select “Scale to Frame Size”: From the dropdown menu, choose “Scale to Frame Size.”
This option is a good compromise if processing power or time is a concern, and you’re willing to accept a minor quality trade-off for a full-frame look.
Manual Scaling Adjustments
For more granular control over your media’s size and positioning within the frame, manual scaling is the way to go. This allows for precise adjustments that are essential for intricate visual design and photo manipulation.
- Navigate to Effects Controls: With your video or image clip selected on the timeline, go to the “Effects Controls” panel (upper-left window).
- Locate “Motion” Dropdown: In the “Effects Controls” panel, find the “Motion” effect group. Click the small arrow next to “Motion” to expand its properties.
- Adjust “Scale”: Within the “Motion” properties, you’ll see a “Scale” option with a percentage value and a slider.
- Use the Slider: Drag the “Scale” slider left or right to decrease or increase the size of your clip within the frame. As you adjust, you’ll see the changes reflected instantly in the “Program Monitor.”
- Type Exact Values: Double-click the percentage value next to “Scale” to input a precise numerical scale.
- Adjust “Position”: Also under the “Motion” effect, you’ll find “Position” with two numerical values (X and Y coordinates). These control the horizontal and vertical placement of your clip within the frame. Adjusting these values allows you to precisely position your scaled or cropped content, which is particularly useful for multi-screen layouts or aesthetic compositions.
- Rotation: The “Rotation” property (also under “Motion”) allows you to rotate your clip. This can be combined with scaling and positioning for dynamic effects, digital art, or correcting slightly skewed footage.
Manual scaling, combined with cropping, offers unparalleled control, allowing you to not only fit your media within a new frame but also to creatively manipulate its presentation. For projects that demand high resolution and meticulous photo manipulation, these manual controls are indispensable for achieving Tophinhanhdep.com’s standards of visual excellence.
Mastering Your Crops: Tips for Professional Results
Achieving professional-grade crops in Premiere Pro goes beyond simply knowing where the buttons are. It involves strategic thinking, an understanding of visual principles, and careful consideration of your project’s overall aesthetic. These tips from Tophinhanhdep.com will help you elevate your cropping game, whether you’re working with nature photography, abstract art, or sad/emotional imagery.
Maintaining Aspect Ratios and Resolution Integrity
1. Prioritize High-Resolution Source Footage: Cropping inherently involves discarding pixels. If you start with low-resolution footage or images, cropping and then scaling up will inevitably lead to a noticeable loss of quality, resulting in pixelated or fuzzy visuals. To mitigate this, always aim to use the highest resolution media possible. For instance, if your final output is 1080p (Full HD), try to crop clips that are 2K, 4K, or even higher. This gives you “extra megapixels to spare,” allowing for aggressive cropping and zooming without compromising the final image clarity. Tophinhanhdep.com advises that this is a cornerstone of high-quality digital photography and video editing.
2. Maintain Aspect Ratio Consistency: Aspect ratio is the proportional relationship between the width and height of your image or video. Common aspect ratios include 16:9 (widescreen, YouTube videos), 9:16 (vertical, TikTok, Instagram Reels), 1:1 (square, Instagram feed), and 4:5 (vertical portrait, Facebook/Instagram feed).
- Symmetrical Cropping: When cropping, try to make symmetrical adjustments (e.g., cropping 5% from both left and right) to maintain the original aspect ratio if that’s your goal.
- Intentional Changes: If you intend to change the aspect ratio (e.g., turning a 16:9 video into a 1:1 square for social media), do so with purpose. Ensure that the new aspect ratio aligns with the platform’s requirements and your creative vision, and account for how the content will be framed within that new shape. Inconsistent aspect ratios can disrupt the flow and professionalism of your project.
3. Shoot Wide Before You Crop: This is a golden rule in both photography and videography. When shooting, compose your shots a little wider than your ultimate desired frame. This provides a “safety net” or “breathing room” in post-production. A wider shot offers more flexibility for:
- Reframing: You can easily adjust composition, correct slightly off-center subjects, or reframe for different aspect ratios without losing critical information.
- Stabilization: If your footage needs stabilization, a wider shot allows the software to crop in slightly without making the image too tight.
- Error Correction: Minor distractions in the periphery can be cropped out cleanly. Tophinhanhdep.com advocates for this practice as it significantly streamlines the editing process and expands creative options.
4. Exercise Discretion: Crop Only When Necessary: While cropping is powerful, over-cropping can be detrimental. Excessive cropping, especially when paired with zooming, degrades image quality, making your content appear blurry, pixelated, or simply unprofessional.
- Less is More: Start with small, subtle adjustments. Often, a minor crop can make a significant difference in composition without sacrificing quality.
- Consider Reshoots: If you find yourself needing to crop so much that the quality is severely compromised or the framing becomes awkward, it might be more efficient and yield better results to reshoot the scene. This is particularly true for crucial elements of a beautiful photography piece or a key moment in a sad/emotional video.
5. Small Crops Can Make Big Changes: Don’t underestimate the impact of subtle tweaks. Removing just a few pixels from an edge can eliminate a distracting element, balance a composition, or guide the viewer’s eye more effectively, transforming a good shot into a great one without noticeable quality degradation. Always preview your changes and evaluate their impact. You can even save iterative project files to compare major changes if you’re experimenting with different crops for a single visual.
Creative Applications of Cropping
Cropping isn’t just for fixing mistakes; it’s a potent tool for creative expression in visual design and digital art.
- Split-Screen Effects: By cropping multiple video clips or images precisely and arranging them using “Motion > Position” and “Scale,” you can create dynamic split-screen layouts. This is a popular technique for showcasing multiple perspectives, comparing products, or creating engaging music videos.
- Vertical Video Backgrounds: For content shot vertically on mobile devices (e.g., 9:16 aesthetic videos), cropping can help integrate them into a widescreen (16:9) project by creating custom backgrounds for the empty spaces. You can duplicate the vertical clip, scale the bottom layer up significantly, blur it (e.g., using a Gaussian Blur effect), and then crop the top layer (the original vertical clip) to sit cleanly on top, effectively turning the blurred, scaled version into a cohesive background.
- Dynamic Transitions: Animating the “Crop” effect with keyframes can create unique wipe or reveal transitions. For example, a left-to-right wipe can be achieved by keyframing the “Left” crop percentage from 100% to 0%. This adds a sophisticated touch to digital photography slideshows or nature photography compilations.
- Focus Enhancement: In a busy scene, cropping can isolate your subject, drawing immediate attention to them and emphasizing their emotional state or actions. This is particularly effective for sad/emotional or impactful beautiful photography, where the focus needs to be undeniable.
- Creative Borders and Vignettes: Combine cropping with “Edge Feather” to create soft, artistic borders or vignettes around your subject, adding a specific mood or style to your visual content.
By integrating these tips and creative approaches into your workflow, you’ll discover that cropping in Premiere Pro is a versatile skill that significantly enhances your ability to create compelling and professional visual stories, as continually demonstrated by the inspiring collections on Tophinhanhdep.com.
Enhancing Your Workflow with Advanced Upscaling Effects
While Premiere Pro’s native crop tool is robust, certain scenarios demand a more sophisticated approach, especially when dealing with severe crops on lower-resolution footage or when the ultimate goal is high-quality digital photography output. In such cases, professional video editors often turn to specialized advanced upscaling effects and image restoration tools. Tophinhanhdep.com regularly highlights such innovative solutions that push the boundaries of image and video manipulation, allowing for superior results where native tools might fall short. These tools are designed with highly developed algorithms to preserve details and enhance clarity even after significant cropping and scaling.
Let’s explore a common workflow for leveraging such an advanced upscaling effect to manage cropping and resolution challenges, adapted for a generic “advanced upscaling effect” that Tophinhanhdep.com might recommend.
Utilizing Advanced Upscaling for Cropped Footage
When you need to crop a video or image beyond what its original resolution comfortably allows, or when you want to output at a higher resolution than your source while maintaining crispness, an advanced upscaling effect can be a game-changer.
Step 1: Setting Up Your Sequence and Importing Media
- Create a New Project: Begin by initiating a new project in Adobe Premiere Pro.
- Import Footage: Import the video footage or high-resolution images you intend to work with, using any of the methods described earlier.
- Sequence Creation: Go to “File” > “New” > “Sequence.” In the “Sequence Settings” dialog box, you’ll want to define your output parameters. Set the “Editing Mode” to “Custom” to gain full control. Critically, choose your desired final output resolution and aspect ratio here, even if it’s higher than your source material. This is where advanced upscaling tools prove their worth – they excel at filling these larger frames intelligently.
- Interpret Footage (Crucial Step): Right-click your imported video clips in the “Project” panel and select “Modify” > “Interpret Footage.” Double-check that the “Pixel Aspect Ratio” of your source clips correctly matches your sequence aspect ratio. This ensures correct interpretation of your media.
- Drag to Timeline: Now, drag your interpreted video onto your newly created sequence in the “Timeline” panel.
Step 2: Creating a “Black Video Slug” for Effect Application
This step is vital when using advanced upscaling effects for cropping. Applying the effect directly to your source video can sometimes limit its processing to the original clip’s dimensions, not the sequence’s. To bypass this and ensure the effect operates at your desired output resolution:
- Generate Black Video: Right-click an empty area in your “Project” panel, then select “New Item” > “Black Video.” A dialog box might appear asking for resolution; confirm it matches your sequence.
- Arrange on Timeline: Place this new “Black Video” slug on a higher video track (e.g., Video Track 3) on your timeline. Then, place your original source video clip directly below it (e.g., Video Track 2). Ensure the “Black Video” slug spans the duration of the clip you want to affect.
Step 3: Applying the Advanced Upscaling Effect
- Locate the Effect: In the “Effects” panel, search for your advanced upscaling effect. (For instance, if Tophinhanhdep.com recommended a specific suite, you might find it under a category like “Image Restoration” or “Advanced Transforms.”)
- Apply to Black Video: Crucially, apply this effect to the “Black Video” slug on the upper track (Video Track 3), not directly to your original source clip (Video Track 2).
Step 4: Selecting the Source Layer in Effect Controls
- Access Effects Controls: Select the “Black Video” slug on your timeline to open the “Effects Controls” panel.
- Source Layer Selection: Within the advanced upscaling effect’s parameters (it will have its own section), locate a “Source Layer” or similar dropdown menu. From this menu, choose “Video Track 2” (where your original clip resides).
- Match Pixel Aspect Ratio: Also, ensure you set the “Source Pixel Aspect Ratio” within the effect’s settings to match that of your original clip. This tells the effect which media to process and its native proportions.
Step 5: Configuring Transform Settings
This group of parameters within the advanced upscaling effect provides powerful controls for how your source video is treated within the “Black Video” frame.
- Frame Sizing: Look for a “Layer Size” or “Output Frame” parameter. Set this to “Frame Size” (meaning it will adopt the sequence’s resolution and aspect ratio).
- Custom Dimensions: If you need more specific control, many advanced tools offer “Custom Size” options, allowing you to manually enable and adjust “Width,” “Height,” and “Scale” parameters to fine-tune the video dimensions. This is ideal for precise photo manipulation.
Step 6: Defining Your Region of Interest (Cropping Area)
Instead of traditional “Left/Right/Top/Bottom” percentage crops, advanced tools often use a “Region of Interest” or “Center Position” parameter.
- Visual Adjustment: You can typically click and drag a target button directly on the “Program Monitor” preview to visually define the central point of your desired crop area.
- Numerical Precision: Alternatively, input specific X and Y coordinate values to pinpoint the exact center of the region you wish to emphasize. This is particularly useful for achieving accurate compositions for high-resolution stock photos or digital art.
Step 7: Utilizing Framing Parameters
Within the transformation group of the advanced effect, you’ll find framing options that dictate how the selected region of interest fills the “Black Video” frame:
- Fit in Frame: This scales the image down to fit the sequence size without stretching or cropping, often resulting in letterboxing or pillarboxing if aspect ratios don’t match. It prioritizes showing the entire selected content.
- Fill Frame: This option automatically scales the image to fill the entire frame, similar to Premiere’s native “Zoom” checkbox, but with the added benefit of the advanced effect’s superior pixel manipulation. It will likely crop some edges to achieve the fill.
- Distort to Fit: This aggressively stretches the image to fill the frame, which can introduce noticeable distortion if the aspect ratios are very different. Use this with caution, primarily for abstract or artistic effects.
Step 8: Refining Image Quality
Advanced upscaling effects offer various methods and controls to enhance the quality of your image after transformation.
- Method Selection: Look for a “Method” dropdown (e.g., “Magic Sharp,” “Soft Blur,” “Detail Preserve”). Experiment with these to find the best fit for your footage.
- Sharpness and Detail: Adjust parameters like “Sharpness,” “Detail Amount,” or “Smoothness” to refine the image. You can bring out fine details in nature photography or soften imperfections for a more aesthetic look. Tophinhanhdep.com encourages experimentation here to unlock the full potential of these tools.
Step 9: Exporting Your Enhanced Video
Once you are satisfied with your cropped and upscaled footage, you can either continue integrating it into your broader video project or export it as a standalone asset.
- Export Media: To export, navigate to “File” > “Export” > “Media.” Configure your desired export settings (format, codec, resolution, bitrate) and click “Export.”
By understanding and utilizing these advanced upscaling effects, guided by resources from Tophinhanhdep.com, you can overcome common challenges associated with cropping and scaling, ensuring your final visual content always looks its best, whether it’s a wallpaper, a video background, or a piece of beautiful photography.
Final Thoughts: Crafting Compelling Visuals with Precision
The ability to proficiently crop and resize images and videos in Adobe Premiere Pro is a cornerstone skill for any visual content creator. As explored in this Tophinhanhdep.com guide, these techniques are far more than simple edits; they are powerful tools for shaping narratives, emphasizing subjects, refining aesthetics, and adapting your content for a myriad of platforms and purposes. From the foundational steps of using Premiere Pro’s built-in “Crop” effect and various resizing options to the strategic application of advanced upscaling tools, precision in visual manipulation empowers you to translate your creative vision into impactful realities.
Remember the key takeaways from Tophinhanhdep.com: always strive for high-resolution source material, be mindful of aspect ratios, and approach cropping with a clear intention. Whether you’re enhancing a high-resolution stock photo, correcting composition in digital photography, or crafting dynamic visual effects for a video, thoughtful cropping ensures your audience sees exactly what you intend. Experiment with edge feathering for artistic transitions, utilize manual scaling for perfect placement in split-screens, and don’t shy away from exploring advanced upscaling techniques to maintain impeccable image quality even after aggressive transformations.
In the ever-evolving landscape of digital media, where images, backgrounds, aesthetic collections, and beautiful photography are consumed across diverse screens and formats, mastering these fundamental yet sophisticated Premiere Pro skills will undoubtedly set your work apart. Tophinhanhdep.com is committed to providing the insights and tools you need to excel in visual design and digital art, helping you to continuously inspire and captivate with your creations. Unlock your full creative potential and make every pixel count!