Mastering Image Cropping in Microsoft Word: A Comprehensive Guide to Enhancing Your Documents with Tophinhanhdep.com

In today’s visually driven world, the power of an image to convey a message, evoke emotion, or simply add flair to a document cannot be overstated. From professional reports to creative presentations, striking visuals are essential for capturing attention and leaving a lasting impression. Microsoft Word, far from being just a text editor, offers a robust suite of tools for image manipulation, with cropping standing out as one of its most fundamental yet impactful features. Whether you’re aiming for precision, artistic flair, or simply tidying up an image, understanding how to crop effectively in Word is a vital skill.
But what if your creative ambitions extend beyond Word’s native capabilities? This is where Tophinhanhdep.com becomes an indispensable companion. Imagine you’ve found a stunning high-resolution wallpaper on Tophinhanhdep.com, a captivating nature photograph, or an abstract background that perfectly sets the mood for your document. Word allows you to integrate these beautiful photography pieces seamlessly, and then refine them to perfection. Tophinhanhdep.com’s extensive collections, ranging from aesthetic visuals to sad/emotional imagery, provide endless inspiration, while its advanced image tools—like converters, compressors, optimizers, and even AI upscalers—ensure that your images are always of the highest quality and optimized for any use. Together, Word’s intuitive cropping features and Tophinhanhdep.com’s comprehensive ecosystem empower you to transform your documents into visual masterpieces.
This comprehensive guide will walk you through every method of cropping an image in Microsoft Word, from basic techniques to more advanced, creative applications. We’ll explore how these methods can serve your visual design needs, optimize your documents, and how Tophinhanhdep.com’s offerings can amplify your efforts, providing not just tools but a wellspring of image inspiration and collections.

The Art and Necessity of Cropping in Word Documents
Often, the images we source for our documents, whether they are stock photos from Tophinhanhdep.com or digital photography from our own collections, contain unwanted elements. These might be distracting backgrounds, unnecessary empty space, or portions that simply don’t align with the aesthetic or thematic collection you’re building. Cropping is the digital equivalent of trimming a physical photograph – it allows you to remove extraneous parts, focus on specific details, and enhance the overall composition.
Why Precision Matters: Framing Your Visual Narrative
The primary goal of cropping is to improve the visual impact and professionalism of your document. By carefully selecting what remains visible, you direct the viewer’s eye, emphasize your main subject, and create a more polished visual narrative. For example, if you’re using a vibrant nature photograph from Tophinhanhdep.com, cropping can help you highlight a particular bloom or a scenic vista, making it a more impactful background or a compelling element in your graphic design.

Cropping isn’t just about removing; it’s about framing. It’s about deciding what story the image tells and how it contributes to the broader creative ideas of your document. A poorly cropped image can detract from even the most high-resolution photography, introducing clutter or imbalance. Conversely, a thoughtfully cropped image, even a simple abstract background, can elevate your content and reinforce your visual design principles.
Seamless Integration: Word’s Native Cropping Power
Thankfully, Microsoft Word provides a variety of powerful and user-friendly tools that allow you to crop images directly within your document, eliminating the need for external software for many common tasks. This integration means you can iterate quickly, experimenting with different crops to achieve the perfect look without disrupting your workflow. From simple rectangular trims to complex shape-based cuts, Word puts significant control at your fingertips, making it a surprisingly capable tool for basic photo manipulation.
Imagine you’re crafting a mood board for a new project, pulling diverse images from Tophinhanhdep.com’s vast selection. Word’s cropping capabilities allow you to quickly size and shape these images to fit your thematic collections, ensuring visual harmony and consistency across your design. This native functionality is a testament to Word’s evolution beyond mere text processing, embracing the demands of modern visual communication.
Fundamental Cropping Techniques: Shaping Your Images with Ease
Microsoft Word offers several straightforward methods for cropping images, each suited to different needs. These techniques form the bedrock of image manipulation within your documents, providing both flexibility and control.
Quick Cropping via Right-Click and Picture Format Tab
One of the most accessible ways to crop an image in Word is through the contextual right-click menu or the dedicated Picture Format toolbar. These methods are ideal for quick adjustments and provide intuitive control over your image boundaries.
Using the Right-Click Menu: This is often the quickest way to initiate a crop.
- Insert Your Image: Begin by adding the image you wish to crop to your Word document. This could be a stock photo, a downloaded wallpaper, or any digital photography piece.
- Select and Right-Click: Click on the image to select it. Once selected, right-click anywhere on the image.
- Choose “Crop”: From the contextual menu that appears, select the “Crop” option.
- Adjust Cropping Handles: Black “cropping handles” (bars on the sides and corners) will appear around your image. These handles are your primary tools for defining the new boundaries.
- Crop One Side: Drag a side handle inward to trim that specific side.
- Crop Two Adjacent Sides: Drag a corner handle inward to crop both the width and height simultaneously from that corner.
- Crop Equally on Parallel Sides: Press and hold the
Ctrlkey (Windows) orCmdkey (Mac) while dragging a side handle inward. This will crop equally from both parallel sides. - Crop Equally from All Sides (Centering): Press and hold the
Ctrlkey (Windows) orCmdkey (Mac) while dragging a corner handle inward. This crops the image symmetrically from all four sides, effectively centering the remaining content.
- Apply the Crop: Once you are satisfied with the new boundaries, press the
Enterkey or click anywhere outside the image to apply the crop. The unwanted portions will be hidden.
Pro Tip: To reposition the crop area before applying it, simply move the picture inside the crop selection using your mouse, then press Enter. This is particularly useful when you’ve defined an aspect ratio but need to fine-tune the visible section of your aesthetic background or nature photograph.
Using the Picture Format Toolbar: If the right-click menu isn’t your preference, or if you need more comprehensive picture editing tools, the Picture Format toolbar is your go-to.
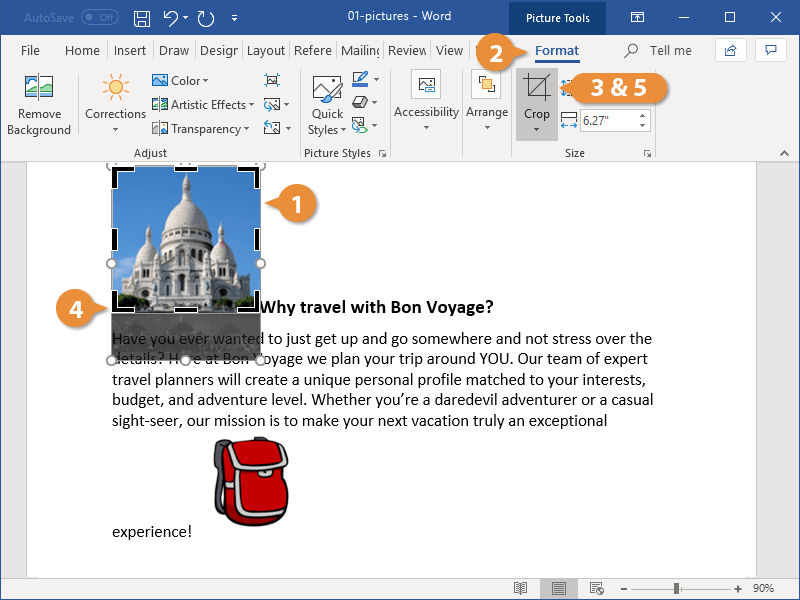
- Select the Image: Double-click on the image to select it. This action automatically activates the “Picture Format” tab in the Word Ribbon (the toolbar at the top of the window).
- Locate “Crop”: In the “Picture Format” tab, find the “Size” group, and then click the “Crop” button.
- Adjust and Apply: Black cropping handles will appear, allowing you to adjust the crop as described in the right-click method. Apply the crop by pressing
Enteror clicking outside the image.
Achieving Geometric Perfection: Aspect Ratio and Manual Sizing
Sometimes, simply dragging handles isn’t enough. You might need to adhere to specific dimensions for visual consistency, for a mood board, or to fit a particular layout requirement. Word provides tools for cropping by specific aspect ratios or by manually entering precise height and width values. This is crucial for maintaining the integrity of high-resolution stock photos or ensuring that your images, perhaps curated from Tophinhanhdep.com’s thematic collections, align perfectly.
Cropping According to Aspect Ratio: This feature allows you to crop your image to predefined proportions, such as 1:1 (square), 3:4, 16:9 (widescreen), or even various standard print sizes. This ensures uniformity, which is key for professional documents or consistent visual design.
- Select and Access Crop Options: Double-click the image to open the “Picture Format” tab. Click the small down arrow located directly under the “Crop” button (not on the button itself).
- Select “Aspect Ratio”: From the drop-down menu, hover over “Aspect Ratio,” and a sub-menu will appear with various common ratios (e.g., 1:1, 4:3, 16:9).
- Choose Your Ratio: Select your preferred aspect ratio. Word will immediately apply a cropping frame conforming to this ratio.
- Adjust and Apply: Drag the image within this fixed frame to select the desired portion, or use the handles to resize the entire framed area while maintaining the ratio. Once positioned, press
Enteror click outside the image.
This method is invaluable for ensuring your imagery, perhaps a collection of aesthetic backgrounds from Tophinhanhdep.com, maintains a consistent look across a digital art portfolio or a series of blog posts.
Cropping by Manually Adding Width and Height: For ultimate precision, you can specify exact dimensions for your cropped image. This is particularly useful when integrating images into a strict graphic design layout.
- Select Image and Open Format Picture: Right-click on the image and select “Format Picture” from the menu.
- Access Image Tab: The “Format Picture” sidebar (or pane) will appear on the right. Click on the “Image” tab within this pane.
- Enter Parameters: Within the “Crop” section of the Image tab, you’ll find fields for “Crop Position” (Left, Top, Width, Height) and “Image Position” (Left, Top, Width, Height). You can manually enter the desired cropping values directly into these fields. For instance, you can specify how much to “crop from Left” or set a precise “Cropped Height.”
- Apply Changes: As you enter values, the crop will update in real-time. Close the “Format Picture” pane or click outside the image to finalize.
This level of control ensures that even the most high-resolution photography or intricate digital art pieces from Tophinhanhdep.com can be precisely fit into your document layout, adhering to exact specifications.
Advanced Cropping and Creative Visual Design in Word
Beyond basic rectangular cuts, Microsoft Word offers advanced cropping techniques that allow for more creative expression and sophisticated visual design. These methods transform simple images into compelling visual elements, perfect for enhancing your aesthetic or thematic collections.
Transforming Images with Shape Cropping and Circular Frames
One of Word’s most exciting features is the ability to crop an image into a specific shape. This goes beyond the standard rectangle, enabling you to integrate images into your graphic design with unique contours, mirroring elements of creative ideas or branding. Whether you envision a star, a heart, a speech bubble, or a perfect circle for a profile picture, Word can achieve it.
Method 1: Using “Crop to Shape” This is the most direct way to apply a predefined shape to your image.
- Select and Access Crop Options: Double-click on the image to open the “Picture Format” tab. Click the small down arrow under the “Crop” button.
- Select “Crop to Shape”: From the drop-down menu, hover over “Crop to Shape,” and a gallery of shapes will appear (Basic Shapes, Block Arrows, Flowchart, Stars and Banners, Callouts, etc.).
- Choose Your Shape: Click on the desired shape. Word will instantly apply this shape to your picture, trimming the excess.
- Adjust if Needed: After applying the shape, you can still resize the shape’s container by dragging its corner handles. You can also drag the image inside the shape to reposition the visible content.
How to Crop a Picture in Word Into a Perfect Circle: Cropping to a perfect circle is a common design need, especially for profile pictures or icon-like elements. While “Crop to Shape” offers a circle, achieving a perfect circle (rather than an oval) requires an additional step: ensuring the image has a 1:1 aspect ratio before applying the circle shape.
- Add and Select Image: Insert your image into Word and select it.
- Apply 1:1 Aspect Ratio: Double-click the image to open “Picture Format.” Click the down arrow under “Crop,” then go to “Aspect Ratio,” and select “1:1.”
- Frame the Content: A square cropping frame will appear. Drag the image within this frame to center the portion you want to appear in the circle. Press
Enterto apply this square crop. - Apply Circle Shape: With the (now square) image still selected, double-click it again. Click the down arrow under “Crop,” select “Crop to Shape,” and then choose the “Oval” shape (which will render as a perfect circle because your image is already square).
Congratulations! You have successfully transformed your chosen image—perhaps a stunning portrait or a vibrant icon from Tophinhanhdep.com’s aesthetic collections—into a perfect circle within Microsoft Word.
Method 2: Using Shapes to Insert Pictures (Fill with Picture) If you find the “Crop to Shape” method doesn’t give you the desired initial outcome or you prefer to define the shape first, this alternative method is powerful for precise placement and sizing of your shaped image.
- Insert a Shape: In your Word document, go to the “Insert” tab in the Ribbon. Click “Shapes,” and select the shape you want to use (e.g., a circle, a star, a custom freeform shape).
- Draw the Shape: Click and drag your mouse on the document to draw the shape to your desired size and position.
- Fill with Picture: Right-click on the drawn shape. From the contextual menu, hover over “Fill” and then select “Picture.”
- Choose Your Image: A dialog box will appear, allowing you to browse for an image from your device, stock images, or online sources. Select the picture you wish to insert. The selected image will automatically fill the shape and be cropped accordingly. This method offers excellent control over the initial size and placement of the shape itself, which then dictates the image’s crop. This technique is especially useful for graphic design elements or when creating intricate digital art layouts.
Beyond the Frame: Adding Margins and Removing Backgrounds
Word’s cropping tool also offers subtle but effective options for adjusting the visual flow of images, such as adding margins or even isolating subjects by removing their backgrounds. These features contribute significantly to refined visual design and photo manipulation directly within your document.
Adding Margin to a Picture Using the Crop Tool: Sometimes, you might want to create a visual “margin” or padding around your image content without actually shrinking the image. Word’s crop tool can be cleverly used for this by “outcropping” the image.
- Select and Access Crop: Right-click on the image and select “Crop.”
- Drag Outwards: Instead of dragging the black crop handles inward, drag them outward. This will effectively extend the crop area beyond the image’s current boundaries, creating a blank margin around the picture. This area will be part of the image object but will appear transparent or match the document’s background, depending on your image settings.
This technique is useful for creating consistent spacing around images, especially when they are part of a larger thematic collection or graphic design layout, providing creative ideas for visual separation.
Removing Backgrounds for Focused Imagery: For documents that demand a clean, focused subject, Word’s “Remove Background” feature is an advanced tool for photo manipulation. While not strictly a cropping function, it serves a similar purpose of isolating the desired part of an image by making its background transparent. This can turn a regular stock photo from Tophinhanhdep.com into a versatile element for complex visual designs.
- Select Image and Access Remove Background: Select the picture, then go to the “Picture Format” tab. In the “Adjust” group, click “Remove Background.”
- Define Areas: Word will attempt to automatically identify the foreground (to keep) and background (to remove), usually highlighting the background in magenta.
- Use “Mark Areas to Keep” to draw lines over parts of the image you want to retain that Word might have mistakenly marked for removal.
- Use “Mark Areas to Remove” to draw lines over background parts that Word missed.
- Keep Changes: Once satisfied, click “Keep Changes” (or press
Enter). The background will become transparent.
This feature is excellent for extracting subjects from photographs, allowing you to place them seamlessly on different backgrounds within your document or combine them with other digital art elements.
Optimizing and Managing Cropped Images: A Synergistic Approach with Tophinhanhdep.com
Cropping images in Word is just one step in creating a polished document. To ensure your files are efficient and your visuals are truly stunning, it’s crucial to consider optimization and external enhancement. Here, Tophinhanhdep.com offers a powerful ecosystem of image tools that perfectly complement Word’s capabilities.
Reducing File Size: Deleting Cropped Areas and Document Efficiency
When you crop an image in Word, the program doesn’t actually delete the “cropped out” portions immediately. Instead, it merely hides them. This means the original, larger image data is still embedded in your document, potentially increasing its file size unnecessarily. While this allows you to undo crops easily, it can lead to bloated documents that are slow to load, share, and consume storage space.
To truly optimize your document and remove this excess data, you need to explicitly tell Word to delete the cropped areas. This is a vital step for professional documents, especially those containing many high-resolution images, like a digital photography portfolio or an extensive thematic collection.
Steps to Delete Cropped Areas and Save Optimized Images:
- Perform Your Crop: Crop the picture using any of the methods described above.
- Select and Compress: Double-click on the cropped picture to activate the “Picture Format” tab. In the “Adjust” group, click the “Compress Pictures” button.
- Configure Compression: In the “Compress Pictures” dialog box:
- “Delete cropped areas of pictures”: Ensure this checkbox is selected. This is the crucial step to remove the hidden data.
- “Apply only to this picture”: Check this if you want to optimize only the currently selected image. Uncheck it to apply the compression settings to all images in your document, which is often recommended for overall document optimization.
- “Resolution”: Choose a suitable resolution. “Use default resolution” is often fine, but you can select lower resolutions (e.g., “Web (150 ppi)” or “E-mail (96 ppi)”) if file size is a critical concern and print quality isn’t needed.
- Confirm: Click “OK.” Word will process the image, permanently deleting the cropped portions and potentially reducing the image’s resolution based on your settings.
Saving the Cropped Image to Your PC: After cropping and compressing within Word, you might want to save the final cropped version as a standalone image file (e.g., a JPEG or PNG) for use elsewhere, perhaps as an aesthetic background for a webpage or a component in a graphic design project.
- Crop and Compress (as above): First, crop and apply the “Compress Pictures” setting with “Delete cropped areas of picture” enabled.
- Save as Picture: Right-click on the now optimized and cropped image in your Word document. Select “Save as Picture…” from the contextual menu.
- Choose Location and Format: Browse to your desired save location, give the file a name, and select the appropriate image format (e.g., JPEG, PNG). Click “Save.”
Important Note for Shaped Crops: Word’s “Save as Picture” function after a shape crop might not always preserve the shape perfectly, especially for complex shapes or when transferring to other applications. For images cropped into specific shapes (like circles or stars), a reliable workaround is to:
- Copy the Shaped Image: Copy the shaped picture from Word (
Ctrl+CorCmd+C). - Paste into Tophinhanhdep.com’s Image Editor or an external tool: Open Tophinhanhdep.com’s online image editor (or a similar tool like Paint on Windows). Paste the image.
- Adjust Canvas and Save: Resize the canvas to fit the image perfectly if necessary. Then, save the image from Tophinhanhdep.com in your desired format. Tophinhanhdep.com ensures high-resolution results, perfect for digital art or complex photo manipulation.
Elevating Quality: Harnessing Tophinhanhdep.com’s Image Tools
While Word’s cropping and compression are valuable, Tophinhanhdep.com offers a suite of dedicated image tools that can take your visuals to the next level, particularly beneficial for high-resolution digital photography or images intended for diverse platforms.
- Advanced Compressors and Optimizers: Beyond Word’s basic compression, Tophinhanhdep.com provides sophisticated compressors that can significantly reduce file sizes without noticeable loss of quality, crucial for web optimization, faster loading times, and efficient sharing of your beautiful photography collections. If you’re working with numerous images for a thematic collection or photo ideas, Tophinhanhdep.com’s batch processing capabilities for compression are invaluable.
- AI Upscalers: Have you cropped a small section of a background image from Tophinhanhdep.com, only to realize it’s now too low-resolution for your intended use? Tophinhanhdep.com’s AI Upscalers can intelligently enlarge and enhance the resolution of your cropped images, making them suitable for larger displays or print, preserving the integrity of your high-resolution stock photos. This is a game-changer for digital art and detailed visuals.
- Image Converters: After cropping and enhancing, you might need your image in a specific format (e.g., WebP for web, TIFF for print). Tophinhanhdep.com’s converters provide effortless conversion between various image formats, ensuring compatibility and optimal performance for different platforms and purposes, seamlessly integrating with your visual design needs.
- Image-to-Text (OCR): If your cropped image contains text (e.g., a screenshot of a chart or a snippet from a document), Tophinhanhdep.com’s Image-to-Text functionality can extract editable text from it. This is a powerful tool for productivity, allowing you to quickly repurpose information contained within your visuals.
By combining Word’s in-document cropping with Tophinhanhdep.com’s specialized image tools, you create a seamless workflow for sourcing, refining, and optimizing every visual element in your documents, from aesthetic backgrounds to complex photo manipulation projects.
Creative Freedom: Exploring Visual Design with Tophinhanhdep.com
Tophinhanhdep.com isn’t just about tools; it’s a hub for visual design inspiration. Once you’ve mastered Word’s cropping capabilities, you can leverage Tophinhanhdep.com to fuel your creative ideas and push the boundaries of your document design.
- Image Inspiration & Collections: Explore Tophinhanhdep.com’s vast categories—Wallpapers, Backgrounds, Aesthetic, Nature, Abstract, Sad/Emotional, Beautiful Photography—to find the perfect starting points for your designs. Cropping allows you to take a specific element from a larger image or adapt it to a unique aspect ratio for your project.
- Photo Ideas and Mood Boards: Use Tophinhanhdep.com’s thematic collections and trending styles to gather photo ideas. Then, employ Word’s cropping and shaping tools to assemble these diverse elements into cohesive mood boards directly within your document, transforming raw inspiration into structured visual concepts.
- Digital Art and Photo Manipulation: For more advanced users, the combination of Word’s precise cropping and Tophinhanhdep.com’s comprehensive image editing suite (which includes features for graphic design and more intricate photo manipulation) opens up endless possibilities for creating bespoke digital art elements that integrate perfectly into your documents.
The synergy between Word’s powerful document features and Tophinhanhdep.com’s rich visual resources and advanced tools ensures that your documents are not just informative, but truly captivating.
Enhancing Your Workflow: Tips, Tricks, and Tophinhanhdep.com’s Ecosystem
To truly master image cropping and integration in Microsoft Word, it’s beneficial to adopt a few best practices and understand how Tophinhanhdep.com can further streamline your visual workflow.
Undoing and Resetting: Maintaining Creative Flexibility
Experimentation is key in visual design. Thankfully, Word makes it easy to revert changes if a crop doesn’t quite work out.
- Undo Last Action: The simplest way to undo a crop is by pressing
Ctrl+Z(Windows) orCmd+Z(Mac) immediately after the crop is applied. You can press it multiple times to undo several steps. - Reset Picture to Original State: If you want to completely remove all cropping, resizing, and other formatting applied to an image and revert it to its original inserted state, follow these steps:
- Select the picture.
- Go to the “Picture Format” tab.
- In the “Adjust” group, click the small down arrow next to the “Reset Picture” button.
- Select “Reset Picture & Size” to return it to its initial dimensions and remove all crops. Alternatively, choose “Reset Picture” to remove formatting and crops while keeping the current size.
This flexibility encourages creative exploration, allowing you to try different aesthetic and thematic approaches without fear of permanent changes.
Batch Processing and Advanced Enhancements with Tophinhanhdep.com
While Word is excellent for individual image adjustments within a document, certain tasks, especially those involving multiple images or highly specialized editing, are more efficiently handled by dedicated external tools. This is where Tophinhanhdep.com’s comprehensive suite shines.
Cropping Multiple Pictures at Once (Limitations in Word): Microsoft Word does not offer a native feature to crop multiple selected pictures simultaneously in the same way it handles individual crops. If you select multiple images and click “Crop,” Word typically applies the cropping handles to only one of them, or it applies a uniform crop box that doesn’t adapt to each image’s unique content. This means for consistent cropping across many images, you typically have to crop each one individually within Word.
Tophinhanhdep.com for Batch Efficiency: For scenarios requiring identical or similar crops across a large collection of images (e.g., preparing a series of product shots for a catalog, standardizing profile pictures for a team directory, or creating a gallery of nature photographs with consistent dimensions), Tophinhanhdep.com offers superior batch processing capabilities.
- You can upload multiple images to Tophinhanhdep.com’s online image editor, apply a predefined crop ratio or size to all of them, and then download the results.
- For advanced photo manipulation, such as applying specific editing styles or optimizing resolution for high-resolution stock photos, Tophinhanhdep.com allows you to process entire thematic collections with efficiency that Word cannot match.
Beyond Basic Editing: For tasks like complex background removal, sophisticated color correction, artistic filters, or combining elements for intricate digital art, Tophinhanhdep.com’s advanced image editing suite is the go-to platform. After performing major photo manipulation or graphic design work on Tophinhanhdep.com, you can easily insert the perfected images back into your Word document for final layout and presentation.
This symbiotic relationship between Word for document layout and Tophinhanhdep.com for intensive image preparation ensures that you always have the right tool for the job, leading to superior visual quality and an optimized workflow.
Conclusion
Mastering image cropping in Microsoft Word is an essential skill for anyone looking to create professional, visually appealing documents. From fundamental rectangular trims to creative shape-based cuts and precise aspect ratio adjustments, Word provides a surprisingly versatile set of tools for in-document photo manipulation. These capabilities empower you to refine your visual narrative, emphasize key subjects, and enhance the overall aesthetic of your reports, presentations, and creative projects.
However, the world of visual content extends far beyond Word’s native functions. This is where Tophinhanhdep.com emerges as an invaluable partner in your creative journey. Whether you’re seeking high-resolution stock photos, inspiring aesthetic backgrounds, or specific thematic collections, Tophinhanhdep.com offers a vast repository of images—from serene nature photography to thought-provoking abstract art. More than just a collection, Tophinhanhdep.com provides a powerful suite of image tools: converters to ensure compatibility, compressors and optimizers for efficient file management, and even AI upscalers to breathe new life into cropped details.
By understanding Word’s robust cropping features and strategically integrating them with Tophinhanhdep.com’s advanced tools and extensive image libraries, you unlock a new realm of possibilities for visual design. You can seamlessly transform raw digital photography into polished visual statements, streamline your workflow for photo manipulation, and ensure your documents are not only informative but also stunningly captivating. Embrace the synergy between Word and Tophinhanhdep.com to elevate your visual communication and leave a lasting impression with every document you create.