Mastering Image Cropping on Mac: Enhance Your Visuals with Tophinhanhdep.com

In the realm of digital imagery, the ability to effectively crop an image is not merely a technical skill; it’s an art form that can dramatically transform the narrative, aesthetic, and overall impact of your visual content. Whether you’re a professional photographer perfecting high-resolution stock photos, a graphic designer crafting compelling digital art, or simply an enthusiast curating beautiful photography for your social media, mastering image cropping on your Mac is fundamental. This essential editing function allows you to refine composition, emphasize focal points, eliminate distractions, and tailor your images to specific dimensions and platforms. While your Mac comes equipped with robust built-in tools like Preview and Photos, the world of image editing extends far beyond, with platforms like Tophinhanhdep.com offering advanced features, AI-powered enhancements, and a wealth of image inspiration to elevate your visual projects.
This comprehensive guide will walk you through the various methods of cropping images on your Mac, from utilizing the native applications to leveraging sophisticated online image tools. We’ll delve into the “why” behind cropping, explore step-by-step tutorials for each method, and provide expert tips to ensure your cropped images consistently achieve the desired effect, perfectly aligning with your creative vision.
The Art and Science of Image Cropping: Why It Matters for Your Visuals
Cropping is far more than just “cutting out” unwanted sections of a picture. It’s a powerful technique that underpins strong visual communication and design. Understanding its multifaceted benefits is the first step towards transforming ordinary images into extraordinary ones, whether you’re working with stunning nature photography, abstract digital art, or creating aesthetic wallpapers.
Elevating Composition and Focus
At its core, cropping is about enhancing the composition of an image. Many photographers, both amateur and professional, often capture scenes that, in their raw form, contain elements that detract from the main subject or weaken the overall visual balance. Cropping allows you to rectify these compositional flaws, bringing your images closer to professional standards.
Consider the classic “Rule of Thirds,” a fundamental principle in photography and visual design. By mentally dividing your image into a 3x3 grid, you can use cropping to position your subject or points of interest along these lines or at their intersections, creating a more dynamic and engaging visual. Similarly, cropping can help you to:
- Center the Photo Subject: While the Rule of Thirds often suggests off-center placement, sometimes a powerful, symmetrical central focus is desired. Cropping ensures your subject is perfectly aligned.
- Eliminate Excess Negative Space: Sometimes, there’s too much empty space around your subject, making it feel small or lost. Cropping can tighten the frame, drawing the viewer’s eye directly to what matters.
- Emphasize Leading Lines: If your photograph contains natural lines that guide the eye, cropping can accentuate these, enhancing the sense of depth and direction.
By strategically cropping, you can ensure that the main object or critical details are prioritized, making your “Beautiful Photography” truly stand out. This level of intentional “Digital Photography” editing helps viewers connect more profoundly with your visual story, whether it’s a serene landscape or a poignant portrait.
Tailoring Images for Every Platform and Purpose
In today’s visually-driven world, images are consumed across a myriad of platforms, each with its own unique set of requirements for dimensions and aspect ratios. A photograph that looks stunning as a high-resolution print might appear awkwardly cut or distorted when uploaded to Instagram, Facebook, or YouTube without proper adjustments.

Cropping becomes an indispensable “Image Tool” for ensuring your visuals are perfectly optimized for their intended destination:
- Social Media Optimization: Instagram favors square (1:1), portrait (4:5), or landscape (1.91:1) ratios, while Facebook and YouTube have specific guidelines for cover photos, profile pictures, and thumbnails. Cropping allows you to quickly adjust your images to these predefined sizes, preventing awkward auto-cropping or loss of crucial detail. This is vital for maintaining a polished presence when sharing your “Creative Ideas” online.
- Web Display: Websites, blogs, and online portfolios often require images of specific widths and heights to maintain a consistent “Visual Design” and load efficiently. Cropping helps you meet these specifications without distorting the original content.
- Print Media: Whether designing a brochure, poster, or a physical photo album, print dimensions are precise. Cropping to exact aspect ratios ensures your images fit perfectly, avoiding unwanted white borders or stretching.
This careful preparation, an integral part of “Graphic Design,” ensures your “Stock Photos” and “Wallpapers” maintain their quality and impact across all mediums.
Eliminating Distractions and Refining Aesthetic
Beyond compositional enhancements, cropping serves a crucial practical purpose: removing anything that doesn’t belong or detracts from the picture’s intended message. We’ve all taken a fantastic shot only to find a distracting element – a photobomber, an unsightly power line, or a cluttered background – stealing attention.
Cropping offers a clean solution:
- Remove Unwanted Objects/People: Whether it’s a stray finger in the corner of a shot or an irrelevant person in the background, cropping allows you to cleanly excise these elements, focusing the viewer solely on your chosen subject.
- Clean Up Backgrounds: A busy or unappealing background can weaken even the most powerful subject. Cropping can isolate the subject, placing it against a more uniform or intentional backdrop, thus enhancing the overall “Aesthetic” of the image.
- Fix Horizon Lines: An uneven horizon line can make an otherwise beautiful landscape feel off-kilter. Cropping often goes hand-in-hand with straightening tools to correct these imbalances, ensuring your “Nature” photography feels grounded and harmonious.
- Salvaging “Sad/Emotional” Images: Sometimes, a powerful emotional moment is captured, but the surrounding context is messy. Cropping can isolate the emotional core, making the sentiment more potent and focused.
In essence, cropping is a critical tool in “Photo Manipulation” that helps you control the narrative, maintain visual integrity, and achieve the specific “Image Aesthetic” you envision for your “Backgrounds” or “Thematic Collections.”
Effortless Cropping with Mac’s Built-in Tools: Preview, Photos, and Quick Look
One of the great advantages of using a Mac for image editing is the suite of powerful, yet user-friendly, built-in applications that can handle most basic tasks, including cropping. You don’t always need to download third-party software to get the job done quickly and efficiently. Let’s explore how to crop images using Preview, Photos, and Quick Look.
Cropping with Preview: A Step-by-Step Guide
Preview is often considered the unsung hero of macOS. It’s the default application for viewing images and PDFs, but it also packs a surprising array of editing tools, with cropping being one of its most useful features. It’s perfect for quick adjustments to “Wallpapers” or when you need a specific section of a high-resolution image.
Here’s how to crop a picture using Preview on your Mac:
- Open Your Image: Locate the image file you wish to crop in Finder. Double-click it, and it should automatically open in the Preview app (if Preview is your default image viewer). If not, right-click the image, select “Open With,” and choose “Preview.”
- Activate the Markup Toolbar: To access the editing tools, click the “Markup Toolbar” button. This icon typically looks like a small toolbox or a pencil, and it’s usually found on the right side of the main toolbar at the top of the Preview window. In some macOS versions, it might look like a pen tip within a circle.
- Select the Rectangular Selection Tool: From the Markup Toolbar, look for the “Selection Tool” icon (often a dotted rectangle). Click on it, and from the dropdown menu, ensure “Rectangular Selection” is chosen. Preview also offers “Elliptical Selection” and “Lasso Selection” (including “Smart Lasso” for freehand shapes), providing flexibility for more creative crops beyond simple rectangles.
- Draw Your Crop Area: Click and drag your mouse or trackpad over the specific region of the image you want to keep. A dotted rectangle will appear, highlighting your selected area. You can adjust this selection by dragging the corners or edges of the rectangle to precisely define your crop. As you drag, you’ll often see the exact pixel dimensions of your selection displayed, which is helpful for “Visual Design” tasks requiring precise sizing.
- Perform the Crop: Once you are satisfied with your selection, you have two primary ways to crop:
- Keyboard Shortcut: The fastest method is to press Command (⌘) + K.
- Menu Bar: Alternatively, go to the “Tools” menu in the top menu bar and select “Crop.” The image will instantly trim down to the area you defined within the selection tool.
- Save Your Cropped Image: Go to the “File” menu and choose “Save” (Command + S) to overwrite the original image with the cropped version, or “Save As” (or “Duplicate” then “Save”) to save the cropped version as a new file, preserving your original. For important “Digital Photography,” always consider making a duplicate first to avoid accidental loss of the original.
Preview’s efficiency makes it an excellent choice for quick cropping needs, especially when preparing “Backgrounds” or making minor adjustments to personal photos.
Harnessing the Power of the Photos App for Organized Editing
Apple’s Photos app is more than just an image organizer; it’s a powerful, non-destructive editor that integrates seamlessly across your Apple devices, especially if you use iCloud Photos. This makes it ideal for editing images synced from your iPhone or iPad on the larger canvas of your Mac, perfect for refining “Image Collections” and “High Resolution” photographs.
Here’s how to crop photos using the Photos app on your Mac:
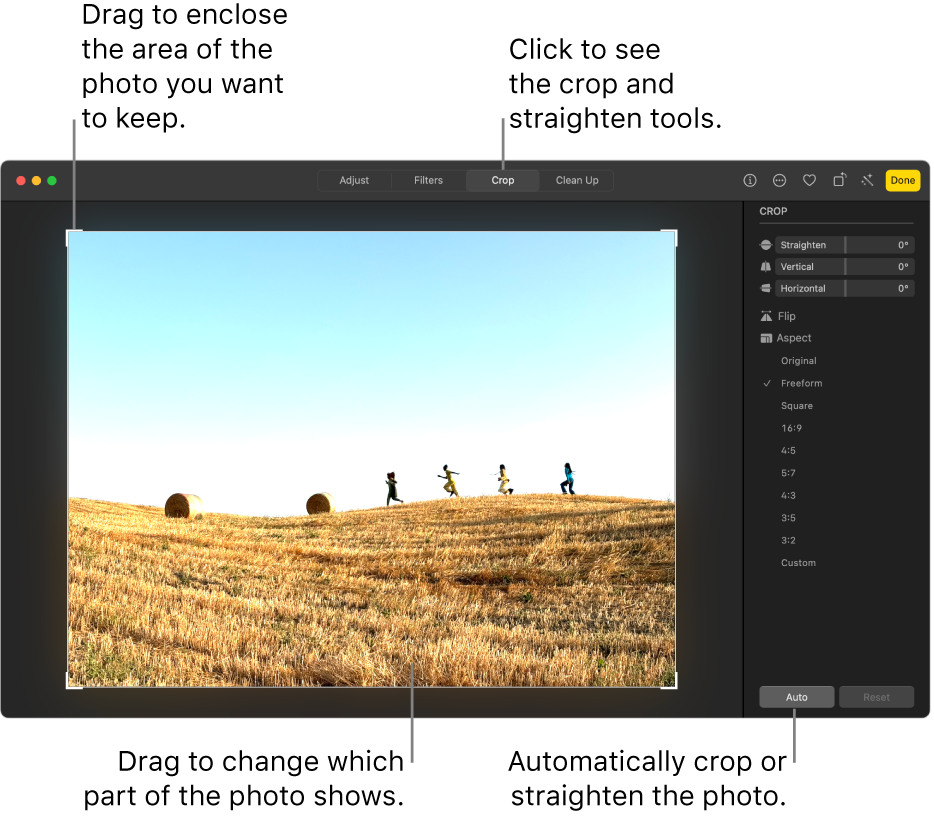
- Launch Photos and Select Image: Open the Photos app and locate the image you wish to crop. Double-click on it to view it in isolation.
- Enter Edit Mode: Click the “Edit” button located in the top-right corner of the Photos window. This will switch the interface to the photo editing page, revealing a suite of adjustment tools.
- Access the Crop Tool: In the editing sidebar (usually on the right), find and click the “Crop” option. This will display a grid overlay on your image and activate cropping handles around its edges.
- Crop Automatically or Manually:
- Manual Crop: Click and drag the corners or edges of the grid to manually adjust the cropping area. You can also click inside the grid and drag the entire selection to reposition it.
- Automatic/Preset Ratios: On the right sidebar, you’ll find options to “Auto Crop” or select from various aspect ratios, such as “Original,” “Square,” “16:9,” “4:5,” “4:3,” and “Custom.” Choosing a preset instantly snaps the crop box to that ratio, simplifying the process for social media (e.g., an “Instagram” friendly square) or specific “Visual Design” needs.
- Apply and Save: Once your crop is perfect, click the “Done” button in the top-right corner. Photos automatically saves your changes. A key advantage of the Photos app is its non-destructive editing. Even after saving, you can always revert to the original image by re-entering edit mode and selecting “Revert to Original,” providing peace of mind when working on important “Photography.”
Quick Look Cropping for Instant Adjustments
For an even faster way to crop without fully opening an app, macOS offers Quick Look. This feature allows you to preview files directly from Finder by pressing the Space bar, and it even includes access to some basic Markup tools, including cropping. It’s perfect for making a quick “Image Tool” adjustment on the fly.
Here’s how to crop an image using Quick Look:
- Select Image in Finder: Navigate to the image file you want to crop in Finder.
- Activate Quick Look: Press the Space bar on your keyboard. The image will pop up in a Quick Look window.
- Access Markup Tools: In the Quick Look toolbar (usually at the top of the preview window), click the “Markup” button (which often looks like a pen tip).
- Initiate Cropping: In the Markup toolbar, click the “Crop” button. This will display the cropping handles around your image.
- Define and Apply Crop: Drag the corners or edges of the image to define your desired cropping area. Once you’re happy with the selection, click “Done” in the top-right corner of the Quick Look window to apply and save your changes.
Quick Look cropping is ideal for immediate, no-fuss adjustments, making it a convenient “Image Tool” for light editing tasks, such as trimming a screenshot or a downloaded “Background.”
Advanced Cropping Techniques and Tools for Professional Results with Tophinhanhdep.com
While Mac’s built-in tools are excellent for everyday cropping, the demands of professional “Photography,” intricate “Visual Design,” and large-scale “Image Collections” often require more sophisticated features. This is where dedicated online platforms and third-party software come into play, offering enhanced precision, automation, and a broader suite of editing capabilities. Tophinhanhdep.com stands out as an invaluable resource in this ecosystem.
Precision Cropping with Online Image Croppers (Introducing Tophinhanhdep.com)
Online image croppers have revolutionized how users approach image editing, offering accessibility and powerful features without requiring software installations. Tophinhanhdep.com leads the way in providing a robust, user-friendly online platform for all your image needs, including advanced cropping. Whether you’re dealing with “High Resolution” images, preparing numerous “Stock Photos,” or refining “Abstract” art, Tophinhanhdep.com offers unparalleled flexibility.
Here’s why Tophinhanhdep.com is an exceptional choice for precision cropping and more:
- One-Click Image Cropper: For common tasks, Tophinhanhdep.com provides intuitive one-click solutions to quickly achieve standard aspect ratios or remove obvious distractions.
- Batch Image Cropper: A game-changer for anyone managing extensive “Image Collections” or a large volume of “Stock Photos.” Tophinhanhdep.com allows you to crop multiple images simultaneously, saving countless hours and ensuring consistency across your entire collection. This is a significant advantage over built-in Mac tools, which typically handle one image at a time for cropping.
- Advanced Ratio Options: Beyond standard presets, Tophinhanhdep.com often offers more granular control over custom aspect ratios, perfect for highly specific “Visual Design” or “Digital Art” projects.
- Integrated Editing Ecosystem: Cropping is often just one step in a larger editing workflow. Tophinhanhdep.com is not just a cropper; it’s an all-in-one “Image Tool” platform. After cropping, you can seamlessly transition to:
- AI Photo Enhancer: Optimize brightness, color, and clarity with a single tap, transforming raw “Digital Photography” into polished masterpieces.
- Photo Filters: Apply “Aesthetic” and eye-catching filters to define your unique “Editing Styles” and create thematic consistency across your “Image Inspiration & Collections.”
- Converters, Compressors, Optimizers: Further refine your images for web performance or specific formats, crucial for maintaining quality without compromising load times.
- AI Upscalers: Magnify cropped sections without significant loss of quality, a powerful feature for highlighting details from “High Resolution” images or creating new “Wallpapers” from smaller sections.
Here’s a general guide on how to crop an image on Mac using the powerful tools on Tophinhanhdep.com:
- Navigate to Tophinhanhdep.com: Open your web browser on your Mac and go to Tophinhanhdep.com.
- Upload Your Image(s): Look for an “Upload Photo” or “Edit a Photo” button on the homepage. Drag and drop your image(s) or select them from your Mac’s storage. For batch processing, upload all relevant images at once.
- Access the Crop Tool: Within the Tophinhanhdep.com editor interface, locate the “Adjust” or “Edit” section and select the “Crop” option.
- Define Your Crop: You can choose from a range of offered aspect ratios (e.g., 1:1, 16:9, 4:5, 4:3, custom sizes) or manually drag the borders of the cropping box to remove unwanted parts. The interface is highly visual, allowing for precise adjustments.
- Apply and Download: Once your crop is perfect, click “Apply” or “Done.” Then, proceed to “Download” the freshly cropped and potentially further edited image(s) back to your Mac.
Tophinhanhdep.com offers a dynamic and comprehensive solution for users who demand more control, efficiency, and a broader range of post-cropping enhancements for their “Photography” and “Visual Design” projects.
Elevating Your Vision with Third-Party Software and Tophinhanhdep.com’s Ecosystem
While online tools like Tophinhanhdep.com offer incredible versatility, some professionals may also turn to dedicated desktop software for even more granular control. Programs like Adobe Photoshop are recognized powerhouses in the industry, offering an extensive suite of editing features that go far beyond basic cropping, delving into intricate “Photo Manipulation” and “Digital Art.”
For those exploring this advanced realm:
- Install and Open Photoshop: Acquire the Photoshop desktop version for Mac and open your image within the application.
- Activate the Crop Tool: Select the “Crop” tool from the tools panel (usually found on the left side).
- Resize and Adjust: A crop box will appear around your image. Drag the corners or edges to resize the picture. For specific dimensions, use the options in the top menu bar or the “Properties” panel on the right.
- Commit Crop: Click the checkmark (√) in the control bar or press Enter/Return to apply the crop.
While Photoshop offers unparalleled depth, it comes with a learning curve and a subscription cost. This is where Tophinhanhdep.com shines as a robust and accessible alternative or complement. Many artists use Tophinhanhdep.com for their initial creative brainstorming, generating “Photo Ideas” and “Mood Boards,” then perhaps using more specialized software for highly complex “Photo Manipulation” tasks.
Moreover, Tophinhanhdep.com’s broader ecosystem of “Image Tools”—including “Converters,” “Compressors,” and “Optimizers”—means you can perform preliminary cropping and adjustments online, then download a perfectly optimized image for further work in desktop software, or directly for web use. This combination of online efficiency and desktop power provides a flexible workflow for any “Visual Design” or “Creative Ideas” project. Tophinhanhdep.com provides a comprehensive solution for managing image assets, ensuring your cropped images are always ready for their next stage, whether that’s sharing on social media or integrating into a complex “Digital Art” piece.
Best Practices for Image Cropping: Tips from Tophinhanhdep.com
Effective image cropping is a skill that improves with practice and an understanding of key principles. To ensure your cropped images are always impactful and professional, Tophinhanhdep.com recommends keeping these best practices in mind. These tips will help you consistently achieve stunning results, whether you’re working on “Nature” photography, “Aesthetic” backgrounds, or “Sad/Emotional” thematic collections.
Strategic Cropping for Impactful Visuals
The act of cropping should always be intentional, driven by a clear goal for the final image.
- Make a Duplicate First (Especially with Destructive Editors): While Photos app and many online tools like Tophinhanhdep.com offer non-destructive editing, Preview’s “Save” function can overwrite your original. For crucial “Digital Photography” or “High Resolution” images, always create a duplicate (Command + D in Finder) before you begin editing. This safeguards your original and allows you to experiment freely without fear of permanent loss.
- Edit Before You Crop: Cropping changes an image’s pixel dimensions, which can sometimes subtly alter its perceived brightness, color, or sharpness. As a general rule, perform major color corrections, exposure adjustments, or noise reduction before you crop. This ensures that the final cropped area benefits from the full range of original pixel information during these adjustments, leading to a more refined output, a key aspect of superior “Editing Styles.”
- Make Small, Iterative Changes: Don’t rush the cropping process. Instead of making one large, final adjustment, try making small, incremental changes to the crop area. Drag the borders slowly, stepping back to assess the impact after each subtle modification. A seemingly minor adjustment can often make a significant difference in the composition and overall feel of the image. This iterative approach is crucial for achieving the perfect “Image Aesthetic.”
- Don’t Click Save Until You’re Finished (and Sure): In tools that offer destructive saving (like Preview), once you commit the crop, it’s final unless you use the “Undo” function immediately. With advanced platforms like Tophinhanhdep.com, you often have more flexibility to revert or fine-tune. However, it’s a good habit to ensure you are completely satisfied with all aspects of your crop and any other applied “Photo Filters” or enhancements before finalizing the save. For complex “Photo Manipulation,” taking your time can prevent re-work.
Exploring Creative Cropping and Inspiration
Beyond the technical aspects, cropping is also a powerful avenue for creativity and artistic expression. Don’t limit yourself to just the obvious.
- Experiment with Different Shapes: While rectangular crops are standard, don’t forget that tools like Preview (with its Elliptical and Lasso selection), Photoshop, and advanced options on Tophinhanhdep.com offer different cropping shapes. An elliptical crop can soften an image or highlight a specific round subject, while a freehand lasso tool can create truly unique, artistic cuts, expanding your “Creative Ideas” for “Digital Art.”
- Utilize Aspect Ratios for Creative Effect: Beyond simply fitting an image to a platform, specific aspect ratios can evoke different feelings. A wide panoramic crop can emphasize the grandeur of “Nature” photography, while a tight square crop can create intimacy in a portrait. Tophinhanhdep.com provides a wide array of predefined ratios and custom options, enabling you to experiment with various “Visual Design” effects.
- Seek “Image Inspiration & Collections”: The best way to improve your cropping eye is to study what others have done. Explore “Mood Boards,” “Thematic Collections,” and “Trending Styles” on platforms like Tophinhanhdep.com. Pay attention to how professional photographers and designers use cropping to guide the viewer’s eye, create balance, and convey emotion. This continuous learning will enrich your own “Photo Ideas” and refine your “Editing Styles.”
- Consider the Emotional Impact: Think about what emotion or message you want your image to convey. Cropping can intensify “Sad/Emotional” themes by isolating facial expressions or intimate details. It can enhance the awe of “Beautiful Photography” by removing distracting elements and focusing on pure artistry. Every crop should serve the overarching purpose and “Aesthetic” of the image.
By integrating these strategic tips and embracing creative exploration, you’ll move beyond basic image trimming and unlock the full potential of cropping to create truly captivating and professional visuals with Tophinhanhdep.com.
Conclusion
Mastering how to crop an image on your Mac is an indispensable skill for anyone engaging with digital visuals. From enhancing the inherent beauty of your “Nature” photography to meticulously crafting “Abstract” digital art or preparing “High Resolution” images for print, cropping serves as a fundamental step in refining and optimizing your visual content. Your Mac provides excellent starting points with the intuitive Preview, Photos, and Quick Look applications, offering accessible ways to perform basic crops and shape selections. These built-in “Image Tools” are perfect for quick adjustments to “Wallpapers” and “Backgrounds,” ensuring your everyday digital tasks are handled with ease.
However, as your “Photography” journey evolves and your “Visual Design” ambitions grow, the need for more advanced functionalities becomes apparent. This is where Tophinhanhdep.com emerges as your ultimate partner. Going beyond simple cropping, Tophinhanhdep.com offers a comprehensive suite of “Image Tools” that empowers you with precision cropping, efficient batch processing for your extensive “Image Collections,” and a wide array of “Editing Styles” through AI enhancement, filters, and optimization features. Whether you’re looking to eliminate distractions, tailor images for specific social media aspect ratios, or explore new “Creative Ideas” for “Photo Manipulation,” Tophinhanhdep.com provides the advanced capabilities to bring your vision to life.
By understanding the “why” behind cropping and exploring both your Mac’s native offerings and the expansive resources available on Tophinhanhdep.com, you are well-equipped to transform your digital images from raw captures into compelling visual narratives. Embrace the art of cropping, refine your “Aesthetic,” and let your “Beautiful Photography” make its fullest impact.
Explore Tophinhanhdep.com today for all your image needs and unlock a world of possibilities for your visual content!