Mastering the Art of Cropping Images in Photoshop: A Comprehensive Guide for Tophinhanhdep.com

In the dynamic world of digital imagery, where every pixel contributes to the overall narrative, the ability to precisely control and refine your visuals is paramount. Whether you are a budding photographer, a seasoned graphic designer, or a content creator curating “Wallpapers” and “Backgrounds” for Tophinhanhdep.com, understanding the nuances of image cropping in Adobe Photoshop is an indispensable skill. It’s more than just cutting away unwanted portions; cropping is a powerful “Visual Design” technique that can dramatically enhance composition, focus attention, and transform an ordinary photograph into a piece of “Beautiful Photography” or a striking “Digital Art” asset.
Imagine capturing a breathtaking “Nature” scene, only to find a distracting element at the edge of the frame, or needing to adapt a “High Resolution” “Stock Photo” to a specific layout for a “Mood Board” or a “Thematic Collection.” This is where Photoshop’s versatile Crop Tool comes into play. It allows you to refine your “Editing Styles,” emphasize the subject, eliminate distractions, and achieve perfectly balanced aesthetics, making your “Images” truly shine. For users of Tophinhanhdep.com, mastering these techniques means unlocking endless “Creative Ideas” and ensuring every image presented on our platform, from “Abstract” art to “Sad/Emotional” expressions, meets the highest standards of visual impact and quality. This guide will walk you through everything you need to know about cropping in Photoshop, from basic operations to advanced non-destructive methods and layer-specific adjustments, empowering you to craft compelling visuals that resonate with your audience.

The Essential Crop Tool: Foundations for Flawless Imagery
The journey to perfectly composed images often begins with the humble yet mighty Crop Tool in Photoshop. This fundamental “Image Tool” is the cornerstone of refining your visual narratives, allowing you to sculpt your “Digital Photography” and “Graphic Design” projects with precision. For contributors and users of Tophinhanhdep.com, understanding its core functionalities ensures that every “Wallpaper” and “Background” image contributes effectively to its intended “Aesthetic” and purpose.
Getting Started with the Photoshop Crop Tool
The very first step to cropping any image in Photoshop is to select the Crop Tool itself. You can find it in the toolbar on the left-hand side of your Photoshop window, or more efficiently, simply press the C key on your keyboard. This universal shortcut makes the process fluid and intuitive, a true asset for anyone working on “Photo Manipulation” or preparing images for “Image Inspiration & Collections.”
Upon selecting the Crop Tool, Photoshop automatically places a cropping border—a visible outline—around your image. This border serves as your initial canvas for adjustment. One crucial detail to be aware of is that Photoshop often remembers your previous crop settings. This means if your last task involved cropping an image to a specific 8x10 ratio, the new cropping border might initially appear with those same dimensions. While this can be convenient sometimes, for a fresh start, it’s often best to reset the tool. To do this, navigate to the Options Bar at the top of your screen, locate the Crop Tool icon, and right-click (Windows) or Control-click (Mac) on it. From the dropdown menu, select “Reset Tool.” This will clear any previous settings and restore the tool to its default state, giving you a clean slate for your current image. If the border itself hasn’t reset to encompass the entire image, simply switch to another tool briefly (like the Move Tool) and then re-select the Crop Tool, and the border will extend to the full canvas.

Once your crop border is reset or set to a freeform state, you’ll notice handles positioned at the corners and midpoints of each side. These handles are your primary interface for manual resizing. Simply click and drag any of these handles to reshape the cropping border. The area enclosed within this border is what you will keep, while the faded or shaded area outside signifies what will be cropped away. To maintain the original aspect ratio of your image while resizing, a useful trick is to hold down the Shift key as you drag a corner handle. This ensures your image proportions remain consistent, which is vital for maintaining the integrity of “Beautiful Photography” destined for “High Resolution” displays. For more centered adjustments, holding down the Alt (Windows) or Option (Mac) key while dragging a handle will resize the border symmetrically from its center point. Combining Shift + Alt/Option allows you to resize proportionally from the center.
You’re not limited to Photoshop’s initial border. You can also click anywhere within the image and drag out your own custom crop border. This provides a freestyle approach, particularly useful when you have a specific, irregular area in mind. After defining your area, you can still refine it by dragging the handles or by clicking and dragging inside the border to reposition the image within the defined crop area. If you decide to discard your current crop adjustments before committing, simply click the “Cancel” button (a crossed-out circle) in the Options Bar, or hit the Esc key. To apply the crop, click the “Commit” button (a checkmark) in the Options Bar, press Enter (Windows) or Return (Mac), or double-click inside the crop border. These basic maneuvers form the backbone of efficient cropping, allowing Tophinhanhdep.com users to quickly refine their “Images” for immediate use as “Wallpapers” or for further “Digital Art” enhancements.
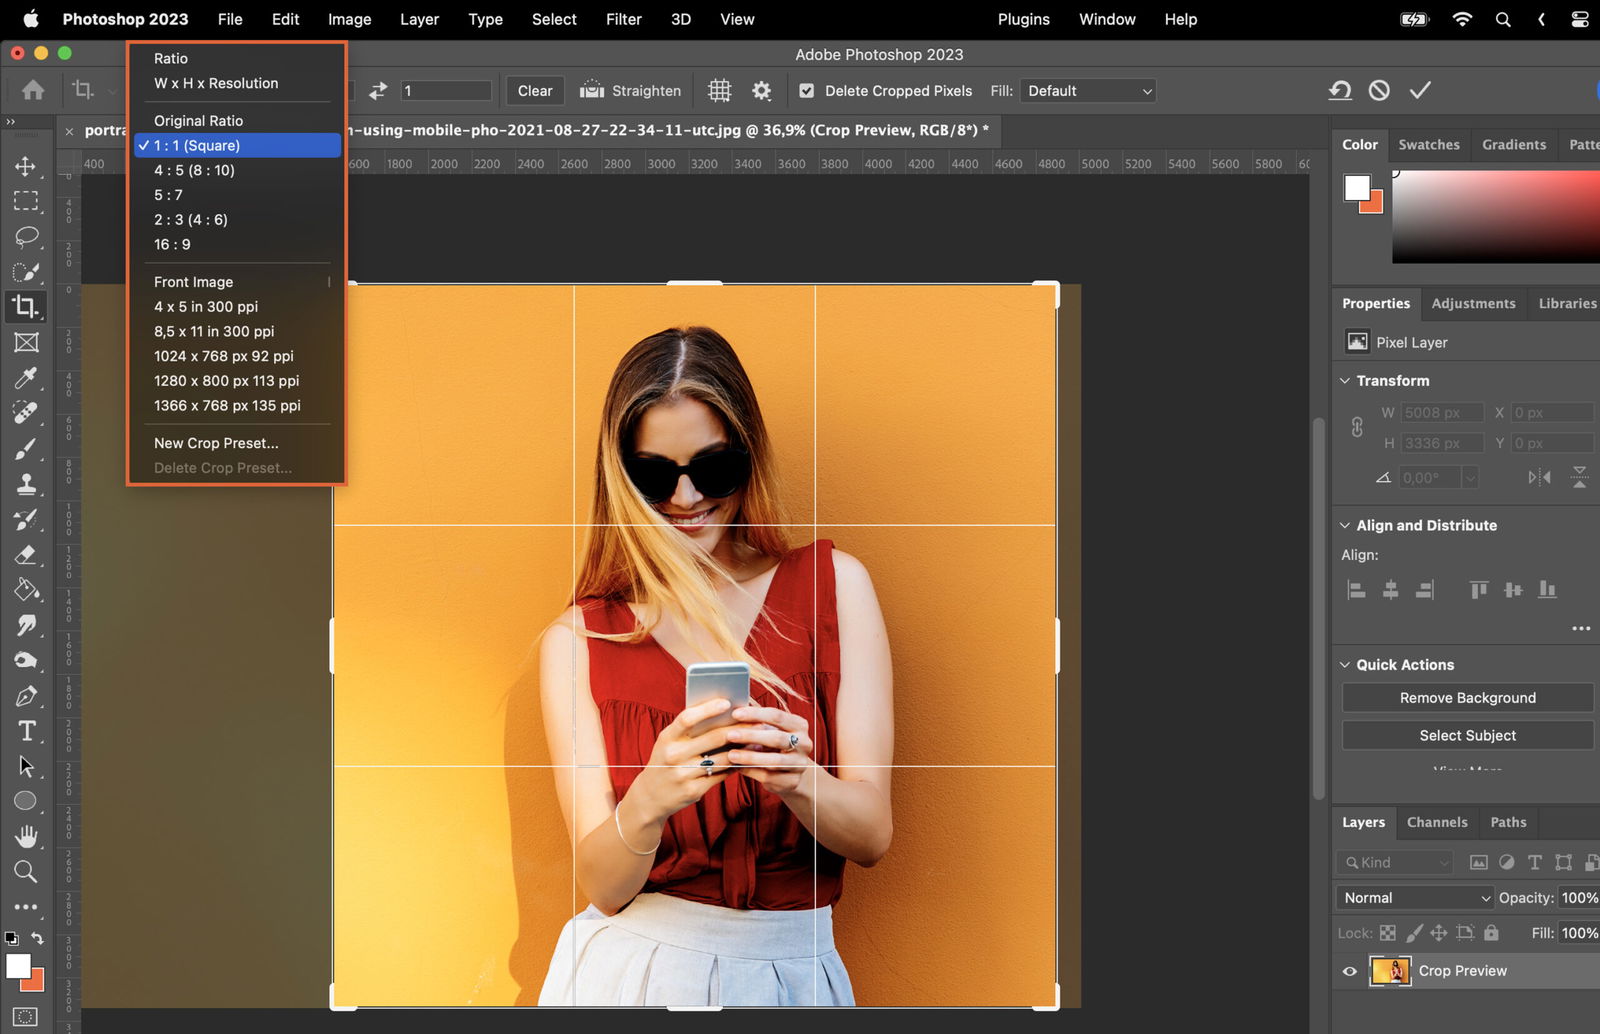
Cropping with Precision: Aspect Ratios and Exact Dimensions
Beyond freehand adjustments, Photoshop’s Crop Tool excels at precision, allowing you to conform your “Images” to specific aspect ratios and exact dimensions – a critical feature for “High Resolution” images and “Graphic Design” projects on Tophinhanhdep.com. This level of control is indispensable when preparing images for print, web banners, or social media, where precise dimensions are often non-negotiable for “Trending Styles.”
Photoshop offers a range of pre-set aspect ratios in the Options Bar, accessible by clicking the dropdown menu next to the “Ratio” field. Here, you’ll find common options like “1:1” for perfect squares (ideal for Instagram or profile pictures), “4:5” or “8:10” for standard portrait prints, and “16:9” for wide-format screens and video thumbnails. Selecting one of these instantly adjusts your cropping border to that fixed proportion. This is incredibly useful for ensuring consistency across “Thematic Collections” or when designing “Mood Boards” with a cohesive visual layout. For instance, if you’re curating a collection of “Aesthetic” “Nature” photos, using a consistent 16:9 ratio can create a seamless browsing experience.
However, your needs might extend beyond these presets. For a custom aspect ratio, such as 11x14 for a specific type of print, you can manually enter “11” into one field and “14” into the other (or vice-versa for portrait/landscape). Photoshop will then constrain the crop border to this exact proportion. If you need to quickly switch the orientation (e.g., from 11x14 landscape to 14x11 portrait), simply click the “Swap Width and Height” icon (two opposing arrows) between the input fields. This flexibility is a boon for “Digital Photography” workflows, allowing quick adaptation without recalculating. For aspect ratios you use frequently, you can even save them as custom presets. After entering your desired values, click the dropdown menu and choose “New Crop Preset.” Give it a descriptive name (e.g., “11x14 Landscape Print”), and it will appear in your list for future use, streamlining your “Editing Styles” and saving valuable time.
The Crop Tool’s capabilities extend further into precise sizing with the “W x H x Resolution” option, which you can select from the same dropdown menu. This feature allows you to define not just the width and height, but also the pixel density (resolution) of your final cropped image. For example, if you need an image to print at exactly 14 inches by 11 inches at a “High Resolution” of 300 pixels per inch (ppi), you would enter “14 in” in the width field, “11 in” in the height field, and “300” in the resolution field, ensuring “px/inch” is selected. This is crucial for commercial “Stock Photos” or “Graphic Design” projects where print quality is paramount.
When using “W x H x Resolution,” it’s important to understand resampling. If the target resolution and dimensions require more pixels than your original image contains, Photoshop will “resample” (interpolate) to add those pixels. While Photoshop’s algorithms are advanced, significant upsampling can lead to a loss of detail and sharpness, impacting the “Beautiful Photography” quality. For this reason, especially when enlarging, many professionals prefer to use Photoshop’s “Image Size” dialog (Image > Image Size) to manage resampling with more control over interpolation methods, before using the Crop Tool. Conversely, when cropping to a smaller size and lower pixel count, the Crop Tool’s resampling is generally effective. To ensure optimal quality when downsizing, verify that your Photoshop preferences for image interpolation (Preferences > General) are set to “Bicubic Automatic” or “Bicubic Sharper.” By mastering these precise cropping methods, Tophinhanhdep.com users can confidently prepare their “Images” for any platform or medium, knowing they meet professional “Digital Photography” standards, and indirectly supporting “Image Optimizers” by reducing extraneous data.
Refining Composition: Straightening and Visual Guides
After setting the foundational crop, the next step in perfecting your “Digital Photography” and “Visual Design” for Tophinhanhdep.com involves refining the composition. Two powerful features within the Crop Tool – straightening and overlays – allow you to correct imperfections and guide the viewer’s eye, transforming good images into truly “Aesthetic” and impactful ones.
Achieving Perfect Alignment with the Straighten Tool
Even the most carefully composed “Beautiful Photography” can sometimes suffer from a slightly tilted horizon line or an architectural element that appears off-kilter. These subtle misalignments, especially prevalent in “Nature” shots or urban “Stock Photos,” can detract from the overall professionalism and “Aesthetic.” Photoshop’s Straighten Tool, an integral part of the Crop Tool functionality, offers a quick and effective solution.
To use this feature, first ensure the Crop Tool is active. In the Options Bar, you’ll find the Straighten Tool icon, resembling a small level. Click on it to activate. Once active, your cursor will transform into a crosshair. Now, identify a line in your image that should be perfectly straight, either horizontally or vertically. For a landscape, this is typically the horizon; for architecture, it might be the edge of a building or a window frame. Click at one end of this line, hold down your mouse button, and drag your cursor directly along that perceived straight line to its other end. As you drag, Photoshop displays a thin guide line, allowing you to precisely align it with your crooked element.
When you release the mouse button, Photoshop works its magic: it automatically rotates the entire image to align the selected line with a true horizontal or vertical axis. As a consequence of this rotation, new transparent areas might appear at the corners of your canvas. The Crop Tool intelligently resizes its border to exclude these transparent areas, ensuring your final image is seamlessly filled with pixels. This simultaneous rotation and adjustment of the crop border is incredibly efficient. After the initial straighten, you still have the flexibility to further refine your crop. You can drag the handles to resize the border, hold Shift for proportional resizing, or click and drag inside the border to reposition the image, ensuring the composition is exactly as you envision. Once satisfied, commit the crop as usual (Enter/Return or double-click). The Straighten Tool is a game-changer for “Editing Styles” that prioritize clean lines and balanced compositions, making your “High Resolution” images ready for display on Tophinhanhdep.com with impeccable alignment.
Leveraging Crop Overlays for Stronger Visual Design
Beyond simple alignment, the Crop Tool in Photoshop also provides powerful visual guides in the form of overlays, designed to assist in creating more dynamic and “Aesthetic” compositions. These overlays are invaluable for anyone involved in “Visual Design,” “Graphic Design,” or developing “Photo Ideas” for “Mood Boards” and “Thematic Collections” on Tophinhanhdep.com.
When the Crop Tool is active, and the cropping border appears, you’ll typically see a 3x3 grid inside it. This is the Rule of Thirds overlay, one of the most fundamental principles of photographic composition. The idea is simple: by placing your main subject or key compositional elements along these grid lines, or, even better, at the points where the lines intersect, you can create a more balanced, engaging, and visually interesting image than by simply centering everything. For a compelling “Beautiful Photography” piece, positioning an element off-center can add tension and draw the viewer’s eye more effectively.
However, the Rule of Thirds is just one of several available overlays. By clicking the “Overlay” icon (a small grid) in the Options Bar, a dropdown menu appears, offering various compositional guides. Here you’ll find:
- Golden Ratio (or Golden Spiral): A more advanced and often subtle compositional guide based on a mathematical ratio found in nature and art. It suggests a more natural and harmonious placement for subjects, often preferred for sophisticated “Digital Art” and fine art “Photography.”
- Diagonal: Lines that stretch from corner to corner, useful for leading the eye or creating dynamic movement.
- Triangle: Guides that divide the image into triangular sections, offering different ways to balance elements.
- Grid: A denser grid for precise alignment or ensuring elements are equidistant.
You can cycle through these different overlays directly from your keyboard by pressing the O key. This allows for quick experimentation to see which guide best suits your image. For certain overlays, like the Golden Spiral or Triangle, you can also flip their orientation (e.g., from top-left to bottom-right spiral) by pressing Shift + O. This flexibility ensures that regardless of your subject – be it “Nature,” “Abstract” forms, or a “Sad/Emotional” portrait – you have the tools to achieve an optimal composition. By actively using these overlays, users of Tophinhanhdep.com can elevate their “Image Inspiration & Collections,” ensuring every visual is not just a picture, but a thoughtfully crafted piece of “Visual Design.”
Beyond the Basics: Advanced Cropping for Photographers and Designers
For those dedicated to “Digital Photography,” “Graphic Design,” and intricate “Photo Manipulation,” the Crop Tool in Photoshop offers functionalities that extend far beyond simple resizing. These advanced techniques are particularly valuable for Tophinhanhdep.com users who demand flexibility, creative control, and the ability to correct complex visual distortions in their “High Resolution” images.
Non-Destructive Cropping: The Power of Pixel Preservation
One of the most powerful features of Photoshop’s Crop Tool, and a cornerstone of professional “Editing Styles,” is the ability to crop non-destructively. This means you can refine your image’s composition without permanently discarding any pixels, offering unparalleled flexibility and creative freedom. This is particularly relevant for “Tophinhanhdep.com” contributors who might want to revisit and re-crop images for different “Mood Boards” or “Thematic Collections” as “Trending Styles” evolve.
By default, when you apply a crop in Photoshop, the “Delete Cropped Pixels” option in the Options Bar is usually checked. When this option is active, Photoshop permanently removes any pixels that fall outside your selected cropping border. While this reduces file size, it also means that once you’ve saved and closed your document, those pixels are gone forever. If you later decide you want to adjust the crop, you’re either stuck with the current crop or forced to start from scratch if you have an uncropped original. This can be restrictive, especially when experimenting with “Creative Ideas” or adapting “Stock Photos” for various uses.
The key to non-destructive cropping lies in unchecking the “Delete Cropped Pixels” option in the Options Bar before you commit your crop. When this box is deselected, Photoshop doesn’t delete the pixels outside the crop border; instead, it simply hides them. They remain part of your document, ready to be “revealed” at any time.
The benefits of this approach are immense:
- Flexibility to Re-Adjust: If you later decide your image needs a different aspect ratio, or if you want to include more of the background, simply re-select the Crop Tool. The entire original image will reappear within the cropping border, allowing you to freely adjust and re-crop without any loss of data. This is invaluable for generating multiple “Photo Ideas” from a single “Beautiful Photography” shot.
- Restoring Hidden Areas: You can drag the crop handles outward, and the “hidden” pixels will instantly reappear, allowing you to restore portions of the image you initially cropped out. No more “white background” fillings where pixels were deleted!
- Repositioning Image within Crop: Even after committing a non-destructive crop, you can use the Move Tool (V key) to reposition the image inside the defined crop boundaries. Photoshop will shift the entire image canvas, but only the visible portion within the crop area will be displayed, allowing for fine-tuning of your composition long after the initial crop. This dynamic adjustment capacity is crucial for “Photo Manipulation” and creating intricate “Digital Art.”
Should you ever need to completely revert your image to its pre-cropped state, you can go to Image > Reveal All. This command instantly expands your canvas to show all the hidden pixels, effectively undoing all previous non-destructive crops. Non-destructive cropping is a fundamental technique for any serious “Digital Photography” or “Visual Design” professional using Photoshop. It embodies the principle of preserving your original data while allowing for endless creative exploration, making it an indispensable tool for Tophinhanhdep.com users to ensure their “Images” retain their “High Resolution” and versatility across all platforms.
Cropping Specific Layers: Isolating Elements in Complex Designs
In many “Visual Design” and “Graphic Design” projects, you’ll work with documents composed of multiple layers, each containing a different image or element. A common challenge arises when you need to crop just one of these layers without affecting the others or the overall canvas size. This is where the standard Crop Tool, designed to crop the entire canvas, falls short. Fortunately, Photoshop offers several ingenious methods to crop individual layers, vital for intricate “Photo Manipulation” and achieving precise “Creative Ideas” for “Aesthetic” compositions on Tophinhanhdep.com.
Method 1: Rectangular Marquee Tool + Delete (Destructive) This is a quick but destructive method. First, select the specific layer you wish to crop in the Layers panel. Then, choose the Rectangular Marquee Tool (M key) from the toolbar. Drag a selection outline around the precise area of the image on that layer that you want to keep. Once your selection is made, go to Select > Inverse (or press Ctrl+Shift+I / Cmd+Shift+I). This flips the selection, so now everything outside your desired area is selected. Finally, press the Delete key on your keyboard. The unwanted pixels on that layer will be removed, leaving transparency. Remember to deselect the area afterwards (Select > Deselect or Ctrl+D / Cmd+D). A critical note: if your layer is a Smart Object, Photoshop might prompt you to rasterize it first (Layer > Rasterize > Smart Object) because Smart Objects cannot be directly modified this way. While fast, this method permanently deletes pixels, limiting future adjustments.
Method 2: Frame Tool (Non-Destructive) A more elegant and non-destructive approach is the Frame Tool (K key). This tool allows you to create a placeholder frame directly on your canvas. Select the layer you want to crop. Then, choose the Frame Tool and click and drag to draw a frame around the desired area of your layer. Photoshop automatically places your selected layer’s content inside this frame. You can resize the frame using its handles, or click and drag inside the frame to reposition the image within its borders. What’s excellent about the Frame Tool is that it’s essentially creating a clipping mask. The pixels outside the frame are merely hidden, not deleted, giving you the flexibility to adjust the frame or its content later. This makes it perfect for quickly trying out different “Photo Ideas” or resizing “Images” within “Digital Art” layouts.
Method 3: Layer Masks (The Preferred Non-Destructive Method) For ultimate control and non-destructive editing, Layer Masks are the professional’s choice. Select the layer you want to crop in the Layers panel. Now, use any selection tool (like the Rectangular Marquee Tool, Lasso Tool, or Quick Selection Tool) to define the area you want to keep visible on that layer. With the selection active, click the Add Layer Mask icon (a rectangle with a circle inside) at the bottom of the Layers panel. Photoshop will instantly hide everything outside your selection, effectively “cropping” the layer. A black and white thumbnail will appear next to your layer thumbnail; white areas on the mask represent visible portions, while black areas hide them.
The power of layer masks lies in their editability. You can:
- Toggle Mask Visibility: Hold Shift and click the mask thumbnail to temporarily enable/disable the mask, revealing the entire original layer.
- View Mask on Canvas: Hold Alt (Windows) or Option (Mac) and click the mask thumbnail to see the mask itself in black and white on your canvas, helping you refine its edges with painting tools.
- Resize the Mask: To adjust the “crop” area, first click the link icon between the layer thumbnail and the mask thumbnail in the Layers panel to unlink them. Then, ensure the mask thumbnail is selected (it will have a white border). Go to Edit > Free Transform (Ctrl+T / Cmd+T). You can now resize and reshape the mask independently of the layer’s content. Once adjusted, click the checkmark in the Options Bar and relink the mask to the layer for cohesive movement.
Layer masks are invaluable for “Visual Design” and “Digital Art” as they allow for precise, non-destructive isolation of elements, enabling complex “Photo Manipulation” and flexible adjustments. This method is highly recommended for “Tophinhanhdep.com” users creating multi-layered “Aesthetic” compositions, as it preserves all original “High Resolution” data and provides endless revision possibilities.
Correcting Perspective with the Perspective Crop Tool
Sometimes, a “Beautiful Photography” shot, especially of architecture, documents, or “Stock Photos” of flat artwork, can suffer from perspective distortion. This occurs when the camera isn’t perfectly parallel to the subject, making rectangular objects appear skewed or trapezoidal. The standard Crop Tool can’t fix this, but Photoshop’s Perspective Crop Tool is specifically designed for this challenge, allowing “Tophinhanhdep.com” users to achieve geometrically accurate results in their “Editing Styles.”
Accessed by holding down the Crop Tool icon in the toolbar or by holding Shift and repeatedly pressing C until it appears, the Perspective Crop Tool presents a cropping border with unique capabilities. Instead of just resizing proportionally, each of its four corner handles can be moved independently.
Here’s how it works:
- Activate the Tool: Select the Perspective Crop Tool.
- Draw Initial Crop: Click and drag to draw an initial crop box around the skewed object or area you want to correct. It doesn’t have to be perfect at first.
- Adjust Corners: Now, drag each of the four corner handles to precisely align them with the corners of the distorted object in your image. For example, if you’re straightening a document, drag the handles to match the four corners of the document. The key is to define the boundaries of the skewed rectangle.
- Commit the Crop: Once you’ve aligned the handles, press Enter (Windows) or Return (Mac), or click the checkmark in the Options Bar. Photoshop then performs a dual action: it crops the image to your defined area and automatically transforms the pixels within that area, straightening the perspective so that the skewed rectangle becomes a perfect rectangle.
This tool is a lifesaver for enhancing the quality of “Stock Photos” or converting a casual snapshot of a painting into a professionally corrected image suitable for “Digital Art.” It’s also incredibly useful in “Graphic Design” when integrating elements from real-world photographs into a flat design. While the Perspective Crop Tool primarily focuses on geometrical correction, you can still specify width, height, and resolution in the Options Bar, similar to the standard Crop Tool, ensuring your corrected image meets specific output requirements. This specialized “Image Tool” elevates your “Photo Manipulation” skills, allowing you to salvage and refine images that would otherwise be unusable due to distorted perspectives, contributing significantly to a polished “Aesthetic” for Tophinhanhdep.com.
Conclusion
The art of cropping in Photoshop is a nuanced and powerful skill, essential for anyone looking to truly master their “Digital Photography” and “Visual Design.” As we’ve explored, the Crop Tool, along with its specialized variants and accompanying techniques, offers far more than just trimming edges. It’s a fundamental aspect of composition, a means of correcting imperfections, and a gateway to sophisticated “Photo Manipulation.”
From understanding the basics of selecting and resetting the tool to employing precise aspect ratios for “High Resolution” output, every cropping technique we’ve covered empowers you to refine your “Images.” Learning to straighten crooked horizons in “Nature” photos, utilize compositional overlays like the Rule of Thirds for stronger “Aesthetic” impact, and embrace non-destructive cropping for flexible “Editing Styles” all contribute to producing stunning “Beautiful Photography.” Furthermore, the ability to crop individual layers and correct perspective distortions with dedicated tools ensures that your “Graphic Design” and “Digital Art” projects can achieve intricate “Creative Ideas” and a professional finish, whether for “Mood Boards,” “Thematic Collections,” or “Trending Styles.”
By integrating these Photoshop cropping techniques into your workflow, you’re not just editing pictures; you’re crafting compelling visual stories that resonate. We at Tophinhanhdep.com encourage you to experiment with these methods, push the boundaries of your creativity, and transform your digital assets. Explore our platform for endless “Image Inspiration & Collections,” discover more “Image Tools,” and elevate your passion for visual excellence. The perfect image is often just a crop away!