Master the Art of Cropping Images in Word: An Essential Guide for Tophinhanhdep.com Enthusiasts

In the vibrant world of digital imagery, where every pixel contributes to a visual story, mastering the art of image manipulation is crucial. For enthusiasts of “beautiful photography,” “aesthetic wallpapers,” and “high-resolution backgrounds” found on Tophinhanhdep.com, the ability to refine and perfect visuals is paramount. While professional tools offer extensive features, sometimes the most impactful edits can be performed directly within familiar applications. Microsoft Word, often underestimated as a mere word processor, harbors robust image editing capabilities, including an incredibly versatile cropping tool.
Imagine you’ve discovered a stunning “nature wallpaper” on Tophinhanhdep.com, perfect for your document, but a small, distracting element in the corner diminishes its impact. Or perhaps you want to create a compelling “mood board” and need to isolate a specific detail from a “stock photo.” This is where knowing “how to crop an image in Word” becomes an indispensable skill. Cropping isn’t just about cutting away unwanted parts; it’s a fundamental aspect of “visual design,” allowing you to improve composition, emphasize subjects, and create visually harmonious layouts. It transforms raw “digital photography” into polished elements, ready for any “thematic collection” or “creative idea” you might be exploring.
This comprehensive guide, tailored for the Tophinhanhdep.com community, will walk you through the various methods of cropping pictures in Microsoft Word. From basic rectangular adjustments to complex shape-based cuts and precise aspect ratio controls, we’ll delve into how these techniques can elevate your documents and bring your “image inspiration” to life.
The Fundamentals of Image Cropping in Word: Why It Matters for Visual Excellence
At its core, cropping is about intentionality. For a platform like Tophinhanhdep.com, dedicated to showcasing exquisite “images” across categories like “Abstract,” “Sad/Emotional,” and “Beautiful Photography,” understanding how to fine-tune visual narratives is key. Cropping allows you to dictate what the viewer sees, guiding their focus and enhancing the emotional or aesthetic impact of an image. In Microsoft Word, this powerful capability is surprisingly accessible, offering multiple pathways to achieve your desired outcome.
The beauty of Word’s cropping tools lies in their ease of use, eliminating the need to constantly switch between applications. This efficiency is a boon for anyone engaged in “graphic design” or “digital art” within documents, allowing for swift adjustments that maintain creative flow. By mastering these foundational techniques, you gain greater control over your visual content, ensuring that every image aligns perfectly with your overall “visual design” goals.
Accessing the Crop Tool: Your Gateway to Precision
Before you can begin sculpting your images, you need to know where to find the right tools. Microsoft Word offers several intuitive entry points to its cropping functionality, ensuring that no matter your workflow, you can quickly initiate the editing process.

The most straightforward method begins with the image itself:
- Insert Your Image: Open your Microsoft Word document. If you haven’t already, insert the picture you wish to crop. You might be using a vibrant “wallpaper,” a serene “background,” or a specific “photo idea” you’ve sourced.
- Select the Image: Click directly on the image. This action is crucial, as it activates the “Picture Format” contextual tab in the Ribbon at the top of your Word window. This tab is your command center for all picture-related adjustments.
- Initiate Crop: Within the “Picture Format” tab, navigate to the “Size” group. Here, you’ll find the “Crop” button. Clicking this button immediately surrounds your image with distinct black cropping handles and lines, signaling that you are now in crop mode.
Alternatively, for those who prefer context menus:
- Right-Click for Speed: Right-click directly on the selected image. A context menu will appear, offering a range of quick actions.
- Select Crop: Among the options, you’ll see “Crop.” Clicking this will also activate the black cropping handles around your image, putting you in control of its dimensions.
Knowing these access points ensures that you can swiftly enter crop mode, ready to transform your “digital photography” or “stock photos” into perfectly framed elements for your document.
Understanding Crop Handles: Shaping Your Vision
Once the crop handles appear, they become your primary interface for reshaping the image. These black lines and corner indicators are not merely decorative; they are interactive elements that allow for precise adjustments, critical for maintaining the “high resolution” quality and “aesthetic” appeal of your Tophinhanhdep.com inspired visuals. The way you drag these handles determines how the image is trimmed.
Here’s a breakdown of how to interact with the crop handles:
- Cropping a Single Side: To remove an unwanted portion from just one edge, click and drag any of the middle side handles (the black lines halfway along the top, bottom, left, or right) inwards. This is ideal for trimming slight excesses or removing a minor distracting element that falls along an edge of your “abstract” or “nature” image.
- Cropping Two Adjacent Sides Simultaneously: For a more sweeping adjustment that maintains the relative proportions of a corner, click and drag one of the corner handles inwards. This allows you to crop both the horizontal and vertical sides connected to that corner at the same time, useful for quickly refining the overall frame of your “beautiful photography.”
- Cropping Equally on Parallel Sides: To achieve a symmetrical crop from opposing sides (e.g., narrowing an image by cutting equally from the left and right), press and hold the Ctrl key (Windows) or Cmd key (Mac) while dragging one of the middle side handles inwards. This technique is excellent for centering a subject or creating a balanced composition, a key aspect of “visual design.”
- Cropping Equally from All Sides (Centric Crop): If you want to zoom in on the central part of your image while maintaining its original proportions relative to the center, press and hold the Ctrl key (Windows) or Cmd key (Mac) while dragging one of the corner handles inwards. This is particularly useful for isolating a key feature in a “sad/emotional” image or focusing on a specific pattern in an “abstract” design.
After making your adjustments, simply press the Enter key or click anywhere outside the image to apply the crop. The parts outside the black lines will disappear, leaving you with your refined visual. To undo a crop, use the universal Undo shortcut (Ctrl+Z or Cmd+Z).
Beyond the Basics: Right-Click and Toolbar Options
While dragging handles offers excellent visual control, Word provides additional options for precision and specific outcomes, aligning with sophisticated “editing styles” and “photo manipulation” techniques.
- Manual Width and Height for Precise Control: Sometimes, “high-resolution” imagery or specific “graphic design” layouts demand exact dimensions. Word allows you to numerically define your crop.
- Right-click the image and select “Format Picture.”
- In the “Format Picture” sidebar that appears, go to the “Image” tab.
- Here, you’ll find fields to manually enter “Crop position” (x/y offsets) and “Picture position” (width/height of the cropped area). This method offers pixel-perfect control, invaluable for aligning images within complex “digital art” projects or ensuring consistent sizing for “thematic collections.”
- Leveraging the Picture Format Toolbar for Advanced Cropping: The “Picture Format” tab isn’t just for activating the basic crop tool; it also houses a dropdown menu under the “Crop” button, unveiling more advanced options.
- Double-click your image to ensure the “Picture Format” tab is active.
- Click the small down-arrow located directly beneath the “Crop” button. This reveals a menu with powerful choices like “Aspect Ratio” and “Crop to Shape,” which we will explore further.
These additional methods underscore Word’s capacity to handle nuanced “visual design” requirements, extending its utility far beyond basic document creation for Tophinhanhdep.com users.
Elevating Your Visuals with Advanced Cropping Techniques
For the discerning eye of a Tophinhanhdep.com contributor or viewer, standard rectangular crops are just the beginning. The world of “image inspiration” and “creative ideas” often demands more dynamic visual treatments. Word’s advanced cropping features allow you to experiment with different “editing styles,” ensuring your images stand out and align with contemporary “trending styles” in “graphic design” and “digital art.” These techniques are vital for crafting compelling “photo ideas,” whether for personal projects or broader “visual design” portfolios.
Aspect Ratio Cropping: Perfect Proportions for Every Display
Aspect ratio refers to the proportional relationship between an image’s width and height. Maintaining a consistent aspect ratio is fundamental in “digital photography” and “visual design” to prevent distortion and ensure that images display correctly across various platforms, from “wallpapers” to social media posts. Tophinhanhdep.com emphasizes quality, and correct aspect ratios are a cornerstone of that.
Word provides preset aspect ratios, simplifying the process:
- Activate Picture Format: Double-click on your image to open the “Picture Format” tab.
- Access Aspect Ratio: Click the down-arrow under the “Crop” button in the “Size” group.
- Choose Your Ratio: Select “Aspect Ratio” from the dropdown menu. You’ll be presented with common ratios like 1:1 (square), 3:4 or 4:3 (portrait/landscape), 16:9 (widescreen), and others.
- Adjust and Apply: After selecting a ratio, a preview of the cropped area will appear. You can then click and drag the image within this selection to choose the exact portion you want to keep. This repositioning is key to ensuring your subject remains the focal point. Once satisfied, press Enter to apply.
This method is particularly useful when preparing images for specific uses, such as “backgrounds” for presentations (often 16:9) or profile pictures (typically 1:1). It ensures a professional and consistent look, a hallmark of “high-resolution” and carefully curated “image collections” from Tophinhanhdep.com.
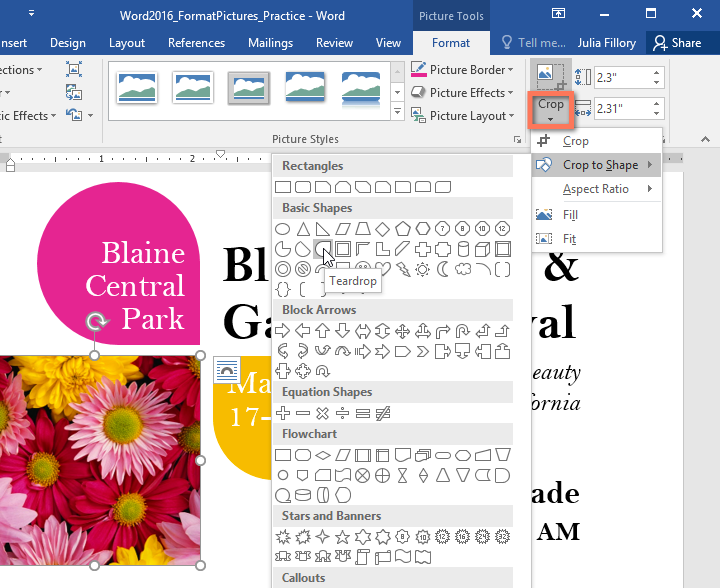
Cropping to Shapes: Adding Creative Flair to Your Documents
Sometimes, a standard rectangular frame doesn’t capture the full “creative idea” you envision. Cropping to a shape allows you to break free from traditional boundaries, adding a touch of “digital art” and “photo manipulation” to your documents. Whether you desire a circular image for an infographic or a star-shaped accent for a flyer, Word offers the tools to infuse your “aesthetic” with unique contours.
There are two primary ways to crop to a shape in Word:
-
Method 1: Direct Crop to Shape:
- Select and Access: Double-click your image to activate the “Picture Format” tab.
- Navigate to Crop to Shape: Click the down-arrow under the “Crop” button. From the menu, select “Crop to Shape.”
- Choose Your Shape: A gallery of shapes will appear, ranging from basic circles and triangles to arrows, callouts, and stars. Select the one that best complements your “visual design.” The image will instantly transform into the chosen shape.
- Refine (Optional): After applying the shape, you can still resize the overall shape by dragging the circular points on its outline, or reposition the image within the shape by double-clicking it and dragging the image itself.
Pro Tip for Perfect Circles: If you want a perfectly circular image, first crop your picture to a 1:1 aspect ratio using the method described above. Then, apply the “Crop to Shape” > “Oval” option. Because the base image is already square, the oval shape will resolve into a perfect circle. This is a favorite trick for creating distinctive profile images or stylistic elements for “mood boards.”
-
Method 2: Drawing a Shape and Filling with a Picture (Greater Control): This method offers more control over the initial dimensions and placement of your desired shape before the image is even introduced, making it a powerful “graphic design” technique.
- Insert a Shape: Go to the “Insert” tab in Word’s Ribbon, click “Shapes,” and select your desired shape (e.g., a circle, heart, or speech bubble).
- Draw the Shape: Click and drag on your document to draw the shape to your preferred size and location.
- Format Shape Fill: Right-click on the drawn shape. From the context menu, choose “Fill” (or “Format Shape” and then navigate to the “Fill & Line” section in the sidebar).
- Insert Picture: Select “Picture” from the fill options. You’ll then be prompted to choose a picture from your device, “stock images,” or the web.
- Observe the Crop: Once you insert the picture, it will automatically fill and be cropped to the contours of your drawn shape. This is particularly effective for creating custom “image inspiration” elements where the frame is as important as the content.
These shape-based cropping techniques open up a world of “creative ideas,” allowing Tophinhanhdep.com users to embed “beautiful photography” into engaging, non-traditional forms within their documents.
Precision Cropping: Manual Dimensions and Removing Backgrounds
Beyond simple cuts, advanced “image tools” in Word offer features that approach basic “photo manipulation.” While not a full-fledged editor, Word can handle more intricate tasks like removing backgrounds, which can drastically alter the “visual design” and focus of your “digital photography.”
-
Removing Backgrounds for Enhanced Focus: This feature is invaluable when you want to isolate a subject from a busy “background” or integrate an object seamlessly into a new context, a common practice in advanced “visual design.”
- Select Image: Click on the picture.
- Access Remove Background: Go to the “Picture Format” tab in the Ribbon. In the “Adjust” group, click “Remove Background.”
- Refine Selection: Word will attempt to automatically detect the foreground and mark the background with a magenta color. You will see handles to expand or contract the area Word considers for removal. Use “Mark Areas to Keep” and “Mark Areas to Remove” tools in the “Background Removal” tab to refine the selection pixel by pixel.
- Keep Changes: Once satisfied, click “Keep Changes” in the Ribbon or press Enter.
This tool, while not as precise as dedicated software like Photoshop, is surprisingly effective for simple backgrounds and can quickly transform an ordinary “stock photo” into a versatile graphic for “digital art” or “graphic design.”
Optimizing and Preserving Your Cropped Masterpieces
After meticulously cropping and refining your images, the next critical step for any Tophinhanhdep.com user is to ensure these “high-resolution” visuals are properly saved and optimized. This involves more than just hitting ‘Save’ on your Word document; it’s about managing file size, preserving your work, and potentially extracting your newly cropped image for use elsewhere. This process connects directly to “Image Tools” like “Compressors” and “Optimizers” that are vital for efficient digital asset management.
Saving Cropped Images: From Document to Digital Library
A common misconception among Word users is that once an image is cropped, the excess pixels are permanently discarded. However, by default, Microsoft Word merely hides the cropped portions of an image. This non-destructive editing approach means you can always revert to the original picture, but it also means the hidden parts continue to contribute to the document’s file size. For large documents with many images, this can become a significant issue, impacting performance and storage.
To truly save a cropped image and potentially extract it for your “image collections” or to share as a standalone “photo idea”:
- Crop the Image: Perform all desired cropping operations on your picture using any of the methods discussed previously.
- Select the Cropped Image: Click on the now-cropped image.
- Compress Pictures: Go to the “Picture Format” tab. In the “Adjust” group, click the “Compress Pictures” button.
- Delete Cropped Areas: A “Compress Pictures” dialog box will appear. Ensure the option “Delete cropped areas of picture” is checked. You can also choose whether to apply this to “Only this picture” or “All pictures in document.”
- Choose Resolution: For optimal balance between file size and quality, select a resolution suitable for your needs. “Web (150 ppi)” is often good for screen viewing, while “Print (220 ppi)” is better for physical output. For Tophinhanhdep.com’s “high-resolution” standards, you might stick to “Use default resolution” if the original image quality is paramount and you’re just removing unnecessary pixels. Click “OK.”
- Save as Picture: Now, right-click on your compressed and cropped image. Select “Save as Picture…” from the context menu. Choose your desired format (e.g., JPEG, PNG) and location on your PC. This action exports the currently visible, cropped version of the image, ready for your “digital library” or use on other platforms.
This process ensures that you’re saving only the relevant parts of your “beautiful photography,” optimizing it for storage and distribution, much like dedicated “image tools” would.
Managing File Size: The Importance of Compression
The “Compress Pictures” feature isn’t just for saving external copies; it’s a vital “image tool” for managing the overall size of your Word documents, especially when they feature numerous “high-resolution” images or “aesthetic backgrounds.” Large file sizes can slow down documents, make them difficult to share, and consume unnecessary storage.
By routinely deleting cropped areas and choosing appropriate resolutions during compression, you contribute to:
- Efficient Document Sharing: Smaller files are easier to email, upload, and download, facilitating collaboration on “graphic design” projects or sharing “thematic collections.”
- Faster Document Performance: Documents with optimized images open and navigate more smoothly.
- Reduced Storage Footprint: Less storage space is consumed on your device or cloud.
This proactive approach to “image optimization” is a best practice for anyone creating visually rich documents, aligning with the principles of efficiency and quality that Tophinhanhdep.com advocates for its users.
Cropping as a Cornerstone of Digital Photography and Visual Design
Cropping, while a seemingly simple act of cutting, is a powerful “editing style” that underpins much of what makes “beautiful photography” and compelling “visual design” truly impactful. For the Tophinhanhdep.com enthusiast, integrating these techniques into your workflow transcends mere functionality; it becomes an extension of your artistic vision.
Enhancing Composition and Focus: The Photographer’s Edge
Every “digital photography” piece tells a story, and cropping helps you refine that narrative. It’s the photographer’s final compositional tool, even after the shot is taken.
- Removing Distractions: An otherwise perfect “nature” shot might have an unwanted branch or a piece of litter. Cropping eliminates these, allowing the viewer’s eye to settle on the intended subject, enhancing the overall “aesthetic.”
- Emphasizing the Subject: By tightly cropping around a subject, you create intimacy and focus. This can transform a broad “background” into a captivating close-up, drawing attention to emotional nuances in “sad/emotional” images or intricate details in “abstract” art.
- Rule of Thirds and Golden Ratio: Cropping allows you to reframe an image to align with classic compositional rules like the Rule of Thirds or the Golden Ratio, creating more balanced and engaging “photo ideas.” This is a fundamental aspect of creating professional-grade “high-resolution” images.
- Changing Orientation: A landscape photograph can be cropped into a portrait to highlight a vertical element, or vice versa, completely altering its context and suitability for different “wallpapers” or “image collections.”
These adjustments directly influence how a viewer perceives the “image inspiration,” making your visuals more potent and aligned with the high standards of Tophinhanhdep.com.
Curating Visual Narratives: Cropping for Mood Boards and Collections
In the realm of “visual design,” “mood boards” and “thematic collections” are crucial for creative development and communication. Cropping is an invaluable “image tool” in curating these visual narratives.
- Consistent Aesthetic: When compiling a “thematic collection” of “aesthetic” images, cropping ensures uniformity in size, aspect ratio, or even shape, creating a cohesive visual experience.
- Isolating Key Elements for Mood Boards: A “mood board” often requires isolating specific textures, colors, or objects from larger “stock photos” or “digital photography.” Cropping allows you to extract precisely what’s needed to convey a particular feeling or concept.
- Creative Layouts and Digital Art: With shape cropping, you can create unique visual elements that fit into complex “graphic design” layouts, turning simple “images” into sophisticated “digital art” components.
For the Tophinhanhdep.com community, where “image inspiration” is drawn from diverse sources, these cropping techniques are not just technical steps but creative acts, enabling you to tailor visuals to tell exactly the story you want. Whether you’re enhancing a personal “wallpaper,” preparing “backgrounds” for a project, or curating a stunning new “photo collection,” the humble crop tool in Microsoft Word proves to be an exceptionally powerful ally in your quest for visual excellence. Embrace its versatility, and watch your documents transform into showcases of refined “beautiful photography” and thoughtful “visual design.”