How to Crop Images in Adobe Illustrator: A Comprehensive Guide for Tophinhanhdep.com Users

In the dynamic world of visual content, precise image manipulation is paramount. Whether you’re curating stunning wallpapers, perfecting high-resolution photography, or crafting bespoke graphic designs for Tophinhanhdep.com, the ability to crop images effectively is a foundational skill. Adobe Illustrator, a powerful vector editing application, offers versatile methods for cropping, adapting to various design needs from simple rectangular cuts to intricate custom shapes. While traditionally associated with vector graphics, Illustrator has evolved to provide robust tools for handling raster images, making it an indispensable part of any designer’s toolkit.
For users passionate about enhancing their visual assets for Tophinhanhdep.com – from aesthetic backgrounds and breathtaking nature shots to abstract art and emotional photography – mastering cropping in Illustrator ensures your visuals are always presented with impact and precision. This guide will walk you through the essential techniques, catering to both newer and older versions of the software, and highlight how these skills complement the diverse offerings of Tophinhanhdep.com, including our extensive image collections, photography resources, and visual design tools.
Understanding the Core Principles of Image Cropping in Illustrator
Before diving into the specific techniques, it’s crucial to grasp how Illustrator differentiates between various image types and their respective cropping implications. This understanding will empower you to choose the most efficient and suitable method for your project, ensuring your creative vision for Tophinhanhdep.com’s content is realized without unnecessary hurdles.
Raster vs. Vector Cropping: A Fundamental Distinction
Adobe Illustrator is primarily a vector-based program, meaning it excels at creating and manipulating graphics that are resolution-independent. However, it frequently interacts with raster images (pixel-based photos, like JPEGs or PNGs) that you might download from Tophinhanhdep.com’s extensive galleries or upload as part of your photography portfolio.
- Raster Images: These are images composed of a grid of pixels. When you “crop” a raster image using certain tools in Illustrator, you are often permanently removing pixel data from the displayed area. This is similar to how image editors like Photoshop handle cropping.
- Vector Graphics: These are mathematically defined paths, lines, and shapes. Cropping vector graphics usually involves modifying their paths or using tools like Pathfinder, which can precisely cut, combine, or subtract shapes without pixel degradation. For many designs on Tophinhanhdep.com, especially in digital art or graphic design, this distinction is vital for maintaining crisp, scalable visuals.
Understanding this difference helps you anticipate how a chosen cropping method will affect your image. For Tophinhanhdep.com users focused on high-resolution photography or digital art, knowing whether your crop is destructive or non-destructive is key to preserving image quality and flexibility.
Linked vs. Embedded Images and Their Cropping Implications
When you bring a raster image into an Illustrator document, it can be either linked or embedded. This choice significantly impacts how the software handles cropping and file size.
- Linked Images: These images remain external files, with Illustrator merely maintaining a link to their location. This keeps the Illustrator file size smaller. When you crop a linked image using the “Crop Image” function, Illustrator typically creates an embedded copy of the cropped portion within your document. The original external file remains untouched, preserving your source material. This is beneficial for Tophinhanhdep.com users dealing with large photography files, as it keeps working files manageable while ensuring original assets are safe.
- Embedded Images: These images are fully incorporated into the Illustrator document. The entire image data resides within the .ai file, increasing its size but making it self-contained. Cropping an embedded image directly modifies the image data within the document.
You can link images by using File > Place (or Shift+Command/Ctrl+P) or by dragging them from your desktop into an open project. Opening a JPEG directly with Illustrator usually embeds it. For optimizing images before or after cropping, Tophinhanhdep.com offers image tools like compressors and optimizers, ensuring your final output is lightweight and efficient.
Method 1: The Intuitive “Crop Image” Function (Illustrator CC 2017 and Newer)
For many Tophinhanhdep.com users working with modern versions of Illustrator (CC 2017 and beyond), the dedicated “Crop Image” function is the most straightforward way to trim raster images. This tool simplifies what was once a multi-step process, making quick adjustments for wallpapers, backgrounds, or stock photos incredibly efficient.
Step-by-Step Guide to Using the Crop Image Tool
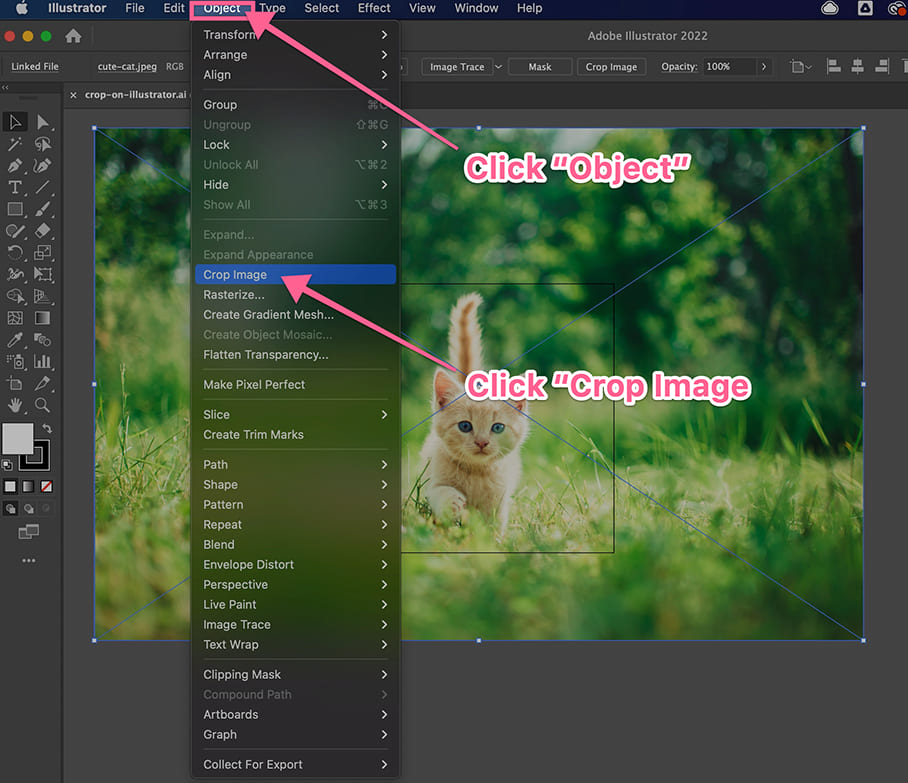
- Prepare Your Image: Begin by opening your design project in Illustrator. If your image isn’t already placed, go to
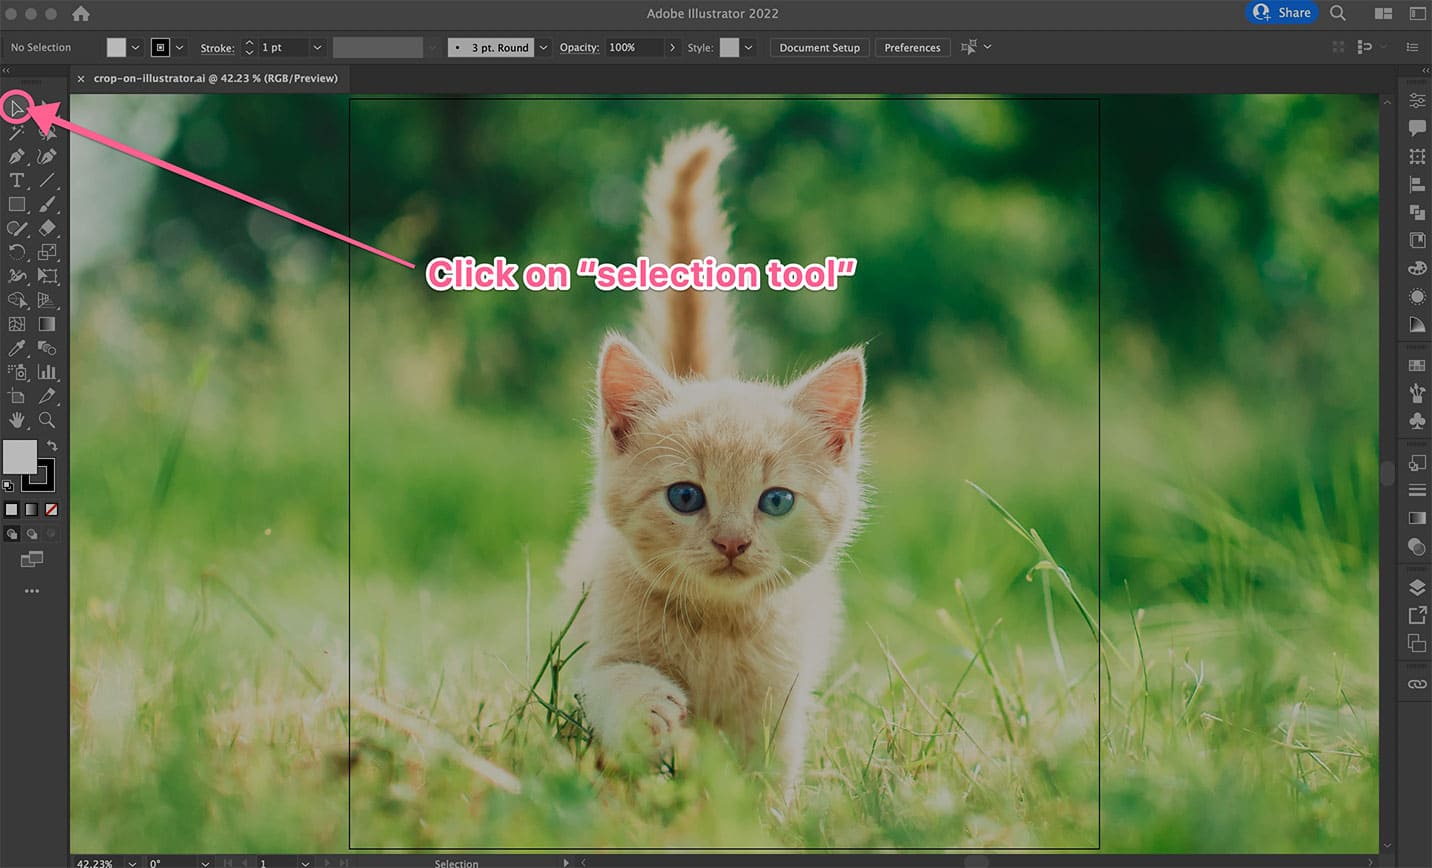
File > Placeand select the image you wish to crop. Once placed, select it using the Selection Tool (the solid black arrow in your toolbar, or pressV). - Activate the Crop Image Function: With your raster image selected, look at the Control panel at the top of your screen. You should see a “Crop Image” button. Alternatively, you can navigate to
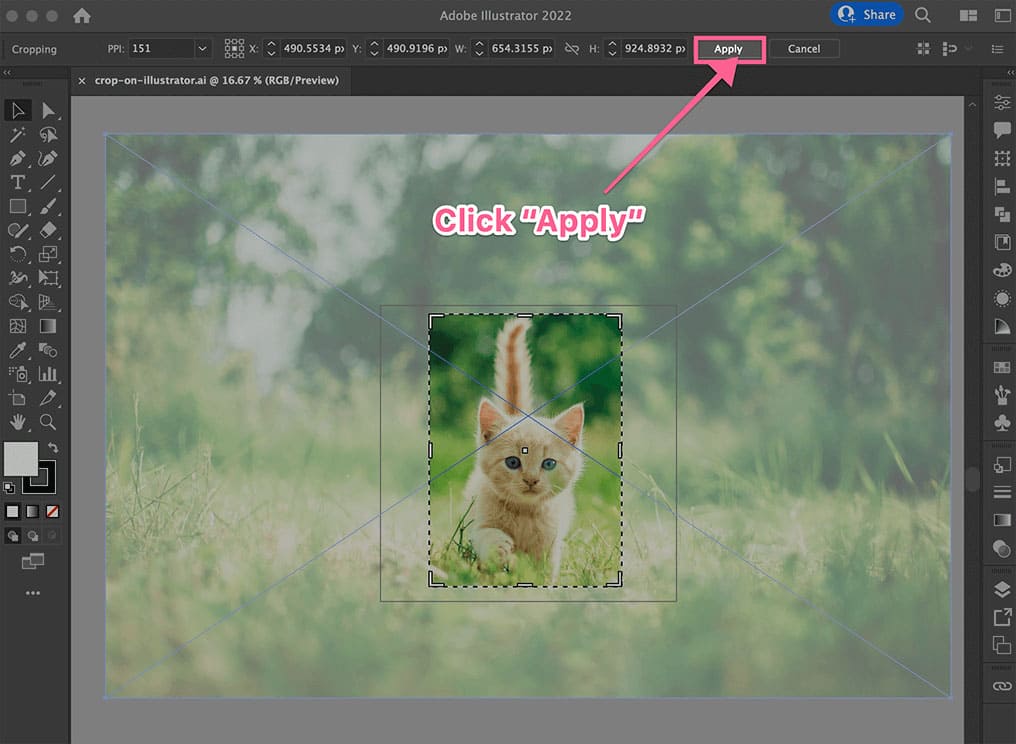
Object > Crop Imagein the top menu bar. If a prompt appears about embedding the image, clickOK. This typically means Illustrator is preparing to embed a cropped copy, leaving your original file intact. - Adjust the Cropping Area: Once activated, a bounding box with adjustable handles will appear around your image. These are your “crop marks.”
- Click and drag the corners or sides of this box to define the area you want to keep. The section outside the box will be the part that is removed.
- You can also adjust the crop using the
X,Y,W(width), andH(height) values in the Control panel for precise dimensions, perfect for fitting images to specific aspect ratios required for Tophinhanhdep.com wallpapers or backgrounds.
- Apply the Crop: Once you’re satisfied with your selection, click the “Apply” button in the Control panel at the top, or simply press
Enter(orReturn) on your keyboard. Illustrator will then process the image, displaying only your selected cropped area.
Best Practices and Considerations for Raster Images
- Permanent Crop: Keep in mind that using the “Crop Image” function is generally a destructive operation for the version of the image within Illustrator. The pixels outside your selection are essentially discarded. If you anticipate needing the uncropped portions later, ensure you have a backup of the original image, perhaps from Tophinhanhdep.com’s original download.
- Raster Only: This function is specifically designed for raster images (.jpg, .png, .eps, or rasterized vectors). It will not work on editable vector graphics, where you’d typically use Pathfinder or other vector-specific tools.
- Image Quality: For high-resolution photography featured on Tophinhanhdep.com, cropping should be done judiciously to avoid excessive enlargement of the remaining pixels, which can lead to quality degradation. Always work with the highest resolution source image possible.
Method 2: Mastering Clipping Masks for Creative and Non-Destructive Cropping
Clipping masks are a powerful and incredibly versatile feature in Illustrator, offering a non-destructive way to crop both raster images and vector graphics into any shape imaginable. This method is invaluable for Tophinhanhdep.com users looking to create unique visual designs, digital art, or photo manipulations with custom forms.
Creating Custom Shapes with Clipping Masks
Unlike the rectangular limitation of the “Crop Image” tool, clipping masks allow you to define your crop area with any closed path.
- Prepare Your Content: Have your image (raster or vector) ready on your artboard. This is the content you want to crop.
- Draw Your Masking Shape: Use any of Illustrator’s drawing tools to create the shape that will serve as your “mask.” This could be:
- Rectangle Tool (
M) or Ellipse Tool (L) for basic geometric shapes. - Pen Tool (
P) for intricate, free-form, or irregular shapes (perfect for artistic collages or unique thematic collections on Tophinhanhdep.com). - Custom Vector Paths: Any existing vector shape can be used.
- Rectangle Tool (
- Position the Mask: The crucial rule for clipping masks is that the masking shape must be on top of the object(s) you want to clip. Draw your shape directly over the portion of the image you wish to keep. To make it easier to see, you can temporarily remove the fill and add a visible stroke to your masking shape.
- Select Both Objects: Using the Selection Tool (
V), click and drag a marquee around both your image and your masking shape, or click the image, holdShift, and click the shape. - Create the Clipping Mask: With both selected, go to
Object > Clipping Mask > Make. Alternatively, use the keyboard shortcutCommand+7(Mac) orControl+7(Windows). Immediately, your image will be “cropped” to the confines of your masking shape.
The Power of Non-Destructive Editing
One of the greatest advantages of clipping masks for Tophinhanhdep.com artists and photographers is their non-destructive nature:
- Hidden, Not Deleted: The portions of your image outside the mask are merely hidden, not permanently deleted.
- Easy Adjustments: You can easily reposition the image underneath the mask, or modify the masking path itself. To do this, simply use the Direct Selection Tool (
A) to select and move anchor points of the mask, or select the entire clipping group and enter isolation mode (double-click) to move the image or reshape the mask. This flexibility is ideal for iterating on creative ideas or mood boards. - Release Any Time: To revert to the original uncropped image, select the clipping group and go to
Object > Clipping Mask > Release(Option+Command+7orAlt+Control+7).
Advanced Clipping Mask Techniques: Flattening Transparency
While clipping masks are non-destructive by default, there are situations where you might want to “bake” the crop into the image, effectively making it permanent, especially if you need to export a flattened image or streamline complex layers.
- Apply Clipping Mask First: Start by creating a clipping mask as described above.
- Adjust Transparency (Optional): If you’re working with advanced transparency effects, you can open the
Window > Transparencypanel and adjust settings (e.g., “Darken”). - Flatten and Expand: With the clipping group selected, go to
Object > Flatten Transparency. A dialog box will appear; confirm your settings and clickOK. Immediately after, go toObject > Expand. This process converts the masked area into a new, permanently cropped raster image. The previously hidden parts are now definitively removed. This is useful when preparing images for web optimization or final output where file size and fewer layers are critical, aligning with Tophinhanhdep.com’s tools for compressors and optimizers.
Method 3: Precision Cropping with Opacity Masks for Gradient Effects
The Opacity Mask is another powerful, non-destructive masking technique in Illustrator that offers even more creative control, particularly for blending images or creating soft-edged crops. For Tophinhanhdep.com users experimenting with aesthetic backgrounds, abstract visuals, or subtle photo manipulations, this method allows for nuanced transparency effects.
Leveraging Color for Transparency Control
Unlike a standard clipping mask that provides a hard edge, an opacity mask uses grayscale values to define transparency:
- White: Areas covered by white in the masking shape will be completely opaque (visible).
- Black: Areas covered by black will be completely transparent (invisible).
- Grays: Shades of gray will create varying levels of transparency, allowing for soft transitions, fades, and gradients.
Here’s how to use it:
- Prepare Your Image and Mask Shape: Place your image on the artboard. Then, draw a shape (rectangle, ellipse, or custom path with the Pen Tool) over the area you want to influence the image’s opacity. This shape will become your opacity mask.
- Fill the Mask Shape with Grayscale: Select your masking shape. Open the
Colorpanel and fill it with a grayscale value. For example:- Fill with pure white for full visibility in that area.
- Fill with pure black for full transparency.
- Fill with a linear or radial gradient from white to black (or shades of gray) to create a gradual fade effect, perfect for subtle transitions in aesthetic images or backgrounds.
- Create the Opacity Mask:
- Select both your image and your grayscale-filled masking shape.
- Go to
Window > Transparencyto open the Transparency panel. - In the Transparency panel, click the “Make Mask” button. Ensure that the “Clip” checkbox is activated if you want the mask to also act as a clipping path, confining the image to the shape’s boundaries, and that “Invert Mask” is unchecked (unless you want to reverse the black/white effect).
- Adjusting Opacity: Once the opacity mask is applied, you’ll see a small thumbnail representation of your mask in the Transparency panel. You can click on this mask thumbnail to edit the mask’s shape or fill independently. You can also adjust the overall opacity slider for the entire masked object in the Transparency panel. This allows for fine-tuning those delicate fading effects often seen in beautiful photography or digital art on Tophinhanhdep.com.
This method is incredibly flexible for sophisticated visual design and photo manipulation, allowing you to create complex blends and layered effects that go beyond simple cuts.
Method 4: Cropping with Artboards for Export-Ready Visuals
While the previous methods focus on modifying images within your document, cropping with artboards is an export-centric approach. It’s particularly useful when you need to define specific output dimensions for your Tophinhanhdep.com images, such as resizing a wallpaper to a standard screen resolution or preparing multiple versions of a stock photo.
Aligning Your Artboard for Perfect Exports
Illustrator’s artboards define the printable or exportable area of your document. By manipulating artboards, you can effectively “crop” your final output.
- Select the Artboard Tool: Activate the Artboard Tool (
Shift+O) from your toolbar. Your active artboard will display handles. - Adjust Artboard to Crop Area:
- Manually: Click and drag the handles of the artboard to resize it directly around the portion of your image or design you want to “crop.”
- Precisely: With the Artboard Tool active, you can type exact dimensions into the Control panel at the top (e.g., specific
WidthandHeightvalues for standard wallpaper sizes). - Fit to Artwork: If you have selected specific artwork elements, go to
Object > Artboards > Fit to Selected Artto automatically resize the artboard to encompass only those elements. Alternatively,Fit to Artwork Boundswill resize the artboard to include all artwork on that artboard.
- Exporting the Cropped Artboard: Once your artboard is perfectly sized to your desired crop:
- Go to
File > Export > Export As...orFile > Save for Web (Legacy)...(for web-optimized images). - In the export dialog box, crucially, ensure the “Use Artboards” checkbox is selected. This tells Illustrator to only export the content within the boundaries of your active artboard, effectively cropping everything outside it.
- If you have multiple artboards and only want to export a specific one, specify the “Range” (e.g., “1” for the first artboard).
- Go to
This method is ideal for creating finished images for Tophinhanhdep.com’s collections, ensuring consistent dimensions and clean edges for all your high-resolution and stock photos.
Using “Trim View” for Pre-Visualization
Often, when working on a complex design, you’ll have elements extending beyond your artboard (known as “bleed” or just messy drafts). “Trim View” provides a quick way to see how your final output will look without actually cropping anything yet.
- Activate Trim View: Go to
View > Trim Viewin the top menu bar. - Instant Preview: Illustrator will instantly hide all artwork outside the active artboard boundaries, giving you a clean preview of your “cropped” image.
- Non-Destructive Preview: Remember, “Trim View” is purely a display mode. It doesn’t permanently cut or remove any artwork. You can still select and edit objects even if they appear trimmed. To revert to the normal view, simply go
View > Trim Viewagain (uncheck it).
“Trim View” is an excellent feature for checking the composition of potential wallpapers, backgrounds, or thematic collections before committing to a final export, helping Tophinhanhdep.com users refine their visual designs efficiently.
Beyond the Basics: Integrating Cropping with Tophinhanhdep.com’s Offerings
Mastering these cropping techniques in Adobe Illustrator goes hand-in-hand with making the most of Tophinhanhdep.com’s resources and services:
- Images (Wallpapers, Backgrounds, Aesthetic, Nature, Abstract, Sad/Emotional, Beautiful Photography): Use precise cropping to adapt any image from our vast collections to specific screen sizes, social media aspect ratios, or to enhance the compositional focus, turning good photos into extraordinary visuals for personal or professional use.
- Photography (High Resolution, Stock Photos, Digital Photography, Editing Styles): Cropping is a fundamental “editing style” that refines composition, removes distractions, and adheres to professional standards for high-resolution photography and stock photos. After cropping, you might use Tophinhanhdep.com’s “AI Upscalers” for further enhancement or “Image-to-Text” tools if the cropped image contains relevant textual elements.
- Image Tools (Converters, Compressors, Optimizers): Once your images are perfectly cropped in Illustrator, Tophinhanhdep.com’s suite of image tools can help you convert them to desired formats, compress their file size, and optimize them for web or print, ensuring fast loading times and efficient storage.
- Visual Design (Graphic Design, Digital Art, Photo Manipulation, Creative Ideas): Cropping is a cornerstone of graphic design. Whether you’re integrating images into digital art pieces, performing complex photo manipulations, or developing creative ideas for new projects, precise cuts and masks are essential for a polished and professional look.
- Image Inspiration & Collections (Photo Ideas, Mood Boards, Thematic Collections, Trending Styles): Cropping enables you to isolate key elements from existing images for mood boards, tailor visuals to fit specific thematic collections, or adjust aesthetics to align with trending styles in visual content.
By integrating these Illustrator cropping skills with the extensive resources available on Tophinhanhdep.com, you empower yourself to create, refine, and present visual content of the highest quality and impact.
Conclusion
Cropping an image in Adobe Illustrator is far from a one-size-fits-all operation. As we’ve explored, Illustrator offers a rich array of tools, from the direct “Crop Image” function for raster files to the versatile and non-destructive clipping and opacity masks, and the export-focused artboard method. Each technique serves a distinct purpose, providing designers and content creators on Tophinhanhdep.com with the flexibility to tackle any visual challenge.
Whether you’re a seasoned graphic designer or just starting your journey into digital art, mastering these methods will significantly enhance your ability to refine photographs, compose compelling visuals, and prepare images for various platforms. By understanding the nuances of raster versus vector, and the implications of linked versus embedded files, you can work more efficiently and creatively. So, the next time you need to trim an aesthetic background, perfect a beautiful photograph, or prepare a high-resolution wallpaper, remember the power of Illustrator’s cropping capabilities and how they seamlessly integrate with the comprehensive visual resources available at Tophinhanhdep.com. Go ahead, experiment with these techniques, and unleash your creative potential!