Mastering the Art of Cropping Images in Photoshop for Tophinhanhdep.com

In the dynamic world of digital imagery, where every pixel counts, the ability to effectively crop an image is not merely a basic function but a fundamental skill that underpins nearly all visual creation. From crafting breathtaking wallpapers and aesthetic backgrounds to preparing high-resolution stock photos or intricate elements for graphic design and digital art, cropping in Photoshop is indispensable. For the vibrant community of Tophinhanhdep.com, dedicated to showcasing beautiful photography, inspiring visual designs, and providing essential image tools, understanding how to crop with precision and creativity is paramount.
Cropping allows you to refine your composition, eliminate distractions, alter aspect ratios, and even completely transform the narrative of an image. It’s the first step in optimizing an image for a mood board, fitting it into a thematic collection, or preparing it for advanced AI upscaling and compression. This comprehensive guide, tailored for Tophinhanhdep.com users, will walk you through every aspect of cropping in Photoshop, ensuring your images achieve their maximum potential, whether for professional photography portfolios or personal creative ideas.
The Crop Tool: Your Gateway to Refined Composition
The Crop Tool in Photoshop is a powerhouse for composition, enabling you to focus viewers’ attention, remove unnecessary elements, and reframe your shots for optimal impact. It’s the cornerstone of digital photography editing styles and a key component in preparing any image for visual design.
Getting Started with the Crop Tool
Before you can harness the full power of cropping, you need to know how to activate and understand its fundamental controls.
- Open Your Image: Begin by launching Photoshop and opening the image you wish to crop. Whether it’s a stunning nature landscape you’re preparing for a high-resolution wallpaper or a vibrant abstract piece for a digital art collection, ensure it’s loaded onto your canvas. The Crop Tool operates on the entire canvas, not individual layers, so its initial application will always affect the overall document dimensions.
- Select the Crop Tool: Navigate to the left-hand toolbar and click on the Crop Tool icon, which typically resembles two overlapping right angles. Alternatively, for a quicker workflow, simply press the ‘C’ key on your keyboard. Once selected, a cropping border will instantly appear around your image, accompanied by the Crop Tool Options Bar at the top of your screen. This bar contains all the settings and adjustments you’ll need.
- Understand the Cropping Border and Options Bar: The cropping border is your visual guide, indicating the area that will remain after the crop. The shaded or faded area outside this border will be removed. The Options Bar, on the other hand, is where you control the tool’s behavior, including aspect ratios, resolutions, and other settings. Photoshop often remembers your last used settings, which can be a blessing or a curse depending on your current task.
- Reset Crop Tool Settings: To ensure a fresh start and avoid any lingering settings from previous edits, it’s always a good practice to reset the Crop Tool. In the Options Bar, locate the tool icon on the far left. Right-click (Windows) or Control-click (Mac) on this icon and select “Reset Tool” from the context menu. This will clear any specific aspect ratios, dimensions, or other preferences, allowing you to define a new crop from scratch. This is particularly useful when you’re switching between vastly different image types for Tophinhanhdep.com, such as preparing a square aesthetic background after working on a panoramic wallpaper.
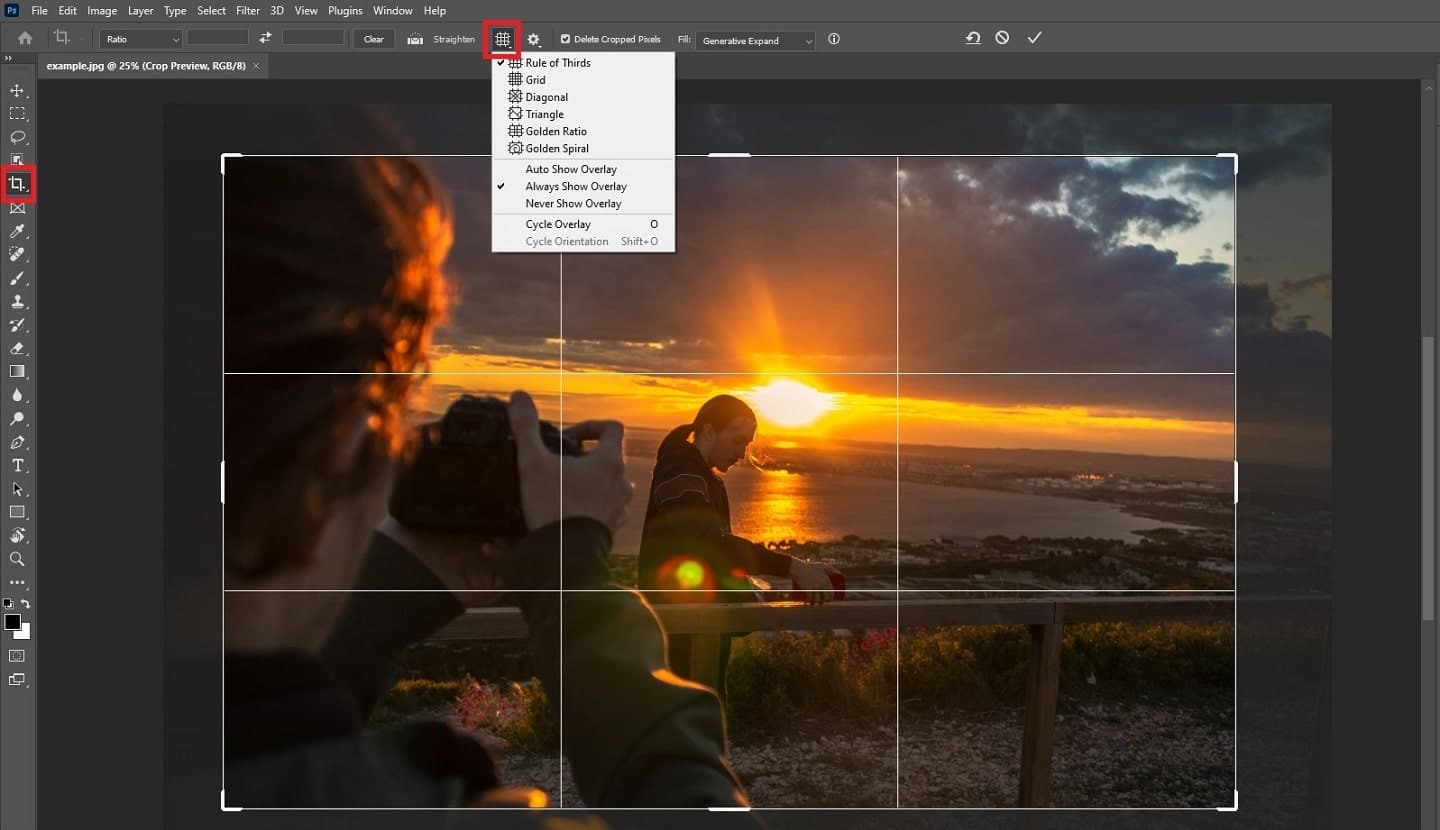
- Grid Preferences: The cropping border often displays an overlay grid, such as the “Rule of Thirds.” You can change this grid from the Options Bar by clicking the grid thumbnail dropdown. Options like Golden Spiral, Diagonal, or no grid can guide your eye for compelling compositions, enhancing the visual design of your final image.
Basic Cropping Techniques
Once the Crop Tool is active and reset, you can begin to shape your image.
- Manual Resizing and Repositioning: Hover your cursor over any of the “handles” (small squares or lines) along the cropping border. Your cursor will change to a double-headed arrow, indicating the direction you can drag. Click and drag these handles to manually resize the crop border. The area inside the border is what you keep, and the faded area outside is what you’ll discard. You can also click and drag inside the cropping border to reposition the image within the selected crop area, allowing for precise adjustments to your subject’s placement.
- Maintaining Aspect Ratio (Shift Key): To preserve the original proportions of your image, hold down the Shift key while dragging any of the corner handles. This locks the aspect ratio, preventing distortion and ensuring your beautiful photography retains its original visual integrity. This is crucial when preparing images for print or specific screen dimensions on Tophinhanhdep.com.
- Resizing from the Center (Alt/Option Key): For symmetrical adjustments, hold down the Alt key (Windows) or Option key (Mac) while dragging any handle. This resizes the crop border from its center point, expanding or contracting evenly in all directions. Combine Shift + Alt/Option to maintain aspect ratio and resize from the center simultaneously.
- Drawing Your Own Crop Border: Instead of relying on Photoshop’s initial border, you can click anywhere on your image and drag out your own custom crop selection. This offers more immediate control over the starting dimensions of your crop.
- Canceling and Resetting the Crop: If you’re not happy with your current crop selection and want to start over, you have a few options. To cancel the crop entirely without applying it, click the “Cancel” button (a circle with a slash) in the Options Bar. To reset the border to its full image size without cancelling the tool, click the “Reset” button (a reversed arrow) in the Options Bar.
Precision Cropping for Specific Needs on Tophinhanhdep.com
Beyond basic adjustments, the Crop Tool truly shines when you need to prepare images for specific output requirements, such as web galleries, print projects, or specialized graphic design elements.
Cropping to Specific Aspect Ratios
Many platforms and print services demand specific aspect ratios. Tophinhanhdep.com users creating stock photos, thematic collections, or elements for visual design will find this essential.
- Using Preset Ratios: In the Options Bar, click on the “Aspect Ratio” dropdown menu. Here you’ll find common presets like 1:1 (square), 4:5, 8:10, 16:9 (widescreen), and more. Selecting one of these instantly snaps the cropping border to that proportion, streamlining your workflow for consistent image layouts.
- Swapping Orientation: If you choose a non-square aspect ratio (e.g., 4:5) and wish to switch between portrait (vertical) and landscape (horizontal) orientation, simply click the “Swap Width and Height” icon (two opposing arrows) in the Options Bar. This is incredibly handy when adapting an image for different creative ideas or mood board layouts.
- Custom Aspect Ratios: For unique requirements not covered by presets, you can manually enter your desired width and height values into the designated boxes in the Options Bar. For instance, entering “14” and “11” will create a 14:11 aspect ratio.
- Saving Custom Presets: If you frequently use a particular custom aspect ratio, save it as a preset for future use. After entering your custom values, click the “Aspect Ratio” dropdown, and select “New Crop Preset.” Give it a descriptive name (e.g., “Tophinhanhdep.com Banner”), and it will be available in your list for one-click access. This greatly boosts efficiency for graphic designers and digital photographers managing large thematic collections.
- Clearing Aspect Ratio: To return to freeform cropping after applying a specific aspect ratio, click the “Clear” button in the Options Bar.
Cropping to Exact Size and Resolution
For digital photography and high-resolution images, especially those destined for print or precise web display, cropping to exact dimensions and resolution is crucial. This directly impacts how your images will be perceived and how effectively they integrate with other image tools like compressors or AI upscalers on Tophinhanhdep.com.
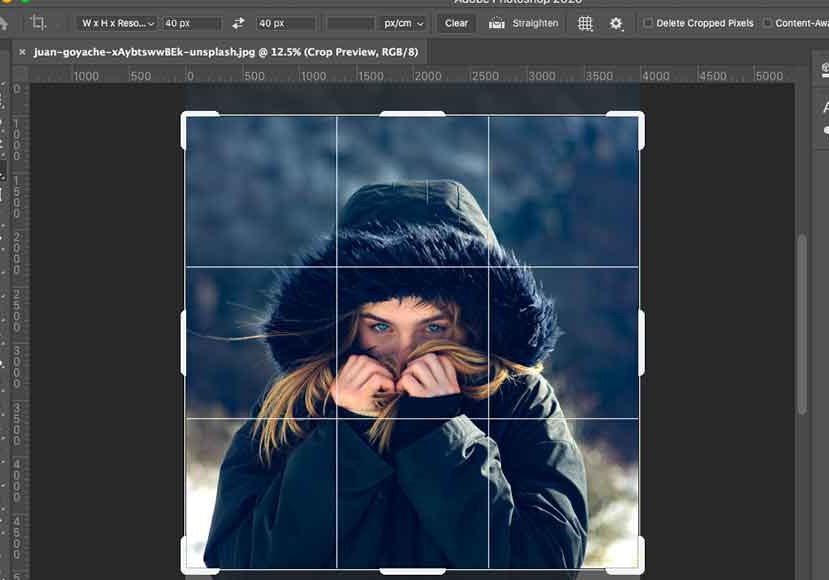
- W x H x Resolution Option: From the “Aspect Ratio” dropdown, select “W x H x Resolution.” This option adds a third input field for resolution.
- Entering Specific Dimensions: Enter your desired width and height values, remembering to include the unit of measurement (e.g., “14 in” for inches, “1920 px” for pixels, “30 cm” for centimeters). This ensures the final output matches precise requirements for wallpapers, stock photos, or elements in a digital art piece.
- Setting Resolution: The resolution field determines the pixel density of your final image. For high-quality printing, 300 pixels per inch (ppi) is the industry standard. For web display, 72 ppi is often sufficient. Ensure the measurement type (px/inch or px/cm) is correct. When cropping for “High Resolution” categories on Tophinhanhdep.com, maintaining 300 ppi is vital.
- Committing the Crop and Checking Image Size: Once your settings are defined and the cropping border is positioned, commit the crop by clicking the checkmark in the Options Bar, pressing Enter (Windows) or Return (Mac), or double-clicking inside the border. To verify the new dimensions and resolution, go to Image > Image Size. This confirms that your image is perfectly prepared, whether for a beautiful photography showcase or as a raw material for photo manipulation.
- Understanding Resampling and Image Quality: When you set a specific resolution, Photoshop might “resample” the image. If you crop to a smaller size and resolution, Photoshop discards pixels, which generally results in a good quality downsize. However, if you crop to a larger size and resolution than the original, Photoshop interpolates (adds) pixels. While modern Photoshop algorithms are advanced, significant enlargement through cropping can lead to a loss of detail and image quality. For such cases, it’s often better to crop first and then use Tophinhanhdep.com’s recommended AI upscalers to intelligently enhance resolution without compromising quality.
Advanced Cropping & Non-Destructive Workflows for Visual Excellence
For graphic designers, digital artists, and photographers looking to maintain maximum flexibility in their creative process, Photoshop offers advanced cropping features and, critically, non-destructive workflows.
Enhancing Composition with Crop Overlays and the Straighten Tool
Achieving an aesthetic composition for a beautiful photography piece or a compelling abstract image often involves more than just resizing.
- Rule of Thirds, Golden Ratio, Other Overlays: The grid overlays within the Crop Tool are powerful compositional aids. The “Rule of Thirds” (a 3x3 grid) helps you place subjects or points of interest at intersecting lines for dynamic balance. The “Golden Ratio” (or Golden Spiral) offers another mathematically pleasing compositional guide, often leading to natural and harmonious designs. Experiment with these different overlays by clicking the “Overlay” icon in the Options Bar to see which best suits your image.
- Cycling Through Overlays and Flipping: You can quickly cycle through the available overlays by pressing the ‘O’ key on your keyboard. For certain overlays like the Golden Spiral or Triangle, you can flip their orientation by pressing Shift+O, allowing for greater creative freedom in visual design.
- Using the Straighten Tool: Crooked horizons or misaligned architectural lines can detract from even the most high-resolution images. The Straighten Tool, found in the Options Bar when the Crop Tool is active, allows you to correct these issues with ease. Click on the Straighten Tool icon, then draw a line across an element that should be straight in your image (e.g., a horizon line, a building edge). Photoshop will automatically rotate the image to align that line, simultaneously adjusting the crop border to avoid transparent areas. This is a game-changer for digital photography, ensuring your landscape wallpapers and cityscapes are always perfectly aligned.
- Integrating Straightening into the Cropping Workflow: The beauty of the Straighten Tool is its seamless integration. You can draw your crop first, then activate the Straighten Tool, or straighten the image first and then refine the crop. Whichever order you choose, the results are powerful, leading to polished images suitable for any thematic collection on Tophinhanhdep.com.
The Power of Non-Destructive Cropping
The “Delete Cropped Pixels” option in the Crop Tool Options Bar determines whether the areas outside your crop are permanently removed or merely hidden. For creative professionals, this distinction is monumental.
- Understanding “Delete Cropped Pixels”: By default, this option is usually turned ON. This means when you commit a crop, Photoshop permanently deletes all the pixels outside the new border. If you later try to expand your crop, those deleted areas will be filled with your background color (usually white), not the original image content. This can be problematic for iterative visual design or photo manipulation where flexibility is key.
- The Benefits of Turning It Off: To work non-destructively, uncheck the “Delete Cropped Pixels” option in the Options Bar before committing your crop. When this option is off, Photoshop simply masks the areas outside your crop rather than deleting them. This means the original pixels are retained, hidden but accessible.
- Flexibility and Reversibility: The primary benefit of non-destructive cropping is unparalleled flexibility. You can commit a crop, work on other aspects of your image, and then return to the Crop Tool later to expand or adjust the crop border, revealing the “hidden” original pixels. This is invaluable for experimenting with different compositions, especially when developing creative ideas for graphic design projects or fine-tuning aesthetic images for a mood board. It empowers you to refine your vision without fear of permanent loss.
- Restoring Hidden Pixels (Image > Reveal All): If you’ve cropped non-destructively, you can easily restore the entire original image at any time. Simply go to the Image menu in the Menu Bar and select “Reveal All.” This will expand your canvas to display all the original, uncropped pixels, giving you a fresh start or allowing for a completely new crop composition.
Cropping Individual Layers: A Designer’s Essential Skill
While the main Crop Tool operates on the entire canvas, there are countless scenarios in visual design, digital art, and photo manipulation where you need to crop a single layer without affecting others in your multi-layered project. This is a critical skill for complex creative ideas and elaborate thematic collections.
Why Crop a Single Layer?
Imagine creating a digital art piece or a complex graphic design layout. You have multiple elements on different layers: a background texture, several isolated subjects, text, and perhaps some abstract overlays. If one of these image layers is too large or contains distracting elements, using the main Crop Tool would flatten and crop your entire project, undoing hours of work. The need arises to trim individual images or elements within their own layers, preserving the integrity of the overall composition. This granular control is essential for detailed photo manipulation and creative graphic design.
Methods for Layer-Specific Cropping
Tophinhanhdep.com offers several techniques for cropping individual layers, ranging from quick destructive edits to highly flexible non-destructive approaches.
Method 1: Rectangular Marquee Tool + Delete (Destructive)
This is the fastest method but permanently removes pixels. Use it when you are certain you won’t need the cropped-out areas again.
- Select the Layer: In the Layers panel, click on the specific layer you want to crop. Ensure it’s highlighted.
- Choose the Rectangular Marquee Tool: From the toolbar, select the Rectangular Marquee Tool (keyboard shortcut ‘M’).
- Create a Selection: Drag a selection outline around the portion of the image you want to keep. Everything outside this selection will be removed.
- Resize the Selection (Optional): For precise adjustments, go to Select > Transform Selection. Unlink the Width and Height in the Options Bar to resize freely, then drag the handles. Click the checkmark to apply.
- Invert the Selection: Currently, you’ve selected what you want to keep. To crop, you need to select what you want to discard. Go to Select > Inverse (Ctrl+Shift+I / Cmd+Shift+I). Now, the area outside your desired portion is selected.
- Crop the Layer: Press the Delete key on your keyboard. The selected (unwanted) pixels will be removed, replaced with transparency.
- Remove Selection Outline: Go to Select > Deselect (Ctrl+D / Cmd+D).
- Note on Smart Objects: If your layer is a Smart Object, Photoshop will warn that it cannot be directly modified. You’ll need to right-click the layer in the Layers panel and choose “Rasterize Layer” first, which converts it to a regular pixel layer, allowing direct edits. Remember, rasterizing removes Smart Object flexibility.
Method 2: Frame Tool (Non-Destructive for Content, Destructive for Layer)
The Frame Tool, while primarily designed for quick layout mockups, can be effectively used to crop layers non-destructively, essentially creating a clipping mask.
- Select the Frame Tool: Find the Frame Tool in the toolbar (it looks like a rectangle with a cross or diagonal lines).
- Create a Frame: Click and drag on your canvas to draw a frame around the area of the layer you want to make visible.
- Place the Image: If your image isn’t already inside the frame, drag the layer from the Layers panel directly onto the frame on the canvas. The image will automatically clip to the frame’s boundaries.
- Adjust Content and Frame: You can click the image inside the frame to move it around, or click the frame’s edges to resize the frame itself. This allows for flexible re-cropping.
- Apply/Commit: Double-click inside the frame or click outside its area to finalize the current view. While the pixels outside the frame are hidden, the Frame Tool itself is a layer, so if you later delete the frame, the underlying content is not restored. It is non-destructive in terms of being able to adjust the view through the frame, but the original layer is effectively “cropped” to that frame.
Method 3: Layer Masks (The Preferred Non-Destructive Approach)
Layer masks are the most flexible and powerful way to non-destructively crop layers, allowing you to hide or reveal parts of a layer with complete reversibility. This method is fundamental for sophisticated photo manipulation, digital art, and complex visual design work.
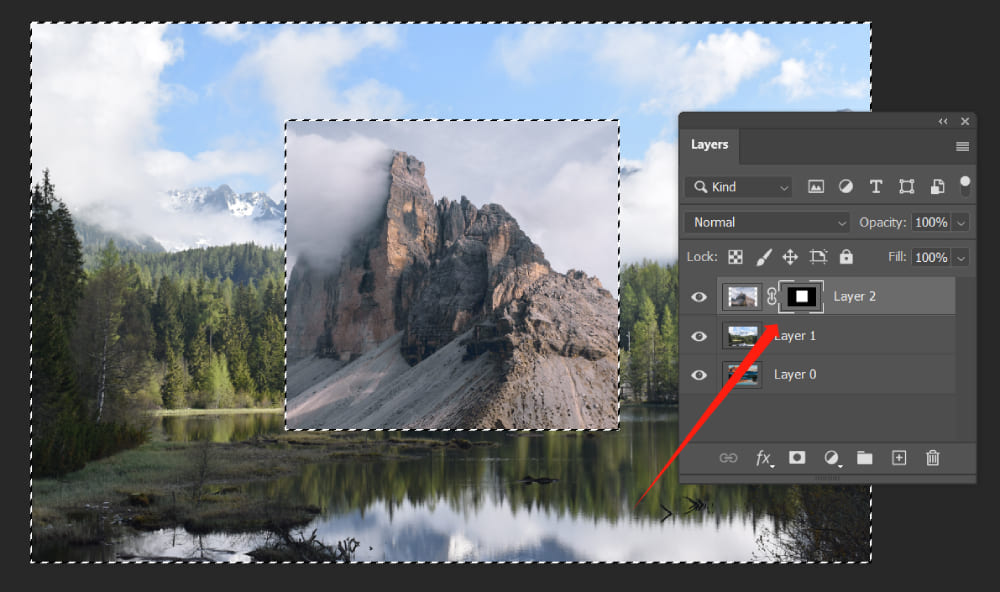
- Select the Layer: In the Layers panel, select the layer you wish to crop.
- Create a Selection: As with Method 1, use the Rectangular Marquee Tool to select the area of the image you want to keep.
- Add a Layer Mask: With the selection active, click the “Add Layer Mask” icon (a square with a circle inside) at the bottom of the Layers panel. Photoshop will instantly create a mask, making the selected area visible (white on the mask) and hiding everything outside the selection (black on the mask). The layer content is not deleted, just hidden.
- Understand the Mask Thumbnail: A black-and-white thumbnail will appear next to your layer thumbnail in the Layers panel. White areas on this mask mean the layer content is visible, while black areas mean it’s hidden. Gray areas indicate partial transparency.
- Toggle and View the Mask: Hold Shift and click the mask thumbnail to temporarily disable/enable the mask. Hold Alt (Windows) or Option (Mac) and click the mask thumbnail to view the mask itself on the canvas, showing you exactly which areas are hidden or visible. Click again to return to the image view.
- Unlink the Mask from the Layer: By default, the layer and its mask are linked. This means if you move or transform the layer, the mask moves with it. For flexible cropping, click the small “link” icon between the layer and mask thumbnails in the Layers panel. Unlinking them allows you to resize the mask independently of the layer content.
- Resize the Layer Mask with Free Transform: Ensure the mask thumbnail is selected (it will have a border around it). Go to Edit > Free Transform (Ctrl+T / Cmd+T). Now you’ll see transform handles around the visible area of your layer. Drag these handles to resize your “crop.” The beauty here is that you’re just adjusting the mask, revealing more or less of the original layer content. Uncheck the “link” icon between Width and Height in the Options Bar if you want to resize the mask freely. Commit the transformation by clicking the checkmark or pressing Enter/Return.
- Relink and Move the Cropped Layer: Once you’re happy with the masked “crop,” click the empty space between the layer and mask thumbnails in the Layers panel to relink them. Now, you can select the Move Tool (V) and reposition your cropped layer anywhere on your canvas, retaining the hidden pixels within the mask.
- Adding Layer Effects: A powerful benefit of layer masks is their compatibility with layer effects. You can add strokes, drop shadows, bevels, and more to your “cropped” layer, creating sophisticated visual designs. For example, by clicking the ‘fx’ icon in the Layers panel and choosing “Stroke,” you can add a border that perfectly conforms to your masked shape, enhancing the aesthetic appeal of your elements within a thematic collection.
Conclusion
The art of cropping in Photoshop is far more intricate and impactful than it initially appears. For users of Tophinhanhdep.com, mastering the Crop Tool and its layer-specific counterparts unlocks a world of creative possibilities. Whether you’re a digital photographer striving for the perfect composition, a graphic designer crafting intricate layouts, or an artist exploring new photo manipulation techniques, these tools are your allies.
From refining high-resolution images for print to optimizing aesthetic backgrounds for web, and from isolating elements for digital art to preparing images for AI upscalers and compressors, the precise control offered by Photoshop’s cropping features is indispensable. Embrace non-destructive workflows with layer masks to maintain flexibility and experiment freely with your creative ideas. Tophinhanhdep.com encourages you to explore these techniques, enhancing every image in your collection and transforming your visual content into truly inspiring works of art.