Mastering Image Cropping on Mac: A Comprehensive Guide for Tophinhanhdep.com Users

In the vibrant world of digital imagery, where every pixel tells a story, the ability to effectively crop an image is not merely a technical skill—it’s an art form. Whether you’re a professional photographer curating a portfolio of high-resolution masterpieces, a graphic designer crafting compelling visual narratives, or simply a Mac user looking to perfect a personal photo for a social media post, mastering the art of cropping is indispensable. At Tophinhanhdep.com, we understand the profound impact that a well-composed image can have, from breathtaking nature wallpapers to evocative abstract backgrounds or poignant sad/emotional photography. This comprehensive guide will delve into the various methods of cropping images on your Mac, ensuring your visuals always convey their intended message with precision and aesthetic appeal.
Cropping goes far beyond simply lopping off unwanted edges. It’s a powerful tool for visual storytelling, allowing you to reshape, refocus, and redefine your images. On a Mac, you’re equipped with a suite of versatile tools, from the surprisingly robust built-in applications like Preview and Photos to advanced online solutions offered by Tophinhanhdep.com. This article will walk you through each method, highlighting their strengths and demonstrating how to harness them for your specific needs, be it for creating stunning aesthetic images or optimizing stock photos for digital photography projects.
Why Image Cropping is Essential in Digital Photography and Design
Cropping is more than just a corrective measure; it’s a creative decision that can dramatically alter an image’s impact. For the diverse range of images featured on Tophinhanhdep.com – from beautiful photography and inspiring photo ideas to thematic collections and trending styles – thoughtful cropping is often the first step in achieving visual excellence.
Enhancing Visual Composition
A perfectly composed image can draw the viewer’s eye exactly where you want it, creating a sense of balance and harmony. Often, an original photograph, while capturing a moment, may contain extraneous elements or an imbalanced layout. Cropping allows you to:
- Follow the Rule of Thirds: By aligning key subjects along the intersecting lines of a 3x3 grid, you can create more dynamic and engaging compositions. Cropping helps you achieve this precise alignment, leading to more aesthetically pleasing results for your backgrounds and wallpapers.
- Center the Photo Subject: Sometimes, the primary focus of an image is lost amidst distracting surroundings. Cropping can bring your main subject to the forefront, emphasizing its importance and eliminating visual clutter. This is particularly useful for portraits or close-up nature photography.
- Create Visual Flow: Strategic cropping can guide the viewer’s eye through the image, creating a narrative or drawing attention to specific points of interest. This is a fundamental aspect of visual design and digital art, where every element is placed with intention.
Tailoring Images for Various Platforms
In today’s digital landscape, images are consumed across a multitude of platforms, each with its own unique size and aspect ratio requirements. A single beautiful photograph might need to be adapted for an Instagram story, a Facebook banner, a YouTube thumbnail, or a website header. Cropping provides the flexibility to:
- Achieve Specific Aspect Ratios: Whether you need a square (1:1), widescreen (16:9), portrait (4:5), or classic (4:3) ratio, cropping allows you to quickly adjust the dimensions of your images. This is crucial for maintaining a professional look across all your digital channels and ensuring your high-resolution images are displayed correctly.
- Optimize for Social Media: Different platforms have specific guidelines for image dimensions to ensure optimal display and engagement. Cropping ensures your images meet these specifications, preventing awkward auto-crops or loss of crucial detail when shared from your thematic collections.
- Prepare for Print and Web Display: Print projects often require high-resolution images cropped to precise dimensions, while web display demands optimized, appropriately sized images for faster loading times. Cropping is the bridge between your original high-resolution photo and its final use.
Highlighting Key Elements and Details
Sometimes, the beauty of an image lies in a small, intricate detail that might be overlooked in the broader frame. Cropping offers a way to zoom in and magnify these elements, transforming a general scene into a focused observation.
- Emphasize Specifics: Whether it’s a delicate pattern in an abstract image, the expressive eyes in emotional photography, or a unique texture in a nature shot, cropping allows you to isolate and highlight these details.
- Remove Unwanted Distractions: Photo-bombers, unsightly backgrounds, or extraneous objects can detract from the intended message or aesthetic of an image. Cropping efficiently removes these unwanted parts, ensuring your image remains clean, focused, and impactful, elevating its aesthetic appeal.
Native Mac Tools for Effortless Image Cropping
Mac users are fortunate to have several powerful, built-in applications that make image cropping straightforward and efficient. These tools require no additional downloads or subscriptions, making them ideal for quick edits and daily tasks.
Cropping with Preview: Your Built-in Powerhouse
Preview is often underestimated, serving as the default viewer for images and PDFs on Mac. However, it harbors a robust set of editing capabilities, with cropping being one of its most accessible features. It’s perfect for quickly adjusting images before using them as wallpapers or backgrounds.
Step-by-Step Guide to Cropping in Preview
Here’s how you can crop an image using the Preview app:
- Open Your Image: Locate the image file you wish to crop in your Finder. Double-clicking it will typically open it in Preview. If Preview isn’t your default viewer, right-click (or Control-click) the image, select “Open With,” and then choose “Preview.”
- Access the Editing Toolbar: In the Preview window, look for the “Markup Toolbar” button. It usually resembles a small toolbox or a pencil icon and is located on the right side of the main toolbar. Click it to reveal the editing options. In newer macOS versions, this icon might appear as a pen nib inside a circle.
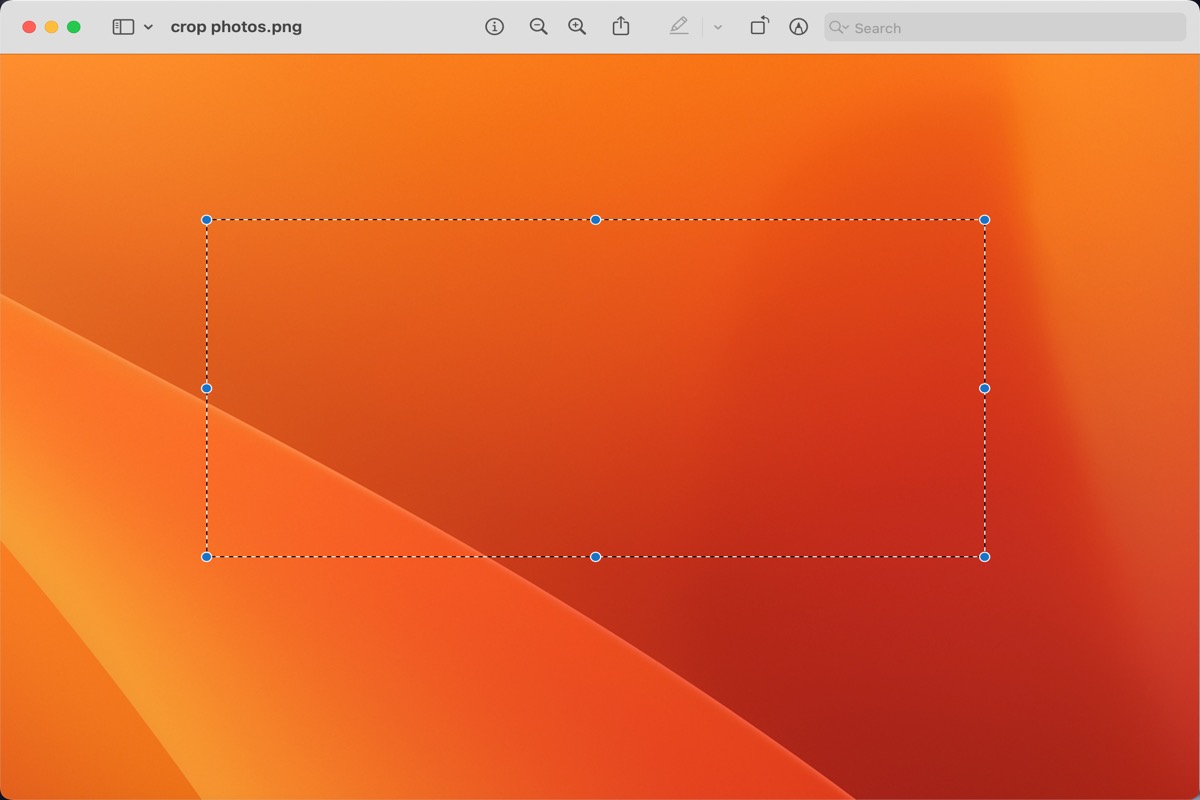
- Select the Cropping Tool: Within the Markup Toolbar, you’ll find the “Selection Tool” icon, often appearing as a dotted rectangle. Click this icon to open a pulldown menu, confirming that “Rectangular Selection” is chosen. Preview also offers “Elliptical Selection” and “Lasso Selection” (including “Smart Lasso”) for more creative, freehand cropping shapes, allowing you to crop a subject out of its background for digital art or photo manipulation projects.
- Draw Your Desired Crop Area: Click and drag your mouse or trackpad over the image to define the area you wish to keep. As you drag, a rectangular selection will appear, and you might see the dimensions of your selection displayed, aiding in precision.
- Refine Your Selection (Optional): Once the initial selection is drawn, you can fine-tune it by clicking and dragging any of the eight blue dots that appear along the selection’s borders. This allows for precise adjustments to capture the perfect composition.
- Execute the Crop: With your selection finalized, you have two options:
- Go to the “Tools” menu in the top menu bar and select “Crop.”
- Alternatively, and much faster, use the keyboard shortcut Command + K. The image will instantly trim down to your selected area.
- Save Your Cropped Image: Go to the “File” menu and choose “Save” to overwrite the original image, or “Save As” (if available in your macOS version, or by holding Option while clicking File to reveal “Save As”) to save it as a new file. It’s often recommended to create a duplicate of your original image (Command + D in Finder) before cropping, especially when using Preview, as it generally performs destructive edits unless you use “Save As” or revert to a previous version (if enabled by macOS).
Speeding Up Workflow with Keyboard Shortcuts
For those who frequently crop images, memorizing a few keyboard shortcuts can drastically improve efficiency:
- Command + O: Opens selected image(s) in Preview (if it’s the default).
- Command + K: Crops the active selection.
- Command + S: Saves the current image.
By combining these, you can open an image, make a selection, crop, and save it in mere seconds, making Preview a surprisingly swift tool for optimizing your images for Tophinhanhdep.com’s aesthetic collections or quick personal use.
Advanced Selection Options in Preview
Beyond the basic rectangular crop, Preview’s “Selection Tool” offers more nuanced ways to isolate parts of your image:
- Elliptical Selection: Ideal for cropping circular or oval subjects, or for creating artistic, softer frames around your main focus.
- Lasso Selection & Smart Lasso: These tools allow for freehand drawing of any shape. Smart Lasso is particularly intelligent, attempting to snap to the edges of distinct objects, making it excellent for isolating a subject from a complex background, a technique often used in photo manipulation.
Refining Photos with the Mac Photos App
If your images are managed within Apple’s Photos ecosystem, either synced from your iPhone/iPad via iCloud Photos or imported directly, the Photos app on your Mac provides an intuitive and non-destructive cropping experience. This means your original image is always preserved, and you can revert your edits at any time, perfect for refining your beautiful photography or stock photos.
Here’s how to crop in the Photos app:
- Open the Photos App: Launch the Photos application on your Mac.
- Select Your Image: Find and double-click the image you wish to crop.
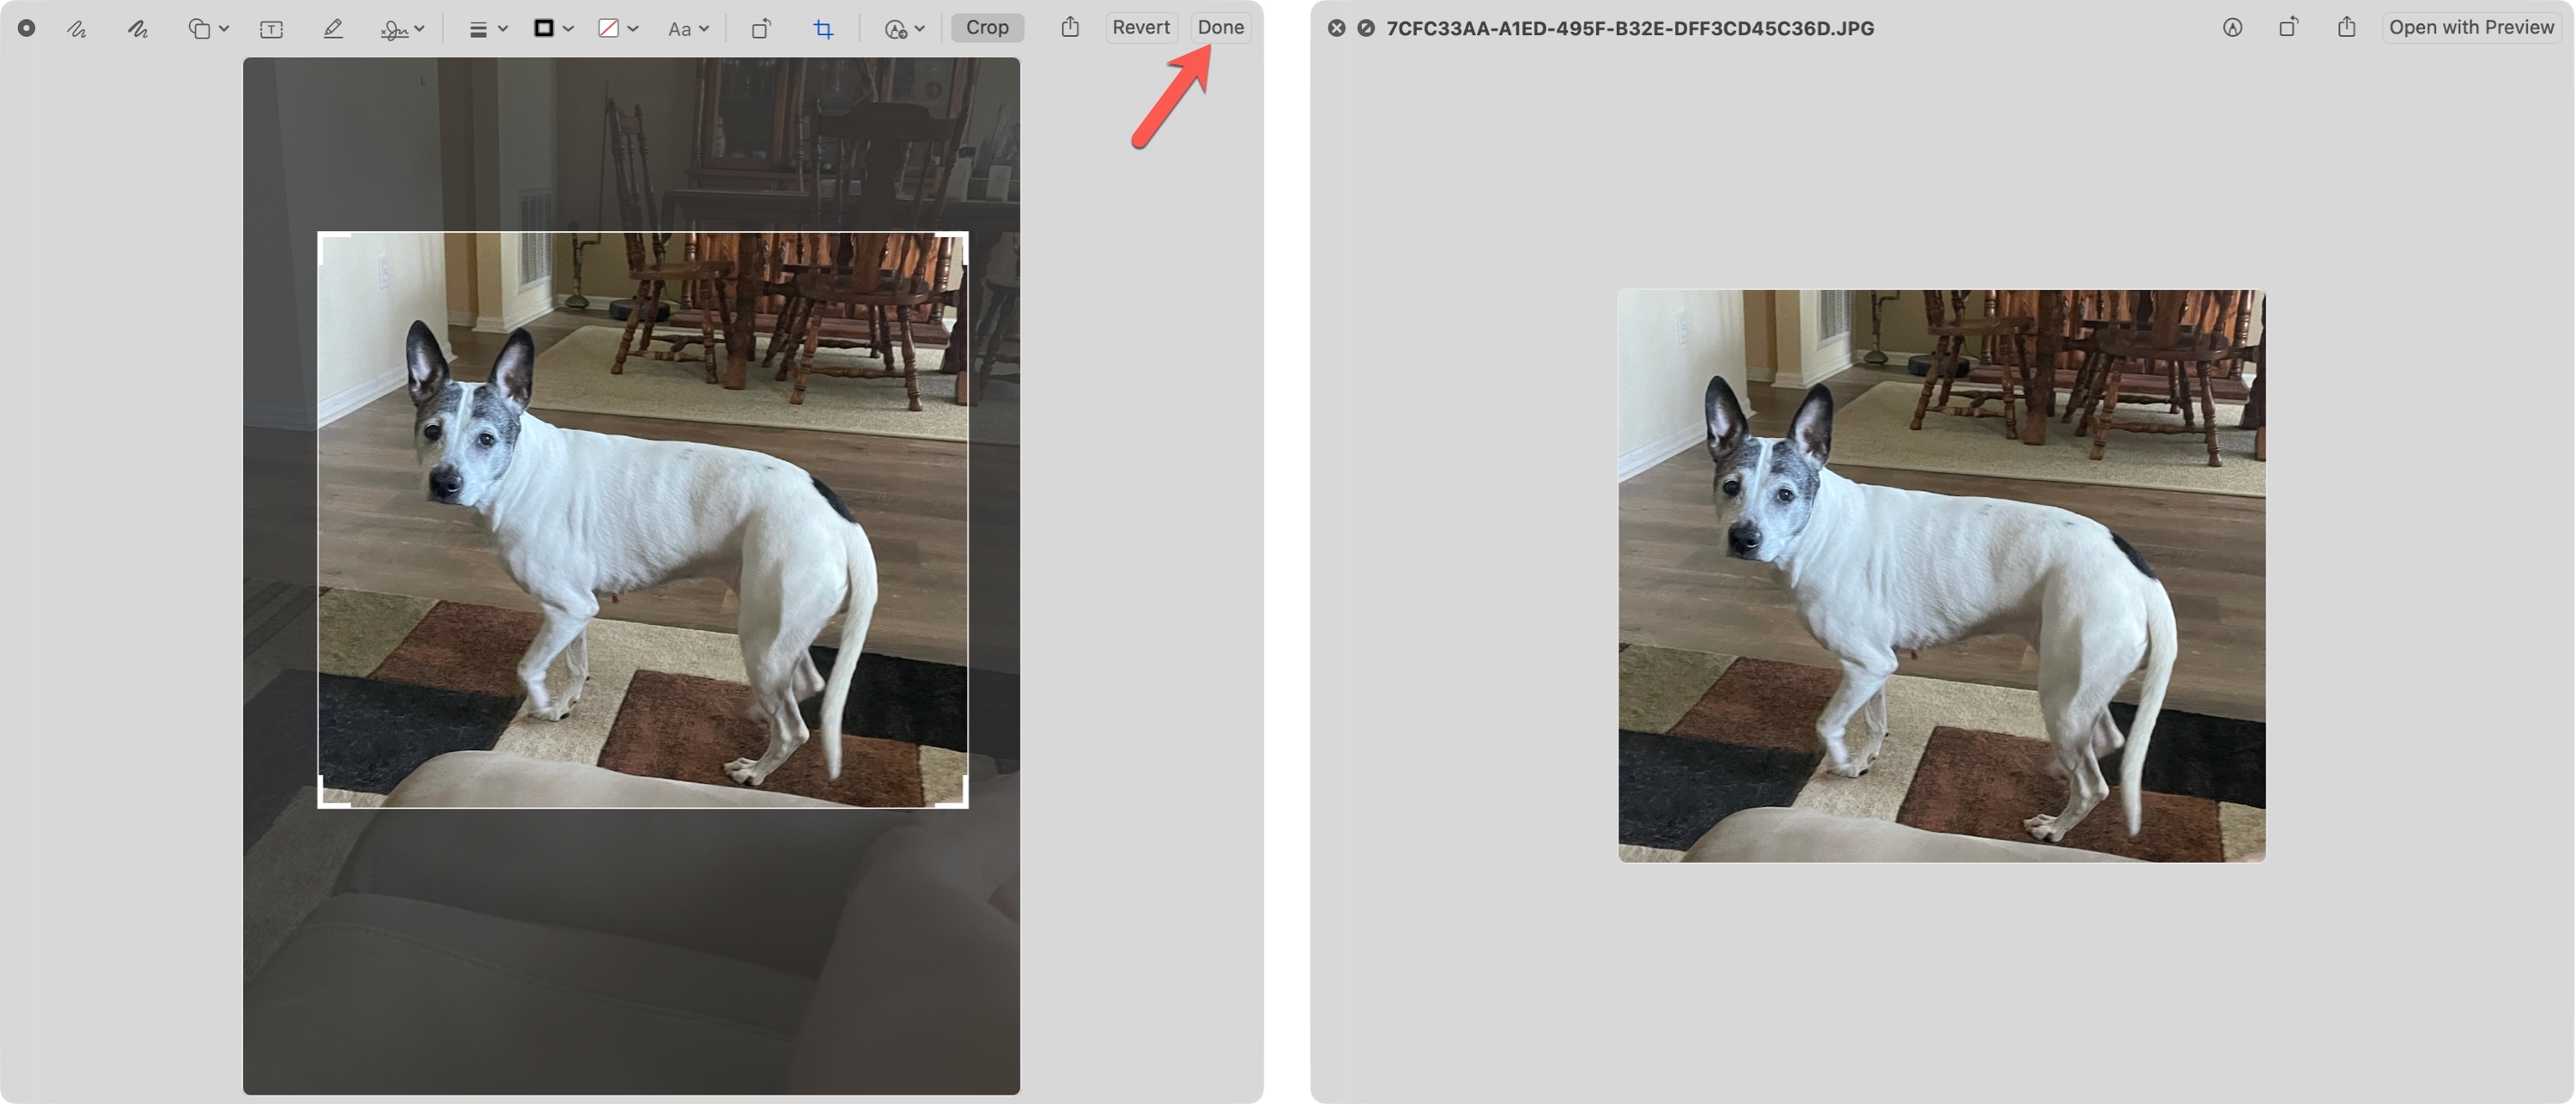
- Enter Edit Mode: Click the “Edit” button located in the top-right corner of the window.
- Choose the Crop Tool: In the editing sidebar, click the “Crop” tool icon.
- Adjust the Crop: A cropping grid will appear over your image. You can:
- Drag the corners or edges: Manually adjust the cropping rectangle to include only the desired area.
- Use Preset Aspect Ratios: The Photos app provides a variety of preset aspect ratios (e.g., Square, 16:9, 4:5, 4:3) on the right-hand toolbar. This is invaluable for preparing images for social media or specific display requirements. You can also select “Custom” for precise dimensions.
- Auto Crop/Straighten: The Photos app also often includes an “Auto” option that suggests an optimal crop and automatically straightens the image, a handy feature for quick fixes in digital photography.
- Apply and Save: Once satisfied with your crop, click “Done” in the top-right corner. The Photos app automatically saves your changes, replacing the displayed image with the cropped version while preserving the original underneath, allowing you to “Revert to Original” at any time.
Quick Cropping On-the-Fly with Quick Look
For those moments when you need to quickly crop an image without fully opening an application, macOS offers “Quick Look.” This feature allows you to preview files directly from the Finder, and it includes some basic markup and editing tools, including cropping.
Here’s how to use Quick Look for cropping:
- Select Image in Finder: Navigate to the image file in your Finder that you want to crop.
- Activate Quick Look: Press the Space bar key. The image will appear in a Quick Look window.
- Access Markup Tools: In the Quick Look window’s toolbar, click the “Markup” button (it looks like a pen tip).
- Initiate Cropping: Click the “Crop” button that appears in the Markup toolbar.
- Draw and Adjust: Drag the corners or edges of the cropping rectangle to define the area you wish to keep.
- Apply Crop: Click “Done” in the top-right corner of the Quick Look window to apply the crop and save the changes to the image file.
Quick Look offers a very rapid way to perform simple, rectangular crops without the overhead of opening a full application, making it ideal for immediate adjustments to your images before using them as backgrounds or sharing them.
Elevating Your Edits with Tophinhanhdep.com’s Online Image Cropper
While Mac’s native tools are excellent for quick and basic cropping, the evolving needs of digital photography and visual design often call for more advanced features, greater flexibility, and the convenience of cloud-based solutions. This is where Tophinhanhdep.com steps in with its powerful online image cropper, seamlessly integrated into its suite of image tools (converters, compressors, optimizers, AI upscalers, image-to-text).
Beyond Basic: Advanced Features and Batch Processing
Tophinhanhdep.com’s online image cropper extends functionality far beyond simple manual dragging, catering to users who demand more control, efficiency, and creative options for their images, from high-resolution photography to aesthetic mood boards.
- One-Click Image Cropper: For common aspect ratios or intelligent content-aware suggestions, Tophinhanhdep.com can offer one-click solutions that swiftly transform your image to the desired crop, saving valuable time.
- Batch Image Cropper: Imagine having dozens, or even hundreds, of images that all need the same crop ratio or a consistent aesthetic. Tophinhanhdep.com excels in batch processing, allowing you to apply cropping rules to multiple images simultaneously. This is a game-changer for managing large thematic collections, preparing stock photos, or updating entire galleries for trending styles.
- Integrated Advanced Editing: Cropping often precedes or follows other enhancements. Tophinhanhdep.com provides a comprehensive suite of photo editing tools. After cropping to perfect the composition, you might use the AI photo enhancer to optimize brightness and color, apply artistic photo filters for an aesthetic look, or utilize other features for digital photography and photo manipulation.
- Cloud-Based Accessibility: Being an online tool, Tophinhanhdep.com’s cropper is accessible from any device with a web browser, not just your Mac. This offers unparalleled flexibility for designers and photographers on the go, allowing you to work on your images regardless of your location or device.
A Step-by-Step Guide to Using Tophinhanhdep.com for Cropping
Using the online image cropper on Tophinhanhdep.com is designed to be intuitive and efficient:
- Access Tophinhanhdep.com: Open your preferred web browser on your Mac (Safari, Chrome, Firefox, etc.) and navigate to the Tophinhanhdep.com website.
- Start Editing: On the homepage, look for an option like “Edit a Photo” or “Image Tools” and select the cropping feature.
- Upload Your Image(s): Click the “Upload” button to select the image files from your Mac that you wish to crop. For batch cropping, select all relevant images.
- Navigate to the Crop Tool: Once your image(s) are loaded, locate the “Adjust” or “Tools” menu, and then select the “Crop” option.
- Define Your Crop:
- Manual Adjustment: Drag the borders or corners of the cropping area that appears over your image to manually define the desired region. You’ll see real-time updates of the crop dimensions.
- Preset Ratios: Choose from a selection of predefined aspect ratios tailored for various uses (e.g., social media platforms, standard print sizes). This ensures your images perfectly fit their intended destination.
- Custom Ratios/Dimensions: For specific projects, you can often input exact pixel dimensions or custom aspect ratios, giving you precise control over the final output for graphic design or digital art.
- Apply and Download: After finalizing your crop, click “Apply” or a similar button to confirm the changes. Then, proceed to “Download” the cropped image(s) back to your Mac. Tophinhanhdep.com often provides options for different file formats and quality settings, allowing you to optimize your images for web or print.
Professional-Grade Cropping: Integrating with Advanced Editing Software
For users engaged in advanced digital photography, graphic design, or complex photo manipulation, dedicated professional software like Adobe Photoshop (or similar advanced image editors) offers the most comprehensive and powerful cropping capabilities. While these tools come with a learning curve and often a subscription, they provide unparalleled control and flexibility.
The process typically involves:
- Opening in Software: Launch your professional editing software and open the image you wish to crop.
- Selecting the Crop Tool: Locate and activate the “Crop Tool” from the main toolbar.
- Defining the Crop Area: A cropping frame will appear. You can drag its corners and edges to resize and reposition the crop.
- Using Advanced Options: Professional software offers extensive options in a control bar or properties panel:
- Ratio and Size Presets: Similar to Photos and Tophinhanhdep.com, you’ll find numerous aspect ratio presets.
- Straighten Tool: Often integrated, allowing you to correct tilted horizons within the cropping interface.
- Content-Aware Fill (Advanced): Some tools can intelligently fill in missing areas if you expand the canvas beyond the original image, a powerful feature for photo manipulation.
- Perspective Crop Tool: For correcting distorted perspectives in architectural or interior photography.
- Committing the Crop: Once satisfied, press Enter/Return or click a checkmark icon to apply the crop.
- Saving: Save the modified image, typically with options for different file formats, quality, and color profiles, crucial for high-resolution stock photos or digital art prints.
These professional tools are essential for intricate work, where every detail matters for beautiful photography, complex visual design projects, or when preparing images for demanding thematic collections.
Best Practices for Superior Image Cropping
Regardless of the tool you choose, adopting best practices can significantly improve your cropping results and overall image editing workflow, especially when preparing images for Tophinhanhdep.com’s diverse range of image categories.
Preserving Your Originals
- Always Duplicate: Before making any destructive edits, especially with tools like Preview, always make a duplicate of your original image file. This serves as a safety net, allowing you to revert to the uncropped version if needed, or experiment without fear of losing the original.
- Understand Non-Destructive Editing: Tools like Apple Photos and professional software often employ non-destructive editing, meaning your original image data is preserved, and changes are applied as layers or instructions. Familiarize yourself with how your chosen tool handles this. Tophinhanhdep.com’s online editor also ensures your original is safe until you explicitly download the modified version.
Strategic Editing Order
- Edit Before You Crop: While it might seem counterintuitive, often it’s best to perform basic color corrections, exposure adjustments, or tint/balance changes before cropping. Cropping reduces the total pixel count of your image. Making these adjustments on the full-resolution image first ensures higher quality and more flexibility, especially for high-resolution images destined for aesthetic or nature photography collections.
- Consider Straightening First: If your image has a tilted horizon or object, straightening it before cropping can help you achieve a more precise and balanced final composition. Many cropping tools integrate a straighten feature for convenience.
The Art of Subtle Adjustments
- Make Small, Incremental Changes: Resist the urge to make drastic crops immediately. Instead, make small adjustments to the crop borders, stepping back to evaluate the composition. This iterative process often leads to the most refined results, capturing the subtle nuances required for sad/emotional photography or delicate abstract images.
- Experiment with Ratios: Don’t be confined to just one aspect ratio. Experiment with different proportions to see which best enhances your image’s focus and narrative, particularly when creating diverse images for mood boards or thematic collections.
Finalizing Your Masterpiece
- Don’t Click Save Until You’re Finished: Be absolutely sure about your crop before committing to “Save” or “Apply.” Once saved, especially with destructive editors, undoing the crop might not be straightforward. Take your time to review the composition, ensuring all unwanted elements are gone and all desired elements are perfectly framed.
- Consider Post-Crop Optimization: After cropping, your image might benefit from further optimization. Tophinhanhdep.com offers other image tools like compressors and optimizers, which can reduce file size without significant loss of quality, crucial for faster loading times on websites or efficient storage of your digital photography. An AI upscaler could also be used if your cropped image needs to be enlarged.
In conclusion, cropping is a foundational skill for anyone working with digital images on a Mac. From the efficiency of built-in applications like Preview, Photos, and Quick Look to the advanced capabilities of Tophinhanhdep.com’s online image cropper and professional software, you have a wealth of options at your fingertips. By understanding the “why” behind cropping and mastering the “how,” you can transform ordinary images into compelling visual assets, perfect for Tophinhanhdep.com’s collections of wallpapers, backgrounds, aesthetic art, high-resolution photography, and creative visual designs. Embrace the crop, and unlock the full potential of your images.