How to Crop an Image in Adobe Illustrator: Master Your Visuals with Tophinhanhdep.com

In the dynamic world of digital content creation, where every pixel contributes to the overall aesthetic and message, the ability to precisely manipulate images is paramount. Cropping, often perceived as a simple task, is in fact a fundamental skill that significantly impacts visual composition, focus, and adherence to various design specifications. For both burgeoning artists and seasoned graphic designers, mastering how to crop an image effectively in Adobe Illustrator is an indispensable part of their toolkit. Tophinhanhdep.com, a hub for high-quality images, photography, and visual design resources, understands this need, offering a vast array of tools and inspiration to elevate your creative projects.
Adobe Illustrator, primarily known as a vector-based software, has evolved over its iterations to offer more streamlined ways to handle raster images, including a dedicated cropping function introduced in its Creative Cloud versions. Before these updates, designers often relied on workarounds or external raster editors like Photoshop. Thankfully, today’s Illustrator is far more versatile, allowing for both permanent and non-destructive cropping methods that cater to a wide spectrum of creative demands. Whether you’re preparing a stunning background for a new website, refining a stock photo for a digital art piece, or curating images for a thematic collection on Tophinhanhdep.com, understanding these techniques will empower your visual storytelling.
This comprehensive guide will walk you through the various methods of cropping images in Adobe Illustrator, from the straightforward Crop Image tool to the more flexible Clipping Mask and Opacity Mask functions. We’ll also explore crucial distinctions between raster and vector graphics, offer practical tips, and show how these Illustrator techniques complement the broader image tools and visual design principles championed by Tophinhanhdep.com.
The Fundamental Role of Cropping in Digital Design and Photography
Cropping is far more than just “cutting out” unwanted parts of an image; it’s a powerful compositional tool that dictates focus, improves aesthetics, and sets the mood. For anyone involved in digital photography or graphic design, cropping is a critical step in the post-production workflow, transforming raw captures into compelling visual narratives.
A well-executed crop can dramatically enhance an image’s impact by:
- Refining Composition: It allows you to adhere to principles like the rule of thirds or leading lines, eliminating distractions and guiding the viewer’s eye. This is especially vital for beautiful photography and aesthetic images featured on Tophinhanhdep.com, where composition directly influences visual appeal.
- Changing Aspect Ratio: Adapting an image to fit specific dimensions for wallpapers, backgrounds, or social media platforms without distorting the content. This ensures your high-resolution images maintain their integrity across different displays.
- Emphasizing Subject Matter: Isolating the main subject, making it stand out and conveying a clearer message. Whether it’s a detail in nature photography or a key element in an abstract composition, a tight crop can amplify its significance.
- Altering Mood or Emotion: A tight crop can intensify sad/emotional expressions, while a wider crop might suggest openness or solitude. This is a crucial consideration when curating thematic collections or mood boards on Tophinhanhdep.com.
For Tophinhanhdep.com’s users, who frequently deal with diverse image categories like wallpapers, backgrounds, aesthetic, nature, abstract, sad/emotional, and beautiful photography, precise cropping is essential. It enables creators to transform raw digital photography into optimized assets for visual design projects, whether they’re crafting graphic design layouts or engaging in intricate photo manipulation. Furthermore, cropping is often the precursor to using other image tools like compressors or optimizers, as it ensures that only relevant pixel data is processed, leading to more efficient file sizes and faster load times for web content.
Method 1: Precision Cropping with Illustrator’s Dedicated Crop Image Tool (CC 2017 and Newer)
For users of Adobe Illustrator Creative Cloud 2017 and later versions, the “Crop Image” function offers the most direct and intuitive way to trim raster images. This tool mimics the cropping functionality found in dedicated photo editors, making it a familiar process for many.
Understanding Raster Images and the Crop Tool’s Limitations
It’s crucial to understand that Illustrator’s Crop Image tool is specifically designed for raster images (pixel-based images) such as JPG, PNG, GIF, or rasterized EPS files. It cannot be directly applied to vector graphics (scalable paths and shapes) that are inherently resolution-independent. If you attempt to use this tool on a vector object, it simply won’t be available.
The Crop Image tool offers primarily rectangular or square crops. While effective for straightforward framing, it doesn’t allow for custom or irregular shapes. A key characteristic of this method is that it permanently removes the cropped-out pixel data from the image within your Illustrator document. While your original source file on your desktop remains untouched, the embedded version in Illustrator will lose the discarded portions. This is an important distinction from non-destructive methods like clipping masks.
Step-by-Step Guide to Using the Crop Image Function
Let’s walk through the process of using the Crop Image tool:
-
Prepare Your Image in Illustrator:
- Open Adobe Illustrator.
- To bring an image into your workspace, you can use
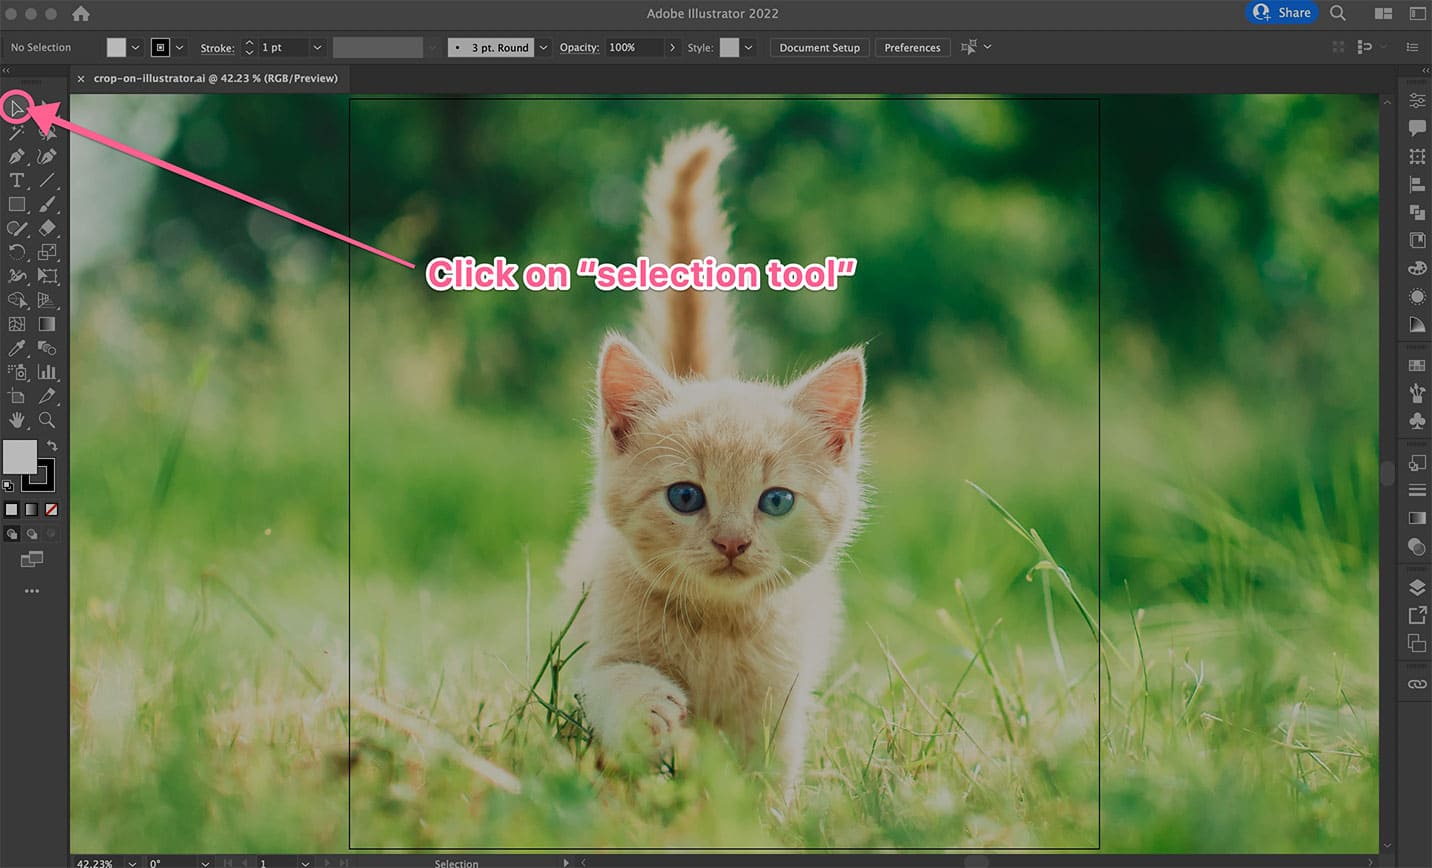
File > Place(Shift + Command/Ctrl + P), which links the image to your document, or simply drag and drop the image from your desktop onto the artboard. If it’s a linked image, Illustrator will prompt you that it will embed a copy upon cropping. Click “OK” to proceed. - Select the placed image using the Selection Tool (the black arrow icon in your toolbar, or press
V).
-
Activate the Crop Image Function:
- Once your raster image is selected, look for the “Crop Image” button in one of two places:
- Control Panel (top of the screen): If your Control Panel is visible, the “Crop Image” button will appear contextually.
- Properties Panel (right sidebar): The “Quick Actions” section within the Properties panel also contains the “Crop Image” option. If you don’t see the Properties panel, go to
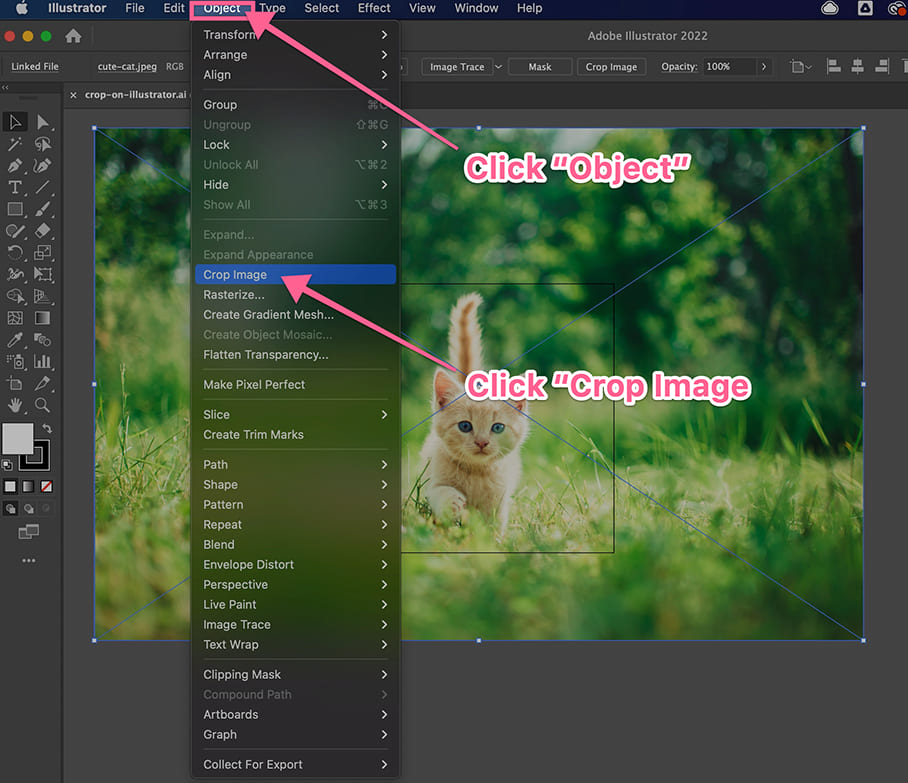
Window > Properties. - Alternatively, you can navigate to
Object > Crop Imagefrom the top menu bar.
- Once your raster image is selected, look for the “Crop Image” button in one of two places:
-
Adjust the Cropping Area:
- Upon activation, a bounding box with black dotted lines and handles will appear around your image. This is the crop widget.
- Drag the corner or side handles of this box to define the area you wish to keep. The lighter, shaded area outside the box indicates the parts that will be removed.
- To maintain the aspect ratio while resizing, hold down the Shift key as you drag a corner handle.
- You can also click and drag the entire crop widget to reposition it over your image.
-
Apply the Crop:
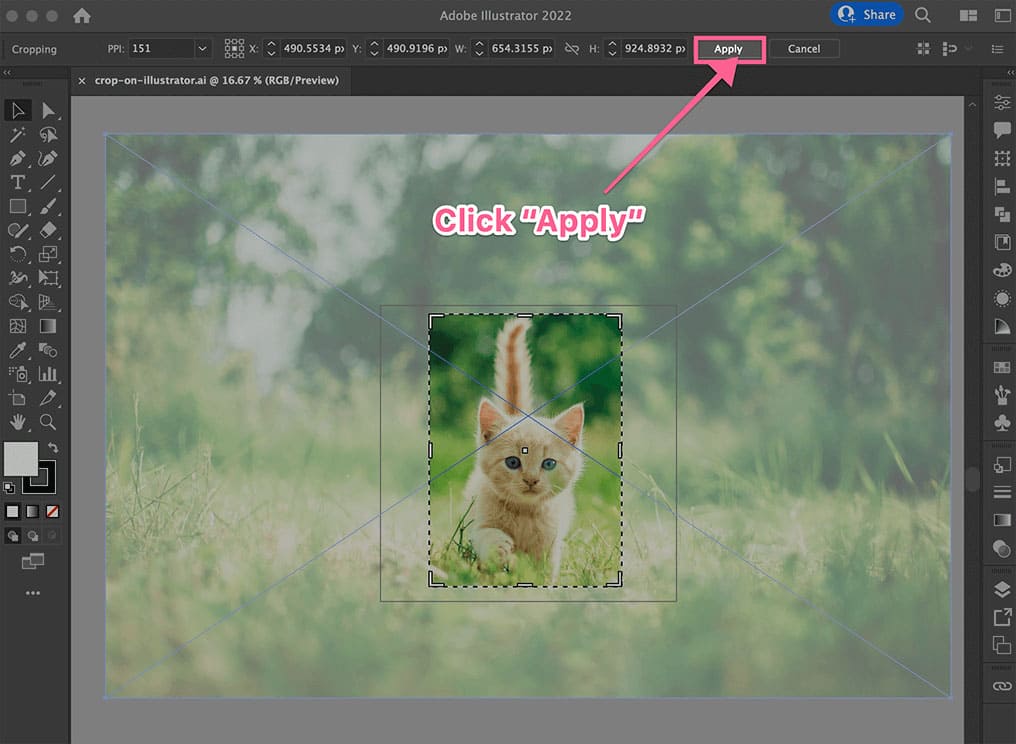
- Once you are satisfied with your cropping selection, click the “Apply” button that appears above the image (or press
Enter/Returnon your keyboard). - Your image will now be cropped, and only the selected portion will remain visible on your artboard.
- Once you are satisfied with your cropping selection, click the “Apply” button that appears above the image (or press
This method is ideal for quickly trimming photographs or scanned images for specific layouts, such as adapting a large stock photo to a smaller banner size or isolating a subject for a digital photography project on Tophinhanhdep.com.
Method 2: Unleashing Creative Shapes with Clipping Masks (All Illustrator Versions)
The Clipping Mask is a cornerstone technique in Adobe Illustrator, offering immense flexibility for cropping not just raster images but also vector graphics, text, and groups of objects into any conceivable shape. Unlike the Crop Image tool, clipping masks are non-destructive, meaning they only hide parts of your artwork rather than permanently deleting them. This makes them incredibly versatile for graphic design, digital art, and photo manipulation tasks where iterative adjustments might be needed.
The Versatility of Clipping Masks: Beyond Rectangular Bounds
One of the most significant advantages of using a clipping mask is the freedom to crop images into any custom shape. Whether you need a circular profile picture, a star-shaped graphic element, or an intricately drawn outline created with the Pen Tool, a clipping mask can achieve it. This capability is invaluable for creating unique visual designs and realizing complex creative ideas that go beyond standard rectangular frames.
A clipping mask functions by using a “masking object” (the shape you draw) to define the visible boundaries of the “masked object” (your image or graphic). Everything inside the masking object remains visible, while everything outside is hidden. The beauty of this method lies in its editability: you can adjust both the masked content and the mask shape independently even after the mask has been applied. This makes it perfect for fine-tuning image inspiration or building detailed mood boards.
Implementing a Clipping Mask for Custom Image Crops
Here’s how to create and apply a clipping mask:
-
Prepare Your Image and Masking Shape:
- Place your raster image or vector graphic onto your Illustrator artboard.
- Now, draw the shape you want to use as your crop directly on top of the image you wish to crop. This shape will be your clipping mask. You can use any shape tool (Rectangle Tool
M, Ellipse ToolL) or the Pen Tool (P) for complex, irregular contours. - Important: The clipping mask shape must be on a layer above the image it will mask. If it’s not, select your shape, then go to
Object > Arrange > Bring to Front(Shift + Command/Ctrl + ]). - For easier alignment, you might want to remove the fill from your masking shape and apply a visible stroke color.
-
Select Both Elements:
- Using the Selection Tool (
V), select both your image (the object to be masked) and the shape you just drew (the masking object). You can do this by dragging a marquee selection over both or by clicking the image, then Shift-clicking the shape.
- Using the Selection Tool (
-
Create the Clipping Mask:
- With both objects selected, go to the top menu bar and click
Object > Clipping Mask > Make. - Alternatively, use the convenient keyboard shortcut:
Command + 7(Mac) orCtrl + 7(Windows).
- With both objects selected, go to the top menu bar and click
-
Result and Further Adjustments:
- Your image will instantly be “cropped” into the shape of your masking object.
- To edit the content inside the mask: Double-click the masked group to enter isolation mode, allowing you to move or resize the image within the mask.
- To edit the mask shape itself: Select the masked group and use the Direct Selection Tool (
A) to modify the anchor points of the clipping path.
This non-destructive approach is perfect for iterative design, allowing you to experiment with different framing for photo ideas or to integrate images seamlessly into complex graphic design layouts on Tophinhanhdep.com.
Advanced Techniques: Opacity Masks for Transparency and Subtle Effects
Building upon the concept of clipping masks, Opacity Masks offer an even more sophisticated way to blend and reveal parts of your images, allowing for gradients, feathered edges, and partial transparency. Instead of simply hiding pixels, an opacity mask uses grayscale values to determine visibility: white areas are fully opaque, black areas are fully transparent, and shades of gray create varying degrees of translucency. This technique is particularly powerful for creating artistic digital art and advanced photo manipulation.
Here’s how to use an Opacity Mask:
-
Prepare Your Image and Masking Object:
- Place your image on the artboard.
- Draw a shape (or multiple shapes, gradients, text outlines) above your image. This will be your opacity mask object.
- Crucially, fill your mask object with a color or gradient that includes black, white, or gray values. For a standard opaque crop, fill it with white. For a feathered edge, use a black-to-white gradient.
-
Select Both Elements:
- Select both your image and the mask object using the Selection Tool (
V).
- Select both your image and the mask object using the Selection Tool (
-
Open the Transparency Panel:
- Go to
Window > Transparencyto open the Transparency panel.
- Go to
-
Create the Opacity Mask:
- In the Transparency panel, ensure your image and mask object are selected.
- Click the “Make Mask” button.
- For a traditional crop effect, ensure the “Clip” checkbox is activated. If you want the mask to also function as a transparency layer and allow areas outside the mask shape to be affected by its opacity, you can uncheck “Clip”. The “Invert Mask” option can reverse the black/white transparency effect.
-
Adjust Opacity and Effects:
- Once the mask is applied, you can select the mask thumbnail in the Transparency panel (it will be on the right) and edit its fill, stroke, or apply gradients to refine the transparency effects.
- This allows for subtle fading effects, blending images into backgrounds, or creating complex visual textures, aligning perfectly with creative ideas and advanced editing styles for Tophinhanhdep.com’s image collections.
Streamlining Your Workflow: Tips, Tricks, and Tophinhanhdep.com Alternatives
Beyond the core cropping methods, efficiency is key in any visual design workflow. Integrating keyboard shortcuts and understanding when to leverage different tools can dramatically speed up your creative process.
Keyboard Shortcuts for Enhanced Efficiency
Memorizing a few key shortcuts can make a significant difference:
- Selection Tool:
V - Direct Selection Tool:
A(useful for editing clipping mask paths) - Place Image:
Shift + Command/Ctrl + P - Rectangle Tool:
M - Ellipse Tool:
L - Pen Tool:
P - Make Clipping Mask:
Command/Ctrl + 7 - Release Clipping Mask:
Shift + Command/Ctrl + 7 - Artboard Tool:
Shift + O(for defining export areas)
When to Use Illustrator vs. Online Tools like Tophinhanhdep.com’s Crop Feature
While Adobe Illustrator offers unparalleled power and flexibility for professional graphic design and digital art, there are scenarios where simpler, online image tools might be more appropriate, especially for quick, high-volume tasks or users without specialized software.
Use Illustrator when:
- You need to crop raster images into custom, irregular shapes using clipping or opacity masks.
- You are working with vector graphics and need precise cutting.
- You require non-destructive editing that preserves the original image data for later adjustments.
- You’re integrating cropping into a larger complex design project that utilizes Illustrator’s other advanced features for photo manipulation or creative ideas.
- You are preparing high-resolution images for professional print or large-scale digital displays where absolute quality control is paramount.
Consider Tophinhanhdep.com’s online cropping tools (or similar basic editors) when:
- You only need simple rectangular or circular crops for raster images (JPG, PNG, GIF).
- You’re quickly preparing images for social media or web use, where speed and ease of use outweigh complex design requirements.
- You don’t have access to Adobe Illustrator or prefer a browser-based solution that doesn’t require software installation.
- You’re dealing with a batch of images that all require the same basic crop, as many online tools offer batch processing capabilities.
- You need to quickly crop images that will then go through other image tools like compressors or optimizers (also available on Tophinhanhdep.com) for immediate web deployment.
Tophinhanhdep.com’s suite of image tools, including converters, compressors, optimizers, and AI upscalers, serves as an excellent complement to Illustrator’s robust capabilities. You might use Illustrator for initial complex cropping and design integration, then bring the finished artwork to Tophinhanhdep.com for further optimization—such as compressing images for faster website loading or using AI upscalers to enhance resolution for larger applications without sacrificing quality. This integrated approach ensures your beautiful photography and aesthetic images are perfectly prepared for any platform or purpose.
Another “quick and dirty” method for rectangular crops in Illustrator, especially when preparing images for export, is the Artboard Trick:
- Select Your Image and Activate the Artboard Tool: Select the image you want to crop. Then, choose the Artboard Tool (
Shift + O) from the toolbar. - Adjust the Artboard: Click and drag the handles of the artboard to resize it precisely around the portion of your image you wish to keep. This effectively defines your new canvas.
- Export with Artboard: Go to
File > Export > Export As...orFile > Save for Web (Legacy). In the export dialog box, crucially, check the “Use Artboards” option. This ensures that only the content within your defined artboard boundaries is exported, effectively cropping your image to those dimensions. You can then delete the original image and place the newly cropped version back into your project if needed.
Conclusion
Cropping an image in Adobe Illustrator, while initially seeming daunting due to the software’s vector focus, is a highly accessible and versatile process once you understand the various methods. Whether you opt for the direct “Crop Image” tool for raster images, embrace the creative freedom of “Clipping Masks” for custom shapes and non-destructive editing, or delve into “Opacity Masks” for sophisticated blending, Illustrator provides the tools necessary to refine your visuals with precision.
As you continue your journey in digital photography and visual design, remember that Tophinhanhdep.com is your ultimate partner for image inspiration, high-resolution assets, and a full suite of image tools. From finding stunning wallpapers and backgrounds to utilizing AI upscalers and compressors, Tophinhanhdep.com supports every stage of your creative workflow. By mastering Illustrator’s cropping capabilities and leveraging the resources available on Tophinhanhdep.com, you can ensure your aesthetic, nature, abstract, and beautiful photography always stands out, telling compelling visual stories that captivate and engage. So go ahead, experiment with these techniques, infuse your graphic design projects with new creative ideas, and transform your digital art with confidence and precision.