How to Curve an Image in Photoshop: Shaping and Tonal Mastery for Stunning Visuals

In the expansive realm of digital photography and visual design, the ability to manipulate images goes far beyond basic adjustments. “Curving an image” in Adobe Photoshop is a powerful technique that can refer to two distinct yet equally impactful processes: physically deforming the shape of an image for creative visual interest, and precisely adjusting its tonal and color characteristics using the “Curves” adjustment layer. Both methods are indispensable tools in the arsenal of any photographer or graphic designer aiming to transform ordinary images into captivating masterpieces.
At Tophinhanhdep.com, we understand the importance of mastering these advanced editing styles to elevate your digital art, whether you’re working with high-resolution stock photos, creating aesthetic backgrounds, or refining beautiful photography. This comprehensive guide will walk you through both interpretations of “curving an image” in Photoshop, providing clear, step-by-step instructions and insights into why these techniques are crucial for modern image manipulation and visual design.

Understanding “Curving” in Photoshop: Shape vs. Tone
The phrase “curve an image” can lead to some initial confusion, as Photoshop offers tools that address both literal shape deformation and metaphorical tonal bending. To truly harness Photoshop’s capabilities, it’s essential to distinguish between these two fundamental approaches and understand when to apply each.
Sculpting Your Image: The Warp Tool for Visual Curves
When you aim to add a physical bend or undulation to an image—making it appear as if it’s wrapping around a surface, rippling, or simply acquiring a non-rectangular shape—you are engaging in shape deformation. This is primarily achieved through Photoshop’s powerful Warp Tool. This technique is fantastic for adding depth, dynamic movement, or integrating an image seamlessly into a complex visual design where perspective or form needs to be altered. Imagine making a flat wallpaper image appear to curve around a digital cylinder, or giving a background a subtle, flowing aesthetic.
Mastering Light and Color: The Power of Curves Adjustment
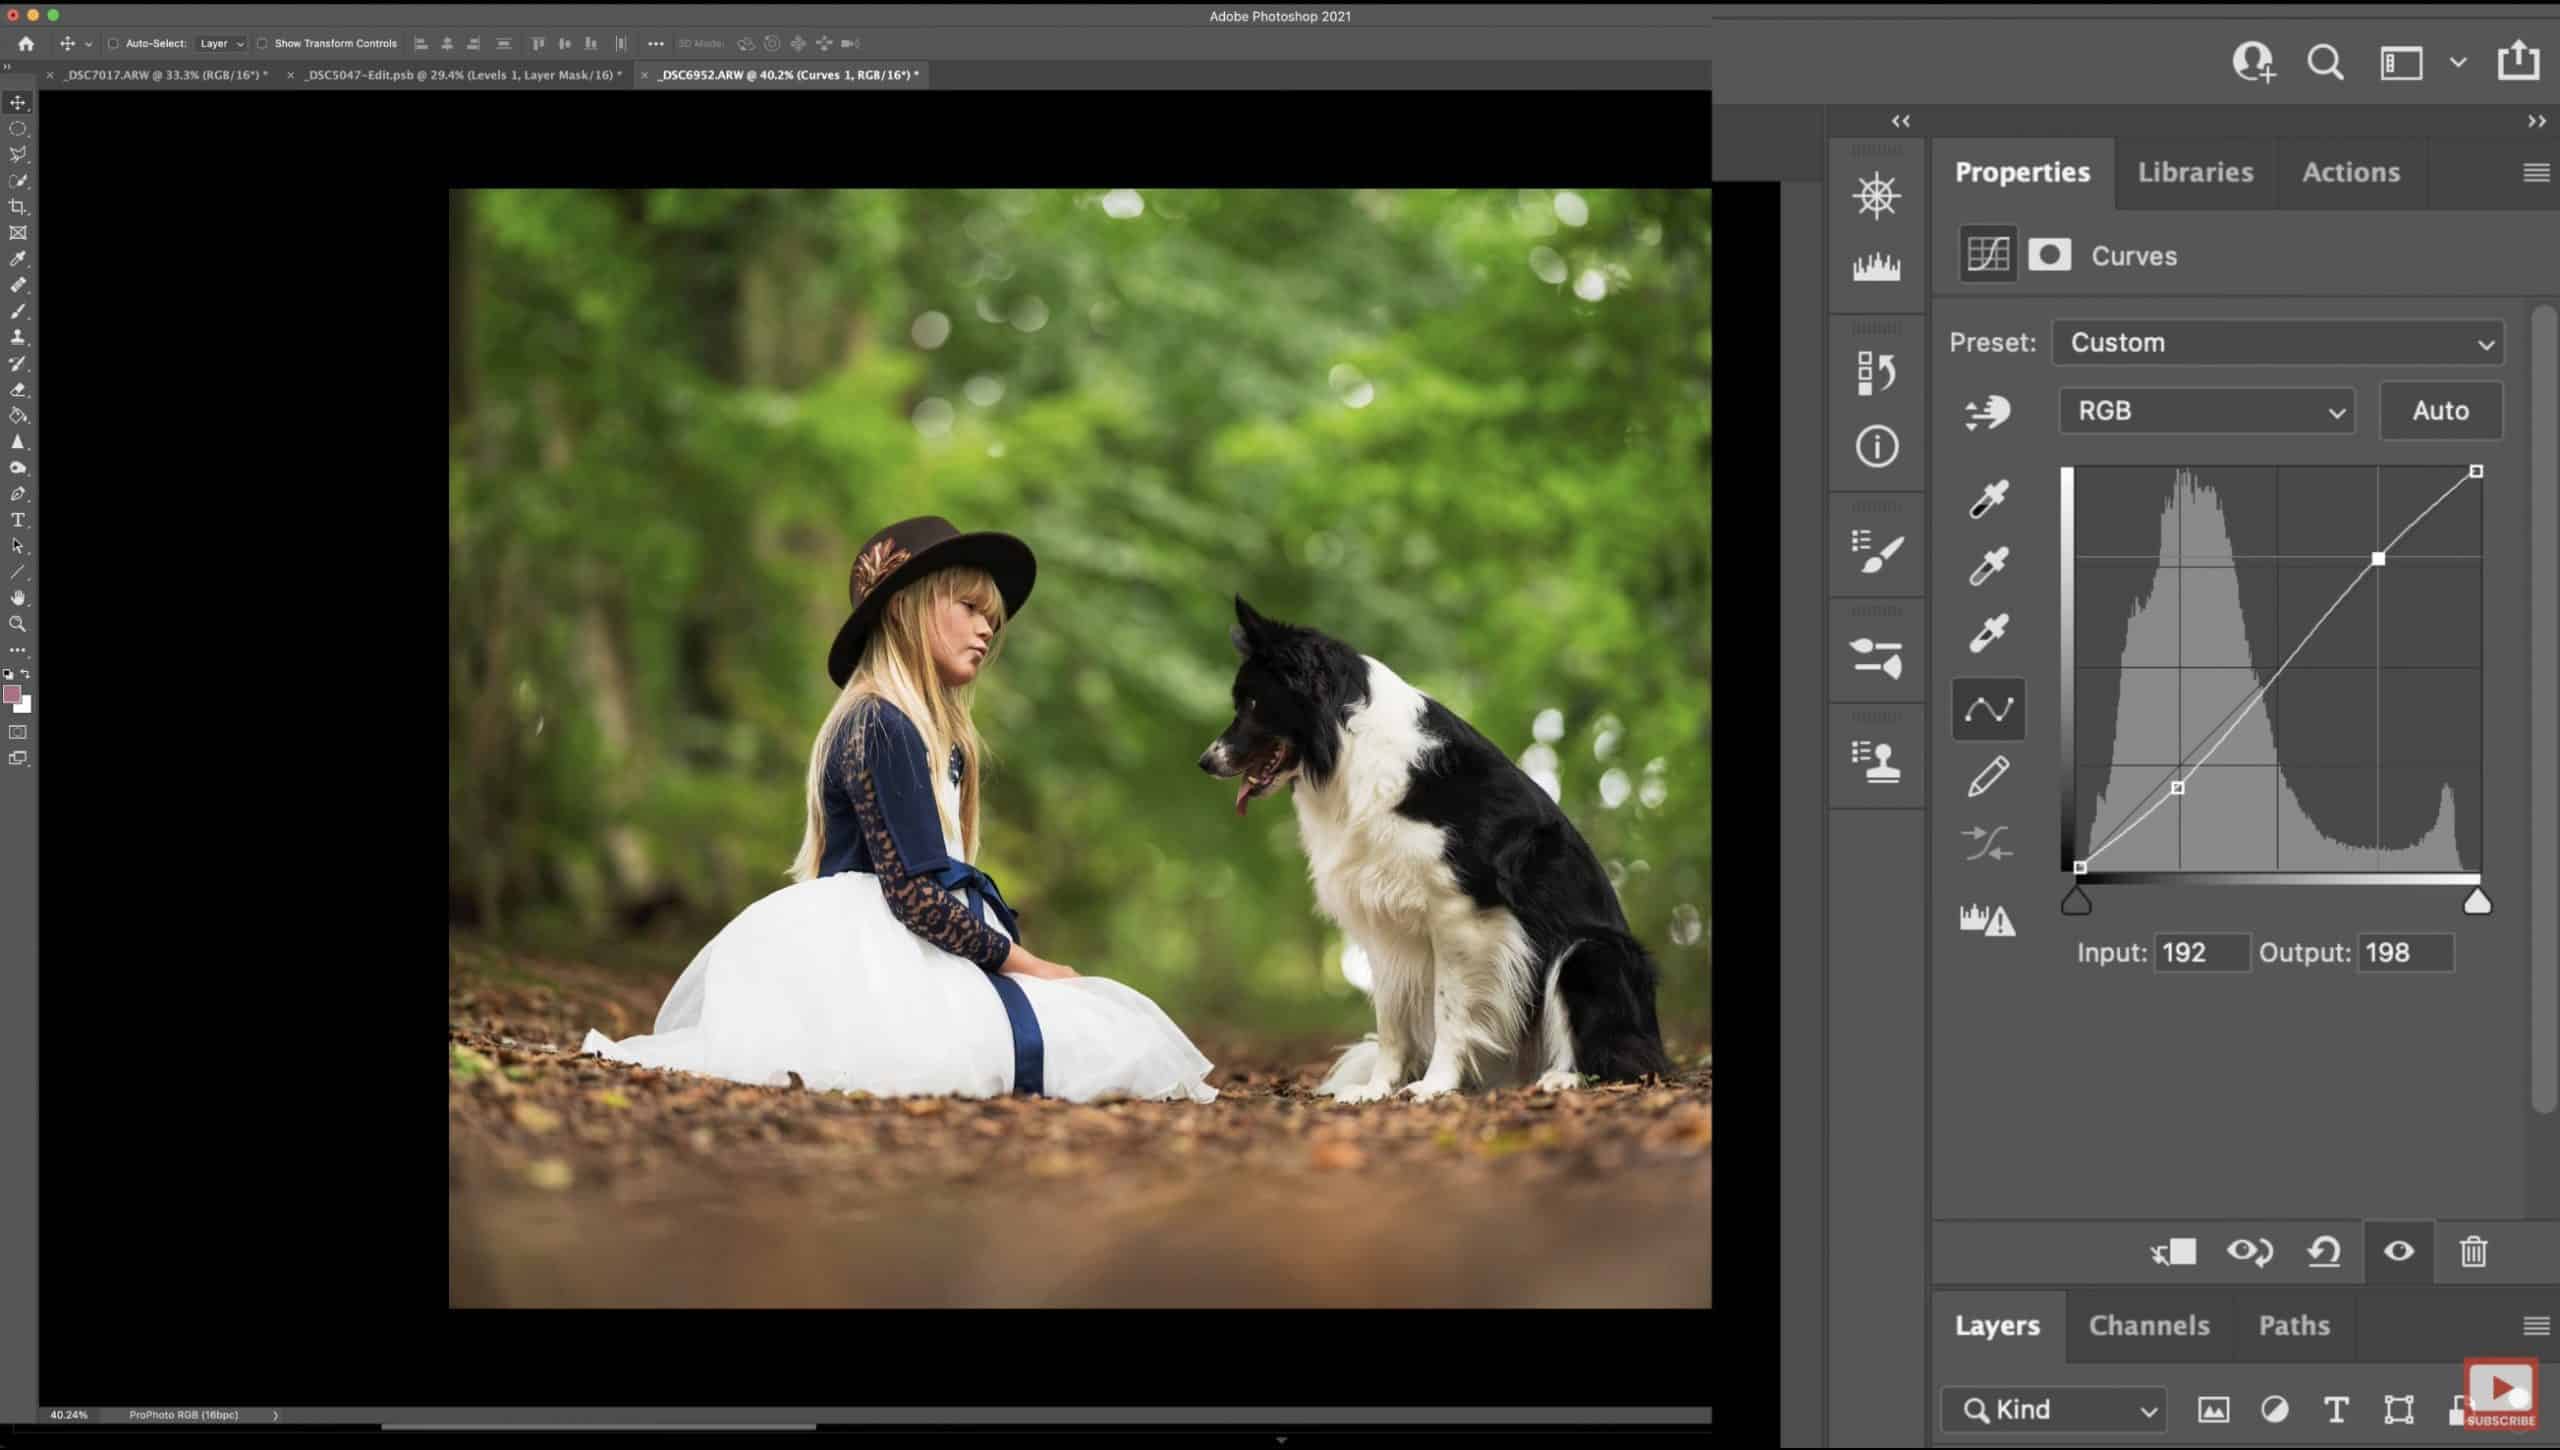
Conversely, the “Curves” adjustment layer, often simply referred to as “Curves,” is Photoshop’s powerhouse for manipulating the tonal range and color balance of an image. This tool doesn’t physically bend the image’s shape but rather adjusts how light (brightness/contrast) and color are distributed across its pixels. By creating a curved line on a graph, you gain minute control over shadows, midtones, and highlights, as well as individual color channels like Red, Green, and Blue. This non-destructive editing method is critical for correcting exposure, enhancing contrast, fine-tuning color harmony, and creating specific moods in your photography, whether it’s vibrant nature shots or evocative sad/emotional imagery. It’s a fundamental aspect of digital photography editing styles and photo post-processing.

Step-by-Step Guide to Warping Your Image for Creative Effects
Let’s begin by exploring how to physically curve an image using the Warp Tool, a technique perfect for adding unique visual interest and dimension to your creative ideas and photo manipulation projects.
Setting the Canvas: Document and Image Placement
Before you can bend and sculpt your image, you need a workspace. Start by preparing your canvas in Photoshop:
- Create a New Document: Go to
File > Newin the menu bar, or pressCtrl+N(Windows) /Command+N(Mac). For simplicity, let’s start with a white canvas. Choose a size and orientation that suits your aesthetic or project requirements. For example, if you’re creating a background, consider standard screen resolutions. - Place the Image: Once your new document is open, you need to bring in the image you wish to curve. Go to
File > Place Embeddedfrom the menu bar. Navigate to your image file, select it, and clickPlace. The image will appear on your canvas. If its size doesn’t perfectly match your document, you’ll see a transformation box around it. You can drag the corners of this box to resize the image as needed, holdingShiftto maintain aspect ratio, and then pressEnterto confirm placement. This ensures your image is ready for manipulation within the document.
Unleashing the Warp Tool: Deforming for Dimension
Now comes the exciting part: applying the curve using the Warp Tool. This is where your flat image begins to take on new dimensions.
- Access the Warp Tool: With your image layer selected in the Layers panel, press
Ctrl+T(Windows) /Command+T(Mac) to activate the Free Transform tool. - Switch to Warp Mode: In the options bar at the top of the screen, you’ll see an icon that looks like a grid with a curved arrow, or you can right-click on the image and select “Warp” from the context menu. Clicking this icon or selecting “Warp” will transform your bounding box into a grid with control points.
- Initiate the Curve: Hover your cursor over the image. You’ll see a grid appear. To start curving, click and drag one of the middle nodes (the small squares on the grid lines) in the horizontal or vertical direction. As you drag, you’ll notice the image bending and conforming to your cursor’s movement. For example, dragging a top-middle node upwards will make the top edge of the image curve upwards, creating a convex shape. Dragging it downwards will create a concave bend.
- Experiment with Control Points: The Warp Tool isn’t limited to simple bends. Each grid intersection and corner has a control point (handle). Dragging these handles allows for more intricate and nuanced deformations. You can pull corners, push sides, and create complex waves or ripples, giving your images a truly unique and manipulated look suitable for digital art or creative photo manipulation.
Refining Your Bend: Distortion and Direction Controls
The Warp Tool’s options bar offers advanced controls to fine-tune your curve, providing even greater precision for your visual design:
- Adjusting Style: In the options bar, you’ll find a “Warp” dropdown menu (usually set to “Custom” once you start dragging). This menu offers predefined warp styles like Arch, Arc, Flag, Wave, and many more. Choosing a style provides a base shape, which you can then further customize with the control points. This is an excellent starting point for achieving consistent aesthetic curves.
- Horizontal and Vertical Distortion: The options bar also presents “Bend,” “Horizontal Distortion,” and “Vertical Distortion” sliders.
- Bend: Controls the overall intensity of the curve. A positive value bends the image in one direction, a negative value in the opposite.
- Horizontal Distortion: Makes one side of the image appear larger or stretched compared to the other. For instance, a 20% horizontal distortion can create a sense of perspective where one edge recedes or protrudes more dynamically.
- Vertical Distortion: Causes the image to lean backward or forward, adding a sense of depth or tilt.
- Flipping Effects: To reverse any of these distortion effects, simply place a negative sign in front of the percentage value. For example, -20% bend will flip the curve direction. This level of control is essential for achieving precise creative ideas or aligning your curved image with other elements in a complex visual design.
- Applying and Saving: Once you’re satisfied with your curved image, press
Enterto apply the warp transformation. Then, go toFile > Save As(orCtrl+Shift+S/Command+Shift+S). Choose your desired file format (e.g., JPEG for web, PSD to retain layers and editability) and location, then clickSave. You’ve now successfully curved your image!
Unlocking the Curves Adjustment Layer: Essential for Photo Perfection
While the Warp Tool literally bends your image, the Curves adjustment layer bends its light and color, offering unparalleled control for precise tonal adjustments and color correction—a cornerstone of professional photography editing.
Accessing the Curves Panel: Your Gateway to Tonal Control
The most effective and non-destructive way to use Curves is through an adjustment layer, ensuring your original image pixels remain untouched.
- Open Your Image: Launch Adobe Photoshop and open the image you want to edit (
File > Open). - Create a Curves Adjustment Layer:
- Locate the
Layerspanel. If it’s not visible, go toWindow > Layers. - At the bottom of the Layers panel, click the “Create New Fill or Adjustment Layer” icon (it looks like a half-filled circle).
- From the list that appears, select
Curves. This will create a new “Curves” adjustment layer above your image layer and automatically open the “Properties” panel for the Curves adjustment.
- Locate the
The Anatomy of a Curve: Input, Output, and Pixel Values
Understanding the Curves dialog box is key to mastering this tool:
- The Grid and Diagonal Line: The Curves dialog box displays a graph. The default state is a diagonal line stretching from the bottom-left to the top-right.
- Horizontal Axis (Input): Represents the original tonal values of your image, from pure black (0) on the left to pure white (255) on the right, with all shades of gray in between. These are the pixel values before adjustment.
- Vertical Axis (Output): Represents the new tonal values that will be applied to your image, also from black (0) at the bottom to white (255) at the top.
- The Line: Every point on this diagonal line represents an input value mapping directly to the same output value (e.g., an input of 128 maps to an output of 128). When you click and drag this line, you’re changing this mapping.
- Histogram: Behind the diagonal line, you’ll see a histogram showing the distribution of pixels in your image across the tonal range. This is incredibly helpful for identifying areas that might be underexposed (pushed to the left) or overexposed (pushed to the right).
- RGB Channels: By default, you’re adjusting the “RGB” channel, which affects all colors equally (luminosity). However, you can select individual color channels (Red, Green, Blue) from a dropdown menu to make selective color adjustments, perfect for correcting color casts or achieving specific color grading effects.
Common Adjustments: From Contrast to Color Grading
The true power of Curves lies in its versatility. Here are some fundamental adjustments you can achieve:
- Adjusting Exposure (Brightness/Darkness):
- To Brighten: Click on the middle of the curve line and drag it upwards (or to the left). This maps midtone input values to brighter output values, making the image brighter.
- To Darken: Drag the middle of the curve line downwards (or to the right). This maps midtone input values to darker output values, making the image darker.
- Enhancing Contrast (The “S-Curve”): This is one of the most common and effective uses of Curves.
- Click on the lower-left quarter of the line (shadows) and drag it slightly downwards. This darkens the shadows.
- Click on the upper-right quarter of the line (highlights) and drag it slightly upwards. This brightens the highlights.
- The resulting “S” shape increases the difference between light and dark areas, adding a pleasing “pop” to the image without making it too dark or bright overall. This is a staple for enhancing high-resolution photography.
- Reducing Contrast (The “Inverse S-Curve”): To soften an image or recover details in harsh shadows/highlights:
- Drag the shadows point upwards.
- Drag the highlights point downwards.
- This creates an inverse “S” shape, reducing the tonal range and contrast, often used for a matte style or a dreamy aesthetic.
- Setting Black and White Points: Dragging the endpoints of the curve directly impacts the darkest and brightest pixels.
- Drag the bottom-left point (black point) horizontally to the right to deepen shadows or clip blacks. Dragging it vertically upwards “lifts” the blacks, creating a faded or matte look.
- Drag the top-right point (white point) horizontally to the left to brighten highlights or clip whites. Dragging it vertically downwards “flattens” the whites.
- Color Correction and Toning:
- Select individual color channels (Red, Green, or Blue) from the RGB dropdown.
- Correcting Color Casts: If an image has a yellow cast, you might go to the Blue channel and drag the midtones point slightly upwards (adding blue) or go to the Red channel and drag the midtones point slightly downwards (removing red, thus adding cyan).
- Creative Toning: You can add specific color tones to shadows or highlights. For example, in the Blue channel, dragging the shadows point up (adding blue to shadows) and the highlights point down (adding yellow to highlights by removing blue) can create a cinematic, desaturated blue/yellow split tone, ideal for aesthetic or emotional images.
Advanced Techniques and Workflow for Mastering Curves
Beyond the basics, Curves offers several advanced functionalities and best practices that can significantly refine your photo manipulation and creative ideas.
Precision with the Hand Pick Tool and Eyedroppers
Sometimes, visually guessing where to place a point on the curve can be challenging. This is where precision tools come in handy:
- The Hand Pick Tool: Located in the Curves panel (it looks like a small hand with an arrow). Click this tool, then hover over your image. As you move your cursor, a circle on the curve graph will highlight, indicating the tonal value of the pixel under your cursor. Click and drag directly on the image itself. Dragging upwards brightens that specific tonal range, and dragging downwards darkens it. This intuitive method allows for direct, real-time feedback on your image.
- Eyedropper Tools: At the bottom of the Curves panel, you’ll find three eyedroppers: black, gray, and white.
- Click the black eyedropper and then click on an area in your image that should be pure black. Photoshop will automatically adjust the black point on the curve.
- Click the white eyedropper and then click on an area that should be pure white. Photoshop will adjust the white point.
- Click the gray eyedropper and then click on an area that should be neutral gray. This is excellent for correcting color casts, as Photoshop will attempt to neutralize the selected point, impacting the entire color balance.
- These tools are invaluable for quickly setting accurate tonal ranges, especially for high-resolution images or stock photos where color accuracy is paramount.
Non-Destructive Editing and Layer Masks
The beauty of using Curves as an adjustment layer is its non-destructive nature and integration with layer masks:
- Flexibility: Because it’s an adjustment layer, you can double-click the Curves layer thumbnail at any time to reopen the Properties panel and modify your adjustments without altering the original image pixels. This encourages experimentation and allows for iterative refinement, crucial for complex visual design projects.
- Targeted Adjustments with Layer Masks: Every adjustment layer comes with a layer mask (a white rectangle next to the Curves thumbnail).
- White on the mask means the adjustment is fully applied.
- Black means the adjustment is completely hidden.
- Shades of gray apply the adjustment partially.
- By selecting the mask and painting with a black brush, you can selectively “remove” the Curves effect from certain areas of your image. For instance, you could darken the sky with a contrast curve but then paint black over a subject’s face to prevent it from becoming too dark, or enhance the contrast of a beautiful landscape while leaving a subtle softness on a foreground element. This allows for incredibly detailed photo manipulation.
Auto-Correction and Custom Looks
For quick fixes or starting points, Curves offers automated solutions and endless creative possibilities:
- Auto Options: In the Curves Properties panel, click the small icon at the top-right (often a menu icon with three horizontal lines). Choose “Auto Options.” Here, you can select methods like “Enhance Brightness and Contrast” or “Find Dark & Light Colors.” The “Find Dark & Light Colors” option, in particular, can be excellent for automatically correcting color casts by identifying the darkest and lightest pixels and adjusting the curve accordingly. While not always perfect, it provides a solid foundation for further manual tweaks, saving time in your workflow.
- Creating Custom Looks and Styles: The ability to manipulate the curve’s shape in intricate ways allows for infinite creative expression. You can create unique color grading presets, develop signature matte or cinematic looks, or rescue underexposed or overexposed images by meticulously adjusting different points along the curve. This is where your understanding of light, color, and mood truly comes into play, transforming simple images into stunning examples of digital art. The versatility of Curves makes it ideal for developing distinctive editing styles that can be applied across thematic collections or mood boards.
Conclusion
Whether you’re physically deforming an image to add dynamic shape with the Warp Tool or meticulously sculpting its light and color with the Curves adjustment layer, mastering these techniques in Photoshop is fundamental for any serious visual creator. From crafting aesthetic backgrounds and enhancing nature photography to correcting color issues in high-resolution images, the power of “curving” offers unparalleled control over your digital creations. Tophinhanhdep.com encourages you to experiment with both methods, integrate them into your workflow, and unlock the full potential of your image manipulation skills. Dive in, practice these steps, and start transforming your images today into truly captivating masterpieces!