Precision Power: The Ultimate Guide to Cutting Out Images on Tophinhanhdep.com

In the dynamic world of digital imagery, the ability to precisely “cut out” a subject from its background is not just a technical skill—it’s a foundational art. Whether you’re a seasoned photographer, an aspiring graphic designer, or simply someone looking to elevate their social media presence, mastering image cutouts opens a universe of creative possibilities. At Tophinhanhdep.com, we understand the transformative power of a perfectly isolated image. From crafting aesthetic wallpapers and dynamic backgrounds to enabling intricate photo manipulations and stunning digital art, the cutout technique is indispensable. This comprehensive guide will delve into the various methods and tools available on Tophinhanhdep.com, empowering you to isolate subjects with unparalleled accuracy and integrate them seamlessly into new visual narratives.

Imagine pulling a vibrant flower from a busy garden to place it against a serene abstract backdrop, or isolating a person to transport them to a breathtaking nature scene. This is the magic of image cutting. It allows for unmatched flexibility in visual composition, making it a cornerstone for creating high-resolution stock photos, developing unique editing styles, and generating fresh visual design ideas. Tophinhanhdep.com is your ultimate resource for achieving these professional-grade results, providing both intuitive tools and insightful tutorials to fuel your creative journey.
Why Cutting Out Images is Essential for Modern Visuals
The relevance of cutting out images extends far beyond simple aesthetic adjustments. In today’s visually-driven landscape, this technique is a critical component for various applications, directly aligning with the core offerings of Tophinhanhdep.com, which encompasses everything from inspirational images to practical image tools.

Firstly, for Visual Design and Graphic Design, cutouts are the building blocks of compelling compositions. They allow designers to extract elements and reassemble them into new designs, creating advertisements, posters, and digital art that truly stand out. Whether you’re crafting a mood board for a new project or designing a thematic collection for Tophinhanhdep.com, the ability to cleanly separate a subject is paramount. It gives you the freedom to experiment with different backgrounds, textures, and overlays, leading to unique and impactful visual narratives.
Secondly, in Photography and Digital Photography, especially when dealing with High Resolution and Stock Photos, clean cutouts are often a requirement. Product photographers, for instance, frequently need to isolate items from their original settings to place them on clean, professional backgrounds for e-commerce platforms. Similarly, portrait photographers might cut out a subject to replace a distracting background with something more artistic or complementary, thereby enhancing the overall aesthetic and emotional impact of the image. This technique is vital for refining your Editing Styles and ensuring your beautiful photography reaches its full potential.
Thirdly, for Image Inspiration & Collections, cutouts facilitate the creation of unique content. Want to design a custom wallpaper featuring your favorite elements? Or perhaps create an abstract background with specific visual motifs? Image cutting makes it possible to layer and combine elements, transforming ordinary pictures into extraordinary pieces of digital art. It’s a key technique for generating trending styles and unique photo ideas, helping you curate diverse and engaging visual collections on Tophinhanhdep.com.
Lastly, and perhaps most importantly for many users, cutouts are invaluable for social media and personal aesthetics. Crafting eye-catching profile pictures, engaging story graphics, or personalized backgrounds becomes effortless when you can easily isolate subjects. It helps in creating consistent branding, developing a unique visual identity, and sharing creative ideas that resonate with your audience. The versatility offered by image cutting ensures that whether you’re aiming for a minimalist look or a complex photo manipulation, your vision can be realized with precision and flair.
At Tophinhanhdep.com, we empower you with the knowledge and resources to make these creative endeavors a reality. Our Image Tools are designed to simplify complex processes, while our extensive libraries of Wallpapers, Backgrounds, and Aesthetic images provide endless inspiration for your cutout projects.
Mastering the Art of Image Cutouts: Techniques and Tools on Tophinhanhdep.com
Achieving a perfect image cutout can range from a one-click automated process to a meticulous, multi-step manual refinement. Tophinhanhdep.com is dedicated to providing you with access to diverse methods that cater to all skill levels and project complexities. We’ll explore how both intelligent AI solutions and traditional precision techniques can be harnessed through our platform or with tools we highly recommend, ensuring your images always achieve the desired aesthetic.
Automated AI Cutout for Instant Background Removal
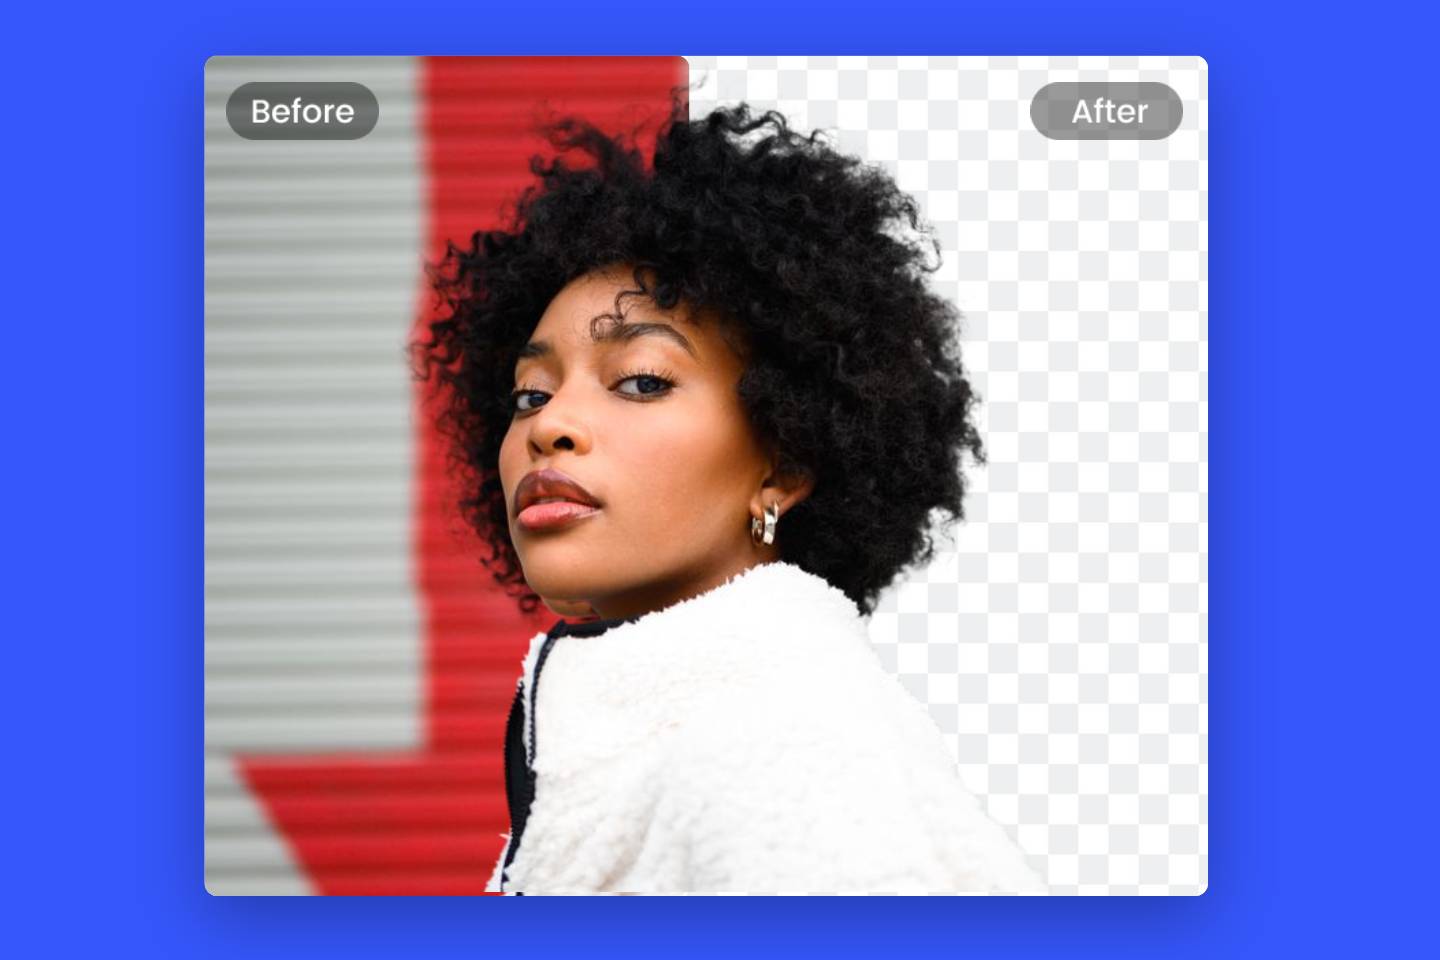
For those who prioritize speed and efficiency without compromising quality, Tophinhanhdep.com champions the use of AI-powered cutout tools. These revolutionary tools leverage advanced algorithms to automatically detect the main subject of an image and intelligently remove its background, often with astonishing precision. This functionality is crucial for users needing quick, professional results for common tasks like e-commerce product listings or dynamic social media content.
How Tophinhanhdep.com’s AI Cutout Works (or tools we recommend):
- Seamless Upload: Begin by simply uploading the image you wish to cut out to the designated tool area on Tophinhanhdep.com, or drag and drop it directly onto the canvas. The user-friendly interface is designed for immediate engagement, ensuring a quick start to your editing process.
- Intelligent Subject Detection: Once uploaded, the AI-enabled background remover instantly analyzes your photo. It automatically identifies the foreground subject—be it a person, an animal, a product, or a complex object—and distinguishes it from the background. This smart selection process is the core of its efficiency.
- Instant Background Removal: In a flash, the tool performs the photo cutout, rendering the background transparent. The intelligence of these AI algorithms means they can tackle even the most challenging edges, such as stray hairs, delicate animal fur, or intricate object outlines, with remarkable accuracy.
- Download and Integrate: The processed image, now with a transparent background, can be downloaded in a high-quality PNG format. This transparent PNG is ideal for immediate use in other design projects, for layering onto new backgrounds, or for further editing within Tophinhanhdep.com’s Visual Design suite.
Practical Applications for Tophinhanhdep.com Users:
- E-commerce Product Photography: Easily prepare professional product photos by removing distracting backgrounds and replacing them with clean white or studio-style settings. This optimizes your product images for maximum impact on online marketplaces.
- Social Media Graphics: Create eye-catching cutout photos for Instagram, Facebook, Pinterest, and other platforms. A flawless cutout can transform a simple picture into a viral sensation, allowing you to add extra flair with text templates, illustrations, and stickers available through Tophinhanhdep.com’s resources.
- Creative Assets: Convert any image subject into a “sticker” or a visual asset that can be reused across various projects, from digital art compositions to personalized wallpapers.
The beauty of AI-powered cutouts lies in their balance of speed, precision, and ease of use, making professional-grade image manipulation accessible to everyone on Tophinhanhdep.com.
Manual Precision with Advanced Layering and Masking Techniques
While AI tools offer remarkable speed, there are instances where complete creative control and meticulous refinement are paramount. For these scenarios, Tophinhanhdep.com supports and provides tutorials on advanced manual techniques, often leveraging powerful photo editing software like Adobe Photoshop or Photoshop Elements, which are staples in professional digital photography and graphic design. These methods involve working with layers and clipping masks, offering unparalleled flexibility and non-destructive editing capabilities.
The core concept is to use a shape or selection as a “mask” that reveals only a portion of the image above it. This is particularly useful for achieving intricate shapes, adding graduated transparency, or preparing complex photo manipulations.
General Steps for Manual Cutouts (applicable to advanced tools recommended by Tophinhanhdep.com):
-
Prepare Your Image:
- Open your chosen image within your preferred advanced photo editing software.
- Convert to a Layer: Typically, your image will open as a “Background” layer. To enable flexible editing, convert this into a regular layer. In most software, you can achieve this by going to
Layer > New > Layer from Backgroundor simply double-clicking the background layer in the Layers palette and naming it. This ensures you can manipulate the image without restrictions.
-
Define Your Cutout Shape:
- Select a Shape Tool: Locate the
Shapestool (often found in the toolbar). Choose aCustom Shape Toolto access a library of predefined shapes (e.g., hearts, stars, arrows) or opt for aRectangle,EllipseorPolygontool for basic geometries. - Draw Your Shape: Draw the desired shape directly onto your image. This shape will act as the outline for your cutout. Don’t worry about its exact position or color just yet; its primary function is to define the boundaries. This action will create a new “Shape Layer” in your Layers palette.
- Select a Shape Tool: Locate the
-
Arrange Layers for Clipping Mask:
-
Order Matters: In the Layers palette (if not visible, go to
Window > Layersto open it), ensure that your picture layer is positioned directly above your shape layer. You can reorder layers by simply dragging them up or down in the palette. -
Create the Clipping Mask: Right-click on your picture layer in the Layers palette. From the contextual menu, select
Create Clipping Mask. This command instructs the picture layer to conform to the transparency and shape of the layer directly beneath it (your shape layer). -
Result: The picture layer is now “clipped” to the shape below. Only the parts of your picture that overlap with the opaque areas of your shape layer will be visible. The Layers palette will visually indicate this by indenting the clipped picture layer and showing a small arrow pointing down to the shape layer.
-
-
Refine and Adjust:
- Independent Adjustment: The beauty of clipping masks is that both the picture layer and the shape layer remain independent. You can use the
Move Toolto adjust the position of your picture within the mask, or resize/reposition the shape itself to alter the cutout area. - Fine-tuning Selections (for complex subjects): For cutting out complex subjects like people, animals, or objects with intricate details (e.g., wispy hair), a simple shape tool might not suffice. Here, Tophinhanhdep.com recommends using advanced selection tools before applying a mask.
- Quick Selection Tool: This intelligent brush tool (often found grouped with the Object Selection tool) allows you to “paint” over the area you want to select. It automatically detects edges based on color, tone, and contrast, making initial selections quick and intuitive. You can toggle between
Add to selectionandSubtract from selectionmodes to refine your edges. - Select and Mask / Refine Edge: After making a preliminary selection with any tool, accessing a dedicated
Select and Maskworkspace (orRefine Edgein older versions) provides a powerful environment for meticulous edge refinement. This is crucial for achieving realistic cutouts of complex elements like hair or fur. Within this workspace, you can use aRefine Edge Brushto intelligently smooth and blend challenging edges. Sliders likeRadius(to expand/contract the edge detection) andFeather(to soften the edge) help achieve a natural look. You can also change theView Modeto better see the edges against different backgrounds. - Color Range Selection: For subjects against a fairly uniform background color, the
Color Rangefeature can be incredibly efficient. By sampling a color from the background (or foreground), you can create a selection based on color similarity. TheFuzzinessslider allows you to control the range of similar tones included in the selection. This method can save significant time on intricate but color-consistent areas.
- Quick Selection Tool: This intelligent brush tool (often found grouped with the Object Selection tool) allows you to “paint” over the area you want to select. It automatically detects edges based on color, tone, and contrast, making initial selections quick and intuitive. You can toggle between
- Once your precise selection is made, you can apply it as a Layer Mask directly to your image layer. This non-destructive method allows you to easily edit the mask later without altering the original image pixels.
- Independent Adjustment: The beauty of clipping masks is that both the picture layer and the shape layer remain independent. You can use the
By combining these advanced layering and selection techniques, Tophinhanhdep.com users can achieve highly professional and customizable image cutouts, perfect for detailed graphic design, photo manipulation, and high-resolution digital art projects.
Enhancing Your Cutouts: Beyond Simple Removal
Cutting out an image is often just the first step in a larger creative process. Tophinhanhdep.com encourages users to go beyond basic removal, exploring techniques that add depth, realism, and a polished finish to their cutouts. These enhancements can transform a simple extracted image into a seamlessly integrated element within a new visual composition, aligning perfectly with our goals for Visual Design and Creative Ideas.
Adding Graduated Transparency for Soft Edges
Sometimes, a hard, sharp edge around a cutout can appear unnatural, especially when integrating a subject into a new, often softer, background. Graduated transparency allows the edges of your cutout to gently fade into the surrounding environment, creating a more harmonious blend. This technique is highly effective for aesthetic backgrounds and artistic photo manipulation.
How to Apply Graduated Transparency (using principles from advanced software):
- Rasterize/Simplify Layer: If your shape layer is a vector shape (meaning it’s mathematically defined and scalable without pixelation), you’ll first need to convert it into a pixel-based layer. In advanced editing software, this is typically done by right-clicking the shape layer in the Layers palette and selecting
Rasterize Layer(orSimplify Layerin some applications). This step allows pixel-based effects to be applied. - Apply a Blur Filter: With the now-rasterized shape layer selected, navigate to the
Filtermenu, thenBlur, and chooseGaussian Blur. - Adjust the Radius: A dialog box will appear, allowing you to control the
Radiusof the blur. Increase the radius to a higher number (e.g., 30 pixels or more, depending on your image size and desired effect). As you adjust the slider, you’ll observe the edges of your shape layer becoming softer and more transparent. - Observe the Effect: Since your picture layer is clipped to this blurred shape layer, the graduated transparency will transfer directly to your cutout. The edges of your subject will now subtly fade out, creating a dreamlike or ethereal effect, perfect for nature-themed images or abstract compositions found on Tophinhanhdep.com.
This technique is incredibly versatile and can be applied to text layers or other pixel layers acting as clipping masks, demonstrating the powerful interplay between different image elements.
Adding Layer Effects for Depth and Realism
Layer effects (often called Layer Styles) are non-destructive attributes that can be applied to a layer to add various visual enhancements. These effects can simulate lighting, texture, and depth, making your cutouts feel more grounded and integrated into their new surroundings. Tophinhanhdep.com encourages the use of these effects to elevate your graphic design and photo manipulation projects.
Common Layer Effects and Their Application:
-
Drop Shadow: This effect creates a shadow that falls behind the contents of the layer. It’s essential for giving a cutout a sense of depth and making it appear as if it’s lifted off the background.
- Application: Select your shape layer (the one your picture is clipped to). Access the
Layer Styledialog box (often found underLayer > Layer Styleor by double-clicking the layer thumbnail in the Layers palette). ChooseDrop Shadow. Here, you can adjust parameters likeAngle,Distance(how far the shadow extends),Spread(how solid the shadow is),Size(how diffused the shadow is), andOpacity. - Tip for Realism: Match the shadow’s direction and intensity to the lighting of your new background image for a convincing effect.
- Application: Select your shape layer (the one your picture is clipped to). Access the
-
Stroke (Border): Adding a stroke creates an outline around your cutout. This can be used for decorative purposes, to create a sticker-like effect, or to separate the subject more distinctly from the background.
- Application: Within the
Layer Styledialog, selectStroke. You can set theSize(thickness),Position(inside, outside, or center of the edge),Blend Mode,Opacity, andColorof the stroke. - Creative Use: A subtle white stroke can highlight a subject for social media graphics, while a colored stroke can match a brand’s palette.
- Application: Within the
-
Inner Shadow/Inner Glow: These effects apply shadows or glows inside the edges of the layer content, creating a recessed or illuminated appearance.
- Application: Similar to Drop Shadow, these are found in the
Layer Styledialog. They can add a subtle three-dimensional quality or highlight internal contours.
- Application: Similar to Drop Shadow, these are found in the
-
Bevel & Emboss: This complex effect adds various combinations of highlights and shadows to give text and shapes a three-dimensional, carved, or raised appearance.
- Application: Useful for digital art or creating stylized buttons and elements from your cutouts.
By thoughtfully applying these layer effects, Tophinhanhdep.com users can transform simple cutouts into professional-grade visual elements, enhancing the overall appeal and narrative of their high-resolution images, backgrounds, and digital art. Experimentation is key to discovering how these tools can best serve your creative vision.
Saving and Exporting Your Masterpieces
Once you’ve meticulously cut out and refined your image, the final crucial step is to save and export it in the appropriate format. Tophinhanhdep.com emphasizes proper file management to ensure your creative work is preserved and ready for any application, whether it’s for web, print, or future editing.
Choosing the Right Format:
- PNG for Transparency: If your goal is to use the transparent cut-out image elsewhere—for layering onto a new background, integrating into a graphic design project, or creating a digital sticker—you absolutely must save it in a format that supports transparency. PNG (Portable Network Graphics) is the industry standard for this. When saving as PNG, ensure you select the option to preserve transparency. This will allow your cutout to seamlessly blend with any new backdrop without a white or colored box around it. Tophinhanhdep.com’s Image Tools include converters that can help if you accidentally save in the wrong format.
- PSD for Editable Layers: If you wish to preserve all your layers, clipping masks, and layer effects for potential future editing, always save a copy in the native format of your editing software, typically PSD (Photoshop Document). This non-destructive approach allows you to revisit your project and make adjustments without losing any quality or flexibility. This aligns with the principles of Digital Photography and advanced Editing Styles.
- JPG for Web and General Use (without transparency): If your cutout is destined for a solid background or a context where transparency isn’t needed, and file size is a concern, JPG (Joint Photographic Experts Group) is an efficient choice. However, remember that JPG does not support transparency, so any transparent areas will be filled with white or black upon saving. For web optimization, Tophinhanhdep.com offers compressors and optimizers that can reduce JPG file sizes without significant quality loss.
Integrating Your Cutouts into New Projects:
- Copy Merged for Quick Transfer: For immediate use of your cutout in another document within the same software, select all layers (
Ctrl + Afor Windows orCommand + Afor Mac) and then useEdit > Copy Merged. This flattens a copy of all visible layers into a single image, which you can then paste into another project. - Smart Objects for Advanced Workflow: In professional software, you can combine your clipped layers into a
Smart Object. Select both your picture layer and your shape layer in the Layers palette, right-click, and chooseConvert to Smart Object. A Smart Object preserves the original layers and allows you to scale, rotate, and transform the combined cutout non-destructively. You can then easily drag this Smart Object into other projects, maintaining full editability of its contents. This is a cornerstone of professional Photo Manipulation and Visual Design.
By understanding these saving and integration strategies, you ensure that your beautifully cut-out images from Tophinhanhdep.com are always ready to be transformed into stunning wallpapers, engaging social media posts, or intricate pieces of digital art.
Unleash Your Creativity with Tophinhanhdep.com
The ability to precisely cut out an image is a gateway to boundless creativity in the digital realm. It transforms static pictures into dynamic elements, enabling you to craft compelling visual narratives, enhance your photography, and design stunning graphics. From the instant gratification of AI-powered background removal to the meticulous artistry of manual layering and masking, Tophinhanhdep.com provides the knowledge and resources to master this essential skill.
Whether your passion lies in creating aesthetic backgrounds, developing unique digital art, curating thematic collections, or simply improving your everyday visuals, Tophinhanhdep.com is your trusted partner. Our platform is not just a repository of beautiful photography and high-resolution images; it’s a vibrant hub for learning, inspiration, and creation. We offer a suite of Image Tools, including AI Upscalers, Converters, and Optimizers, to complement your cutting-out endeavors, ensuring your final output is always pristine and impactful.
Explore our vast collections of Images—ranging from captivating Nature scenes to thought-provoking Abstract art—and let them fuel your next creative project. With the power of precision cutouts at your fingertips, you are limited only by your imagination. Dive into the world of Visual Design and Photo Manipulation, discover new Creative Ideas, and contribute to the ever-evolving landscape of digital aesthetics.
Start creating stunning visuals today. Visit Tophinhanhdep.com and unlock the full potential of your images!