Mastering Image Cutting in Adobe Illustrator: Your Ultimate Guide

In the dynamic world of visual design, the ability to precisely manipulate images and graphics is a cornerstone of creating compelling content. Whether you’re a seasoned graphic designer, a photographer refining high-resolution shots, or a content creator looking to craft engaging visuals, mastering how to cut or crop an image in Adobe Illustrator is an indispensable skill. Unlike simpler tools like Microsoft PowerPoint or Canva, Illustrator offers a multifaceted approach, providing both straightforward cropping options for raster images and sophisticated cutting tools for vector graphics, text, and intricate shapes.
At Tophinhanhdep.com, we understand the importance of quality imagery, from stunning wallpapers and backgrounds to aesthetic photography and abstract art. Our comprehensive resources on image tools, visual design, and creative inspiration underscore the value of precision in every visual asset. This guide will delve into the various methods Adobe Illustrator offers for cutting and cropping, ensuring that whether you’re dealing with a beautiful landscape photo or a complex vector illustration, you have the right technique at your fingertips. We’ll explore methods that allow for permanent removal of unwanted areas, as well as non-destructive techniques that preserve your original artwork within the file, giving you ultimate flexibility in your creative process.
For this tutorial, we’ll be using Adobe Illustrator 2022, but the principles and most functions are applicable across recent Creative Cloud versions. Let’s unlock the full potential of Illustrator’s cutting capabilities and elevate your visual design projects.
Fundamental Methods for Cropping Raster Images
When it comes to images – your cherished photographs, striking backgrounds, or any rasterized visual asset – Illustrator offers dedicated tools to refine their boundaries. Cropping, in this context, primarily involves selecting a rectangular area of an image you wish to keep and discarding the rest. While it might seem like a simple operation, understanding the nuances of each method ensures you choose the most efficient and appropriate approach for your specific design needs.
Method 1: The “Crop Image” Tool (Illustrator CC 2017 and Above)
The “Crop Image” function is the most direct and intuitive method for handling raster images like .jpg, .png, .eps (rasterized), or other photo formats in Illustrator. This tool is specifically designed for pixel-based imagery and cannot be applied to editable vector graphics. It’s ideal for quickly trimming photographs or embedded images to a desired rectangular or square dimension.
Understanding the Process: When you use the “Crop Image” tool, Illustrator effectively embeds a copy of your image within the file, applying the crop. While your original image file on your computer remains untouched, the version within your Illustrator document is permanently trimmed. This means that if you later decide to revert to the original uncropped image within Illustrator, you would need to re-import the original file. This embedding process ensures that your Illustrator file remains self-contained, but it’s a key consideration for workflow and file management.

Step-by-Step Guide to the Crop Image Tool:
-
Prepare Your Image in Illustrator:
- First, ensure your image is placed or opened within an Illustrator artboard. If you’re working with a new project, you can drag and drop your image onto the artboard or use
File > Place(Shift+Command+Pon Mac,Shift+Control+Pon Windows) to import it. - Once placed, decide on the desired visual outcome. For instance, if you have a high-resolution photograph from Tophinhanhdep.com that features a cute cat amidst trees, and you want to focus more on the cat, you might need to resize the image. Click the image with the “Selection Tool” (the black arrow, shortcut
V), move your cursor to a corner, pressShift(to maintain aspect ratio), and drag to resize. Adjust it so the cat is within your intended final boundaries.
- First, ensure your image is placed or opened within an Illustrator artboard. If you’re working with a new project, you can drag and drop your image onto the artboard or use
-
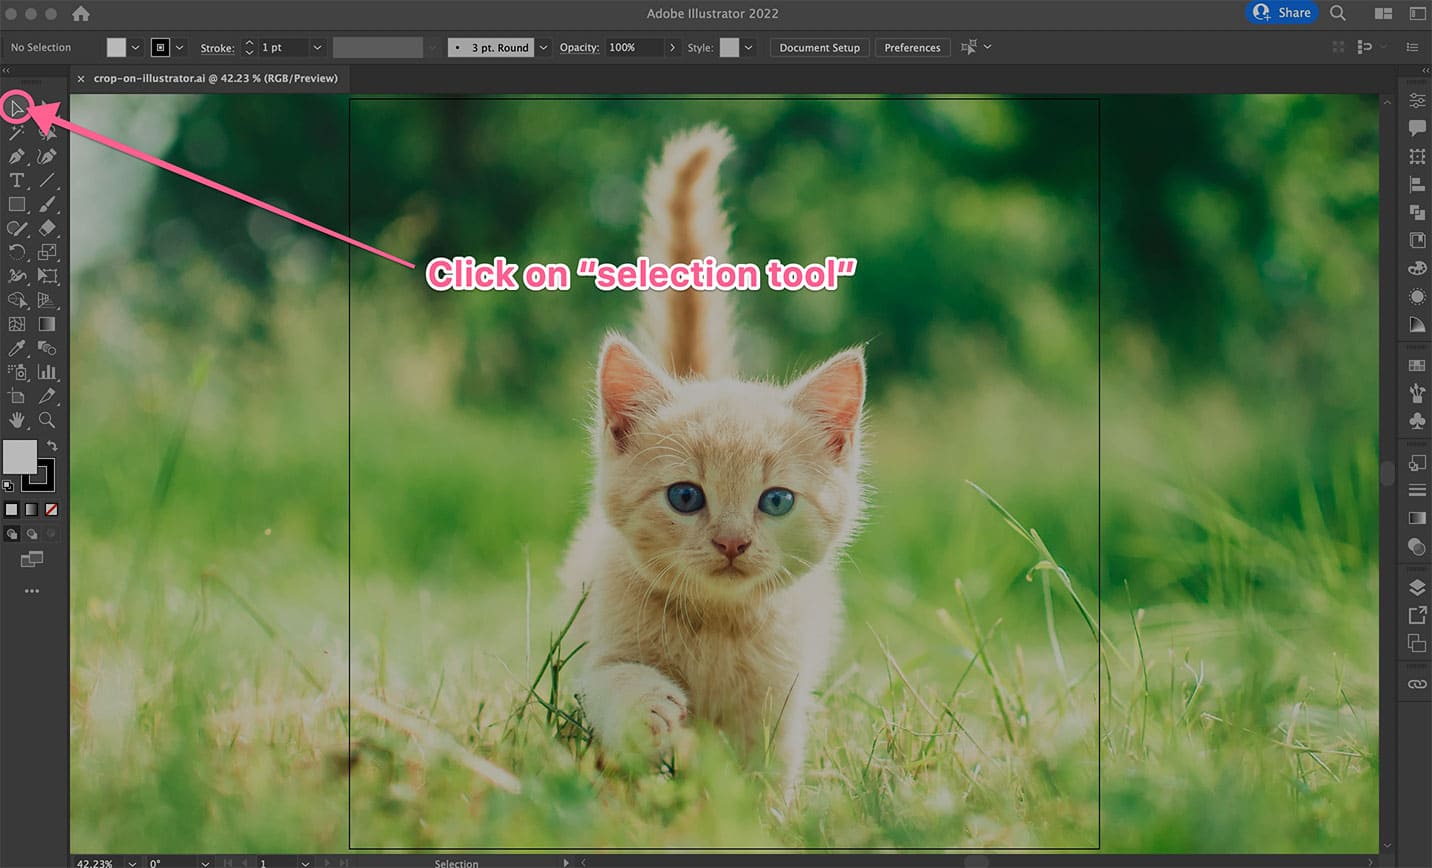
Select the Image:
- Activate the “Selection Tool” (black arrow icon in the left toolbar or press
V). If your toolbar appears condensed, go toWindow > Toolbars > Advancedto expand it. - Click directly on the image you wish to crop. A bounding box will appear around it, indicating it’s selected.
- Activate the “Selection Tool” (black arrow icon in the left toolbar or press
-
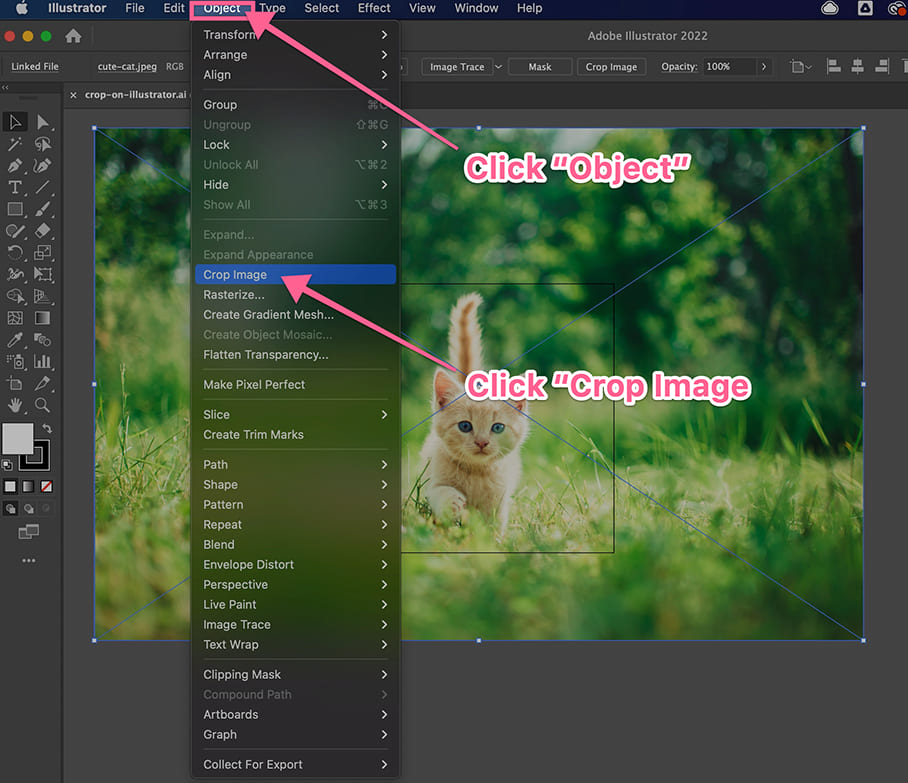
Access the “Crop Image” Function:
- Navigate to the top menu bar and click
Object. - From the dropdown menu, select
Crop Image. - A prompt might appear, informing you that the image will be embedded. Click
OKto proceed. This is Illustrator confirming that the original image’s full data will no longer be directly accessible from within this Illustrator file after the crop, though the source file on your disk remains safe.
- Navigate to the top menu bar and click
-
Adjust the Cropping Area:
- After the prompt, you’ll see a black dotted line outline (the crop widget) around your image. This widget has handles on its corners and sides.
- Click and drag these handles inward or outward to define the exact area you want to keep. The lighter, transparent area outside the dotted lines indicates what will be removed. Center your desired composition within this defined area.
-
Apply the Crop:
- Once you’re satisfied with the cropping area, locate the “Apply” button, typically found in the Control panel at the top of your screen or in the Properties panel (if not visible, go to
Window > Properties). - Click
Apply. The parts of the image outside your defined crop area will disappear, leaving only your desired selection on the artboard.
- Once you’re satisfied with the cropping area, locate the “Apply” button, typically found in the Control panel at the top of your screen or in the Properties panel (if not visible, go to
This method is incredibly efficient for quick adjustments, especially when preparing numerous images for web optimization or digital presentations, a common task for users sourcing high-resolution stock photos from Tophinhanhdep.com.
Method 2: Precision Cropping with Clipping Masks
The Clipping Mask is a remarkably versatile and non-destructive method for cropping images and vector graphics in Adobe Illustrator. Unlike the “Crop Image” tool, which is limited to rectangular cuts, clipping masks allow you to crop an image into any shape – be it a circle, a star, a complex custom path drawn with the Pen tool, or even text. The beauty of this technique lies in its non-destructive nature: the original image data remains intact underneath the mask, meaning you can easily readjust the crop or even release the mask at any time without losing any pixels.
This makes it an excellent choice for visual design, photo manipulation, or creating aesthetic images where precise, unique shapes are required.
Understanding the Process: A clipping mask works by using one object (the “clipping path”) to hide parts of other objects (the “clipped artwork”) that fall outside its boundaries. The clipping path must always be a closed shape and needs to be positioned above the artwork it intends to mask in the layer stack. Whatever is within the boundaries of the clipping path remains visible, and everything outside it becomes invisible.
Step-by-Step Guide to Creating Custom Cuts with Clipping Masks:
-
Prepare Your Artwork:
- Import your raster image into Illustrator (
File > Placeor drag and drop). This technique also works seamlessly with vector graphics. - Ensure your image is positioned on the artboard.
- Import your raster image into Illustrator (
-
Draw Your Clipping Path (The Shape of Your Crop):
- Select a shape tool from the toolbar (e.g., “Rectangle Tool” (
M), “Ellipse Tool” (L), or “Star Tool”). Alternatively, use the “Pen Tool” (P) to draw a completely custom, irregular shape. - Draw this shape directly over the area of the image you want to keep. This shape will define the visible portion of your image.
- Pro Tip for Visibility: To easily see how your clipping path aligns with the image underneath, you can temporarily turn off the fill color of your shape (set fill to “None”) and apply a contrasting stroke color. This allows you to precisely position the mask.
- Select a shape tool from the toolbar (e.g., “Rectangle Tool” (
-
Ensure Correct Stacking Order:
- It is crucial that the clipping path (the shape you just drew) is positioned above the image or objects it will mask.
- If your image is on a separate layer or if your shape is not on top, select the shape with the “Selection Tool” (
V), then go toObject > Arrange > Bring to Front(Shift+Command+]on Mac,Shift+Control+]on Windows).
-
Select Both Objects:
- Using the “Selection Tool” (
V), click and drag a marquee selection box that encompasses both your clipping path shape and the image (or multiple objects) you want to crop. - Alternatively, click on the image, then hold down
Shiftand click on the clipping path shape. Both should now be selected.
- Using the “Selection Tool” (
-
Create the Clipping Mask:
- Go to the top menu, click
Object. - From the dropdown, select
Clipping Mask. - Then, click
Make(Command+7on Mac,Control+7on Windows).
- Go to the top menu, click
-
Refine Your Mask (Optional):
- Once the clipping mask is applied, your image will appear cropped to the shape of your path.
- If you need to adjust the position of the image within the mask, use the “Direct Selection Tool” (white arrow, shortcut
A) to click on the image itself (not the clipping path) and drag it. - To edit the clipping path’s shape or size, use the “Direct Selection Tool” (
A) to select anchor points or handles, or use the “Selection Tool” (V) to select the entire masked group and resize it. - To release the mask and revert to the original uncropped image and shape, select the masked group, go to
Object > Clipping Mask > Release.
This technique is incredibly powerful for adding creative flair to your images, whether you’re designing unique aesthetic elements or integrating dynamic shapes into your graphic design projects, leveraging the vast image collections from Tophinhanhdep.com.
Method 3: Dynamic Transparency with Opacity Masks
The Opacity Mask in Adobe Illustrator offers a uniquely sophisticated and flexible way to “crop” an image, especially when you need nuanced control over transparency or soft edges. Instead of simply cutting away parts of an image, an opacity mask uses the grayscale values of a separate object (the mask) to control the transparency of another object. Areas of the mask that are white will reveal the underlying image as fully opaque, areas that are black will render it completely transparent, and shades of gray will create varying levels of semi-transparency.
This method is particularly valuable for creative ideas in digital art, photo manipulation, and visual design where gradual fades, subtle blends, or intricate transparent effects are desired.
Understanding the Process: An opacity mask requires two elements: the artwork you want to mask (e.g., your image) and the object that will serve as the mask (a shape, a gradient, text, etc.). The opacity mask is non-destructive, meaning you can easily edit or release it at any time, preserving your original artwork.
Step-by-Step Guide to Achieving Transparency with Opacity Masks:
-
Place Your Image:
- Start by placing your raster image onto the Illustrator artboard (
File > Place).
- Start by placing your raster image onto the Illustrator artboard (
-
Create Your Masking Shape:
- Draw the shape that will define how your image is revealed. This can be any closed path (rectangle, ellipse, custom shape, or even text).
- For an opacity mask, the fill color of this shape is crucial:
- White: Areas filled with white will show the image as opaque.
- Black: Areas filled with black will hide the image (make it transparent).
- Grays: Shades of gray will create varying degrees of transparency.
- Gradients: Using a gradient (e.g., black to white) allows for smooth fades and soft edges, ideal for blending images into backgrounds or creating unique aesthetic effects.
- Place this masking shape directly over the image, covering the portion you want to affect.
-
Ensure Correct Stacking Order:
- Like clipping masks, the masking shape must be positioned directly above the image you want to mask. Use
Object > Arrange > Bring to Frontif necessary.
- Like clipping masks, the masking shape must be positioned directly above the image you want to mask. Use
-
Select Both Objects:
- Use the “Selection Tool” (
V) to select both the image and the masking shape.
- Use the “Selection Tool” (
-
Open the Transparency Panel:
- Go to
Window > Transparencyto open the Transparency panel. You’ll see options for blending modes and opacity.
- Go to
-
Make the Opacity Mask:
- In the Transparency panel, ensure both the image and the mask are selected.
- Click the
Make Maskbutton. - You’ll notice two small squares appear in the Transparency panel: one representing your original artwork and one representing the mask. The mask square will be active (outlined), indicating you can now edit the mask itself.
- By default,
Clipmight be checked (making the mask act like a clipping mask as well) andInvert Maskmight be an option (reversing the white/black effect). Adjust these settings as needed.
-
Adjust and Refine the Mask (Optional):
- To edit the mask, click on the mask square in the Transparency panel. You are now “inside” the mask editing mode. You can draw new shapes, apply gradients, or change colors within this mask.
- For example, if you used a white shape and part of your image disappeared, it’s because the default behavior is often to
Clipand then invert. You might need to uncheckClipandInvert Maskto get the desired effect. If you want a gradual fade, apply a black-to-white radial or linear gradient to your masking shape. - To go back to editing your original artwork, click the artwork square in the Transparency panel.
- To release the opacity mask, select the masked object and click
Release Maskin the Transparency panel.
Opacity masks provide unparalleled creative control, enabling you to produce stunning visual effects for abstract images, digital photography compositions, and intricate graphic designs. This technique from Tophinhanhdep.com can truly transform your images into works of art.
Advanced Techniques for Cutting Vector Objects and Shapes
While cropping primarily addresses raster images, Adobe Illustrator, being a vector-based program, excels at “cutting” or dividing vector objects with remarkable precision and versatility. This goes beyond merely trimming edges; it involves splitting, subtracting, and manipulating paths to create entirely new shapes. These methods are crucial for graphic design, logo creation, digital art, and photo manipulation when working with scalable vector elements.
Method 4: Freeform Cutting with Eraser, Scissors, and Knife Tools
For those moments when you need to make quick, freehand alterations or precise breaks in vector paths, Illustrator provides a trio of specialized cutting tools: the Eraser, Scissors, and Knife tools. These tools allow for intuitive and dynamic modification of vector objects, offering a more immediate interaction than path point editing.
Where to Find the Cutting Tools:
If you don’t see all three tools immediately in your toolbar, they are likely nested together. Look for one of these icons (Eraser Tool, Scissors Tool, or Knife Tool) in your left toolbar. Click and hold the mouse button on the visible tool, and a flyout menu will appear, revealing the others. To ensure all tools are visible, enable the “Advanced Toolbar” via Window > Toolbars > Advanced.
The Eraser Tool: Freeform Object Removal
The “Eraser Tool” (Shift+E) is your go-to for quickly and somewhat imprecisely removing parts of vector shapes or objects. It works much like a physical eraser, allowing you to “rub away” areas, effectively cutting and separating the remaining paths. This is perfect for illustrative styles or when you need to quickly carve out an irregular section without needing to retain the removed portion.
How to Cut an Object Freely with the Eraser Tool:
- Select the Object(s): Use the “Selection Tool” (
V) to select the vector object(s) you want to erase from. If nothing is selected, the Eraser tool will affect all visible objects. - Activate the Eraser Tool: Select the “Eraser Tool” from the toolbar, or press
Shift+E. - Adjust Eraser Size (Optional): You can change the size of the eraser brush by pressing the left bracket key (
[) to make it smaller or the right bracket key (]) to make it larger. Adjust the size to suit the precision needed. - Erase: Click and drag your mouse over the area of the object you wish to remove. As you “erase,” Illustrator will intelligently close the open paths created by your action, turning a single object into multiple distinct shapes. For example, if you “bite” into an apple shape, it will become two closed paths: the main apple with a bite taken out, and the “bite” piece itself (which will typically be removed).
This tool is excellent for adding organic, hand-drawn imperfections or quickly tidying up overlapping shapes in your digital art and graphic design work.
The Scissors Tool: Precise Path Splitting
The “Scissors Tool” (C) offers a more controlled approach to cutting, specifically designed for splitting existing paths at anchor points or along segments. It doesn’t “erase” areas but rather opens up paths or divides them into separate, editable segments. This is invaluable when you need to precisely break a closed shape into two open paths or segment a line for further manipulation.
How to Cut an Object into Two Parts with the Scissors Tool:
- Select the Object: Use the “Selection Tool” (
V) to select the vector object whose path you want to cut. - Activate the Scissors Tool: Select the “Scissors Tool” from the toolbar, or press
C. - Click on the Path: Move the Scissors tool cursor over an anchor point or anywhere along a path segment. Click once.
- Make Another Cut (Optional): If you click on a closed path, it becomes an open path. To truly divide an object into two distinct parts (e.g., splitting a strawberry graphic down the middle), you would typically need to make two cuts on opposing sides of the object. For example, click on one side of a circle, then click on the opposite side. This will create two open paths.
- Separate the Parts: Once you’ve made the necessary cuts, switch back to the “Selection Tool” (
V) or “Direct Selection Tool” (A). You can now select and move the newly created path segments or objects apart.
The Scissors Tool is fundamental for precise editing of vector illustrations, allowing you to deconstruct shapes and lines for reassembly or individual styling, essential for intricate graphic design and digital art projects.
The Knife Tool: Dynamic Cuts with Curves or Wavy Lines
The “Knife Tool” offers a unique blend of freehand control and path-splitting functionality. It allows you to draw freeform lines (straight, curved, or wavy) directly across a vector object, effectively slicing it into multiple, distinct, closed shapes. Unlike the Eraser, the Knife tool retains all the pieces it cuts, making it a powerful tool for deconstruction and creating new elements from existing ones.
How to Cut an Object with Curves or Wavy Lines Using the Knife Tool:
- Select the Object: Use the “Selection Tool” (
V) to select the vector object you want to cut. - Activate the Knife Tool: Select the “Knife Tool” from the toolbar (it might be nested with the Eraser/Scissors tools).
- Draw Your Cut Line: Click and drag your mouse across the object. As you draw, a line will appear. Once you release the mouse, the object will be cut along that line, and Illustrator will close the paths of the newly formed shapes.
- For Straight Lines: To make a perfectly straight cut, hold down
Alt(Windows) orOption(Mac) while dragging with the Knife Tool. - For Angular Straight Lines: Hold
Alt/Option + Shiftwhile dragging to constrain the line to 45 or 90-degree angles.
- For Straight Lines: To make a perfectly straight cut, hold down
- Separate the Pieces: After the cut, switch to the “Selection Tool” (
V). You can now select and move the individual pieces that were created by the Knife tool. For example, if you slice a pear, you’ll have two separate pear segments.
The Knife Tool is excellent for generating organic divisions, creating abstract shapes, or preparing objects for unique photo manipulation effects, adding depth to your visual design palette.
Method 5: Mastering Shape Intersections with the Pathfinder Panel
The Pathfinder panel is an incredibly robust and indispensable toolset in Adobe Illustrator for any graphic designer. It’s designed specifically for combining, dividing, subtracting, and intersecting multiple vector shapes to create complex new geometries from simpler ones. If you need to cut one shape out of another, create complex compound paths, or unify multiple objects, Pathfinder is the most efficient and precise method.
This panel is a fundamental component of visual design, empowering you to craft intricate logos, icons, and digital art with clean, mathematically precise results.
Accessing the Pathfinder Panel:
If the Pathfinder panel is not visible on your screen, go to Window > Pathfinder. It will pop up as a floating panel, ready for use.
The Pathfinder panel is divided into two main sections: Shape Modes (which typically create a new, single shape) and Pathfinders (which often result in multiple new shapes or more complex operations). Let’s explore some key functions.
Cutting One Shape from Another Using Shape Modes (e.g., Minus Front)
The “Minus Front” (also known as “Subtract”) shape mode is one of the most common Pathfinder operations for “cutting” one shape out of another. It takes the top object and subtracts its area from the object(s) beneath it.
Step-by-Step Guide to Using Minus Front:
- Draw Your Base Shape: Create the larger, background shape (e.g., a circle using the “Ellipse Tool” (
L)). This is the shape you want to cut from. - Draw Your Cutting Shape: Create the smaller shape (e.g., a star using the “Star Tool”) that you want to cut out. Place this “cutting” shape directly on top of the base shape, positioning it where you want the cut to occur.
- Select Both Shapes: Use the “Selection Tool” (
V) to select both the base shape and the cutting shape. - Apply Minus Front: Open the Pathfinder panel. Under “Shape Modes,” click the icon for “Minus Front” (it looks like two overlapping squares with the top one subtracting from the bottom).
- The top shape will disappear, leaving a “hole” in the bottom shape where it overlapped.
Other useful Shape Modes include:
- Unite: Combines selected objects into one single shape.
- Intersect: Creates a new shape from the overlapping area of selected objects.
- Exclude: Creates a new shape from the non-overlapping areas of selected objects (like “Intersect” but inverted).
Advanced Divisions with Pathfinders (e.g., Divide)
While Shape Modes are great for quick combinations or subtractions, the “Divide” Pathfinder option offers even more granular control, especially when you want to retain all the resulting pieces from an intersection. “Divide” slices all selected overlapping objects into their fundamental, non-overlapping component parts.
Step-by-Step Guide to Using Divide:
- Draw and Overlap Shapes: Create your base shape (e.g., a circle) and your cutting shape (e.g., a star), overlapping them as desired.
- Select All Shapes: Use the “Selection Tool” (
V) to select all the shapes involved in the division. - Apply Divide: In the Pathfinder panel, under “Pathfinders,” click the “Divide” icon (it looks like multiple squares being cut into individual pieces).
- Ungroup the Result: After applying “Divide,” all the newly created segments will be grouped together. Right-click (or
Control+clickon Mac) on the divided group and selectUngroup(Shift+Command+Gon Mac,Shift+Control+Gon Windows). - Separate and Use Pieces: Now, each individual segment created by the division is a separate, editable object. You can select and move them independently, recolor them, or delete unwanted pieces. This is perfect for creating complex layered designs or extracting specific components for your aesthetic images. For example, if you wanted to cut multiple star shapes from a circle while reusing the original star, “Divide” would be the starting point, allowing you to extract the “star” shape from the circle and then apply further operations.
The Pathfinder panel is indispensable for creating sophisticated graphics, from logos and icons to intricate patterns and photo manipulation effects. It transforms complex operations into a few clicks, making it a cornerstone of efficient visual design.
Practical Applications and Best Practices for Tophinhanhdep.com Users
Understanding the array of cutting and cropping tools in Adobe Illustrator is just the first step. The true mastery lies in knowing when to use each method to achieve optimal results for your specific projects. For users of Tophinhanhdep.com, who frequently work with diverse image types—from high-resolution photography and backgrounds to abstract designs and elements for graphic design—this knowledge is paramount.
Here’s how to integrate these techniques effectively into your workflow, ensuring your visual assets are perfectly prepared and optimized.
Choosing the Right Tool for the Job
-
For Quick, Rectangular Cropping of Raster Images:
- Use the “Crop Image” tool (Illustrator CC 2017+). This is the fastest method for photographs or embedded raster images when you simply need to trim them to a rectangular or square shape. It’s perfect for adjusting the focus of a beautiful photography piece or tailoring a wallpaper to specific dimensions. Remember its permanent nature within the Illustrator file.
-
For Custom-Shaped Cropping (Non-Destructive) of Raster or Vector Images:
- Utilize “Clipping Masks.” When you need to crop an image into a circle, a star, or any complex, irregular shape, clipping masks are your best friend. Their non-destructive nature means you can always readjust the crop or even revert to the original image. This is ideal for creative ideas, photo manipulation, or integrating images into unique graphic design layouts.
-
For Gradual Transparency and Blending Effects:
- Employ “Opacity Masks.” If your visual design requires soft edges, fades, or controlled transparency, an opacity mask using grayscale values or gradients provides unmatched flexibility. It’s perfect for creating ethereal abstract images or blending different elements seamlessly in your digital art.
-
For Freeform or Precise Cuts on Vector Objects:
- Reach for the “Eraser,” “Scissors,” or “Knife” tools.
- Eraser: For quick, freehand removal of vector parts, adding an organic feel.
- Scissors: For precise cuts at anchor points or along path segments, great for breaking open paths or segmenting lines.
- Knife: For slicing vector objects into multiple closed shapes with freehand lines, useful for deconstruction and creating new design elements. These tools are indispensable for intricate graphic design and digital art projects.
- Reach for the “Eraser,” “Scissors,” or “Knife” tools.
-
For Complex Shape Combinations, Subtractions, and Divisions of Vector Objects:
- Master the “Pathfinder Panel.” When building logos, icons, or complex illustrations, Pathfinder operations like “Unite,” “Minus Front,” “Intersect,” and “Divide” are essential. They allow you to create entirely new, clean vector shapes from existing ones, crucial for high-resolution graphics and scalable visual assets.
Best Practices for Tophinhanhdep.com Users
- Start with High-Resolution Images: Always begin with the highest quality images available from Tophinhanhdep.com. Cropping, especially with raster images, inherently involves discarding pixels. High-resolution source material ensures your final cropped images retain clarity and sharpness.
- Prioritize Non-Destructive Editing: Whenever possible, favor methods like “Clipping Masks” and “Opacity Masks.” These techniques keep your original image data intact, offering flexibility for future adjustments and iterations in your visual design process. This is particularly important for digital photography and image collections where variations might be needed.
- Optimize After Cropping: After you’ve refined your images and graphics in Illustrator, especially for web or digital use, remember to optimize them. Tools available at Tophinhanhdep.com for image compression and optimization can help reduce file sizes without significantly compromising visual quality, crucial for fast-loading websites and efficient digital distribution.
- Leverage Keyboard Shortcuts: Speed up your workflow by memorizing key shortcuts:
Vfor Selection ToolAfor Direct Selection ToolShift+Efor Eraser ToolCfor Scissors ToolPfor Pen ToolLfor Ellipse ToolMfor Rectangle ToolCommand+7(Mac) /Control+7(Windows) for Make Clipping MaskShift+Command+G(Mac) /Shift+Control+G(Windows) for Ungroup (often needed after Pathfinder operations).
- Experiment and Practice: The best way to become proficient is through hands-on practice. Don’t be afraid to experiment with different tools and combinations. Try cutting various shapes, applying different Pathfinder modes, and playing with opacity masks to discover unique creative ideas and push the boundaries of your digital art.
Conclusion
Adobe Illustrator stands as an unparalleled powerhouse for visual design, offering a rich array of tools to precisely cut and crop images and vector graphics. From the straightforward “Crop Image” function for quick rectangular trims of your high-resolution photography, to the versatile “Clipping Masks” for custom shapes and the artistic “Opacity Masks” for dynamic transparency effects, Illustrator empowers you with control over every pixel and path.
Beyond raster image manipulation, the “Eraser,” “Scissors,” and “Knife” tools provide intuitive ways to carve and segment vector objects, while the “Pathfinder” panel unlocks advanced capabilities for combining, subtracting, and dividing shapes to build intricate graphic designs and abstract art.
At Tophinhanhdep.com, we believe that mastering these image tools is fundamental to transforming your creative ideas into stunning visual realities. By understanding the distinctions between each method and applying them judiciously, you can streamline your workflow, produce cleaner designs, and unlock new possibilities for photo manipulation and digital art. Continue to explore, experiment, and refine your skills, and you’ll find that Adobe Illustrator, combined with the comprehensive resources from Tophinhanhdep.com, will be your ultimate companion in crafting captivating visual content.