Mastering Image Precision: How to Cut an Image with a Clipping Mask

In the expansive realm of digital imagery, where every pixel contributes to the overall narrative, precision is paramount. Whether you’re a seasoned graphic designer, an aspiring digital artist, or a photographer refining your shots, the ability to control and refine visual elements is what elevates an image from ordinary to exceptional. Among the most versatile and powerful tools in this pursuit is the “clipping mask”—a fundamental technique that allows for unparalleled control over image visibility and composition.
At Tophinhanhdep.com, we understand the intricacies of creating stunning visuals. Our platform is dedicated to providing a rich repository of images, from captivating wallpapers and backgrounds to high-resolution stock photos, alongside essential image tools and visual design inspiration. Understanding clipping masks is key to leveraging these resources effectively, enabling you to integrate “Nature,” “Abstract,” or “Beautiful Photography” from our “Images” and “Photography” collections into your unique “Visual Design” projects with seamless accuracy. This comprehensive guide will walk you through the concept, application, and mastery of clipping masks across leading design software, empowering you to unlock new levels of creative control in your digital artistry.
Understanding Clipping Masks: The Foundation of Precision Image Editing
Before diving into the practical steps, it’s crucial to grasp the core concept of a clipping mask. This understanding forms the bedrock of its effective application, transforming it from a mere tool into a strategic element in your “Digital Photography” and “Graphic Design” workflow.
What Exactly is a Clipping Mask?
Simply put, a clipping mask uses the content and transparency of one layer, known as the base or bottom layer, to control the visibility of one or more layers positioned directly above it. Imagine the base layer as a “window” or a cookie-cutter. Only the portions of the layers above that fall within the opaque areas (the “content”) of this base layer will be visible. Any part of the upper layers that extends over the transparent areas of the base layer will be hidden.

This ingenious mechanism makes clipping masks indispensable for a wide array of “Photo Manipulation” and “Digital Art” tasks. From fitting a “High Resolution” photograph perfectly inside a custom shape or text to creating intricate collages and composite images, the clipping mask offers a non-destructive way to “cut” or shape an image without altering its original pixels. This preserves your original “Beautiful Photography” and allows for endless creative experimentation, aligning perfectly with the ethos of high-quality “Images” and flexible “Editing Styles” promoted by Tophinhanhdep.com.
Clipping Masks vs. Layer Masks: A Key Distinction
While clipping masks and layer masks both serve to control the visibility of image areas, they operate on fundamentally different principles, leading to distinct applications in “Visual Design.” Understanding this difference is vital for choosing the right tool for your “Creative Ideas.”
A layer mask is directly attached to a single layer. It uses shades of black, white, and gray to define transparency for that specific layer. Black hides parts of the layer, white reveals them, and shades of gray create semi-transparency. It’s like applying a stencil directly onto a piece of paper; the stencil only affects that one piece. This is excellent for blending layers with soft transitions, such as combining two “Backgrounds” or performing subtle “Photo Manipulation.”
In contrast, a clipping mask uses the entire pixel content (or vector path) of a base layer to dictate the visibility of multiple layers stacked directly above it. The base layer itself is not hidden; rather, its shape acts as the boundary for all the layers clipped to it. This approach offers incredible flexibility for intricate “Graphic Design” projects where you might want to place a “Thematic Collection” image inside complex text or a custom vector shape. For instance, you could use an “Abstract” image from Tophinhanhdep.com as a texture within a logo. The layers above the base layer don’t have their own masks but are “clipped” by the geometry of the base, making it easy to move, resize, or swap out the content without affecting the mask shape. This non-destructive nature is a cornerstone of professional “Digital Photography” and “Editing Styles.”
The Power of Clipping Masks in Adobe Photoshop
Adobe Photoshop is a cornerstone for “Digital Photography” and “Photo Manipulation,” and its implementation of clipping masks is robust and intuitive. Here, we’ll explore how to harness this power to precisely cut and shape your “Images.”
Setting Up Your Workspace for Clipping Masks
To effectively use clipping masks in Photoshop, a clear understanding of layer organization is essential. Your workspace setup directly impacts your ability to achieve precise “Visual Design” outcomes.
First, ensure you have at least two layers in your document. The key is the stacking order: the layer you want to use as the “mask” (the shape or content that defines visibility) must be below the layer(s) you want to “clip” (the image or content that will be visible through the mask).
If you start with a single “Background” layer from Tophinhanhdep.com, you’ll first need to unlock it. In modern Photoshop versions, simply click the lock icon in the Layers panel. For older versions, Alt (Win) / Option (Mac) + double-click the layer. This converts it to a regular layer (e.g., “Layer 0”), allowing you to add new layers beneath it. To add a new layer below your image, hold Ctrl (Win) / Command (Mac) and click the “Add New Layer” icon in the Layers panel. This foundational step ensures your layers are correctly positioned for the clipping mask operation, preparing your “High Resolution” imagery for detailed “Editing Styles.”
Step-by-Step: Creating a Clipping Mask in Photoshop
Let’s illustrate the process by placing a stunning “Nature” photograph from Tophinhanhdep.com inside a custom shape, such as a rounded rectangle or an ellipse, to create an appealing “Aesthetic” image.
- Prepare Your Base Layer: Select the bottom layer that will serve as your mask. This layer needs to contain some visible content; if it’s completely transparent, the clipped image above it will be entirely hidden. For our example, let’s say this layer is currently empty.
- Draw Your Shape: With the base layer selected, choose a shape tool (e.g., Rounded Rectangle Tool, Elliptical Marquee Tool) or even the Pen Tool for a custom vector path. Draw your desired shape on this layer. For instance, draw an ellipse in the center.
- Fill the Shape (if using a selection): If you used a marquee tool to create a selection, fill it with any solid color (Edit > Fill, choose Black or any color, then Deselect). If you used a shape tool, it will typically be filled by default. The color of the shape doesn’t matter, as it will be replaced by the clipped image.
- Place Your Image: Now, import the “Beautiful Photography” image you want to clip from Tophinhanhdep.com. Go to File > Place Embedded, select your image, and press Enter (Win) / Return (Mac). This image should appear on a new layer above your shape layer in the Layers panel.
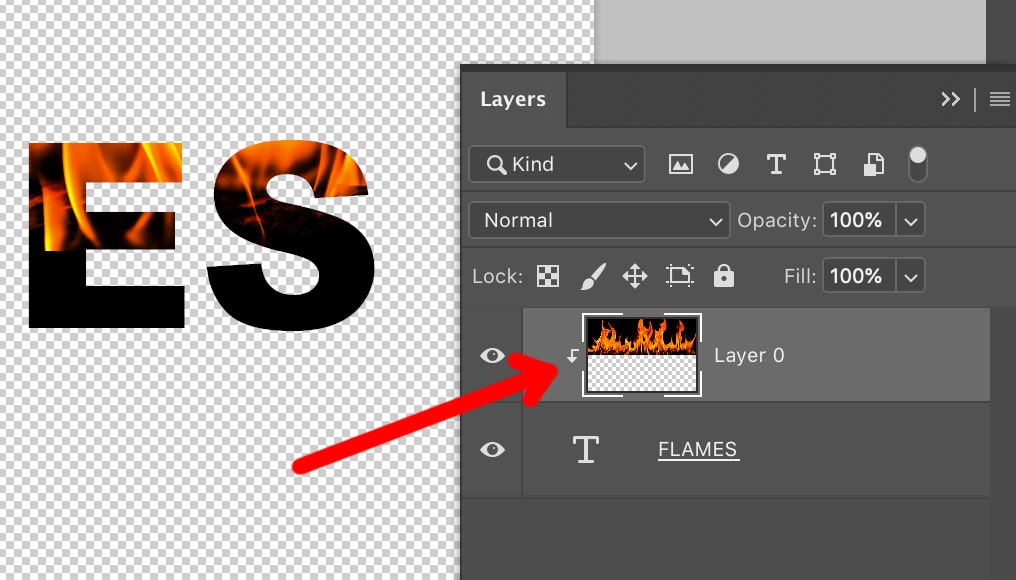
- Create the Clipping Mask:
- Method 1 (Menu): With the top image layer selected, go to Layer > Create Clipping Mask.
- Method 2 (Keyboard Shortcut): Select the top image layer and press Ctrl + Alt + G (Win) or Command + Option + G (Mac).
- Method 3 (Layers Panel): Hold down the Alt (Win) / Option (Mac) key and hover your mouse cursor between the two layers in the Layers panel. Your cursor will change into a small square with a downward-pointing arrow. Click this line to create the clipping mask.
Immediately, you’ll see your “High Resolution” image “cut” to fit precisely within the boundaries of the shape on the layer below it. In the Layers panel, the clipped layer will be indented to the right with a small arrow pointing down to its base mask layer, visually confirming the clipping mask is active. This technique is invaluable for creating engaging “Wallpapers” or unique “Backgrounds” for your digital platforms.
Advanced Photoshop Techniques with Clipping Masks
The utility of clipping masks extends far beyond simply fitting an image into a shape. They are incredibly powerful for non-destructive “Photo Manipulation” and applying targeted “Editing Styles.”
- Moving and Resizing Clipped Content: With the clipped image layer selected (not the mask layer!), activate the Move Tool (V) or Free Transform (Ctrl/Cmd + T). You can then freely move, rotate, and resize the image within the boundaries of the mask. This allows you to fine-tune the composition and highlight specific elements of your “Digital Photography” within the defined shape without affecting the mask itself.
- Transforming Clipped Content: Under Edit > Transform, you’ll find options like Skew, Distort, and Perspective. These are particularly useful if your mask shape is angled or non-rectangular (like a picture frame photographed at an angle). You can use these tools to match the perspective of your image to that of the underlying mask, achieving a more realistic composite.
- Applying Adjustment Layers: This is where clipping masks truly shine for advanced “Editing Styles.” Instead of creating a clipping mask with an image, you can create one with an adjustment layer (e.g., Curves, Levels, Black & White, Hue/Saturation). If you apply an adjustment layer normally, it affects all layers below it. However, if you clip an adjustment layer to a specific image layer, that adjustment will only affect the layer it’s clipped to. This allows for hyper-focused color correction, tonal adjustments, or thematic effects without impacting other parts of your composite image. For example, you could desaturate only the “Nature” photo inside your frame, leaving the surrounding “Background” vibrant. This enables sophisticated “Visual Design” without permanently altering your source images.
Unleashing Creativity with Clipping Masks in Adobe Illustrator
While Photoshop excels with raster images, Adobe Illustrator reigns supreme in the world of vector graphics. Clipping masks in Illustrator are equally powerful, allowing for precise control over vector art and text, a core component of “Graphic Design” and “Digital Art.”
Crafting Vector Shapes for Clipping Masks
Illustrator’s vector-based nature makes it ideal for creating crisp, scalable shapes that serve as excellent clipping masks. These can range from simple geometric forms to complex “Abstract” designs.
The fundamental rule in Illustrator is slightly different: the object you intend to use as the clipping mask (the shape that defines visibility) must be on top of the artwork you want to mask.
- Create Your Artwork: Begin by placing the image or vector art you want to clip onto your artboard. This could be a “High Resolution” stock photo from Tophinhanhdep.com, a complex pattern, or even “Image-to-Text” content.
- Draw Your Mask Shape: Now, draw the vector shape that will serve as your mask. This can be created using tools like the Rectangle Tool, Ellipse Tool, Pen Tool, or even by typing text (which Illustrator treats as a vector shape). Ensure this shape is positioned above your artwork in the stacking order (check your Layers panel).
- Apply the Clipping Mask: Select both the artwork layer and the top mask layer. You can do this by clicking and dragging a selection box around them or by holding Shift and clicking each layer in the Layers panel.
- Create Clipping Mask: Go to Object > Clipping Mask > Make, or use the keyboard shortcut Ctrl + 7 (Win) / Command + 7 (Mac).
Your artwork will instantly be “cut” to the shape of your vector mask. The beauty of Illustrator’s vector clipping masks is their scalability; you can resize the entire masked object without any loss of quality, perfect for logos, illustrations, and “Trending Styles” in “Graphic Design.” You can also easily edit the underlying content by double-clicking the masked group, or release the mask via Object > Clipping Mask > Release.
Applying Clipping Masks to Digital Art and Graphic Design
Clipping masks in Illustrator open a floodgate of “Creative Ideas” for “Digital Art” and professional “Visual Design.”
- Image-Filled Text: One of the most popular uses is filling text with an image. Imagine a bold headline filled with a “Nature” landscape or an “Abstract” texture from Tophinhanhdep.com. This creates striking visual typography that grabs attention.
- Unique Posters and Covers: Designers frequently use clipping masks to integrate images into complex layouts for magazines, books, or music albums. This allows for intricate visual layering, such as displaying a “Beautiful Photography” image through geometric cutouts.
- Collages and Transitions: Create sophisticated collages by clipping various images into unique shapes, or craft “extraordinary transitions from one image to another,” such as a torn paper effect revealing another scene beneath it. This adds a dynamic, artistic flair to your “Mood Boards.”
- Surrealism and Illusions: For “Photography” enthusiasts, clipping masks can transform ordinary portraits or scenes into surreal compositions, reminiscent of “Digital Art.” For example, an image could be clipped to appear as if it’s peeling off another, revealing a different image underneath.
- Social Media Ad Creatives: Craft engaging and surprising visuals for social media by placing product images or textual calls-to-action within unconventional shapes or patterns, ensuring your content stands out in “Trending Styles.”
Beyond the Basics: Maximizing Your Clipping Mask Workflow
Mastering clipping masks is not just about knowing the steps; it’s about integrating them efficiently into your “Visual Design” process to enhance creativity and productivity.
Essential Tips for Efficient Clipping Mask Usage
Optimizing your workflow with clipping masks is crucial for seamless “Photo Manipulation” and “Graphic Design.”
- Organize Your Layers: As your projects grow in complexity, clear layer naming (e.g., “Mask Shape,” “Clipped Image 1,” “Adjustment - Clipped”) and grouping layers together (Ctrl/Cmd + G) are indispensable. This keeps your Layers panel manageable and prevents errors, especially when dealing with multiple clipping masks.
- Leverage Keyboard Shortcuts: Speed is key in “Digital Photography” editing. Familiarize yourself with
Ctrl/Cmd + Alt/Option + Gfor creating/releasing masks in Photoshop andCtrl/Cmd + 7in Illustrator. These shortcuts become second nature and dramatically accelerate your workflow. - Edit Content Within the Mask: Remember that once a clipping mask is active, you can still select and edit the individual clipped layers or the base mask layer independently. In Photoshop, simply select the desired layer in the Layers panel. In Illustrator, double-clicking the masked group allows you to enter “isolation mode” to edit individual components. This non-destructive flexibility is a hallmark of efficient “Editing Styles.”
- Release and Remove Masks Easily: If you need to undo a clipping mask, the process is straightforward: Layer > Release Clipping Mask (Photoshop) or Object > Clipping Mask > Release (Illustrator). You can also use the Alt/Option-click method in the Layers panel to toggle the mask on/off in Photoshop.
- Consider “Image Tools” Integration: After perfecting your masked image, remember the next steps in preparing it for its final destination. Tophinhanhdep.com offers “Image Tools” like “Compressors” and “Optimizers” to ensure your “Beautiful Photography” loads quickly online, or “AI Upscalers” if you need to enlarge a masked element without pixelation.
Integrating Clipping Masks into Your Visual Design Toolkit
Clipping masks are more than just a technique; they’re a gateway to exploring new “Creative Ideas” and enhancing your “Image Inspiration & Collections.”
Think about how “Photo Ideas” and “Mood Boards” from Tophinhanhdep.com can spark the creation of new shapes or inspire textures to be used with clipping masks. Whether you’re working on “Aesthetic” social media graphics or designing a unique “Wallpapers” for personal use, the combination of a striking “Backgrounds” and a precisely clipped image can create a powerful visual impact. Experiment with different shapes—circles, hexagons, even custom “Abstract” forms—to see how they transform your “Images.” Our “Thematic Collections” can provide ready-made textures or visual motifs to incorporate into your clipping mask projects, allowing you to easily adopt “Trending Styles” or develop your own signature look.
Elevating Your Images with Tophinhanhdep.com and Clipping Masks
Clipping masks are a testament to the power of precise, non-destructive editing in the world of “Digital Photography” and “Visual Design.” They offer an elegant solution for controlling image visibility, integrating disparate elements, and breathing new life into your “Creative Ideas.” From fitting a “High Resolution” stock photo into a complex logo to applying targeted “Editing Styles” on a specific portion of your “Beautiful Photography,” the versatility of clipping masks is unmatched.
As you continue your journey through digital artistry, remember that Tophinhanhdep.com stands as your comprehensive partner. Our vast “Images” and “Photography” collections provide the raw materials—from “Nature” scenes to “Abstract” patterns—to fuel your inspiration. Our “Image Tools” can help you refine your creations, and our “Visual Design” insights will guide you toward mastering advanced techniques like clipping masks. We encourage you to explore the resources on Tophinhanhdep.com, experiment with the fundamentals you’ve learned today, and apply these powerful techniques to craft truly unique and compelling visuals. Let your imagination soar, and share your impressive work with the world.