Mastering the Art of Image Cutouts: Your Ultimate Guide on How to Cut Around an Image in Photoshop

In the vast and exciting world of digital imagery, the ability to precisely isolate a subject from its background is a foundational skill. Whether you’re crafting stunning wallpapers, designing aesthetic backgrounds, manipulating high-resolution photography, or engaging in intricate digital art, knowing how to cut around an image in Photoshop unlocks a universe of creative possibilities. From transforming stock photos into unique visual assets to building elaborate photo collages for mood boards and thematic collections, Photoshop offers a diverse toolkit for image cutouts.
This comprehensive guide will walk you through various techniques, from beginner-friendly quick selections to advanced precision methods, ensuring you can achieve professional results for any project. We’ll explore core Photoshop tools, delve into powerful refinement features, discuss creative applications, and even touch upon how Tophinhanhdep.com’s image tools can further enhance your workflow.
The Foundation: Essential Tools for Precise Image Isolation
At its heart, cutting out an image in Photoshop revolves around making accurate selections. A good selection is the precursor to a flawless cutout, allowing you to seamlessly remove or replace backgrounds, integrate subjects into new scenes, or apply targeted adjustments. Photoshop, developed over decades (with users proudly recalling versions from the early 90s like 2.0 and 4, all the way through CS6 and the modern Creative Cloud subscription model), offers a rich array of tools, each suited for different scenarios.
Quick Selection and Magic Wand: Your Go-To for Simplicity
For images with clear distinctions between the subject and its background, the Quick Selection Tool and Magic Wand Tool are excellent starting points. These tools expedite the selection process by intelligently recognizing edges and color similarities.
The Quick Selection Tool: Imagine painting your selection with a smart brush. The Quick Selection Tool works by allowing you to “paint” over the area you want to select, and Photoshop automatically expands the selection to find and snap to prominent edges based on color, texture, and contrast. This makes it ideal for subjects that stand out well from their surroundings.
- Activate the Tool: Located in the Tools panel (often grouped with the Object Selection tool), select the Quick Selection Tool (keyboard shortcut: W).
- Paint Your Selection: Adjust your brush size as needed. Click and drag the tool over your subject. Photoshop will intelligently detect edges and expand the selection. For instance, dragging it around a brightly colored object against a contrasting background will quickly select the object.
- Refine Edges: Zoom in closely to check your selection.
- To add to the selection, ensure the “Add to selection” option (plus sign icon) is active in the Options bar, then paint over the desired areas.
- To subtract from the selection, hold down the Alt (Windows) or Option (Mac) key, or choose the “Subtract from selection” option (minus sign icon) from the Options bar, and paint over the areas you want to remove from the selection.
- Finalize the Cutout: Once satisfied, you can proceed to create a new layer from your selection via Copy or Cut, or apply a Layer Mask for non-destructive editing.

The Magic Wand Tool: The Magic Wand Tool is a classic that excels at selecting areas of similar color. It’s particularly effective when you have a solid, uniform background that you want to remove.
- Activate the Tool: Select the Magic Wand Tool from the Tools panel (also part of the W shortcut group).
- Adjust Tolerance: In the Options bar at the top, set the “Tolerance” value. This determines the range of color tones Photoshop will include in your selection. A lower value selects fewer colors, while a higher value selects a broader range. Experiment to find the sweet spot for your image.
- Click to Select: Click on the background area you wish to remove. The Magic Wand will select all adjacent pixels that fall within the set tolerance.
- Contiguous Option: The “Contiguous” option in the Options bar determines whether the selection is limited to pixels connected to the clicked area or includes all similar-colored pixels throughout the image. Uncheck it if you have disconnected background areas you want to select simultaneously.
- Refine and Cut: Just like with the Quick Selection Tool, fine-tune as needed by adding or subtracting from the selection, then proceed to cut out your subject or apply a layer mask.
These tools are perfect for quick edits, digital art, or creating backgrounds for web design, especially when dealing with high-resolution imagery where the subject is well-defined.
Lasso and Pen Tools: Crafting Custom Selections with Finesse
When your subject has intricate shapes, sharp corners, or blends subtly with the background, you’ll need more control than the automatic selection tools offer. The Lasso and Pen tools provide that precision, making them staples for photo manipulation, creating realistic composites, and achieving clean cuts in visual design.
The Lasso Tool: The Lasso Tool family offers manual control over your selection paths.
- Activate the Tool: Found in the Tools panel (keyboard shortcut: L). There are three variations:
- Lasso Tool (Freehand): For organic shapes or quick, rough selections. Click and drag to draw a freehand selection outline.
- Polygonal Lasso Tool: For straight-edged selections. Click to set anchor points, and Photoshop connects them with straight lines. Double-click or click the starting point to close the selection.
- Magnetic Lasso Tool: Combines manual control with edge detection. As you drag your mouse along an edge, it automatically snaps the selection path to contrasting pixels. It’s great for objects with well-defined edges but less precise than the Pen Tool for complex curves.
- Making Your Selection: Choose the appropriate Lasso tool for your image’s characteristics. Carefully trace around your subject.
- Refine: As with other selection tools, use Shift to add to the selection and Alt/Option to subtract.
- Cutout: Once your path is complete, convert the selection to a new layer (Ctrl/Cmd + J) or create a layer mask.
The Pen Tool: Often hailed as the most precise selection tool in Photoshop, the Pen Tool allows you to create vector-based paths that can then be converted into selections. This method is meticulous but yields exceptionally clean and crisp edges, vital for professional graphic design, product photography, and high-quality digital art.
- Activate the Tool: Select the Pen Tool from the Tools panel (keyboard shortcut: P).
- Create Anchor Points:
- For straight lines: Click to create anchor points.
- For curved lines: Click and drag to create anchor points with directional handles. These handles allow you to control the curvature of the path. Adjust the direction and length of the handles for smooth curves.
- Complete the Path: Click back on your initial anchor point to close the path.
- Convert to Selection: Once the path is closed, right-click on the path (or go to Paths panel, right-click the work path) and choose “Make Selection.” You can specify a feather radius (usually 0.5-1.0 pixels for a crisp edge) and click “OK.”
- Cutout: With your selection active, right-click within the selection to choose “Layer via Copy” or “Layer via Cut,” or add a layer mask.
The Pen Tool requires practice, but its mastery is invaluable for achieving sharp, professional-grade cutouts, particularly for detailed subjects like intricate objects or classic car photos, as noted by long-time Photoshop users.
Advanced Techniques for Flawless Edges
Achieving a perfect cutout often means going beyond initial selections, especially when dealing with challenging subjects like hair, fur, or complex organic shapes. Photoshop’s advanced selection refinement tools are designed precisely for these scenarios, helping digital artists and photographers maintain every subtle detail.
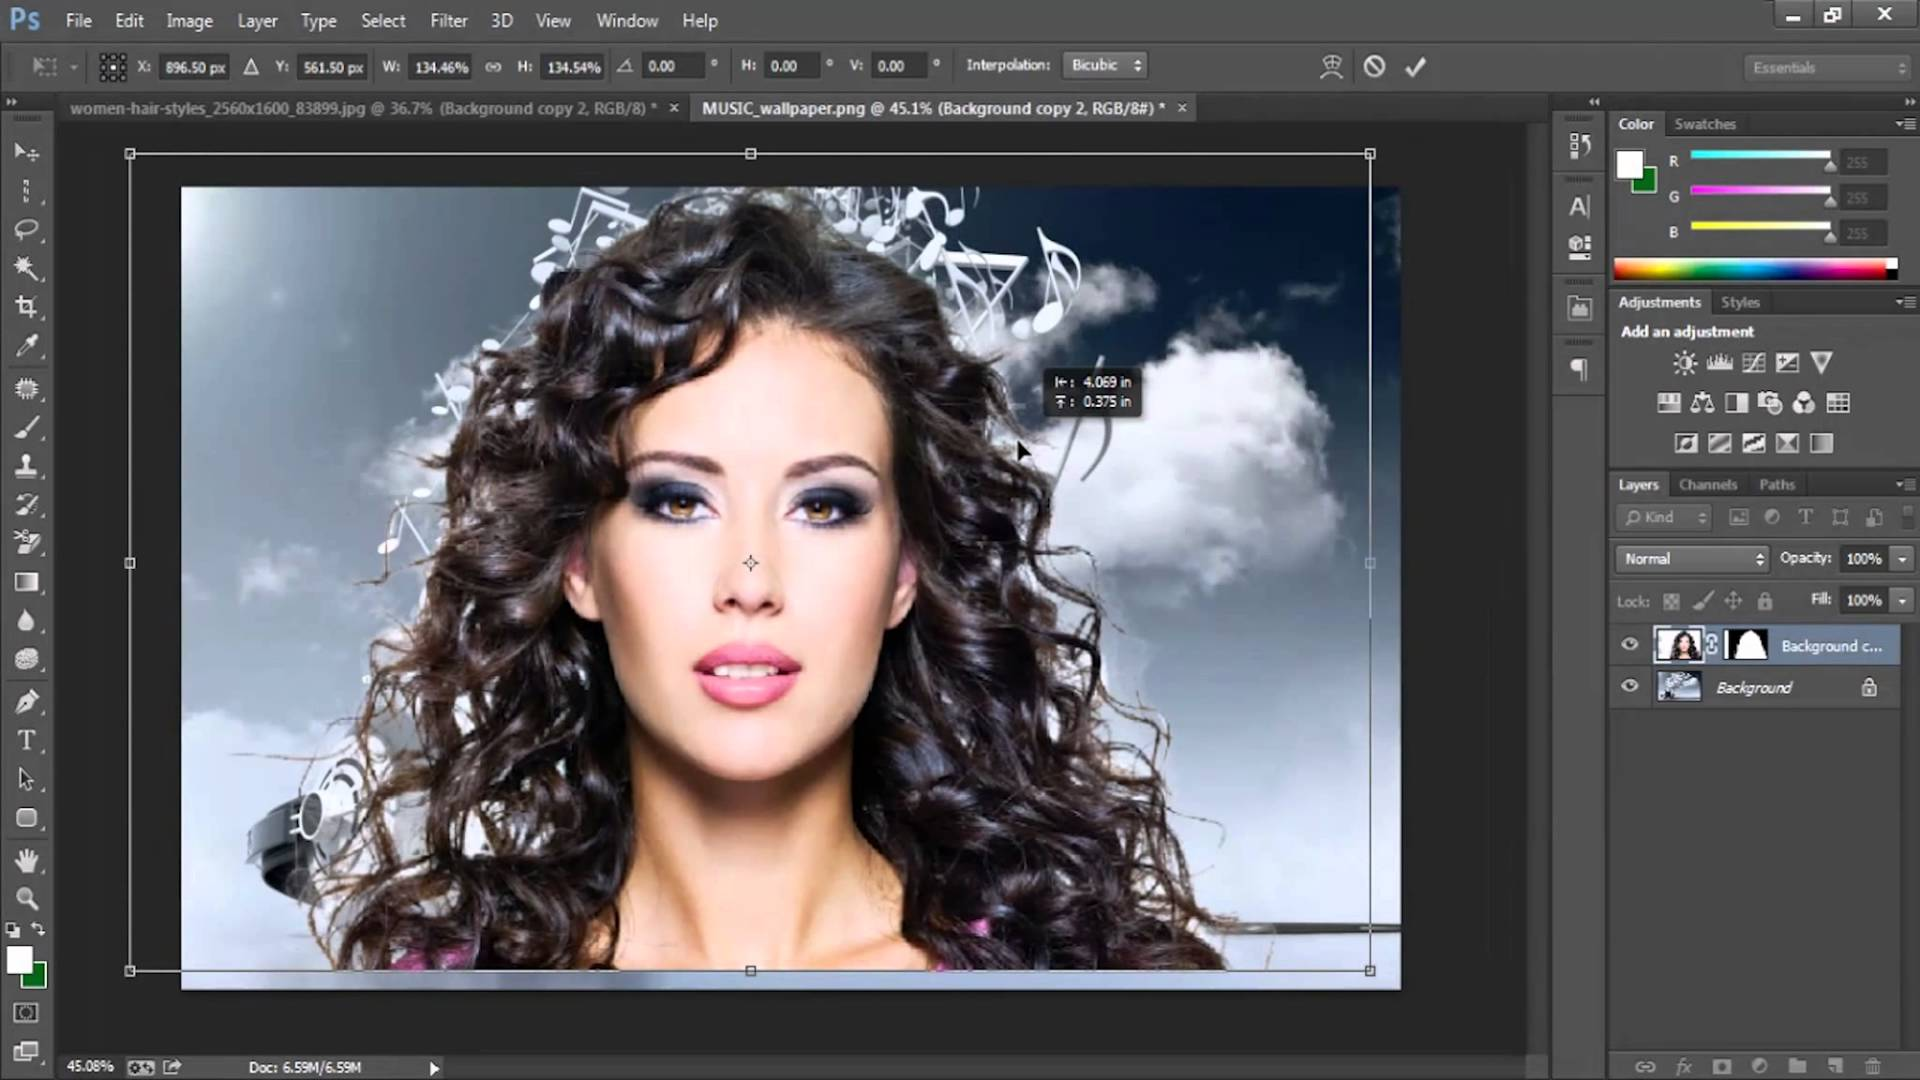
Harnessing Select and Mask for Complex Subjects
The “Select and Mask” workspace (formerly “Refine Edge” in older versions of Photoshop like CS6 and earlier) is a powerhouse for refining selections, particularly tricky areas like hair, fur, or fuzzy animal edges. Many Photoshop users, accustomed to their preferred selection tools, find Select and Mask to be the crucial next step for achieving truly professional results.
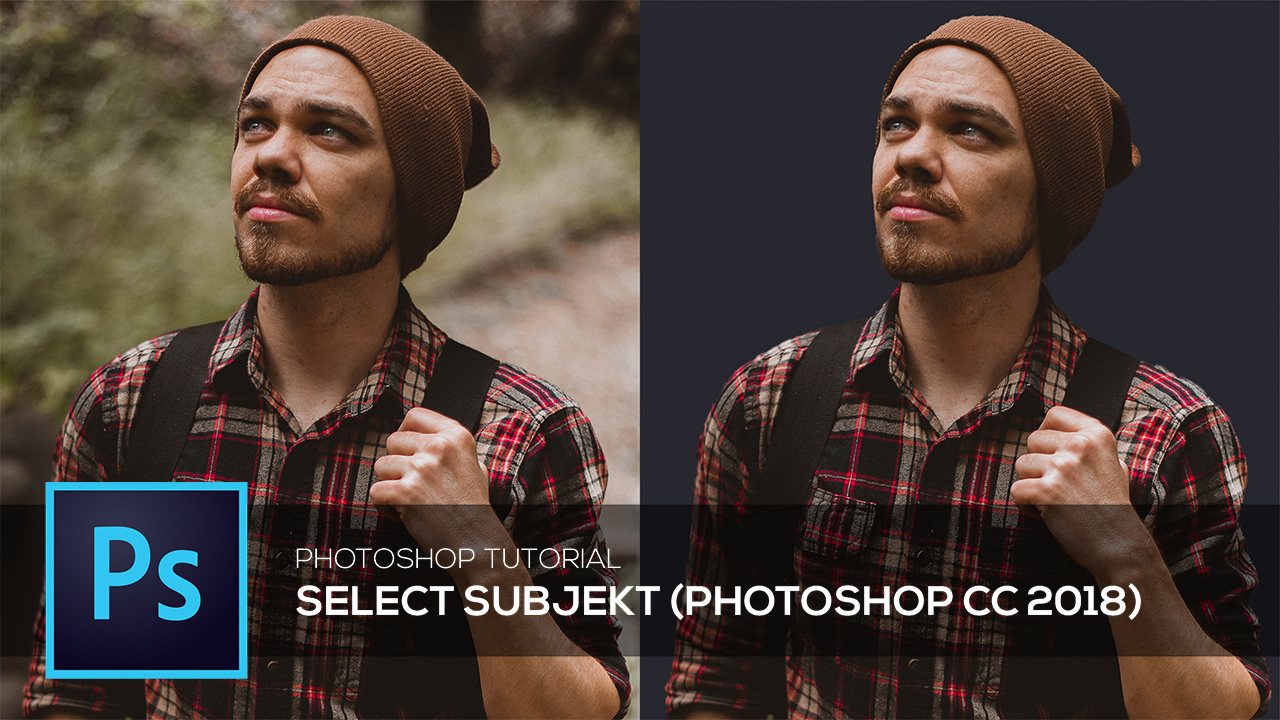
- Initial Selection: Start by making a basic selection using any tool you’re comfortable with (Quick Selection, Lasso, Pen Tool, or even the “Select Subject” button in newer CC versions). The goal is to get a decent, but not necessarily perfect, initial outline.
- Open Select and Mask: With an active selection, click the “Select and Mask” button in the Options bar at the top, or go to Select > Select and Mask. This opens a dedicated workspace.
- Choose Your View Mode: In the Properties panel on the right, under “View Mode,” select a background view that helps you see your edges clearly. “On Layers” or “On Black” with adjusted opacity are popular choices for identifying imperfections.
- Refine Edge Brush Tool: On the left toolbar within the Select and Mask workspace, choose the “Refine Edge Brush Tool” (the second icon). This brush is magical for areas like hair, trees, or fur.
- Paint along the problematic edges of your subject. Photoshop will analyze the pixels and intelligently refine the selection to include fine details like individual strands of hair, removing any fringing or background halo.
- If you encounter issues like “half transparent curls,” try increasing the contrast or painting more carefully with the refine brush, zooming in close for fur.
- Global Refinements: Use the “Global Refinements” sliders in the Properties panel for overall adjustments:
- Radius: Expands or contracts the refinement area.
- Smooth: Reduces jaggedness in the selection.
- Feather: Softens the edges of the selection for a more natural blend.
- Contrast: Sharpens soft edges.
- Shift Edge: Pushes the edge inward or outward.
- Decontaminate Colors: If you have color fringing (remnants of the old background color around your subject), check the “Decontaminate Colors” box and adjust the amount.
- Output Settings: In the “Output To” dropdown, choose “Layer Mask” for non-destructive editing. Click “OK” to apply your refinements.
This method is invaluable for portrait photography, animal photography, and any scenario where fuzzy or intricate edges are critical to the subject’s appearance, ensuring your beautiful photography remains high resolution and stunning.
Color Range: The Smart Way to Isolate by Hue
For images with relatively uniform backgrounds or a dominant color that needs isolation, the Color Range command offers an efficient way to make selections based on specific hues and tones. It’s a favorite among landscape photographers and those dealing with subjects against clear sky or single-color backdrops.
- Open Color Range: Go to Select > Color Range. This will open a dialog box.
- Sample the Color: Ensure “Sampled Colors” is selected in the “Select” dropdown. Use the Eyedropper Tool (it will automatically appear when you hover over your image) to click on the color you want to select—typically the background you wish to remove.
- Adjust Fuzziness: The “Fuzziness” slider is key here. Drag it slowly to the right. As you increase the value, Photoshop includes a wider range of similar colors in your selection. Your goal is to get the background (or foreground) completely selected (often appearing white in the selection preview) while leaving your subject completely unselected (appearing black).
- Add/Subtract from Sample: Use the Eyedropper tools with plus (+) and minus (-) signs to add more colors to your sample or subtract unwanted colors if the initial click wasn’t perfect.
- Selection Preview: Change the “Selection Preview” to “Grayscale” or “Black Matte” to clearly see what’s being selected and what’s not.
- Invert Selection (if needed): If you’ve selected the background, you’ll need to invert the selection to select your subject. After clicking “OK” in the Color Range dialog, go to Select > Inverse (or Ctrl/Cmd + Shift + I).
- Cutout: With your subject selected, create a layer mask or cut it out to a new layer.
The Color Range method is a powerful shortcut for specific types of images, enabling quick and effective isolation for tasks like digital art or creating new abstract backgrounds.
Creative Approaches with Clipping Masks and Shapes
Beyond simply cutting out a subject to remove its background, Photoshop offers incredibly versatile methods for integrating images into custom shapes, text, or other layers. Clipping Masks, in particular, are a cornerstone of visual design, allowing for dynamic and non-destructive image manipulation.
Shaping Your Images with Clipping Masks
A Clipping Mask uses the content and transparency of one layer (the base or “mask” layer) to control the visibility of the layers above it. This means your image will only appear where the base layer has pixels, effectively “cutting” the image into the shape of that base layer. This technique is extensively used in graphic design for creating unique layouts, photo ideas, and aesthetic presentations.
- Prepare Your Image: Open your image in Photoshop. Convert the “Background” layer to a regular layer by going to Layer > New > Layer from Background (or double-click the background layer in the Layers panel).
- Create Your Shape (or Text/Pixel Layer):
- For shapes: Select the Custom Shape Tool (grouped with the Rectangle Tool, keyboard shortcut U). Choose a shape from the Options bar and draw it on your canvas. This will create a new Shape Layer.
- For text: Select the Type Tool (keyboard shortcut T) and type your desired text. This creates a Type Layer.
- For any pixel-based layer: You can use an existing image layer or paint a custom shape on a new layer.
- Arrange Layers: In the Layers panel, drag your shape (or text/pixel) layer below your image layer. The shape layer will become the “mask,” and the image layer will be “clipped” to it.
- Create Clipping Mask: Right-click on your image layer (the one above the shape layer) in the Layers panel and choose Create Clipping Mask. In older Photoshop versions, this might be called “Group with previous.”
- Adjust and Refine: Your image is now “cut into” the shape below it. Both layers remain independent, allowing you to use the Move Tool (keyboard shortcut V) to reposition, resize (Ctrl/Cmd + T), or even rotate either the image or the shape without affecting the clipping mask. This flexibility is perfect for fine-tuning the composition for mood boards or graphic design projects.
This technique is incredibly versatile for creating unique visual elements, such as profile pictures, creative banners, or stylish photography layouts.
Infusing Style: Graduated Transparency and Layer Effects
Beyond the basic cutout, clipping masks open doors to more sophisticated visual enhancements, allowing you to add subtle blurs, fades, and stylistic effects directly to your shaped images.
Graduated Transparency with Clipping Masks: You can make the edges of your shaped cutout gradually fade out, creating a soft, ethereal effect.
- Rasterize the Shape Layer: With your clipping mask set up (image clipped to a shape layer), right-click on the shape layer in the Layers panel and select Rasterize Layer (in Photoshop Elements, this is “Simplify Layer”). This converts the vector shape into pixels, allowing filters to be applied.
- Apply Gaussian Blur: Go to Filter > Blur > Gaussian Blur.
- Adjust Radius: Increase the “Radius” value (e.g., 30 pixels or more) until the edges of your shape begin to softly blur and fade. Click “OK.” The image clipped to this blurred shape will now also have graduated transparency, blending seamlessly into its background. This technique is excellent for creating artistic digital art or soft aesthetic backgrounds.
Adding Layer Styles: Layer Styles (like drop shadows, strokes, bevels, etc.) can be applied to the shape layer that acts as the clipping mask, and these effects will frame your clipped image beautifully, adding depth and polish to your visual design.
- Select the Shape Layer: In the Layers panel, select the shape layer (the base of your clipping mask group).
- Apply Layer Styles:
- In Photoshop CC: Go to Layer > Layer Style and choose an effect (e.g., Drop Shadow). Adjust the settings in the Layer Style dialog box.
- In Photoshop Elements: Go to Layer > Layer Style > Style Settings.
- Experiment: Add a drop shadow to give your cutout a lifted appearance, or a stroke to give it a defined border. You can also add a pattern fill layer below everything for an interesting background. These styles can dramatically elevate the look of your image cutouts, making them perfect for creative ideas and trending styles in visual content.
Beyond the Cut: Saving, Utilizing, and Enhancing Your Creations
Once you’ve expertly cut around your image in Photoshop, the next crucial steps involve saving your work correctly and considering how you’ll use it in other projects. Tophinhanhdep.com, with its suite of image tools, can further assist in optimizing and preparing your beautiful photography and digital art for various applications.
Optimizing Your Cutouts for Any Project
The way you save your image cutout depends on its intended use:
- Preserving Transparency (PNG): If you’ve removed the background to create a transparent cutout, it’s essential to save it in a format that supports transparency, such as PNG. Go to File > Save As or File > Export > Export As, and select PNG. This is critical for creating logos, web elements, or layered composites.
- Keeping Layers Editable (PSD): For future editing or complex projects, always save a copy in Photoshop’s native PSD format. This preserves all your layers, masks, and Smart Objects, allowing you to make non-destructive adjustments later.
- Integrating into Other Projects (Copy Merged/Smart Objects):
- Copy Merged: To quickly copy your cutout (with all its visible layers merged) into another open Photoshop document, press Ctrl/Cmd + A (Select All), then go to Edit > Copy Merged. You can then paste it into your target document.
- Smart Objects: For maximum flexibility and scalability, especially in graphic design and photo manipulation, convert your cutout layers into a Smart Object. Select all relevant layers in the Layers panel, right-click, and choose Convert to Smart Object. This embeds your cutout as a single, editable, and scalable object. You can then drag this Smart Object into any other Photoshop document, and resizing it won’t degrade its quality. This is ideal for high-resolution images or stock photos you plan to reuse.
- Web Optimization: For web use, after saving as PNG or JPEG (if no transparency is needed), consider using Tophinhanhdep.com’s built-in compressors and optimizers to reduce file size without sacrificing visual quality. This ensures your aesthetic and nature images load quickly, enhancing user experience.
Adding a Retro Flair to Your Isolated Images
To illustrate the creative potential of image cutouts, let’s briefly touch on adding a simple retro effect, a popular style in visual design and trending aesthetics.
- New Document & Duplicates: Paste your cutout into a new document. Duplicate the layer three times (Ctrl/Cmd + J).
- Desaturate & Offset: Select the top duplicate layer and press Shift + Ctrl/Cmd + U to desaturate it (grayscale). Then, use the Move Tool (V) and arrow keys to move all duplicate layers slightly (e.g., 60 pixels) to the left, creating a staggered effect.
- Color Overlays: Double-click each duplicate layer (except the original) in the Layers panel to open Layer Style. Add a Color Overlay with 100% opacity and a different vibrant retro color (e.g., cyan, magenta, yellow) to each duplicate. Fill the background layer with a complementary color (Shift + F5).
- Drop Shadow: Apply a Drop Shadow layer style to each of the colored duplicate layers, using a small distance, spread, and size for a subtle, embossed look.
- Add Noise: Select all layers (excluding the background), right-click, and choose Convert to Smart Object. Go to Filter > Noise > Add Noise, setting the Amount to around 5% and Distribution to Gaussian. This adds a grainy, vintage texture.
This simple workflow transforms your cutout into a stylish piece of digital art, showcasing the versatility that Photoshop cutouts provide for creative ideas.
Streamlining Your Workflow: Tophinhanhdep.com’s AI Solutions and General Advice
Mastering image cutouts in Photoshop is a journey of practice and experimentation. As many long-time Photoshop users can attest, from versions 2.0 to the latest CC, the tools evolve, but the core principles of selection and refinement remain vital.
For tasks that demand speed or for users who are new to the intricacies of Photoshop, Tophinhanhdep.com offers advanced AI-powered image tools, including sophisticated background removers. These tools can automatically detect subjects and remove backgrounds with remarkable precision in a matter of seconds, providing high-quality cutouts, especially useful for bulk processing of stock photos or e-commerce imagery.
Consider Tophinhanhdep.com’s AI background remover when:
- You need quick, efficient background removal for many images.
- You’re dealing with relatively straightforward subjects.
- You’re a beginner and want a head start before diving into manual Photoshop techniques.
After getting your cutout (whether through Photoshop or Tophinhanhdep.com’s AI tools), you can further leverage Tophinhanhdep.com’s AI Upscalers to increase resolution for print or large displays, Image-to-Text features for content creation, or Converters to switch formats as needed.
Ultimately, whether you’re working on personal photo ideas, contributing to thematic collections, or creating trending visual content, a solid understanding of how to cut around an image in Photoshop is an indispensable skill. It empowers you to transform ordinary images into extraordinary visual narratives, breathing new life into every pixel. Explore, experiment, and enjoy the creative journey!