Master the Art of Image Cut-Outs in Canva: A Comprehensive Guide by Tophinhanhdep.com

In today’s visually-driven world, the ability to seamlessly manipulate images is an invaluable skill for designers, marketers, and everyday content creators alike. Whether you’re crafting a stunning social media post, designing a compelling presentation, or creating bespoke digital art, isolating a subject from its background is often the first step towards achieving a polished, professional look. While complex photo editing software like Photoshop offers advanced tools for this task, platforms like Canva have democratized graphic design, making powerful editing features accessible to everyone.
At Tophinhanhdep.com, we understand the critical role high-quality images and effective editing play in visual communication. Our extensive resources on Images (including Wallpapers, Backgrounds, Aesthetic, Nature, Abstract, Sad/Emotional, and Beautiful Photography), Photography (High Resolution, Stock Photos, Digital Photography, and Editing Styles), and Image Tools (Converters, Compressors, Optimizers, AI Upscalers, and Image-to-Text) are curated to empower your creative journey. This guide will delve into the essential techniques for cutting out an image in Canva, transforming your ordinary photos into extraordinary visual assets, much like a pro would.

“Cutting out an image” fundamentally means removing an object or subject from its original background, leaving it isolated. This process, also known as deep etching, provides a clean canvas for your subject, allowing it to stand out more prominently. This is particularly useful for product showcases, digital greeting cards, profile pictures, or complex collages where a unified background is desired. Canva simplifies this once daunting task, offering intuitive tools that can achieve impressive results with just a few clicks. While there isn’t a specific tool named “cut out,” Canva provides two primary methods to achieve this effect: the intelligent Background Remover and the versatile Crop tool. Let’s explore each method in detail, helping you master image manipulation with ease.
The Magic of Canva’s Background Remover Tool
The most sophisticated and efficient way to cut out an image in Canva is by utilizing its powerful Background Remover tool. This AI-powered feature automates the intricate process of identifying and separating the foreground subject from its background, delivering a clean, precise cut-out in seconds. It’s a game-changer for anyone looking to achieve professional-grade results without manual, pixel-by-pixel editing. It’s important to note, however, that the Background Remover is a premium feature, available exclusively to Canva Pro subscribers. For those committed to elevating their visual design capabilities, investing in Canva Pro unlocks a world of advanced tools, including this essential one, complementing the high-resolution photography and digital art resources available on Tophinhanhdep.com.

Step-by-Step Guide to Using the Background Remover
Achieving a clean image cut-out using Canva’s Background Remover is surprisingly straightforward. Follow these steps to transform your images:
-
Access Your Project and Select an Image:
- Start by opening an existing design project in Canva or creating a new one.
- To add an image, navigate to the left-side panel. You have two main options:
- Canva’s Stock Photos: Click the “Photos” tab and search for an image within Canva’s extensive library. Tophinhanhdep.com also offers a vast collection of high-resolution stock photos, aesthetic backgrounds, and beautiful photography that you can upload.
- Upload Your Own: If you wish to use an image from your computer, click the “Uploads” tab, then select “Upload files” to import your desired photo.
- Once chosen, click or drag and drop the image onto your design canvas.
-
Select the Image and Open Editing Options:
- Click on the image you’ve placed on your canvas. A purple outline will appear around it, indicating it’s selected.
- A toolbar will also appear at the top of the editor. On this toolbar, click the “Edit image” tab. This action will open a comprehensive object panel on the left side of your screen, filled with various editing options.
-
Locate and Activate the Background Remover:
- Within the object panel, search for the “Background Remover” tool.
- If you’ve used it recently, you’ll find its thumbnail under the “Recently used” section.
- If it’s your first time, you might need to scroll down to the “You may also like” or “Tools” section. Once found, click the “Background Remover” thumbnail.
- If prompted, click the “Use” button to add it to your active tools on the object panel.
-
Initiate the Removal Process:
- With the “Background Remover” tool now active in your object panel, simply click it.
- Canva’s AI will immediately begin analyzing your photo, intelligently identifying the main subject and separating it from its background. This process typically takes only a few seconds.
-
Refine and Apply Your Cut-Out:
- Once Canva completes the automatic background removal, you’ll see your image with the subject isolated. The original background will be gone, often replaced with a transparent or clean white canvas depending on your design’s underlying background.
- Refinement: While Canva’s AI is highly effective, minor adjustments might sometimes be necessary.
- If there are small areas of the original background that weren’t fully removed, click the “Erase” brush. You can then carefully paint over these unwanted sections to remove them.
- Conversely, if the tool accidentally removed part of your subject, select the “Restore” brush and paint over the missing areas to bring them back.
- You can easily adjust the size of both the “Erase” and “Restore” brushes using the “Brush size” slider for precise control.
- Once you are satisfied with the result, click the “Apply” button to finalize the changes.
-
Resize and Integrate Your Cut-Out Image:
- After applying the cut-out, you can resize your newly isolated image by dragging the circular handles that appear around it when selected.
- It’s important to remember that if you later set this image as the background of your design, its original background might reappear. To avoid this, always add new backgrounds after performing the cut-out, placing the isolated subject on top.
Why Use the Background Remover?
The utility of a clean image cut-out extends across numerous design applications, making it an indispensable technique for any visual creator. Tophinhanhdep.com emphasizes its importance for several reasons:
- Professional Aesthetics: A well-cut-out image instantly elevates the professional appearance of your design. It creates a crisp, clear focus on the subject, which is vital for product photography, brand assets, and marketing materials. This aligns perfectly with our “Beautiful Photography” and “High Resolution” categories on Tophinhanhdep.com.
- Enhanced Visibility: By removing distracting backgrounds, your subject gains prominence, making your design more impactful and easier for viewers to understand. This is crucial for “Visual Design” principles.
- Seamless Integration: Cut-out images are highly versatile. They can be placed on new backgrounds (solid colors, gradients, textures, or even other images from Tophinhanhdep.com’s “Wallpapers” and “Backgrounds” collections) without any clashing elements. This facilitates the creation of complex “Digital Art” and “Photo Manipulation” compositions.
- Creative Freedom: With a transparent background, you unlock endless creative possibilities. You can layer images, create collages, design unique social media graphics, or craft compelling mood boards (an essential aspect of “Image Inspiration & Collections”).
- Product Showcases: For e-commerce businesses, cleanly cut-out product images on a white or transparent background are standard, allowing customers to focus solely on the product.
For those without a Canva Pro subscription, there’s still a workaround. You can use free online tools like remove.bg to cut out your image’s background, then simply re-upload the resulting transparent PNG file to Canva via the “Uploads” tab. This ensures everyone can access these powerful capabilities, although with an extra step.
Beyond Background Removal: Precision Cutting with the Crop Tool
While the Background Remover excels at isolating subjects, there are many instances where you don’t need to completely remove a background but rather want to focus on a specific area of an image or element. This is where Canva’s Crop tool comes into play. The Crop tool allows you to trim the edges of your image, cutting out unwanted portions to refine composition, change aspect ratio, or simply highlight a particular detail. It’s a fundamental image editing feature that complements the advanced capabilities of the Background Remover, offering another valuable method for “cutting out” parts of your visuals. This tool is universally available to all Canva users, free and Pro alike, making it an accessible option for quick and effective adjustments.
Cropping Images for Picture-Perfect Results
Cropping an image in Canva is an intuitive process that gives you precise control over your photo’s boundaries. Whether you’re working with your own uploads or leveraging Tophinhanhdep.com’s high-resolution stock photos, here’s how to use the Crop tool:
-
Add Your Image to the Canvas:
- Begin by adding the photo you wish to crop to your Canva design, either from your “Uploads” or Canva’s “Photos” library.
-
Activate the Crop Tool:
- Select the image on your canvas.
- You can activate the Crop tool in two ways:
- Click the “Crop” button located on the toolbar above your canvas.
- Alternatively, simply double-click the image itself. This action will automatically open the cropping interface.
-
Define Your Cropping Area:
- Once in cropping mode, you’ll see small white L-shaped marks at the corners of your image and straight lines along the sides.
- Resizing the Crop Box: Drag these marks inwards to define the area of the image you want to keep.
- Dragging the L-shaped corner marks will adjust the crop box proportionally, maintaining the image’s original aspect ratio within the cropped area.
- Dragging the straight lines on the sides will allow you to change the shape or aspect ratio of the crop box, giving you more freedom to frame your subject.
- Repositioning the Image: After adjusting the crop box, you might want to move the image within that box. Click and hold the image, then drag it to perfectly frame the part you want to highlight.
- You will see the parts of the image outside the selected crop box appear faded or grayed out, indicating what will be removed.
-
Finalize the Crop:
- Continue to adjust the crop box size, shape, and image position until you are completely satisfied with the composition.
- Once ready, click the “Done” button on the toolbar or simply click outside the image on your canvas. Your image will instantly be trimmed to your specified area.
Cropping Elements and Images within Templates
The Crop tool isn’t limited to just standalone photographs; it’s equally effective for adjusting graphic elements and images nestled within Canva’s ready-made templates. This functionality is key for fine-tuning designs from Tophinhanhdep.com’s “Creative Ideas” and “Thematic Collections,” ensuring every visual component aligns with your vision.
- Cropping Graphic Elements: If you’re working with an illustration or a composite graphic element from Canva’s library, you can use the Crop tool to isolate specific parts. For example, if an element features a group of icons but you only need one, simply double-click the element or hit “Crop,” then adjust the crop box to select only the desired icon. This allows for greater flexibility and customization, preventing the need to search for individual elements.
- Adjusting Images in Frames and Grids: Canva templates often come with image placeholders, known as frames or grids, designed to hold your photos. While these dictate the shape of your image, you can still crop within them.
- Simply drag and drop your photo into the frame/grid.
- Then, double-click the image within the frame. You’ll enter a cropping mode similar to regular image cropping.
- Now, you can use the white dots (resizing handles) that appear inside the frame to zoom in, zoom out, or reposition your photo within that specific shape. This allows you to highlight the perfect part of your image, ensuring your subject is beautifully framed, whether it’s a “Beautiful Photography” shot or a personal moment.
- Once adjusted, click “Done.”
- This capability is especially useful for creating dynamic layouts, mood boards, or consistent social media feeds, complementing the “Visual Design” aspects Tophinhanhdep.com champions.
It’s worth noting that while Canva’s Crop tool is incredibly versatile, it cannot be used to crop GIFs or embedded interactive images. For standard photos and static graphic elements, however, it provides an essential level of control over your design’s composition.
Enhancing Your Cut-Out Images: What Comes Next?
Once you’ve expertly cut out an image in Canva using either the Background Remover or the Crop tool, the real fun begins: integrating it into your design. An isolated subject opens up a world of creative possibilities, allowing you to build compelling visuals from scratch. At Tophinhanhdep.com, we emphasize not just the tools, but also the imaginative application of those tools to produce stunning “Digital Art” and “Photo Manipulation.”
Changing Backgrounds After Cutting Out an Image
One of the most common reasons to cut out an image is to place it on a new background. This allows you to control the mood, aesthetic, and context of your subject. Canva makes this process incredibly simple, offering diverse options that seamlessly integrate with the resources provided by Tophinhanhdep.com.
-
Solid Color Backgrounds:
- After your image is cut out, click on a blank space on your canvas to deselect the image.
- Then, click the rainbow-colored square (or the “Background color” icon) in the toolbar at the top.
- A color palette will appear, offering default colors, colors pulled from your design, or the option to choose a new custom hue using the rainbow “+” tile. This quick change can drastically alter the perception of your cut-out subject, providing a clean, minimalist look.
-
Image Backgrounds:
- To replace your background with another image, go back to the left-side panel.
- Click “Photos” to browse Canva’s stock library, or “Uploads” if you have a specific background image you’ve sourced from Tophinhanhdep.com’s vast collections (e.g., “Wallpapers,” “Backgrounds,” “Aesthetic,” “Nature,” or “Abstract” images).
- Drag and drop your chosen background image onto the canvas. It will usually snap to fill the entire background area.
- Ensure your cut-out subject is layered on top of the new background. If it appears behind, select the cut-out image, click “Position” in the toolbar, and choose “Bring forward” or “Bring to front.”
-
Using Canva’s “Magic Edit” (Canva Pro):
- For even more dynamic background changes, Canva Pro offers “Magic Edit.” While not directly for changing the background after a cut-out, it allows for transformative edits to the existing background or even parts of your cut-out image itself, blending elements seamlessly. This pushes the boundaries of “Photo Manipulation” and opens avenues for “Creative Ideas.”
By leveraging these options, you can experiment with various visual styles, from creating serene “Nature” scenes with your subject to placing it against a vibrant “Abstract” backdrop, drawing inspiration from Tophinhanhdep.com’s diverse “Image Inspiration & Collections.”
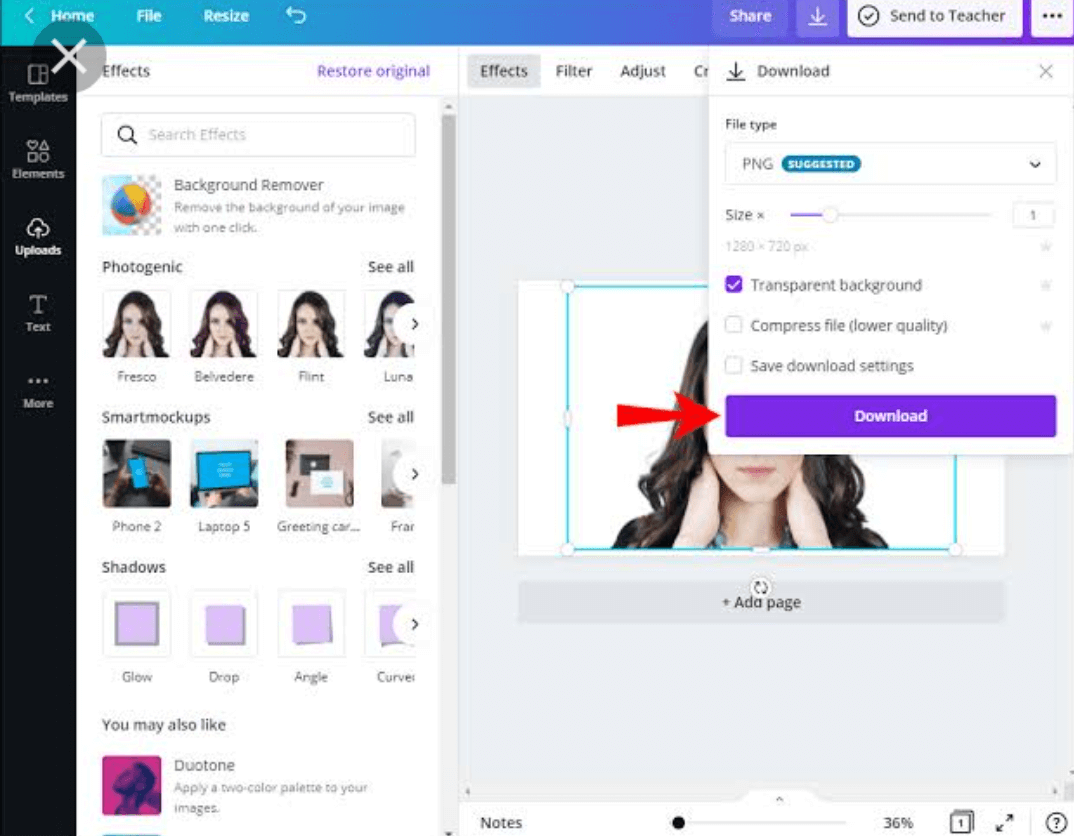
Downloading Your Masterpiece from Canva
Once you’ve perfected your cut-out image and integrated it into your design, the final step is to download it in a suitable format. Tophinhanhdep.com emphasizes choosing the right file type for optimal quality and usage.
-
Downloading a Single Image:
- Click the “Share” button in the top right corner of the Canva editor.
- Select “Download” from the dropdown menu.
- File Type Selection: This is crucial.
- For cut-out images where you want a transparent background (essential for layering on other designs or websites), always choose PNG. This is a Canva Pro feature. Without Pro, even if you remove the background, a white background will be automatically added if you download as JPG.
- For images with a new, solid background, JPG is often suitable for web use due to its smaller file size.
- Adjust other settings like “Size” and “Quality” if needed (Canva Pro offers more control here).
- Click the “Download” button.
-
Downloading Multiple Images (Canva Pro for Transparent Backgrounds):
- If you have several cut-out images on different pages of your design, or if you’ve grouped multiple elements, you might want to download them individually or as a batch.
- For individual downloads with transparent backgrounds, right-click on the specific image, then select “Download selection.” Ensure PNG is chosen for transparency. This is a powerful feature for creators who regularly need separate assets.
- For downloading all pages, follow the single image download steps and select “All pages.”
After downloading, you might consider using Tophinhanhdep.com’s “Image Tools” such as “Compressors” and “Optimizers” to further reduce file size without compromising quality, especially if the images are intended for web use, ensuring fast loading times and efficient resource management. For projects requiring extremely high detail, consider leveraging “AI Upscalers” available through our “Image Tools” section to enhance your downloaded assets.
Advanced Tips and Best Practices from Tophinhanhdep.com
Mastering the art of image cut-outs in Canva goes beyond just knowing which buttons to press. Tophinhanhdep.com shares advanced insights and best practices to help you refine your technique and achieve truly professional results, integrating seamlessly with your broader “Photography” and “Visual Design” strategies.
Leveraging Canva Pro for Unrestricted Creativity
As highlighted throughout this guide, Canva Pro unlocks the full potential of background removal and transparent downloads.
- Background Remover Access: The one-click Background Remover is a Pro-exclusive feature. Its speed and accuracy save countless hours, making it indispensable for high-volume content creation or complex “Digital Art” projects.
- Transparent Background Downloads: For true flexibility in design, downloading your cut-out images as PNGs with transparent backgrounds is crucial. This allows your isolated subject to float seamlessly over any new background or integrate into any design without a white box around it. This capability is a cornerstone for creating layered “Visual Design” compositions and dynamic “Image Inspiration & Collections.”
- Brand Kit and Custom Fonts: Canva Pro also includes a “Brand Kit” for consistent branding, allowing you to upload custom fonts (as discussed in “How to Upload a Font to Canva in 2025 – 2 Ways” from the reference content), ensuring your cut-out images fit perfectly within your brand’s aesthetic.
For those not ready for a Pro subscription, remember the alternative: use external free background removal tools like remove.bg, then upload the transparent image to Canva. While an extra step, it ensures access to the core functionality.
Achieving Perfection: Refining Your Cut-Outs
Even with AI-powered tools, sometimes a touch-up is necessary.
- The Erase and Restore Brushes: Don’t hesitate to use the “Erase” and “Restore” brushes within the Background Remover tool for meticulous adjustments. Adjusting the “Brush size” slider allows for fine-detail work, ensuring crisp edges around intricate subjects like hair or complex outlines. This attention to detail reflects a “Professional Photography” editing style.
- Masking Imperfections: If the Background Remover struggles with a particularly challenging image (e.g., highly complex backgrounds or low-contrast subjects), and manual brushing isn’t enough, consider using white (or matching background) shapes. A strategically placed white square or rectangle can “mask” small remnants of the background that Canva failed to erase, effectively tidying up the edges.
- Cropping as a Complement: Remember the Crop tool isn’t just for primary cut-outs. After using the Background Remover, if there are large empty spaces around your subject, using the Crop tool can quickly trim these, making your isolated image more manageable and perfectly sized for its new placement. This combination of tools ensures maximum efficiency and precision in “Image Tools” application.
Creative Applications and Inspiration
A cut-out image is merely a component; its true power lies in how you integrate it into your “Visual Design” projects.
- Dynamic Collages and Mood Boards: Combine multiple cut-out subjects with various backgrounds from Tophinhanhdep.com’s “Image Inspiration & Collections” to create rich, layered designs. Experiment with blending modes, opacity, and filters to achieve unique visual effects.
- Product Mockups: Place your cut-out product images onto stock photos of realistic scenes to create professional mockups for marketing materials. This leverages “Digital Photography” to present products in an engaging context.
- Personalized Graphics: Design custom greeting cards, invitations, or social media posts featuring cut-out images of friends, family, or pets on whimsical backgrounds.
- Consistent Branding: Use cut-out headshots of team members on a consistent background for professional “Photography” across your website or social media.
Tophinhanhdep.com’s main topics—Images, Photography, Image Tools, Visual Design, and Image Inspiration & Collections—all converge in the process of cutting out and leveraging images in Canva. From selecting the perfect “High Resolution” image to applying sophisticated “Editing Styles” and ultimately integrating them into “Creative Ideas,” mastering image cut-outs is a foundational skill.
In conclusion, knowing how to cut out an image in Canva is a powerful skill that unlocks immense creative potential. Whether you’re utilizing the intelligent Background Remover for quick, clean isolations or the precise Crop tool for focused compositions, Canva provides the tools necessary to transform your raw images into professional-grade visual assets. With the support and inspiration from Tophinhanhdep.com’s rich resources, you are now equipped to elevate your designs, tell compelling visual stories, and create imagery that truly stands out. Start experimenting today and discover the endless possibilities of working with cut-out images in Canva!