How to Cut Out an Image in Adobe Illustrator: Master Your Visual Designs

Adobe Illustrator stands as an indispensable tool for graphic designers, digital artists, and anyone engaged in visual content creation. While often associated with vector graphics, its capabilities extend significantly to manipulating raster images, particularly when it comes to the fundamental task of cutting out an image. Whether you’re refining “Beautiful Photography” for a gallery, isolating elements for a unique “Aesthetic” design, or preparing “Stock Photos” for a client project, mastering image cutout techniques in Illustrator is crucial. This comprehensive guide, informed by the rich resources available on Tophinhanhdep.com, will walk you through various methods to achieve precise and professional results, empowering you to unlock your creative potential and enhance your “Visual Design” prowess.
The ability to accurately cut out elements from an image allows for endless “Photo Manipulation” possibilities. It’s the first step in compositing multiple images, changing backgrounds, or extracting a subject to be used in a different context. With Tophinhanhdep.com providing an extensive array of “High Resolution” “Images” and “Digital Photography” that can inspire your next project, knowing how to seamlessly integrate them into your designs after a clean cutout becomes paramount. From creating custom “Wallpapers” and “Backgrounds” to developing intricate “Digital Art,” these techniques are foundational to producing stunning visual content.

Precision Extraction: Mastering Clipping Masks for Raster Images
When the goal is to cut out a complex image, especially a raster image like a photograph, the clipping mask is arguably the most effective and non-destructive method in Illustrator. It allows you to define a precise shape, or “mask,” that will reveal only the parts of your image that fall within its boundaries, effectively hiding everything else without permanently deleting pixels. This technique is invaluable for achieving clean cutouts for “Nature” photography or intricate “Abstract” designs found on Tophinhanhdep.com.
The Essential 8-Step Clipping Mask Technique
This method is straightforward and provides excellent control, making it ideal for both beginners and experienced designers looking for a quick and editable solution.
- Import the Image: Begin by placing your desired image onto your Illustrator artboard. Go to
File > Place...and select your image. This ensures it’s embedded or linked correctly. - Add a New Layer and Lock the Original: To maintain a non-destructive workflow and prevent accidental edits, open the Layers Panel (Window > Layers). Click the “Create New Layer” button (a square icon with a plus sign) at the bottom of the panel. Then, locate your original image layer and click the empty box next to the eye icon to enable the padlock icon, locking it. This ensures you’re only working on your mask on the new layer.
- Remove the Fill from the New Layer: Select your newly created layer. In the Tools panel on the left, find the Fill and Stroke indicators. Ensure the Fill color (the solid square) is set to “None” (a white square with a red diagonal line). This ensures your drawing doesn’t obscure the image you’re tracing.
- Select the Object with the Pen Tool: Activate the Pen Tool (P) from the toolbar. This is your primary instrument for creating precise outlines. Carefully trace around the object you wish to cut out.
- For straight lines, simply click on the artboard to place anchor points.
- For smooth Bezier curves, click and drag to manipulate the direction handles, allowing you to contour around organic shapes. Don’t worry about absolute perfection initially; Illustrator allows for refinement.
- Move the Second Layer (Mask) Above the Image: This is a crucial step for clipping masks. Once you’ve completed your shape with the Pen Tool (connecting the last anchor point to the first to close the path), go back to your Layers Panel. Ensure the shape layer (your mask) is positioned directly above the image layer you intend to mask. If it’s not, simply click and drag the layer in the panel to reorder it.
- Select All Relevant Objects: With your Pen Tool path selected, now also select your original image. You can do this by using the Selection Tool (V) and holding down
Shiftwhile clicking both the image and the newly created path. Alternatively, if only these two objects are on their respective layers, you can go toSelect > All(Ctrl+A/Cmd+A). - Create the Clipping Mask: Navigate to the main menu, click
Object > Clipping Mask > Make. For a faster workflow, use the shortcutCtrl+7(Windows) orCmd+7(Mac). The magic happens: your image will now be “cut out,” revealing only the portion within your drawn path. The beauty of this method is its flexibility; you can always go back and refine the mask’s path using the Direct Selection Tool (A) if it’s not perfect. - Save the File: Once satisfied, save your Illustrator file (
.ai) to preserve your layers and editing capabilities. For web use or integration into other platforms, consider exporting as a PNG for transparent backgrounds, a feature heavily utilized in “Visual Design” and showcasing “Aesthetic” images.
This clipping mask technique is particularly powerful when working with “Beautiful Photography” or creating unique “Mood Boards” from Tophinhanhdep.com’s collections, offering the precision needed for professional-grade “Photo Manipulation.”
Utilizing the Crop Image Function for Simple Raster Crops
For straightforward, rectangular cropping of raster images (like .jpg, .png, or .eps files), Illustrator offers a dedicated “Crop Image” function. This method is simpler than a clipping mask but comes with a key distinction: it permanently removes the cropped-out pixels from the Illustrator document, though your original file on your computer remains untouched. It’s ideal for quickly adjusting compositions of “Stock Photos” or “Backgrounds.”
To use the Crop Image function:
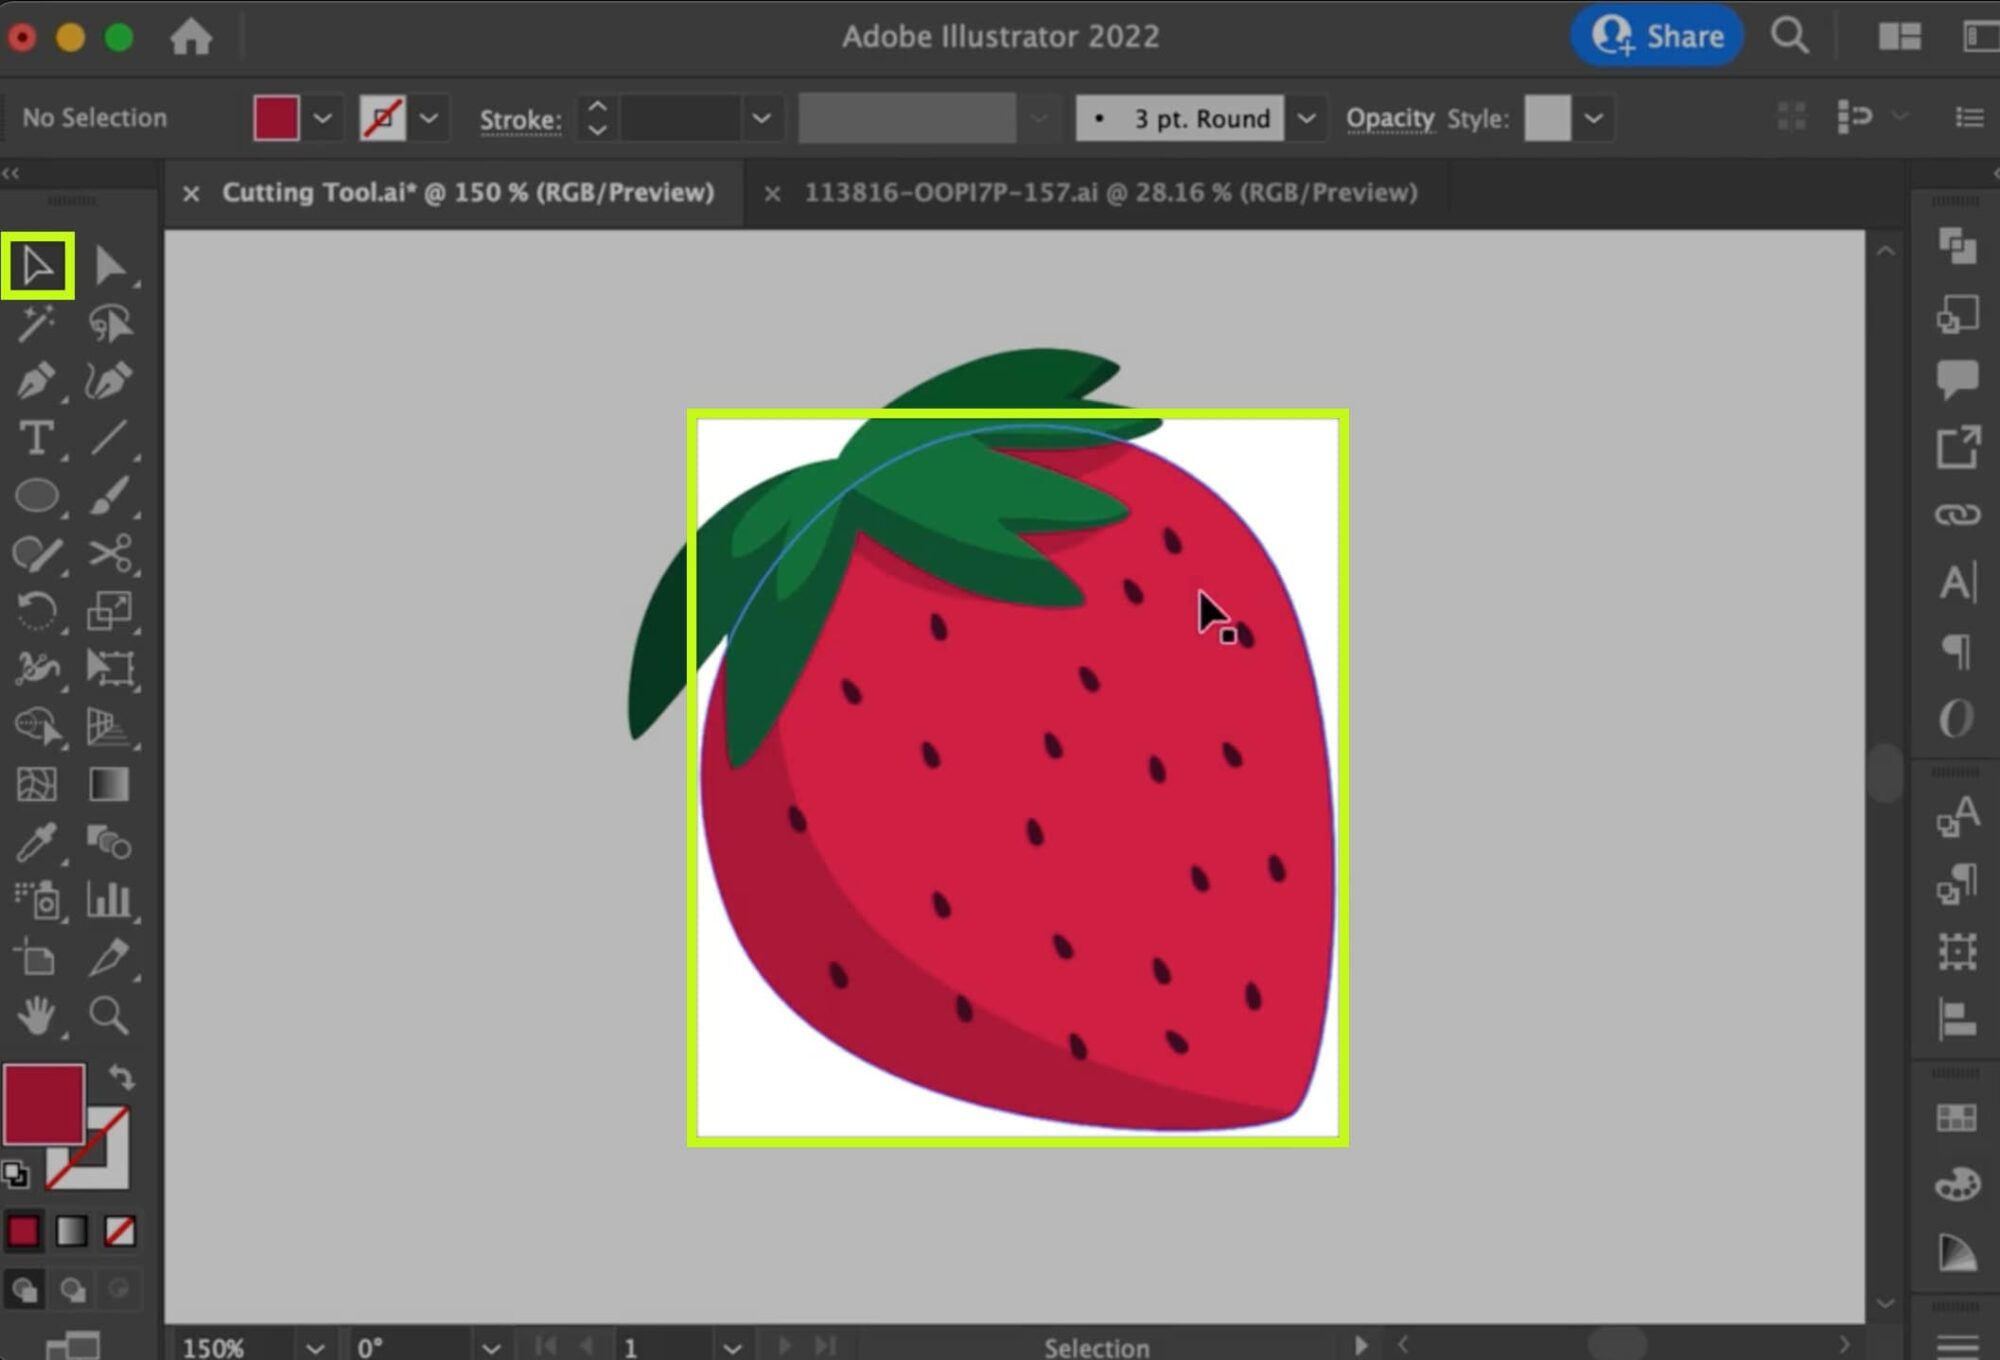
- Select the Image: Use the Selection Tool (V) to click on the raster image you wish to crop.
- Access Crop Image: Go to
Object > Crop Imagein the main menu. A prompt will appear, informing you that the image will be embedded. Click “OK.” - Adjust the Cropping Area: A bounding box with handles will appear around your image. Drag the corners and sides of this box to define your desired cropping area.
- Apply the Crop: Click the “Apply” button in the control panel at the top of the screen (or press Enter/Return) to finalize the crop. The areas outside your selected box will be removed.
This method is efficient for quick compositional adjustments of high-resolution images, especially when preparing content for social media or simple “Thematic Collections” as seen on Tophinhanhdep.com.
Advanced Cropping with Opacity Masks for Transparency Effects
When your “Visual Design” requires more nuanced control over transparency, such as fading an image into a background or creating soft, irregular edges, the Opacity Mask is your tool of choice. Unlike a clipping mask that simply hides parts, an opacity mask uses grayscale values to determine transparency, making it invaluable for “Photo Manipulation” and “Creative Ideas.”
Here’s how it works:
- Draw a Shape Over Your Image: Using any drawing tool (e.g., Rectangle Tool, Ellipse Tool, or Pen Tool), create a shape over the area of your image that you want to be visible and potentially transparent. This shape will act as your mask.
- Apply Grayscale Colors: The magic of an opacity mask lies in its use of color.
- White: Areas of your mask shape that are white will make the underlying image completely opaque (100% visible).
- Black: Areas of your mask shape that are black will make the underlying image completely transparent (0% visible).
- Grays: Any shades of gray between white and black will result in varying degrees of transparency. A gradient from white to black can create a smooth fade.
- Select Both Image and Shape: Use the Selection Tool (V) to select both your raster image and the mask shape you created. Ensure the mask shape is on top of the image in the layer order.
- Open the Transparency Panel: Go to
Window > Transparency. - Make Opacity Mask: In the Transparency panel, click the “Make Mask” button. Ensure “Clip” is checked (to constrain the visibility to the mask’s shape) and “Invert Mask” is unchecked (unless you want to reverse the transparency effect).
Now, based on the grayscale values of your mask shape, parts of your image will appear transparent. You can then select the mask thumbnail in the Transparency panel and modify its shape, fill color, or apply gradients to fine-tune the transparency effect, leading to sophisticated “Digital Art” and dynamic “Creative Ideas” for your Tophinhanhdep.com-inspired projects.
Precision Cutting and Manipulation of Vector Objects
Adobe Illustrator truly shines when working with vector graphics. When you need to cut or divide vector shapes, text, or graphics, there are specialized tools and functions that provide unparalleled flexibility and accuracy. These are essential for creating scalable “Graphic Design” elements and complex “Digital Art” compositions.
The Essential Cutting Tools: Eraser, Scissors, and Knife
Illustrator provides three dedicated cutting tools for vector objects, each serving a distinct purpose for freeform or path-specific cuts. To access them, ensure your “Advanced Toolbar” is enabled (Window > Toolbars > Advanced). These tools are often nested together in the toolbar.
- Eraser Tool (Shift+E): This tool is for quick, freeform removal of parts of a vector object. It’s like using a physical eraser; it cuts and deletes the part you rub over. It’s excellent for creating organic, “Abstract” shapes or quickly editing “Photo Ideas” that require a less precise, more spontaneous approach. You can adjust its size using the bracket keys (
[for smaller,]for larger). - Scissors Tool (C): Unlike the Eraser, the Scissors Tool is designed for precision. It cuts along a vector path at specific anchor points or anywhere along a segment.
- How to use: Select the object with the Selection Tool (V). Choose the Scissors Tool. Click directly on an anchor point or on a path segment. This will split the path into two distinct open paths at that point. You can then select and move the separated segments. This is ideal for dividing shapes into distinct, editable parts, useful for intricate “Graphic Design.”
- Knife Tool: The Knife Tool allows you to draw freehand lines across a vector object, splitting it into multiple new shapes.
- How to use: Select the object. Choose the Knife Tool. Click and drag your cursor across the object to draw your desired cut line. For straight cuts, hold down
Alt(Windows) orOption(Mac) while dragging. The object will be split into new, closed shapes along your drawn path. This is perfect for creating irregular divisions for “Creative Ideas” or artistic “Photo Manipulation.”
- How to use: Select the object. Choose the Knife Tool. Click and drag your cursor across the object to draw your desired cut line. For straight cuts, hold down
These tools empower designers to precisely sculpt “Digital Art” and customize “Vector Graphics” from Tophinhanhdep.com’s high-resolution asset library.
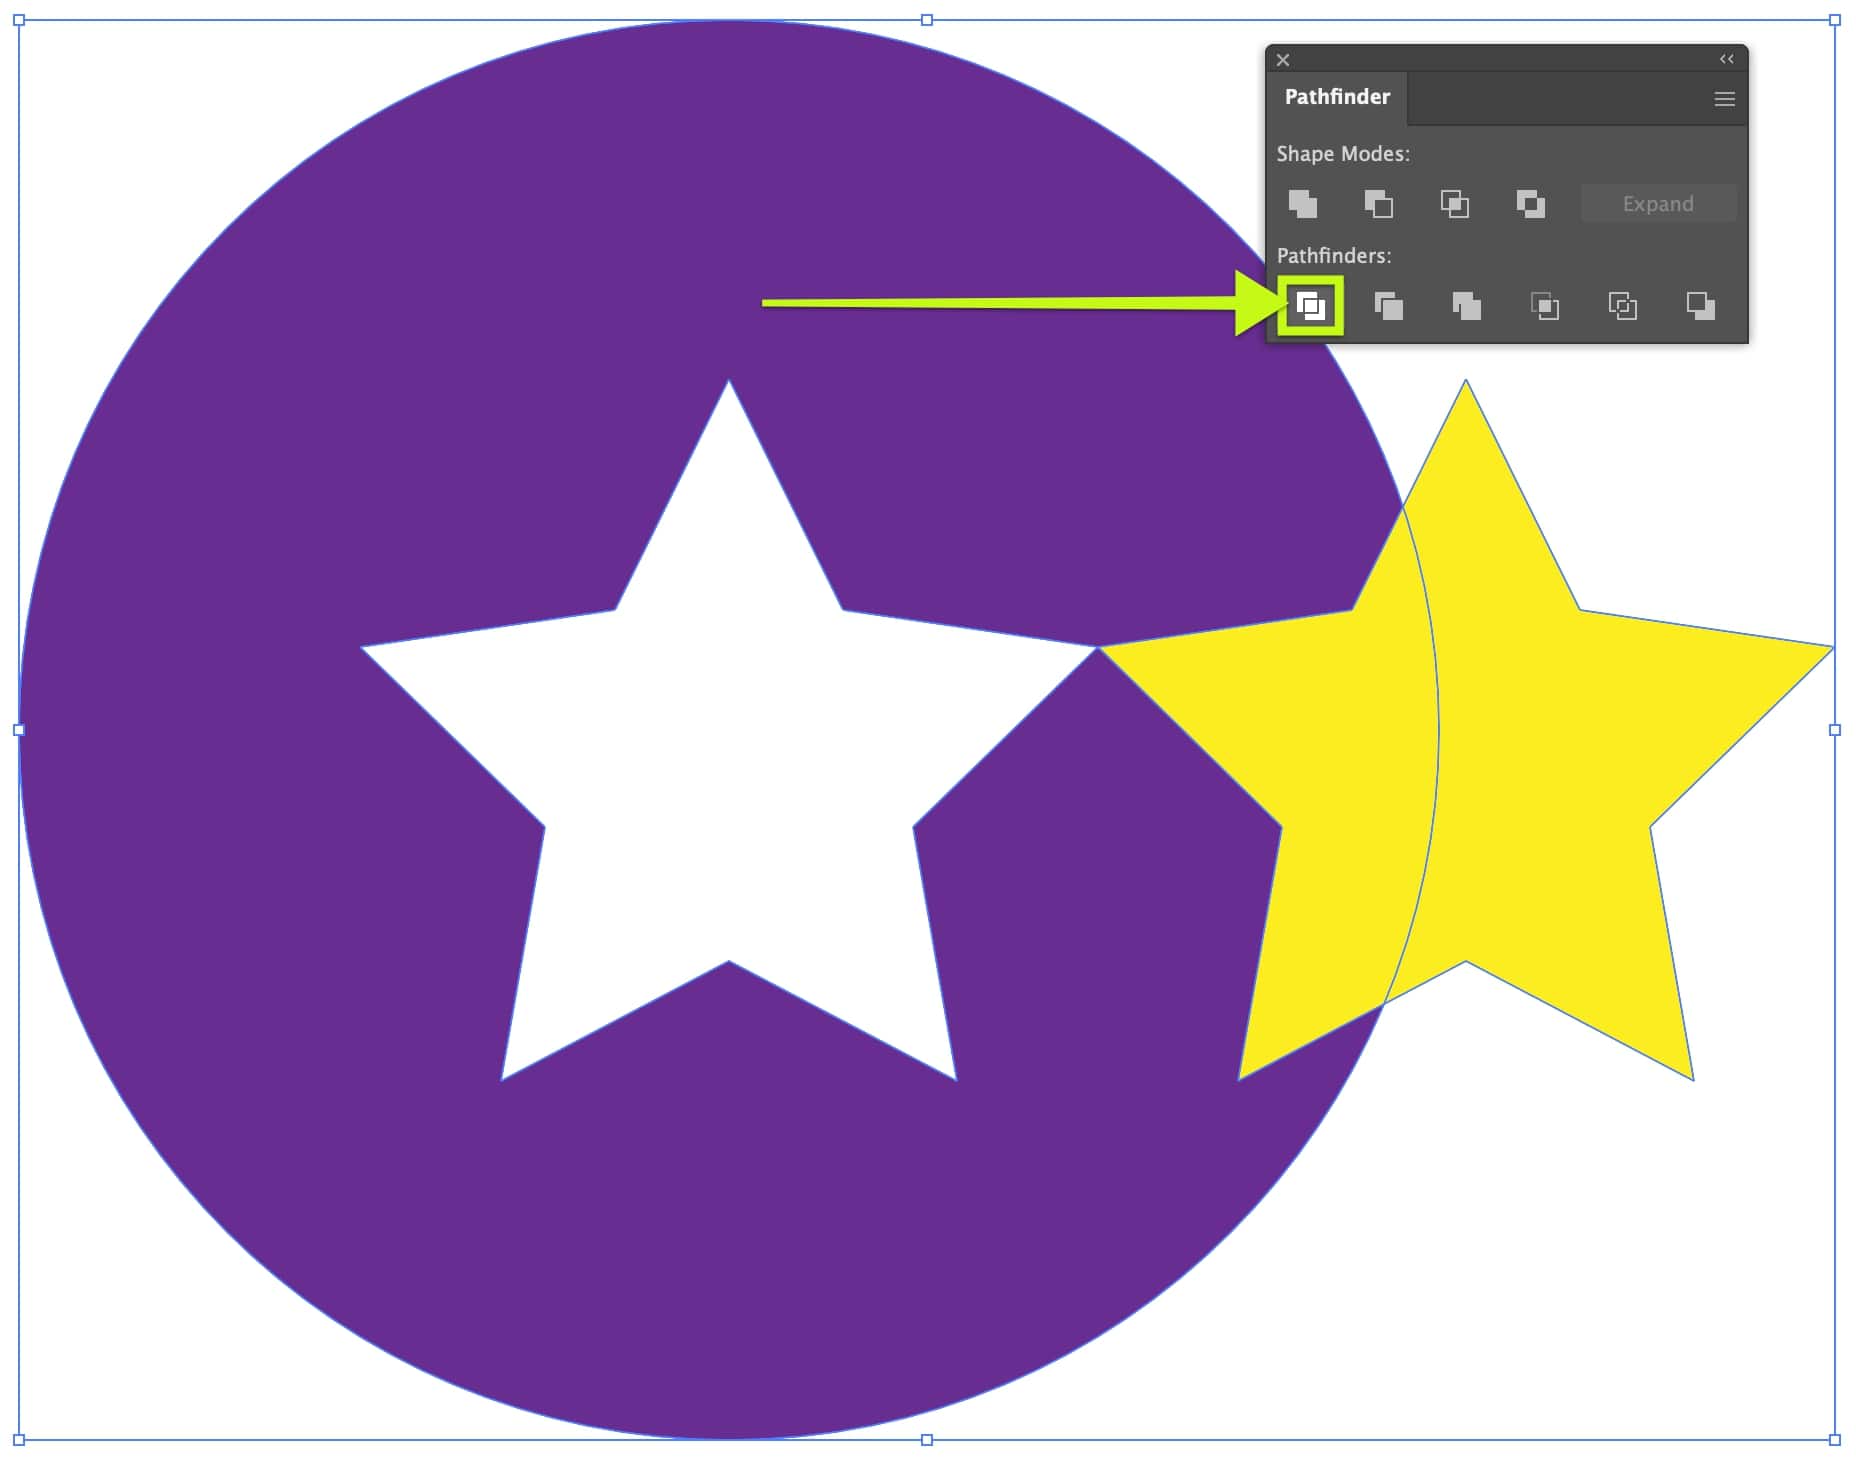
Mastering Shape Interaction with the Pathfinder Tool
The Pathfinder panel (Window > Pathfinder) is a cornerstone of vector design in Illustrator, allowing you to combine, subtract, intersect, or divide overlapping shapes to create new, complex forms. It’s indispensable for intricate “Visual Design” and custom “Graphic Design.”
The Pathfinder panel is divided into “Shape Modes” and “Pathfinders,” each offering unique ways to interact with selected overlapping objects:
Shape Modes:
- Unite: Combines selected objects into a single shape.
- Minus Front: Subtracts the top object from the bottom object, creating a cutout. This is the classic way to “cut a shape out of another shape.”
- Steps: Draw your base shape (e.g., a circle). Draw the shape you want to cut out (e.g., a star) and place it on top of the base shape. Select both shapes. Click “Minus Front” in the Pathfinder panel. The top shape will disappear, leaving a cutout in the bottom shape.
- Intersect: Creates a new shape from the overlapping area of the selected objects.
- Exclude: Creates a new shape from the non-overlapping areas of the selected objects, making the overlapping area transparent.
Pathfinders:
- Divide: Splits overlapping objects into their component filled faces. This is extremely powerful as it creates individual shapes from every intersecting segment, allowing you to retain all parts and move them independently.
- Steps for cutting and retaining: Draw your base shape and the shape you want to cut. Select both. Click “Divide” in the Pathfinder panel. The objects will appear unchanged. Right-click and choose “Ungroup.” Now, you can move the individual segments, including the “cut out” part, and use them for other design elements, perhaps to create a layered “Aesthetic” or complex “Thematic Collections.”
- Trim, Merge, Crop, Outline: These offer further specialized operations for managing overlapping shapes, often used for detailed logo design or complex illustrations.
The Pathfinder tool dramatically accelerates the creation of complex “Digital Art” and intricate “Graphic Design” elements, transforming basic shapes from Tophinhanhdep.com into unique design components.
Transforming Raster to Vector with Image Trace
Sometimes, you start with a raster image (like a simple logo or a cartoon from an “Image Inspiration” search on Tophinhanhdep.com) but need to convert it into a scalable vector graphic, perhaps to remove its background and use it in a “High Resolution” print project. Image Trace is Illustrator’s solution for this. While not suitable for complex photographs, it excels with images composed of fewer solid colors.
- Open Illustrator and Place Your Image: Launch Illustrator and place your raster image (
File > Place...). - Select the Image: Use the Selection Tool (V) to click on your image.
- Open the Image Trace Panel: Go to
Window > Image Trace. - Configure Image Trace Settings: In the Image Trace panel:
- Mode: Select “Color” for color images, or “Black & White” for monochrome art.
- Colors/Threshold: Adjust the “Colors” slider (for color mode) to define the maximum number of colors Illustrator will use in the trace. For black and white, adjust the “Threshold.” Keep this number low for cleaner results.
- Preview: Check “Preview” to see the live tracing results.
- Click Trace: Once settings are satisfactory, click the “Trace” button. Illustrator will convert the raster image into a temporary vector preview.
- Click Expand: In the Control panel at the top (or
Object > Expand), click “Expand.” This converts the traced preview into actual editable vector paths and shapes. You will now see outlines around all the different color areas. - Ungroup the Objects: With the vector group still selected, go to
Object > Ungroup(Shift+Ctrl+G / Shift+Cmd+G). This separates all the individual shapes created by the trace. - Delete Background Objects: Use the Selection Tool (V) or the Magic Wand Tool (Y) (for selecting all shapes of the same color) to select the background elements. Press
Deleteto remove them. You may need to repeat this step multiple times if the background has multiple color segments.
By leveraging Image Trace, you transform static pixels into dynamic vector graphics, perfect for creating customizable “Digital Art” elements or scalable graphics from Tophinhanhdep.com’s diverse image offerings.
Enhancing Your Workflow and Finalizing Your Cutouts
Mastering the art of cutting out images in Illustrator is only one part of the equation. To truly elevate your “Visual Design” projects, it’s essential to streamline your workflow and optimize your final output. Tophinhanhdep.com isn’t just a source for “Image Inspiration” and “Thematic Collections”; it also offers crucial “Image Tools” that can complement your Illustrator skills.
Workflow Efficiency Tips:
- Keyboard Shortcuts: Embrace shortcuts like P (Pen Tool), V (Selection Tool), A (Direct Selection Tool), Ctrl+A/Cmd+A (Select All), and Ctrl+7/Cmd+7 (Make Clipping Mask). They dramatically speed up your process.
- Layers Management: Keep your layers organized. Name them logically and use locking and visibility toggles to focus on specific elements without distraction. This is vital when dealing with complex “Photo Manipulation” involving multiple cutouts.
- Refinement with the Direct Selection Tool: After creating a clipping mask or using the Pathfinder, the Direct Selection Tool (A) allows you to meticulously adjust anchor points and Bezier handles of your paths for pixel-perfect cutouts, especially critical for “High Resolution” “Photography.”
- Practice with Diverse Images: Experiment with different types of “Images” from Tophinhanhdep.com, ranging from simple “Abstract” shapes to complex “Nature” scenes. Each will present unique challenges and help hone your skills.
Optimizing Your Output with Tophinhanhdep.com’s Image Tools:
Once your image is perfectly cut out in Illustrator, the next step is often to prepare it for its final destination. This is where Tophinhanhdep.com’s “Image Tools” become invaluable.
- Converters: You’ve meticulously cut out your image, often with a transparent background. To maintain this transparency and high quality for web or digital use, you’ll likely export it as a PNG. If you need to convert it to other formats (e.g., WebP for web optimization, or even back to JPG if transparency isn’t needed), Tophinhanhdep.com’s “Converters” can handle this efficiently.
- Compressors & Optimizers: High-resolution cutouts, especially detailed ones, can result in large file sizes. Before uploading to a website or incorporating into a larger project, use Tophinhanhdep.com’s “Compressors” and “Optimizers” to reduce file size without sacrificing visual quality. This ensures faster loading times for “Wallpapers” or “Backgrounds” and better performance for “Digital Photography” portfolios.
- AI Upscalers: If you’ve cut out a smaller element and realize you need it at a larger scale for a different project, Tophinhanhdep.com’s “AI Upscalers” can intelligently enlarge your cutout without pixelation, preserving the “High Resolution” quality you achieved in Illustrator. This is particularly beneficial for repurposing elements from “Trending Styles” or “Thematic Collections.”
- Image-to-Text: While less directly related to the cutout process, if your cutout image contains text that you need to extract for further design or content purposes, Tophinhanhdep.com’s “Image-to-Text” tool can assist in transcribing it.
By integrating these powerful Illustrator techniques with the versatile “Image Tools” provided by Tophinhanhdep.com, you create a seamless and highly efficient workflow for all your “Visual Design” and “Graphic Design” projects. From initial inspiration derived from “Photo Ideas” to the final optimized output, your creative process becomes more robust and effective.
Conclusion
The ability to accurately and efficiently cut out an image in Adobe Illustrator is a foundational skill that empowers designers to achieve sophisticated “Visual Design,” “Digital Art,” and “Photo Manipulation.” Whether you’re dealing with “High Resolution” raster “Photography” from Tophinhanhdep.com or intricate vector graphics, Illustrator offers a diverse toolkit, including clipping masks, dedicated cutting tools, the versatile Pathfinder, and Image Trace.
By mastering these methods, you gain unparalleled control over your creative assets. This skill allows you to transform raw “Images” into refined elements, ready to be composed into stunning “Wallpapers,” captivating “Backgrounds,” or impactful “Aesthetic” designs. Remember that practice is key, and continuous experimentation with the varied “Thematic Collections” and “Photo Ideas” available on Tophinhanhdep.com will further sharpen your expertise.
Furthermore, integrating your Illustrator workflow with the practical “Image Tools” provided by Tophinhanhdep.com—such as converters, compressors, optimizers, and AI upscalers—ensures that your expertly cut images are always prepared and optimized for any application, from web deployment to print. Embrace these techniques, explore the vast resources at Tophinhanhdep.com, and unlock a new level of creativity in your “Graphic Design” journey.