Mastering Image Cutouts in Photoshop: Your Essential Guide to Precision and Creativity

In the expansive realm of digital imagery, the ability to precisely “cut out” an image or isolate a subject from its background stands as a foundational skill. Whether you’re a seasoned graphic designer crafting intricate digital art, a photographer refining high-resolution stock photos, or an enthusiast creating aesthetic collages for image collections, mastering this technique in Adobe Photoshop is indispensable. This comprehensive guide will delve into various methods, from classic precision tools to modern AI-driven selections, empowering you to achieve flawless cutouts for all your visual design projects.
Cutting out an image is more than just removing a background; it’s about unlocking creative potential. It allows for seamless photo manipulation, enabling you to place subjects into new environments, create striking visual effects, or prepare images for various applications like web design, print media, or even personalized wallpapers and backgrounds. At Tophinhanhdep.com, we understand the importance of quality images and effective tools, and this guide serves as a testament to that commitment, helping you elevate your photography and visual design endeavors.
The Fundamentals of Image Cutouts and Why They Matter
The process of isolating an object or person from its surrounding elements is a cornerstone of modern image editing. This skill is crucial across almost all facets of digital imagery, from creating stunning abstract compositions to meticulous photo retouching.
The Art of Isolation: Why Cutouts are Essential for Visual Design
Imagine designing a captivating mood board for an upcoming project, or assembling a thematic collection of images. Often, the perfect subject is embedded within an unsuitable or distracting background. This is where the power of image cutouts truly shines. By isolating subjects, you gain unparalleled flexibility:
- Graphic Design: Create logos, product mock-ups, or intricate digital art pieces where elements need to seamlessly blend or stand out against new backdrops.
- Photo Manipulation: Combine elements from multiple photographs to create fantastical scenes, realistic composites, or eye-catching advertisements.
- Image Collections: Prepare images for use as wallpapers, backgrounds, or aesthetic visuals, ensuring the focus remains squarely on the intended subject.
- Digital Photography Editing: Refine high-resolution photos, remove distractions, or achieve specific editing styles that demand a clean separation of foreground and background.
- Creative Ideas: Fuel your imagination by remixing and repurposing elements, leading to fresh photo ideas and trending styles.
A perfectly executed cutout ensures that the isolated subject appears natural and integrated into any new environment, preventing the tell-tale “pasted on” look that undermines professionalism. This precision is vital for stock photos, where clarity and adaptability are paramount.
Historical Context: Photoshop’s Evolution in Cutting Techniques
For those who started with early versions like Adobe Photoshop 2.0 in the early 90s, the journey of image cutting has been remarkable. Back then, without layers, isolating elements was a painstaking process. As Photoshop evolved through versions like 2.5, CS4, CS6, and now the Creative Cloud (CC) iterations, the tools and methodologies have become increasingly sophisticated and intuitive. Long-time users, like those commenting on Photoshop Cafe, recount their progression from basic selections to mastering complex features like Refine Edge (now Select and Mask) for challenging elements like hair and fuzzy animal fur. The continuous development of these tools underscores Photoshop’s dedication to empowering users with unparalleled control over their images.
Core Photoshop Tools for Precise Image Cutouts
Photoshop offers a diverse arsenal of tools, each suited for different types of images and desired levels of precision. The “best” tool often depends on the complexity of the subject and its contrast with the background. Here, we’ll explore seven highly effective methods to cut out an image.
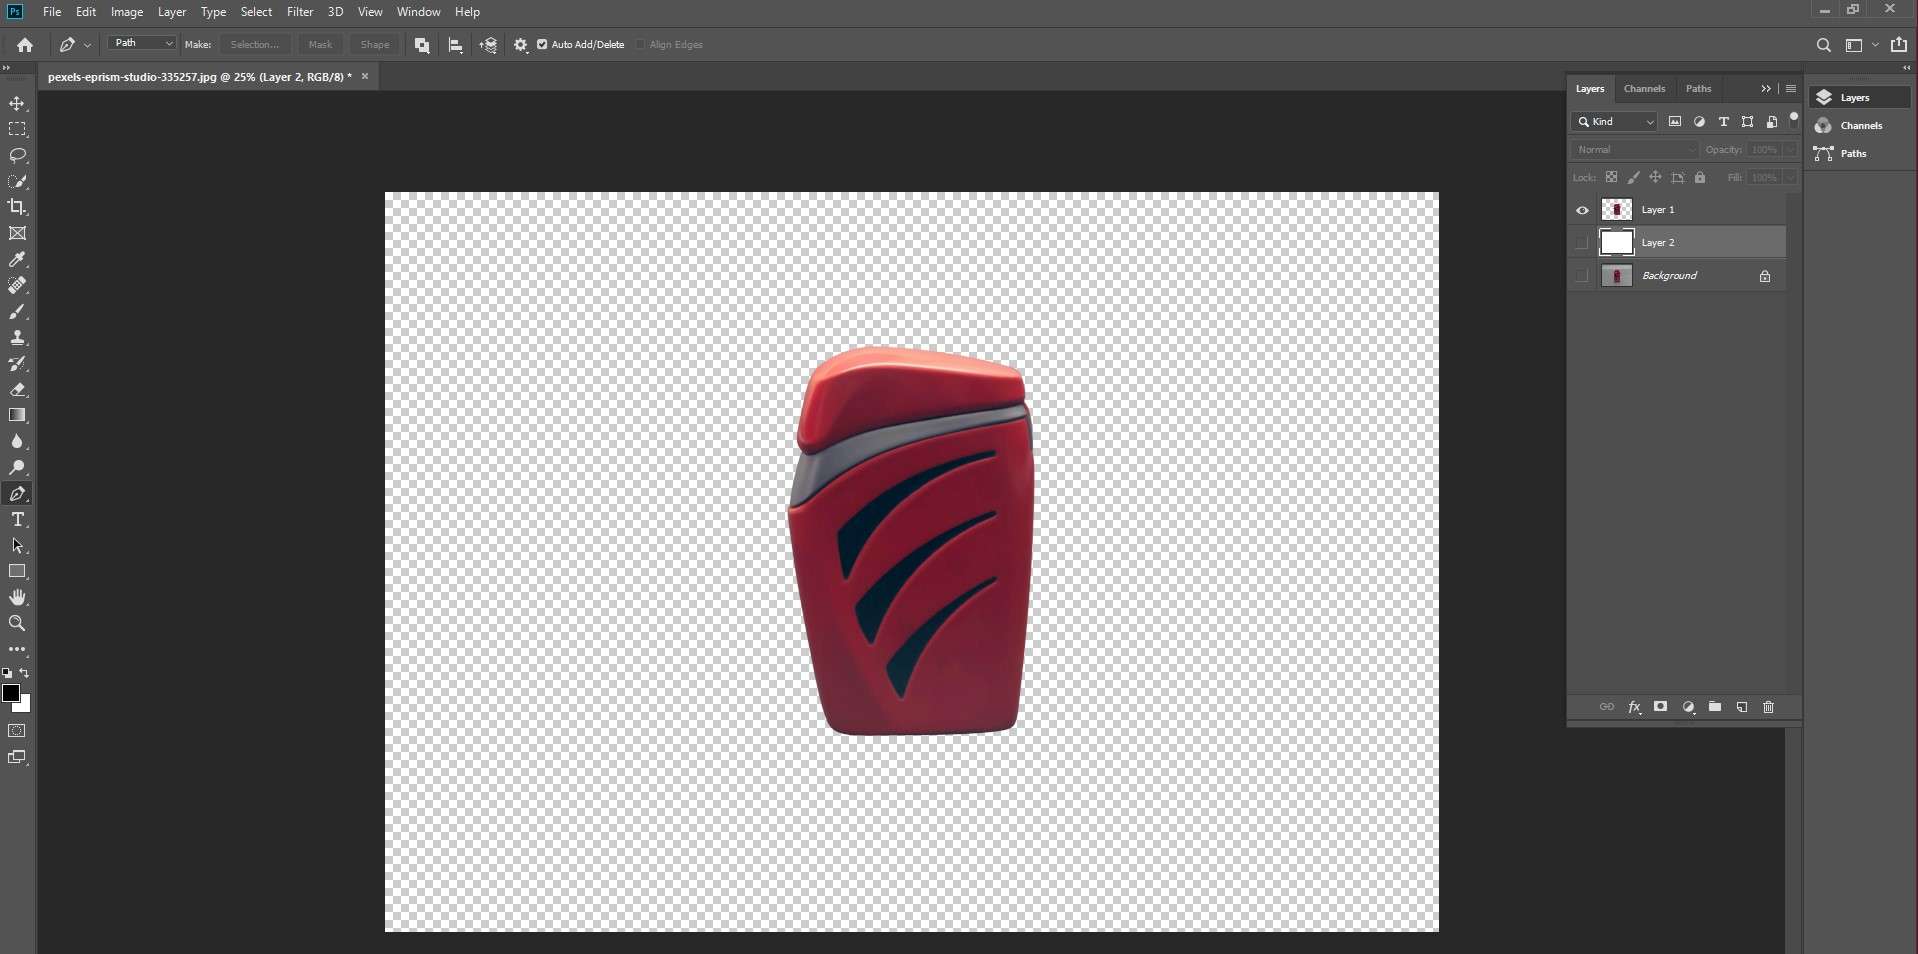
Method 1: The Pen Tool for Crisp, Clean Edges
When unparalleled precision and vector-like crispness are required, especially for objects with sharp, well-defined edges, the Pen Tool is the professional’s choice. Many experienced Photoshop users, particularly those working with product photography or classic car images, swear by its accuracy.
Step-by-Step Guide:
- Select the Pen Tool: From the toolbar, choose the Pen Tool (P) and ensure the “Path” option is selected in the options bar, not “Shape.”
- Start Drawing the Path: Click on the edge of your subject to create your first anchor point. Continue clicking along the contours, dragging the cursor to create curved segments. Don’t worry if the initial path isn’t perfect; it’s designed for refinement.
- Close the Path: Connect the last anchor point back to the first one, forming a closed path around your subject. A small circle appears next to the Pen Tool icon when hovering over the starting point, indicating you’re about to close the path.
- Refine the Path: Switch to the Direct Selection Tool (A), nested under the Path Selection Tool. Zoom in closely to meticulously adjust individual anchor points and their Bezier handles. Drag points to fine-tune placement and manipulate handles to control the curvature, achieving seamless transitions along the edges. For tight curves, add more anchor points with the Pen Tool (it will automatically show a “+” icon).
- Convert Path to Selection: Once your path is perfectly refined, open the Paths Panel (Window > Paths). You’ll see your “Work Path.” Ctrl-click (Cmd-click on Mac) directly on the “Work Path” thumbnail to convert it into a selection, indicated by “marching ants.”
- Create a Layer Mask: With the selection active, navigate to the Layers Panel (Window > Layers). Hold Alt (Option on Mac) and click the “Add Layer Mask” icon at the bottom of the panel. This non-destructively hides the background, leaving your perfectly cut-out subject on its own layer.
The Pen Tool requires practice, but the resulting crisp, scalable selections are invaluable for high-quality graphic design and photo manipulation.
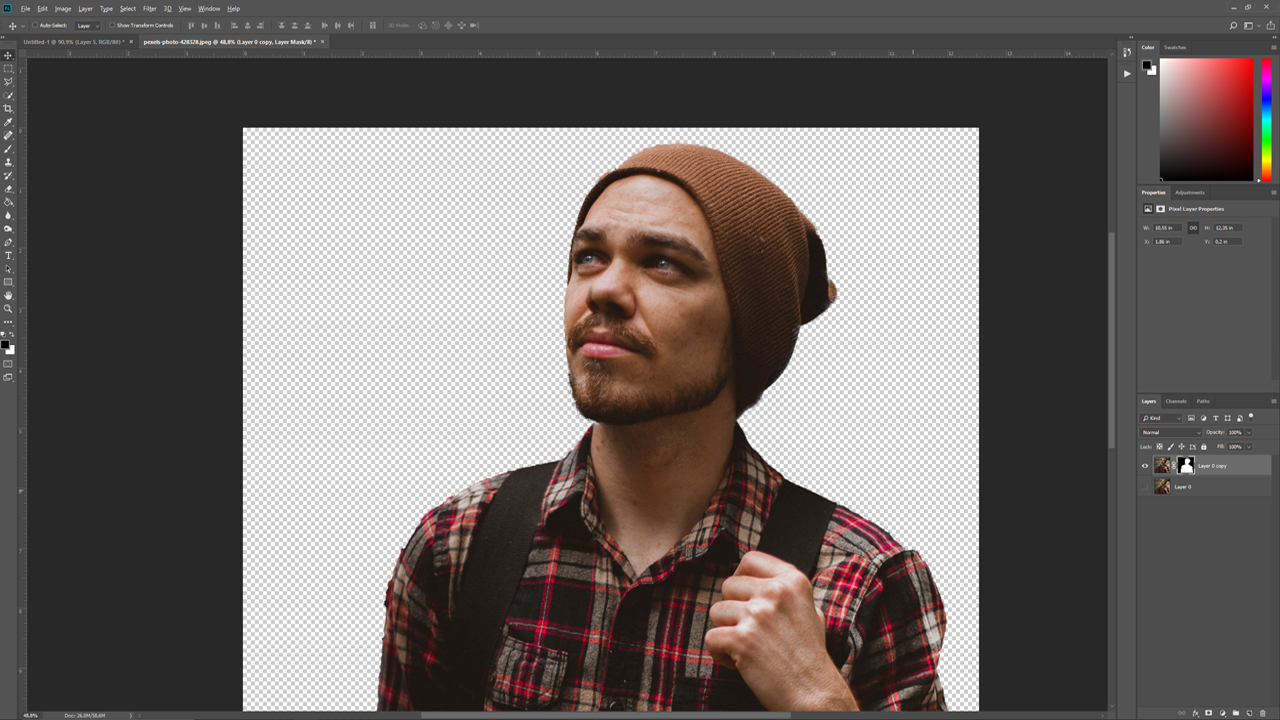
Method 2: Quick Selection and Select & Mask for Complex Subjects
For subjects with intricate details like hair, fur, or feathered edges, a combination of the Quick Selection Tool and the powerful Select & Mask workspace (formerly Refine Edge) offers an efficient and precise solution. This is often the go-to method for portraits and animal photography.
Step-by-Step Guide:
- Open Your Image: Load your photo into Photoshop.
- Initial Selection with Quick Selection Tool: Select the Quick Selection Tool (W) from the toolbar. Adjust the brush size as needed. Click and drag over your subject. Photoshop’s intelligent algorithm will try to detect edges and expand the selection automatically. If the selection extends too far, hold Alt (Option) and drag to subtract from the selection.
- Enter Select & Mask Workspace: Once you have a decent initial selection, click the “Select and Mask” button in the options bar at the top, or go to Select > Select and Mask.
- Choose Your View Mode: In the Properties panel on the right, under “View Mode,” choose a background that provides the best contrast for your subject (e.g., “On Layers,” “On White,” or “On Black” with increased transparency). This helps you clearly see the edges.
- Refine Edges with the Refine Edge Brush Tool: On the left toolbar within the Select & Mask workspace, select the Refine Edge Brush Tool (R). Carefully paint over challenging areas like hair or fur. Photoshop’s AI will analyze the pixels and intelligently differentiate between foreground and background, smoothing and refining the selection along these complex edges.
- Adjust Global Refinements: Use the “Global Refinements” sliders in the Properties panel:
- Smooth: Reduces jaggy edges.
- Feather: Softens the edge.
- Contrast: Sharpens the transition.
- Shift Edge: Moves the selection boundary inward or outward.
- Decontaminate Colors (Crucial for Hair): For backgrounds that bleed into fine details, especially hair, check the “Decontaminate Colors” box. This helps remove residual background color fringing, making the cutout look more natural. Adjust the “Amount” slider as needed.
- Output to a New Layer with Layer Mask: In the “Output Settings” section, select “Output To: New Layer with Layer Mask” and click “OK.” This creates a new layer with your subject cut out and the background non-destructively masked.
This method is particularly powerful for making realistic selections of subjects with soft or complex edges, crucial for integrating them into new high-resolution image backgrounds or digital art compositions.
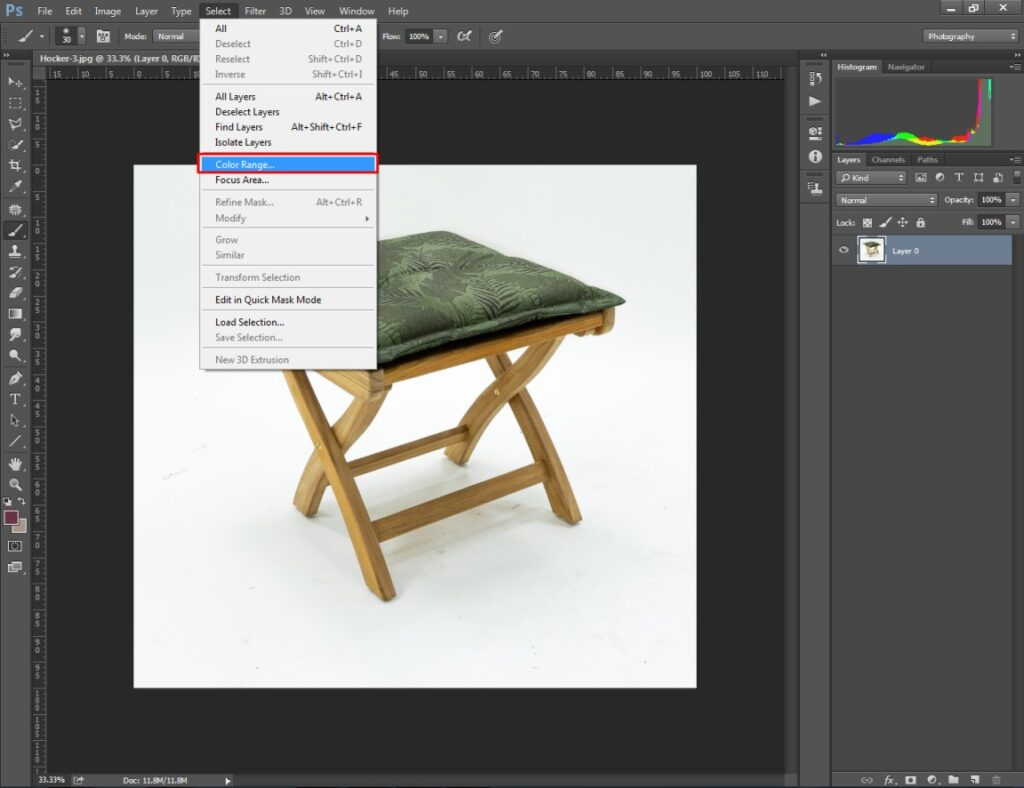
Method 3: Harnessing the Power of Color Range
The Color Range command (Select > Color Range) is a hidden gem for cutting out subjects, especially when dealing with complex textures or backgrounds that share a distinct color palette, such as landscapes with a clear sky or objects surrounded by a uniform color. As one user noted, “I mostly work with Landscapes so the Color Range is my favorite.”
Step-by-Step Guide:
- Open Color Range: Go to Select > Color Range. A dialog box will appear, showing a black and white preview.
- Sample the Color: Use the first eyedropper tool (the one without a “+” or “-”) to click on the color in your image that you want to select (or remove). If your goal is to select the subject, click on the subject’s color; if it’s to remove the background, click on the background color. In the Color Range dialog, white areas are selected, black areas are not, and gray areas are partially selected.
- Refine Selection with Eyedroppers:
- Use the “Add to Sample” eyedropper (with a “+”) to click on additional areas of the same color or similar hues you want to include in the selection. This is particularly useful for varied backgrounds like skies.
- Use the “Subtract from Sample” eyedropper (with a “-”) to remove unwanted areas from your selection.
- Adjust Fuzziness: The “Fuzziness” slider controls the range of similar colors included in your selection. Drag it to the right to include more color variations (e.g., different shades of blue in a sky) and to the left for a tighter selection. Aim for your target area to be predominantly white in the preview, with clear separation from the unwanted areas.
- Create Layer Mask: Once satisfied with the selection (marching ants will appear), Alt-click (Option-click on Mac) the “Add Layer Mask” icon in the Layers panel. If you selected the background, this will mask it out. If you selected the subject and it’s now masked, invert the mask (Ctrl+I or Cmd+I on Mac while the mask is selected) to reveal the subject.
Color Range is particularly effective for elements like trees, smoke, or liquids where defining crisp edges with other tools would be incredibly challenging.
Method 4: Background Eraser Tool for Targeted Removal
The Background Eraser Tool is a powerful, semi-automatic tool designed specifically for removing backgrounds while preserving the edges of the foreground object. It “erases” pixels to transparency, making it a form of image masking on the fly.
Step-by-Step Guide:
- Select the Background Eraser Tool: From the toolbar, click and hold on the Eraser Tool to reveal the fly-out menu, then select the Background Eraser Tool.
- Adjust Tool Settings: In the options bar at the top:
- Brush Size: Adjust for efficiency on larger areas and precision on edges.
- Hardness: A softer brush (lower hardness) can create a more blended edge; a harder brush (higher hardness) is good for sharp edges.
- Limits: Set to “Find Edges” for better edge detection.
- Tolerance: This is key. A lower tolerance removes only colors very similar to the sampled color. A higher tolerance removes a wider range of colors. Start with a moderate value (e.g., 20-30%) and adjust as you go.
- Sampling: “Continuous” samples continually as you drag. “Once” samples only the first color clicked. “Background Swatch” erases only the current background color. “Once” or “Background Swatch” are often safer to prevent accidental foreground removal.
- Start Erasing: Position the crosshairs (the center of the brush) over the color you want to eliminate in the background. Click and drag. The tool will erase pixels within the brush diameter that match the sampled color under the crosshairs, trying to avoid pixels that define the edges of your foreground subject.
- Protect Foreground Color (Optional): If your background shares similar colors with your subject, you might accidentally erase parts of your subject. To prevent this, check “Protect Foreground Color” in the options bar, then Alt-click (Option-click) on the color within your subject that you want to protect using the eyedropper that appears.
The Background Eraser is excellent for quick background removal on images where the subject has distinct edges and the background is relatively uniform or has clear color differences.
Method 5: Automated Efficiency with Subject Selection
For modern Photoshop CC users, the “Select Subject” command represents a significant leap in AI-powered selection. It automatically identifies the most prominent object(s) in an image and generates a selection around them. As one user aptly put it, “For a faster pre selection just click the ‘select subject’ button in CC and in any cases you get a really good automatic selection of your subject.”
Step-by-Step Guide:
- Open Your Image: Load your photograph into Photoshop.
- Activate Select Subject: Go to Select > Subject. Photoshop will analyze your image and automatically create a selection around what it perceives as the main subject. This usually takes just a few seconds.
- Refine the Selection (if necessary): While “Select Subject” is often remarkably accurate, especially on clearly defined subjects, it may not be perfect. Use other selection tools (like the Quick Selection Tool, Lasso Tool, or Polygonal Lasso Tool) to add to or subtract from the selection:
- Hold Shift and drag with a selection tool to add to the selection.
- Hold Alt (Option) and drag to subtract from the selection.
- For highly complex edges like hair, immediately jump into the “Select and Mask” workspace (as described in Method 2) after the initial “Select Subject” generation.
- Cut Out the Image: Once the selection is finalized:
- To copy to a new layer: Press Ctrl+J (Cmd+J on Mac). This creates a new layer with only the selected subject, leaving the original background intact below.
- To create a layer mask: Click the “Add Layer Mask” icon in the Layers panel. This is a non-destructive way to hide the background.
Select Subject is an incredible time-saver for a wide range of images, providing a strong starting point for almost any cutout task.
Method 6: Basic Shapes with Marquee Tools
For subjects that are perfectly rectangular or elliptical, the Marquee Tools offer the quickest and most straightforward selection method. While not suitable for complex shapes, they are indispensable for cropping specific, regularly shaped areas.
Step-by-Step Guide:
- Choose a Marquee Tool: Select either the Rectangular Marquee Tool (M) or the Elliptical Marquee Tool (M, by clicking and holding on the Rectangular Marquee Tool icon) from the toolbar.
- Make Your Selection: Click and drag to draw a selection around the part of the image you want to cut out.
- Hold Shift while dragging to constrain the selection to a perfect square or circle.
- Hold Alt (Option) while dragging to draw the selection from its center.
- Cut or Copy to a New Layer: Once your selection is active:
- To cut: Go to Layer > New > Layer via Cut (Ctrl+Shift+J or Cmd+Shift+J). This removes the selected area from the original layer and places it on a new one.
- To copy: Go to Layer > New > Layer via Copy (Ctrl+J or Cmd+J). This duplicates the selected area to a new layer, leaving the original intact.
While simple, the Marquee Tools are fundamental for basic cropping tasks and can be combined with other methods for more intricate results.
Method 7: Non-Destructive Editing with Layer Masks
Layer masks are arguably the most powerful and versatile tool for image cutouts, offering non-destructive editing. Instead of permanently deleting pixels, a layer mask simply hides parts of a layer, allowing for endless adjustments and refinements without damaging the original image data. This is often the preferred method for image editing experts due to its flexibility.
Step-by-Step Guide:
- Make a Selection: Begin by making a selection of your subject using any of the tools described above (Pen Tool, Quick Selection, Lasso, etc.). The more accurate your initial selection, the less work the mask will require.
- Add a Layer Mask: With your selection active, ensure your image layer is selected in the Layers panel. Click the “Add Layer Mask” icon (a rectangle with a circle inside) at the bottom of the Layers panel. Photoshop will automatically convert your selection into a mask, revealing the selected area (white on the mask thumbnail) and hiding everything else (black on the mask thumbnail).
- Refine the Mask with a Brush: Select the layer mask thumbnail (not the image thumbnail) in the Layers panel. Choose the Brush Tool (B) from the toolbar.
- Paint with white to reveal more of the layer (add to your cutout).
- Paint with black to hide more of the layer (remove from your cutout).
- Paint with gray to create semi-transparent areas.
- Adjust brush size, hardness, and opacity as needed. Zoom in closely for precise control.
- Feather the Mask (Optional): To soften the edges of your cutout, you can apply a feather to the mask. While the mask thumbnail is selected, go to Filter > Blur > Gaussian Blur, or use the “Feather” slider in the Properties panel (Window > Properties) if it’s visible.
Layer masks are the cornerstone of professional photo manipulation, allowing you to iterate on your cutouts and fine-tune them with absolute control, perfect for digital art and detailed editing styles.
Advanced Techniques: Clipping Masks, Graduated Transparency, and Layer Effects
Beyond simply isolating a subject, Photoshop allows you to integrate cutouts into creative designs, adding depth and style.
Cutting Images into Custom Shapes using Clipping Masks
Clipping masks offer a fantastic way to crop an image into any shape you desire, not just standard rectangles or ellipses. This is invaluable for visual design, adding a unique aesthetic touch to photos.
Step-by-Step Guide (for Photoshop CC and Elements):
- Prepare Your Image: Open your image in Photoshop. Convert the “Background” layer into a regular layer by going to Layer > New > Layer from Background. Give it a name and click OK.
- Create Your Shape: Select the Custom Shape Tool (U) from the toolbar. In the options bar, choose your desired shape (e.g., a heart, star, or any custom vector shape). Draw the shape on your canvas where you want your image to be cropped. This shape will be on its own layer above your image layer.
- Arrange Layers: In the Layers panel, drag the shape layer below your image layer. The image layer should be directly above the shape layer.
- Create Clipping Mask: Right-click on the image layer (the top layer) in the Layers panel and select “Create Clipping Mask.” (In older versions, this might be “Group with Previous”).
- Adjust and Refine: Your image will now be clipped to the shape below it. Both layers remain independent. You can use the Move Tool (V) to reposition and resize either the image or the shape, allowing you to perfectly frame your cutout within the custom shape.
Clipping masks are excellent for creating unique photo ideas, graphical elements for digital art, and visually engaging collections.
Adding Depth with Graduated Transparency and Layer Styles
Once you have your cutout, you can enhance it further using advanced techniques like graduated transparency and layer effects, which are integral to creative photo manipulation.
- Graduated Transparency: To make your cutout gradually fade into transparency, you can use Gaussian Blur on the clipping mask.
- Right-click the shape layer in the Layers panel and choose “Rasterize Layer” (or “Simplify Layer” in Elements).
- Go to Filter > Blur > Gaussian Blur. Adjust the Radius to a higher number (e.g., 30 pixels or more) until the edges of your image softly fade out.
- Layer Styles/Effects: Add dimension and visual interest to your cutouts.
- Select the shape layer (or the layer containing your cutout).
- Go to Layer > Layer Style (or Layer > Layer Style > Style Settings in Elements) to open the Layer Style dialog box.
- Apply effects like “Drop Shadow” (to give the cutout a lifted appearance), “Stroke” (to add an outline), “Bevel & Emboss,” and more. These effects dynamically update as you adjust your layers.
These techniques allow for sophisticated visual design, transforming simple cutouts into compelling elements within your broader compositions.
Saving, Optimizing, and Exploring Alternatives
After investing time in creating perfect cutouts, knowing how to properly save and utilize them is crucial.
Best Practices for Saving Your Cutouts
- Preserving Transparency: If you want to use your cutout on a new background, save it in a format that supports transparency, such as PNG.
- Editable Layers: To retain all your layers and masks for future editing, always save a copy in PSD (Photoshop Document) format.
- Using in Other Projects:
- For quick use in another Photoshop document, select all (Ctrl+A / Cmd+A), then go to Edit > Copy Merged (Ctrl+Shift+C / Cmd+Shift+C). You can then paste it into your new document.
- For preserving editability and efficiency, convert your cutout layer(s) into a Smart Object (select layers, right-click, “Convert to Smart Object”). This allows you to drag the Smart Object into other Photoshop documents, maintaining its flexibility.
- Optimization: For web use, consider image optimizers to reduce file size while maintaining visual quality, ensuring your beautiful cutouts load quickly on any platform.
When to Consider Online Alternatives like Tophinhanhdep.com
While Photoshop offers unparalleled control, some users might find its learning curve steep or simply need a quicker solution for straightforward tasks. For those instances, online AI-powered background removers like Tophinhanhdep.com can be incredibly efficient.
Why use Tophinhanhdep.com?
- Speed: Automatically cut out subjects in seconds, perfect for batch processing or when you have a pile of images.
- Simplicity: No need to master complex Photoshop tools; just upload your image, and our AI does the heavy lifting.
- Quality: Our AI-powered tools deliver high-quality cutouts with transparent backgrounds, often comparable to manual Photoshop efforts for well-defined subjects.
- Accessibility: Accessible from any web browser, making it a convenient image tool for quick edits on the go.
Tophinhanhdep.com is an excellent resource for photographers and designers looking to streamline their workflow, providing an accessible pathway to professional-looking cutouts without the deep dive into Photoshop’s intricacies.
Enhancing Your Visual Creations with Tophinhanhdep.com’s Offerings
Cutting out images is merely the first step in a vast world of visual possibilities. At Tophinhanhdep.com, we provide not only the inspiration but also the tools and resources to transform your cutouts into stunning visual assets.
Once you’ve mastered the art of image cutouts, you can leverage them to:
- Create Bespoke Wallpapers and Backgrounds: Combine your isolated subjects with new scenic or abstract backgrounds from our extensive collections, crafting unique visual experiences.
- Develop Unique Aesthetic Imagery: Produce captivating digital art and photo manipulations that reflect your personal style and creative vision.
- Curate Engaging Image Collections: Isolate elements to build thematic collections, mood boards, and trending styles that resonate with your audience.
- Refine Photography for Impact: Use precise cutouts to enhance your high-resolution photography, making subjects pop and compositions more compelling for stock photos or digital display.
- Explore New Visual Design Frontiers: Experiment with graphic design and creative ideas, using cutouts as building blocks for innovative projects.
From converters and compressors to AI upscalers, Tophinhanhdep.com supports your entire creative workflow, ensuring your images are optimized and ready for any application. By integrating Photoshop’s power with our innovative image tools, you unlock an endless canvas for your visual inspirations.
In conclusion, knowing “how to cut out an image in Photoshop” is a cornerstone skill for anyone involved in digital imaging. With a range of tools and techniques at your disposal, from the meticulous Pen Tool to the efficient Select Subject, Photoshop offers unparalleled control. Whether you opt for the in-depth precision of Photoshop or the swift efficiency of Tophinhanhdep.com’s online tools, mastering cutouts will significantly enhance your creative output and open new avenues for visual expression. We encourage you to practice these methods and explore the vast creative potential they unlock!