Mastering Image Cutouts in Photoshop: A Comprehensive Guide for Stunning Visuals

In the dynamic world of digital imagery and visual design, the ability to precisely “cut out an image in Photoshop” is not just a skill; it’s a fundamental superpower. Whether you’re crafting breathtaking wallpapers, designing compelling product layouts, or assembling intricate digital art, isolating a subject from its background is often the crucial first step. This technique allows for unparalleled creative freedom, enabling you to seamlessly integrate elements into new scenes, create striking compositions, and transform ordinary photographs into extraordinary visual narratives.

From the early days of Adobe Photoshop, as veterans like Kim recalling version 2.0 without layers or Joel Schilling starting with Photoshop 4 in 1997 attest, the challenge of cleanly separating a subject from its surroundings has been a constant. Over the decades, Photoshop has evolved, introducing a rich array of sophisticated tools and intelligent features that make this process more accessible and powerful than ever before. This guide will delve into the various methods for cutting out images, exploring techniques suitable for both beginners and seasoned professionals, ensuring your visual projects, from high-resolution stock photos to intricate photo manipulations, achieve a polished, professional look.
The Indispensable Role of Image Cutouts in Visual Design
The impact of a well-executed image cutout extends far beyond simple background removal; it’s a cornerstone of effective visual communication. In a world saturated with imagery, standing out requires not just beautiful photography but also intelligent design. Cutouts play a pivotal role in elevating your visual assets across numerous applications within graphic design, digital art, and creative photography.
Imagine a product shot. A rectangular image placed on a website might convey information, but a meticulously cut-out product, freed from its original background and placed on a clean, eye-catching aesthetic background, immediately captures attention. This is why the advertising industry heavily relies on cutouts – they create focus, enhance visual appeal, and make products pop. Similarly, when curating image collections, mood boards, or thematic compilations, seamlessly integrating subjects from various sources often necessitates precise cutouts to maintain visual coherence and artistic intent.
For photographers working with high-resolution images, cutouts can transform a good photograph into a stunning one. A portrait, for instance, can gain a new dimension when its background is replaced with a more dramatic, abstract, or nature-inspired setting, aligning with evolving editing styles and trending visuals. This technique is invaluable for stock photos, where isolated subjects are highly sought after for their versatility in various design contexts. Even for personal projects like creating custom desktop wallpapers or unique backgrounds, the ability to cut out and reposition elements offers endless creative possibilities. It enables the creation of personalized aesthetic designs or the compilation of sad/emotional or beautiful photography into compelling visual stories.
Ultimately, mastering image cutouts is about gaining control over your visual narrative. It empowers you to refine your digital photography, experiment with photo manipulation, and bring your creative ideas to life with precision and impact.
Essential Tools for Cutting Out Images in Photoshop
Photoshop offers a diverse toolkit for isolating subjects, each suited to different types of images and backgrounds. Understanding when and how to use these tools is key to achieving efficient and high-quality cutouts.
The Quick Selection Tool: Your First Step to Rapid Isolation
The Quick Selection Tool is often the go-to for many Photoshop users, especially when starting out, as its name suggests, for its speed and ease of use. It functions much like a smart paintbrush, intuitively detecting edges as you drag it across your desired subject. This tool is particularly effective on images where the subject is relatively distinct from the background in terms of color, contrast, or focus.
How it Works: Painting Your Selection Located in Photoshop’s left-hand Tools panel (often grouped with the Object Selection tool, accessible by pressing ‘W’), the Quick Selection Tool operates by allowing you to “paint” over the area you wish to select. As you brush, Photoshop intelligently analyzes the pixels under your cursor, extending the selection to encompass similar adjacent pixels while attempting to stop at natural edges. You can adjust the brush size to suit the intricacy of the area you’re selecting – a larger brush for broad strokes and a smaller one for tighter corners.
Fine-Tuning with Add and Subtract Modes Rarely will a single sweep of the Quick Selection Tool yield a perfect selection, especially around intricate areas. This is where the “Add to Selection” and “Subtract from Selection” modes become invaluable. These options are found in the Options bar at the top of the Photoshop interface.
- Add to Selection: This is the default mode. Continue brushing over areas you want to include in your selection that were missed in the initial pass.
- Subtract from Selection: Hold down the
Alt(Windows) orOption(Mac) key, and your cursor will change to a minus sign. Now, you can brush over areas that were mistakenly included in your selection (e.g., parts of the background that got accidentally selected) to remove them.
By strategically zooming in and alternating between these modes, you can refine your selection with remarkable precision, preparing your subject for background removal or further manipulation.
The Magic Wand Tool: For Uniform Backgrounds
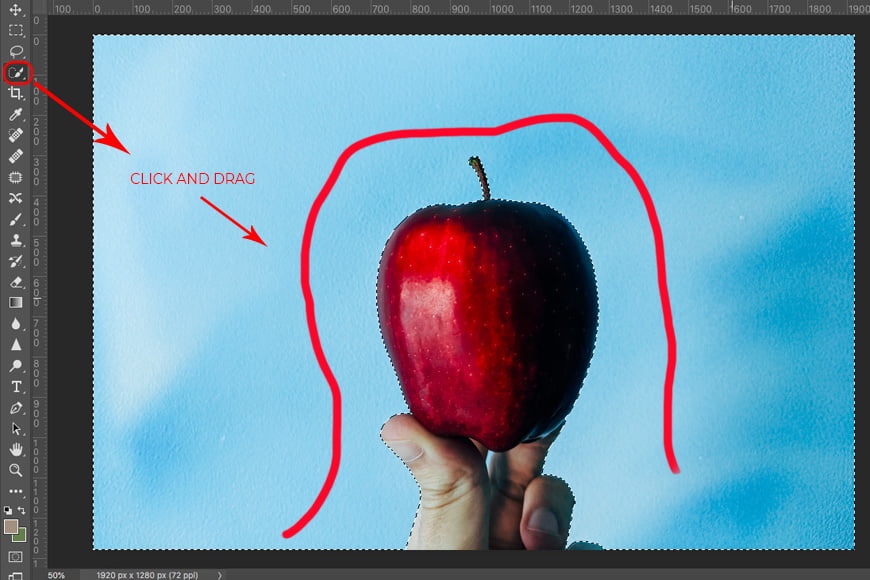
For images featuring large areas of solid or near-solid color backgrounds, the Magic Wand Tool is a rapid and highly effective solution. It excels at selecting contiguous pixels of similar color, making it ideal for images like product shots against a white backdrop or a subject against a clear blue sky.
Understanding Tolerance and Contiguous Selection The key to the Magic Wand’s effectiveness lies in its “Tolerance” setting, located in the Options bar.
- Tolerance: This value (ranging from 0 to 255) dictates how wide a range of colors the Magic Wand will select. A lower tolerance (e.g., 10-30) will select only pixels very close in color to where you clicked, while a higher tolerance (e.g., 50-100) will include a broader spectrum of similar hues. You’ll often need to experiment with this value based on your image’s background complexity.
- Contiguous: When this option is checked, the Magic Wand will only select similar-colored pixels that are directly connected to the pixel you clicked. If unchecked, it will select all similar-colored pixels throughout the entire image, regardless of whether they are adjacent. For most background removal tasks, especially with consistent backgrounds, keeping “Contiguous” checked is usually preferable.
Quick Background Removal
Once you’ve adjusted the tolerance and clicked on the background area, the Magic Wand will swiftly select all similar pixels. If your subject is now surrounded by a clean selection, you can right-click within the selected area and choose “Layer via Copy” or “Layer via Cut” to move your subject to a new layer, effectively removing the background. Alternatively, you can simply press the Backspace or Delete key to remove the selected background, provided your layer isn’t locked.
The Pen Tool: Precision and Smooth Curves
When ultimate precision and crisp, clean edges are paramount, especially for subjects with intricate shapes or smooth curves, the Pen Tool is the professional’s choice. While it requires a bit more practice to master, the results are unparalleled, producing vector-based paths that can be converted into perfectly smooth selections.
Crafting Paths with Anchor Points and Handles The Pen Tool (shortcut ‘P’) works by creating a series of “anchor points” connected by “paths.”
- Straight Lines: Click once to set an anchor point. Click again elsewhere to create a straight line segment between the two points.
- Curved Lines: Click and drag to create an anchor point with “direction handles.” These handles allow you to control the curvature of the path segment. By manipulating these handles, you can precisely match the contours of your subject.
- Adjusting Paths: Use the Direct Selection Tool (white arrow) to move individual anchor points or adjust direction handles for fine-tuning. For sharp corners after a curve, hold
Alt(Windows) orOption(Mac) and click on the last anchor point to break the direction handles, allowing you to create a new curve independently. - Closing the Path: Connect the final anchor point back to the initial one to close the path, forming a complete outline around your subject.
Converting Paths to Selections Once your path is complete and perfectly outlines your subject:
- Go to the “Paths” panel (Window > Paths).
- Select your newly created “Work Path.”
- Click the “Load path as a selection” icon at the bottom of the panel (a dotted circle). This will convert your vector path into a pixel-based selection, ready for cut-out. The Pen Tool is highly recommended for creating high-resolution cutouts destined for digital photography, stock photos, or any visual design where pristine edges are crucial.
Leveraging Layer Masks for Non-Destructive Editing
Regardless of the selection tool you use, incorporating Layer Masks into your workflow is a best practice for non-destructive editing. Instead of permanently deleting pixels, a layer mask conceals them, allowing for adjustments and refinements at any stage without damaging the original image data.
Creating and Refining Masks
- Make a Selection: First, use any of the aforementioned selection tools (Quick Selection, Magic Wand, Pen Tool) to accurately select your subject.
- Add Layer Mask: With your subject selected, click the “Add Layer Mask” icon (a rectangle with a circle inside) at the bottom of the Layers panel. Photoshop will automatically convert your selection into a layer mask, making the selected area visible (white on the mask thumbnail) and concealing the unselected areas (black on the mask thumbnail).
- Refining with a Brush: To further refine the mask, select the layer mask thumbnail in the Layers panel. Choose the Brush Tool (B) and set your foreground color to black (to hide more of the image) or white (to reveal more). Use a soft-edged brush to paint along the edges, meticulously refining the cutout. Gray values on the mask can also create semi-transparent areas.
The Benefits of Flexibility Layer masks offer unparalleled flexibility:
- Non-Destructive: You can always go back and adjust the mask without losing any original image data.
- Feathering and Blurring: Apply feathering or blurring directly to the mask for softer edges (e.g., Filter > Blur > Gaussian Blur on the mask).
- Gradient Masks: Use gradient tools on the mask to create graduated transparency effects, as seen in advanced visual design. This approach is crucial for complex photo manipulation and digital art projects where iterative refinement is common.
Advanced Techniques for Flawless Image Cutouts
While the basic tools get the job done for many scenarios, some subjects demand more sophisticated techniques. Photoshop offers advanced features designed to tackle challenges like wispy hair, fuzzy animal fur, or objects with similar colors to their backgrounds.
The Power of Select and Mask (Formerly Refine Edge)
The “Select and Mask” workspace is Photoshop’s dedicated environment for making highly intricate selections, particularly excelling at difficult edges like hair, fur, or complex organic shapes. It evolved from the older “Refine Edge” tool, offering a more comprehensive and intuitive interface.
Dealing with Hair, Fur, and Complex Edges The standout feature within Select and Mask is the “Refine Edge Brush Tool.” After making an initial rough selection of your subject (e.g., with the Quick Selection Tool), enter the Select and Mask workspace (Selection > Select and Mask, or click the button in the Options bar).
- Refine Edge Brush Tool: Select this brush from the left-hand toolbar within the workspace. Paint along the challenging edges (like wisps of hair against a busy background). Photoshop’s algorithms will analyze the area, intelligently distinguishing between foreground and background pixels, even for semi-transparent or highly detailed elements.
- Global Refinements: On the right-hand Properties panel, you’ll find sliders for “Global Refinements”:
- Smooth: Reduces jaggy edges, smoothing the outline.
- Feather: Softens the edge, creating a gentle fade.
- Contrast: Sharpens the transition between selected and unselected areas.
- Shift Edge: Expands or contracts the selection boundary.
- Decontaminate Colors: For subjects with edges that pick up color fringes from the old background, the “Decontaminate Colors” option (at the bottom of the Properties panel) is a lifesaver. It works by replacing fringe colors with colors from the subject, creating a much cleaner transition.
View Modes and Edge Detection Tools The Select and Mask workspace offers various “View Modes” to help you visualize your selection more effectively. You can cycle through options like “On Layers,” “On Black,” “On White,” “Overlay,” and “Reveal Layer.” Each view highlights the selection differently, allowing you to spot imperfections more easily. For instance, “On Black” or “Overlay” with a colored background often reveals issues around hair that are invisible against other views.
This powerful tool transforms the arduous task of cutting out complex subjects into a manageable and often enjoyable process, ensuring your high-resolution digital photography retains its intricate details.
Color Range: Selecting by Color Fidelity
The Color Range command is a robust selection method that targets pixels based on their color and luminosity values. It’s particularly useful when you need to select non-contiguous areas of similar color or to isolate a subject against a relatively consistent but potentially complex background.
Sampling Colors and Adjusting Fuzziness
- Open Color Range: Go to Selection > Color Range. This opens a dialog box.
- Sample Colors: In the dialog box, use the eyedropper tool to click on a color in your image that you want to select (e.g., the background color). For multiple colors, hold down
Shiftand click with the “Add to Sample” eyedropper. - Fuzziness Slider: The “Fuzziness” slider is crucial here. Dragging it to the right increases the range of similar colors included in the selection, while dragging it to the left restricts it. The goal is to adjust the fuzziness until your desired subject appears as a solid black silhouette (or white, depending on the preview mode) against a transparent or contrasting background in the dialog box’s preview.
- Selection Preview: You can switch between different preview modes (Selection, Grayscale, Black Matte, White Matte, Quick Mask) within the Color Range dialog box to better visualize your selection.
Best for Disconnected Areas and Similar Hues Color Range excels where other tools might struggle. For example, selecting all the leaves on a tree against a sky, even if they are scattered or have small gaps. It’s also great for isolating subjects where subtle color shifts in the background might fool other tools, allowing you to fine-tune the selection based purely on color data. However, for subjects with colors very similar to their background, or highly varied backgrounds, combining Color Range with other refinement tools (like Select and Mask) is often necessary.
Clipping Masks: Cutting Images into Custom Shapes
Beyond simple background removal, Photoshop offers powerful ways to cut images into predefined or custom shapes using Clipping Masks. This technique is fantastic for creative ideas, graphic design elements, and adding a unique visual flair to your images, whether for digital art or aesthetic collections.
Transforming Photos with Predefined or Custom Shapes A Clipping Mask works by using one layer (the base or clipping layer) to define the visible area of the layer(s) directly above it (the clipped layers). Only the areas of the clipped layers that overlap with opaque pixels on the clipping layer will be visible.
- Prepare Layers: Open your image and convert the background layer into a regular layer (Layer > New > Layer from Background).
- Create a Shape: Select the Custom Shape Tool (U) or any other shape tool (Rectangle, Ellipse, etc.). Choose a shape from the options bar and draw it on your canvas. This shape will be your clipping mask.
- Arrange Layers: In the Layers panel, ensure your image layer is directly above your shape layer.
- Create Clipping Mask: Right-click on the image layer in the Layers panel and select “Create Clipping Mask.” Your image will now be “clipped” to the shape below it, taking on its form.
Adding Graduated Transparency and Layer Effects Clipping Masks offer robust creative control:
- Graduated Transparency: To add a soft, fading edge to your shape cutout, first rasterize (Photoshop CC: Right-click shape layer > Rasterize Layer; Photoshop Elements: Simplify Layer) your shape layer. Then, apply a Gaussian Blur (Filter > Blur > Gaussian Blur) with a suitable radius. The blurry edges of the shape layer will create a graduated transparency in your image cutout.
- Layer Effects: Enhance your shape cutouts by applying layer styles to the shape layer itself. This includes drop shadows, strokes, bevels, or color overlays. These effects will apply to the shape, making your cutout visually integrated into your visual design. This is particularly useful for creating stylish graphics for image inspiration or thematic collections.
- Move and Scale Independently: Both the image and the shape layers remain independent. You can select either layer and use the Move Tool (V) or Free Transform (Ctrl/Cmd + T) to adjust their position and size without affecting the clipping relationship, allowing for perfect composition within your chosen shape.
Optimizing Your Cutout Workflow and Creative Applications
Mastering the mechanics of cutting out an image is just one part of the journey. To truly excel in visual design and digital photography, you need to integrate these skills into an efficient workflow and understand how cutouts empower diverse creative applications.
Refining Edges for a Seamless Look
A successful cutout isn’t just about removing the background; it’s about making the subject look as if it was always meant to be in its new environment. Seamless integration hinges on meticulous edge refinement.
- Feathering and Smoothing: As seen in the Select and Mask workspace, “Feather” softens the hard edges of a selection, creating a more natural transition. “Smooth” removes jaggedness, especially from selections made with tools like the Lasso, resulting in a cleaner outline. Use these judiciously; too much feathering can make an object look blurry or detached, while too little can leave a harsh, unrealistic line.
- Decontaminating Colors: Color fringes, remnants of the original background color clinging to the subject’s edges, are a common problem. The “Decontaminate Colors” option in Select and Mask is the most effective solution, replacing these unwanted hues with colors sampled from the subject itself, crucial for maintaining high-resolution image quality.
- Adjusting Contrast for Integrated Results: Rob Cubbon, a design expert, rightly points out that an object might have contrasted well with its original background but often needs a boost after being cut out. Once isolated, consider adjusting the subject’s contrast (Image > Adjustments > Brightness/Contrast, or Curves/Levels) to ensure it pops and integrates naturally with its new background, whether it’s an abstract design or a beautiful landscape.
Integrating Cutouts into Diverse Visual Projects
The versatility of image cutouts unlocks a vast realm of creative possibilities, enriching various aspects of your visual content.
- Creating Dynamic Collages and Photo Manipulation: The most direct application of cutouts is in assembling new compositions. By isolating multiple subjects, you can layer them, scale them, and arrange them to tell new stories, create surreal digital art, or design compelling graphic elements for mood boards. This involves a fundamental understanding of layers and blending modes.
- Enhancing Wallpapers, Backgrounds, and Aesthetic Designs: Customizing desktop wallpapers or creating unique backgrounds becomes effortless. Cut out a favorite subject, place it against a new gradient, texture, or an entirely different scene. This allows for personalized aesthetic choices, turning any image into a high-resolution backdrop that reflects your style or theme.
- Improving Stock Photos and Digital Photography: For those preparing images for stock libraries or presenting professional digital photography, clean cutouts of subjects on transparent or white backgrounds are invaluable. They offer maximum flexibility for clients who can then integrate the subject into their own visual design projects.
Exporting and Preserving Transparency
The final step in the cutout process is saving your work in a format that retains its transparency and is suitable for its intended use.
- Choosing the Right File Format (PNG, PSD):
- PNG (Portable Network Graphics): This is the go-to format for web images requiring transparency. It supports lossless compression and preserves the alpha channel, ensuring your cutout has a clean transparent background when placed on a website or in another document.
- PSD (Photoshop Document): Always save a copy in PSD format. This preserves all your layers, layer masks, and editable elements, allowing you to return to your project for future adjustments or further photo manipulation.
- Smart Objects for Editable Layers: If you plan to reuse a cutout across multiple Photoshop projects, converting your subject layer (or grouped layers) into a Smart Object (Right-click layer > Convert to Smart Object) is highly recommended. Smart Objects retain the original image data, allowing for non-destructive scaling and transformations. You can drag Smart Objects directly into other Photoshop documents, keeping them fully editable.
Exploring AI-Powered Alternatives for Efficiency
While Photoshop offers unparalleled control, the rise of artificial intelligence has introduced incredibly efficient alternatives for quick background removal, especially for those with less Photoshop experience or a high volume of images.
- When to Use Online Tools for Quick Background Removal: For straightforward images with clear subject-background separation, or when you need to process a large batch of images quickly, AI-powered online background removers can be a game-changer. These tools use advanced algorithms to automatically detect and isolate subjects, often delivering impressive results in seconds.
- Example of AI Tools: Websites like Tophinhanhdep.com (as an example of an online background remover) offer AI-driven solutions that simplify the cutout process. You simply upload your image, and the AI takes care of the intricate work, providing you with a high-quality cutout with a transparent background in a fraction of the time it would take manually. Many of these tools also offer batch processing capabilities, which can significantly optimize workflows for large collections of images. While they might not offer the same granular control as Photoshop for extremely challenging edges, they are excellent for rapid prototyping, social media graphics, and preparing images for visual design projects where speed is critical.
In conclusion, mastering how to cut out an image in Photoshop is an essential skill for anyone involved in digital photography, graphic design, or visual content creation. By understanding the diverse tools and techniques available, from the foundational Quick Selection to the advanced Select and Mask, and by leveraging modern AI alternatives, you can achieve stunning, professional-quality results that elevate your images and bring your creative visions to life. This mastery is not just about technical proficiency; it’s about unlocking a new dimension of artistic expression in the vast landscape of visual design.