How to Cut Out Images in Photoshop: Masterful Techniques for Flawless Selections

In the vast and dynamic world of digital imagery, the ability to precisely cut out subjects from their backgrounds is a fundamental skill. Whether you’re a budding graphic designer, a seasoned photographer, a digital artist, or simply someone looking to create captivating visual content for personal projects or thematic collections, mastering image cutouts in Photoshop is indispensable. This technique unlocks endless creative possibilities, from crafting stunning photo manipulations and collages to preparing images for high-resolution stock photo platforms or simply refining aesthetic backgrounds.
At Tophinhanhdep.com, we understand the power of a perfectly isolated subject. It transforms a good image into a versatile asset, ready for any visual design endeavor. Over the years, Photoshop has evolved, introducing increasingly sophisticated tools to make this once tedious task remarkably efficient. From its early versions in the ’90s, when artists grappled with rudimentary selections, to today’s AI-powered features, the journey of image cutting has been one of continuous innovation. This comprehensive guide will delve into the most effective methods for cutting out images in Photoshop, ensuring you achieve professional results every time.

Foundational Tools for Precise Image Cutouts
Photoshop offers a diverse arsenal of selection tools, each suited to different types of images and specific cutting needs. Understanding when and how to deploy each tool is key to efficient and accurate image manipulation. Whether you’re dealing with sharp, geometric forms or soft, intricate details, there’s a tool tailored to your challenge.
The Quick Selection Tool: Speed and Smart Edges
The Quick Selection tool is a favorite among many for its intuitive operation and impressive ability to intelligently detect edges. It’s particularly effective for subjects that have a clear distinction in color, contrast, or focus from their background. This tool operates much like a brush, where you “paint” over the area you want to select, and Photoshop automatically extends the selection to logical edges.
How to Use the Quick Selection Tool:
- Open Your Image: Begin by opening your desired image in Adobe Photoshop.
- Activate the Tool: Locate the “Quick Selection Tool” in the left-hand toolbar (it often shares a spot with the Object Selection tool and Magic Wand tool, accessible by clicking and holding). Alternatively, press ‘W’ on your keyboard to select it.
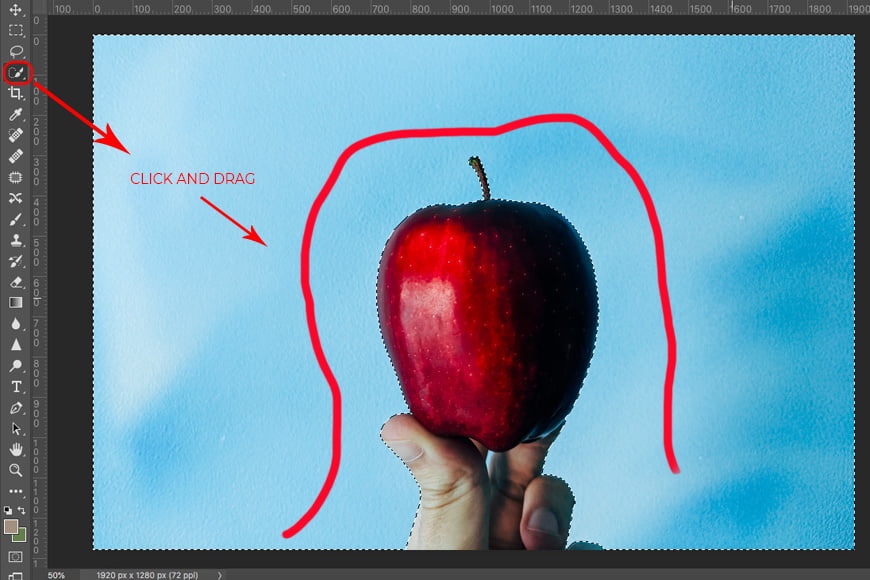
- Initiate Selection: Adjust your brush size as needed from the options bar at the top. For larger areas, a bigger brush is faster; for fine details, a smaller brush offers more control. Click and drag the tool over the object you wish to cut out. You’ll observe Photoshop automatically expanding the selection to encompass similar pixels and detect edges.
- Refine Your Selection: Continue clicking and dragging until your entire object is selected. If the selection extends beyond your object, press ‘Alt’ (Windows) or ‘Option’ (Mac) and drag over the excess area to subtract it. You can toggle between “Add to Selection” and “Subtract from Selection” in the options bar for precise adjustments. Zooming in (Ctrl/Cmd + +) is crucial for accurate refinement.
- Isolate the Cutout: Once satisfied with your selection, right-click within the selected area. Choose “Layer via Copy” to create a new layer containing only your cutout, leaving the original background intact. Alternatively, “Layer via Cut” will move the cutout to a new layer and remove it from the original. This non-destructive approach allows for further photo manipulation and visual design flexibility.
The Quick Selection tool is ideal for subjects with well-defined boundaries, such as people against a simple background or distinct objects in a composition. It’s a fantastic starting point for many image cutout tasks.
The Magic Wand Tool: Simplicity for Uniform Backgrounds
For images with solid, uniform, or highly contrasting backgrounds, the Magic Wand tool is exceptionally efficient. It selects pixels based on color similarity, making it perfect for removing plain backdrops quickly.
How to Use the Magic Wand Tool:
- Load Your Image: Open your image in Photoshop.
- Select the Magic Wand: Choose the “Magic Wand Tool” from the left toolbar (often grouped with Quick Selection, press ‘W’ to cycle through).
- Adjust Tolerance: In the options bar, adjust the “Tolerance” value. A higher tolerance selects a broader range of similar colors, while a lower value is more restrictive. Experiment to find the sweet spot for your image. For complicated backgrounds, a higher value might be necessary; for simple, solid colors, a lower value is often best.
- Click to Select: Click on the background area you want to remove. The Magic Wand will automatically select adjacent pixels of similar color. If your background is uniform, a single click might be enough.
- Manage Contiguous Areas: The “Contiguous” option (in the options bar) determines whether the tool selects only directly connected pixels or all similar-colored pixels throughout the image. Uncheck it if you need to select non-connected areas of the same color (e.g., holes in an object).
- Refine and Isolate: As with the Quick Selection tool, you can add or subtract from your selection (Shift-click to add, Alt/Option-click to subtract). Once the background is fully selected, right-click and choose “Layer via Copy” or “Layer via Cut” to isolate your subject.
The Magic Wand tool is a rapid solution for simple background removals, making it valuable for tasks like preparing product photos or creating collages from images with plain backdrops.
The Pen Tool: Vector Precision for Sharp Edges
When unparalleled precision and smooth, crisp edges are paramount, the Pen tool is the professional’s choice. Unlike pixel-based selection tools, the Pen tool creates vector paths, which means selections remain sharp and scalable regardless of zoom level. This makes it ideal for high-resolution photography, stock photos, and graphic design elements where perfect outlines are critical. While it requires more practice, the results are consistently superior for intricate objects or those with complex, non-fuzzy edges.
How to Use the Pen Tool:
- Open Your Image: Open the image you wish to meticulously cut out.
- Activate the Pen Tool: Select the “Pen Tool” from the left-hand toolbar, or press ‘P’ on your keyboard. Ensure “Path” is selected in the options bar at the top.
- Create Anchor Points: Zoom in closely to the edge of your object. Click to create your first anchor point. Continue clicking along the edge of your subject to add more anchor points.
- Straight Lines: Simply click at each corner or change in direction.
- Curved Lines: Click and drag to create Bezier handles, which allow you to control the curvature of the path. Adjust the direction and length of these handles to match the curve of your object’s edge. You can hold ‘Alt’ (Windows) or ‘Option’ (Mac) while dragging a handle to adjust one side independently.
- Complete the Path: Continue placing anchor points until you’ve traced the entire outline of your object. Close the path by clicking on your initial anchor point. A small circle will appear next to the Pen tool cursor when you hover over the starting point, indicating you’re about to close the path.
- Convert to Selection: Once the path is complete, right-click on the path. Choose “Make Selection” from the context menu. You can set a “Feather Radius” (a small value like 0.5-1.0 pixels often works well to soften the edge slightly) and click “OK”.
- Isolate Your Cutout: With the selection active, you can now right-click and choose “Layer via Copy” or “Layer via Cut” to move your perfectly cut out subject to a new layer.
The Pen tool offers the highest level of control and produces the cleanest edges, making it invaluable for professional photo manipulation and creating digital art that demands flawless precision.
The Polygonal Lasso Tool: Controlled Straight-Line Selections
For beginners and those working with subjects that have predominantly straight edges or angular forms, the Polygonal Lasso Tool offers a straightforward and quick cutting method. It’s less precise than the Pen Tool for curves but far more controlled than the standard Lasso Tool. This tool is especially useful for graphic design projects where animation in tools like After Effects might be the next step, as perfect edge precision isn’t always the primary concern, but a clean, defined cut is.
How to Use the Polygonal Lasso Tool:
- Open Your Image: Load your photo into Photoshop.
- Select the Tool: Find the “Polygonal Lasso Tool” in the left toolbar (it’s usually grouped with the Lasso Tool and Magnetic Lasso Tool).
- Outline Your Subject: Zoom in to your image. Click to create your first point on the edge of the object you want to cut out. As you move your mouse, a straight line will follow. Click again to create a second point, and Photoshop will draw a straight line between the two. Continue clicking along the contours of your object, making short segments to approximate curves if necessary.
- Complete the Selection: Once you have traced the entire outline, click on your initial anchor point to close the selection. A small circle next to the cursor indicates you are about to close the path.
- Create a New Layer: With the selection active, press ‘Ctrl + J’ (Windows) or ‘Cmd + J’ (Mac). This will automatically create a new layer containing only your selected figure.
- Correcting Details (Post-Selection): This method often benefits from post-selection refinement.
- Add a Contrast Layer: Create a new layer beneath your cutout layer and fill it with a contrasting color (e.g., bright green or magenta). This helps highlight any missed spots or jagged edges.
- Refine Edges: Select your cutout layer. Re-select its outline by holding ‘Ctrl’ (Windows) or ‘Cmd’ (Mac) and clicking on the layer thumbnail in the Layers panel.
- Contract Selection: Go to “Select” > “Modify” > “Contract.” Contract the selection by 1 or 2 pixels. This helps trim any stray background pixels that might be clinging to the edge.
- Inverse and Delete: After contracting, press ‘Ctrl + Shift + I’ (Windows) or ‘Cmd + Shift + I’ (Mac) to inverse the selection. Now, press ‘Backspace’ or ‘Delete’ to remove the unwanted fringe.
- Softening Edges (Optional): To make the cutout blend more naturally, you can subtly blur its edges.
- Re-select the cutout outline (Ctrl/Cmd + click layer thumbnail).
- Go to “Select” > “Modify” > “Contract” again, this time by 2-3 pixels.
- Inverse the selection (‘Ctrl/Cmd + Shift + I’).
- Go to “Filter” > “Blur” > “Gaussian Blur.” Adjust the radius to achieve a subtle fade, typically a low value like 1-3 pixels.
The Polygonal Lasso tool is excellent for its straightforwardness, making it a good practice tool for those new to image cutting and for projects where speed and clear, though not always perfectly smooth, edges are acceptable.
Advanced Refinement and Specialized Techniques
While the foundational tools provide the initial selection, many images, particularly those with complex details like hair, fur, or semi-transparent elements, demand more advanced refinement. Photoshop offers powerful features like Layer Masks, Select and Mask, and Color Range to tackle these challenges with finesse.
Layer Masks: Non-Destructive Editing for Flexibility
Layer masks are a cornerstone of non-destructive editing in Photoshop. Instead of permanently deleting pixels, a layer mask allows you to hide or reveal parts of a layer, offering unparalleled flexibility to refine your cutouts at any stage without fear of irreversible changes. This is crucial for digital photography and complex photo manipulation.
How to Use Layer Masks:
- Duplicate Your Layer: Open your image and duplicate the background layer by pressing ‘Ctrl + J’ (Windows) or ‘Cmd + J’ (Mac). This ensures your original image remains untouched. Rename this new layer (e.g., “Subject Cutout”).
- Make an Initial Selection: Using any of the selection tools mentioned above (Quick Selection, Pen, Lasso, Magic Wand), create a rough-to-precise selection of your desired object.
- Apply a Layer Mask: With your selection active and the duplicated layer selected, click the “Add Layer Mask” icon at the bottom of the Layers panel (it looks like a rectangle with a circle inside). Photoshop will automatically convert your selection into a layer mask, hiding the unselected areas. White areas on the mask reveal the layer, while black areas conceal it.
- Refine the Mask:
- Activate the Mask: Click on the layer mask thumbnail in the Layers panel.
- Paint to Adjust: Select the “Brush Tool” (B). Set your foreground color to black to hide pixels (paint on the mask) or white to reveal them. Paint directly on the image to fine-tune your cutout. For softer edges, use a soft-edged brush; for hard edges, use a hard-edged brush.
- Adjust Opacity/Flow: Lower the brush opacity or flow for subtle transitions.
- Use Refine Edge Brush: For highly intricate edges (like hair), you can use the “Refine Edge Brush” within the Select and Mask workspace (see next section) while the mask is active.
- Create New Compositions: Once refined, your subject is perfectly isolated on its own layer, ready to be combined with new backgrounds or incorporated into complex visual designs.
Layer masks are invaluable for maintaining editable cutouts, allowing for continuous refinement and adaptation in any creative project.
Select and Mask (Refine Edge): Mastering Complex Edges Like Hair and Fur
For the most challenging edges, such as stray hairs, fuzzy animal fur, or complex tree branches, Photoshop’s “Select and Mask” workspace (formerly “Refine Edge”) is a game-changer. This dedicated environment provides advanced tools to accurately separate intricate foreground elements from their backgrounds. Many seasoned Photoshop users, even those who began with earlier versions, praise its capabilities for achieving realistic cutouts.
How to Use Select and Mask:
- Make a Preliminary Selection: Start by making the best initial selection you can using any of Photoshop’s selection tools (e.g., Quick Selection, Lasso, or even the new “Select Subject” feature in recent Photoshop versions). A good starting point minimizes the work needed in Select and Mask.
- Open Select and Mask: With an active selection, click the “Select and Mask…” button in the options bar at the top, or go to “Select” > “Select and Mask…”
- Choose Your View Mode: In the Properties panel on the right, under “View Mode,” select an option that provides the best contrast for refining your edges (e.g., “On Layers,” “On Black,” “On White,” or “Overlay”). Adjust the opacity slider to suit your needs.
- Refine Edge Brush Tool: On the left toolbar within the workspace, select the “Refine Edge Brush Tool” (it looks like a brush with a dotted circle). This is the magic brush for hair and fur.
- Paint the Edges: Gently paint along the challenging edges (e.g., around hair, fur, or wispy details). The brush intelligently detects the difference between foreground and background pixels, creating a much more accurate selection.
- Adjust Global Refinements: In the Properties panel, use the “Global Refinements” sliders:
- Smooth: Reduces jagged edges.
- Feather: Softens the edge transition.
- Contrast: Creates a harder edge.
- Shift Edge: Moves the selection boundary inward or outward.
- Decontaminate Colors (Optional): If your subject has a halo or color fringe from the old background, check the “Decontaminate Colors” box. This helps remove residual background colors, especially useful for blending cutouts into new environments. Adjust the “Amount” slider as needed.
- Output Your Selection: Under “Output Settings,” choose “Output To: Layer Mask.” This ensures a non-destructive cutout. Click “OK.”
The Select and Mask workspace is indispensable for achieving professional-grade cutouts, particularly for subjects with complex, organic edges, and is a staple for high-resolution digital photography and digital art.
Color Range: Targeting Specific Tones for Intricate Details
The Color Range command is a powerful, yet often underutilized, tool for creating selections based on specific color or tonal values within an image. It’s particularly effective for isolating objects that are predominantly one color or have consistent color gradients, even if they have disconnected areas or intricate details. This can be especially useful for nature photography or abstract images where color consistency is key.
How to Use Color Range:
- Open Your Image: Open the image in Photoshop.
- Access Color Range: Go to “Select” > “Color Range…” This will open a dialog box with selection options.
- Sample the Color: Ensure “Sampled Colors” is selected in the “Select” dropdown. Use the main eyedropper tool to click on the color in your image that you want to select (e.g., the background color if it’s uniform, or a specific color within your subject).
- Adjust Fuzziness: The “Fuzziness” slider is crucial. Drag it to the right to include a wider range of similar colors in your selection. Drag it left to narrow the selection to a very specific color. Watch the preview in the dialog box (or change “Selection Preview” to “Grayscale” or “None” to see the full image) to gauge the accuracy of your selection. Aim for your desired subject to appear white (selected) or black (unselected) with good contrast.
- Add/Subtract Colors: Use the “+” eyedropper to add more color variations to your selection (click on areas that should be selected but aren’t). Use the “-” eyedropper to remove colors from your selection (click on areas that are selected but shouldn’t be).
- Refine and Output: Once you’re satisfied with the initial selection, click “OK.” Photoshop will create an active selection based on your settings. From here, you can further refine it with other tools (like Select and Mask for edges) or immediately create a layer mask or new layer via copy.
The Color Range tool shines when dealing with intricate patterns or fragmented elements of a similar hue, making it a valuable addition to your photo manipulation toolkit.
Clipping Masks: Cutting Images into Custom Shapes
Beyond simply isolating a subject, Photoshop also allows you to “cut” an image into a custom shape, creating unique visual effects perfect for graphic design, digital art, or enhancing aesthetic photography. This is achieved using a technique called a Clipping Mask, which effectively uses the transparency and shape of one layer to define what’s visible in the layer above it.
How to Cut a Picture into a Shape with Clipping Masks:
- Prepare Your Image: Open your image in Photoshop. If it’s a background layer, go to “Layer” > “New” > “Layer from Background” and name it (e.g., “Picture Layer”). This converts it to a regular layer, which is necessary for clipping masks.
- Create Your Shape:
- Select the “Shapes tool” (U) from the toolbar.
- In the options bar at the top, choose “Custom Shape Tool.”
- From the “Shape” dropdown, select your desired custom shape (e.g., a heart, star, or any graphic element).
- Draw the shape directly onto your image. This will create a new “Shape Layer” above your “Picture Layer.” The shape will initially obscure part of your image.
- Arrange Layers: In the Layers palette (Window > Layers), drag the “Shape Layer” below your “Picture Layer.” The order is crucial: the shape layer must be the base for the clipping mask.
- Create the Clipping Mask: Right-click on your “Picture Layer” in the Layers palette. Select “Create Clipping Mask.”
- Result: Your “Picture Layer” will now be “clipped” to the boundaries of the “Shape Layer” below it. Only the parts of the picture that fall within the shape will be visible. The Layers palette will show the picture layer indented with a small downward-pointing arrow, indicating it’s part of a clipping group.
- Adjust and Refine: Both layers remain independent. You can select the “Move Tool” (V) and reposition, resize, or rotate either the picture layer (to change what part of the image is shown within the shape) or the shape layer (to change the shape’s position or size on the canvas).
Adding Graduated Transparency (Optional):
- Rasterize Shape Layer: To apply blur for graduated transparency, right-click the “Shape Layer” and select “Rasterize Layer” (or “Simplify Layer” in Photoshop Elements). This converts the vector shape into pixels.
- Apply Gaussian Blur: Go to “Filter” > “Blur” > “Gaussian Blur.” Set a high “Radius” value (e.g., 30 pixels or more) and click “OK.” The edges of your picture will now subtly fade out, creating a soft, artistic effect.
Adding Layer Effects (Optional):
- Select Shape Layer: Select the “Shape Layer” in the Layers palette.
- Add Styles: Go to “Layer” > “Layer Style” (or “Layer” > “Layer Style” > “Style Settings” in Photoshop Elements) to add effects like a “Drop Shadow,” “Stroke,” or “Bevel & Emboss” to the shape itself. This allows you to visually enhance the cutout, adding depth and dimension.
Clipping masks are a powerful technique for creative ideas, letting you integrate images into unique visual designs and digital art compositions.
Optimizing and Integrating Your Cutouts
Once you’ve meticulously cut out your image, the next step is to ensure it’s saved correctly and integrated seamlessly into your broader visual projects. Proper saving preserves transparency, while additional effects can elevate the cutout’s aesthetic appeal.
Saving Your Cutouts for Diverse Applications
The way you save your cutout image depends entirely on its intended use. For digital photography, graphic design, or web backgrounds, choosing the right file format is crucial for maintaining quality and transparency.
- Preserving Transparency (PNG): If your goal is to use the cutout with a transparent background in other applications (like web design, presentations, or other image editing software), you must save it in a format that supports transparency. PNG (Portable Network Graphics) is the most common and recommended format for this purpose.
- Go to “File” > “Export” > “Export As…” or “Save for Web (Legacy)…” (depending on your Photoshop version).
- Select PNG as the format. Ensure the “Transparency” option is checked.
- Choose an appropriate size and quality, then click “Export” or “Save.”
- Preserving Layers for Future Editing (PSD): If you anticipate needing to make further edits to your cutout or its layers in Photoshop, always save a copy in Photoshop’s native PSD format. This preserves all layers, masks, and effects, making it easy to revisit and adjust your work.
- Go to “File” > “Save As…”
- Select “Photoshop (*.PSD)” as the format.
- Save your file.
- For Use in Other Photoshop Projects (Copy Merged/Smart Object):
- Copy Merged: To quickly transfer a flattened version of your cutout (with transparency) to another open Photoshop document, press ‘Ctrl + A’ (Windows) or ‘Cmd + A’ (Mac) to select all, then go to “Edit” > “Copy Merged.” You can then paste it into your target document.
- Smart Object: For a more flexible approach that keeps layers editable and scalable within another Photoshop document, convert your cutout layers into a Smart Object. Select all relevant layers in the Layers panel, right-click, and choose “Convert to Smart Object.” You can then drag this Smart Object into any other Photoshop document, retaining its original layer structure and editability. This is excellent for creating reusable assets for your thematic collections or mood boards.
Enhancing Cutouts with Layer Effects and Transparency
A cutout doesn’t have to exist in isolation. Photoshop’s layer effects and transparency controls offer powerful ways to integrate cutouts more realistically or artistically into new compositions, enhancing their visual impact and aesthetic appeal.
- Layer Styles (Layer Effects): Layer Styles allow you to add non-destructive effects like shadows, glows, bevels, and strokes directly to your cutout layer.
- Double-click on your cutout layer in the Layers panel, or go to “Layer” > “Layer Style” > “Blending Options…”
- Experiment with effects like “Drop Shadow” (to give depth), “Outer Glow” (for an ethereal look), or “Stroke” (to add an outline). Each effect comes with numerous adjustable parameters.
- Opacity and Fill: Adjusting the “Opacity” or “Fill” percentage of your cutout layer in the Layers panel can create semi-transparent effects, helping the cutout blend more subtly with its new background or appear ethereal.
- Adjustment Layers: To non-destructively adjust the color, tone, or contrast of your cutout to match its new environment, use Adjustment Layers.
- With your cutout layer selected, click the “Create new fill or adjustment layer” icon at the bottom of the Layers panel (half-black, half-white circle).
- Choose an adjustment (e.g., “Levels,” “Curves,” “Hue/Saturation”).
- To apply the adjustment only to your cutout, create a clipping mask between the adjustment layer and your cutout layer (Alt/Option-click on the line between the two layers in the Layers panel, or right-click the adjustment layer and choose “Create Clipping Mask”).
These enhancement techniques are vital for photo manipulation, graphic design, and crafting compelling digital art, ensuring your cutouts truly shine within any composition.
Beyond Photoshop: Streamlining with Tophinhanhdep.com Image Tools
While Photoshop offers unparalleled depth and control for image cutouts, sometimes you need a quick, hassle-free solution, especially when dealing with simple backgrounds or a large volume of images. For those moments, Tophinhanhdep.com provides AI-powered image tools that can drastically simplify the background removal process.
Our AI background remover is designed for speed and efficiency, offering high-quality image cutouts with transparent backgrounds in just one click. It’s an excellent option for users who are new to Photoshop or require rapid processing for tasks like preparing images for product listings or creating quick mood boards.
How to Use Tophinhanhdep.com’s AI Background Remover:
- Access the Tool: Visit Tophinhanhdep.com and navigate to our AI background remover.
- Upload Your Images: Simply upload the image(s) you want to cut out.
- Automatic Cutout: Our AI tool will automatically detect the subject and remove the background in a matter of seconds.
- Refine (Optional): For minor adjustments, our “magic brush” feature allows you to restore or retain specific object areas if needed.
- Download: Preview your cutout and download the high-quality, transparent image.
This efficient alternative is perfect for batch processing, saving valuable time for busy photographers, graphic designers, or anyone curating extensive image collections. It complements Photoshop’s detailed control by offering a fast-track solution for common cutout needs, ensuring you always have access to optimized, high-resolution imagery.
Conclusion: Unleash Your Creative Vision with Mastered Cutouts
The ability to cut out images in Photoshop is more than just a technical skill; it’s a gateway to limitless creative expression in visual design. From isolating subjects for new aesthetic backgrounds and crafting intricate photo manipulations to preparing high-resolution stock photos and generating assets for digital art and mood boards, the versatility of these techniques is undeniable.
As users have shared for decades, from Photoshop versions as old as 2.0 to the latest CC editions, the continuous evolution of these tools empowers creators to overcome challenges, whether it’s precisely tracing a landscape, refining fuzzy animal hair, or cutting an image into a custom shape. Practice is key, and combining different methods—starting with a quick selection and refining with masks or the Pen tool—often yields the best results.
At Tophinhanhdep.com, we champion the spirit of visual innovation. By mastering these Photoshop cutout techniques, complemented by our efficient online image tools, you unlock a new realm of possibilities for your photography, graphic design, and digital art projects. So dive in, experiment, and transform your images into stunning visual narratives, ready to inspire and captivate.