Mastering Image Resolution: Your Comprehensive Guide to Reducing Image File Sizes and Optimizing Visuals with Tophinhanhdep.com

In today’s visually-driven world, images are everywhere – from stunning wallpapers and aesthetic backgrounds to professional stock photos and intricate digital art. However, the sheer size and high resolution of many modern images can often present challenges, especially when it comes to web performance, storage, and meeting specific submission requirements. Learning “how to decrease resolution of image” effectively is a fundamental skill for anyone involved in digital photography, visual design, or even just regular online sharing. This comprehensive guide, brought to you by Tophinhanhdep.com, will delve into the intricacies of image resolution, explain why and when you might need to reduce it, and provide practical methods and best practices to achieve optimal results.

Why Reduce Image Resolution? Unlocking Efficiency and Performance
The act of reducing an image’s resolution isn’t about compromising quality unnecessarily; rather, it’s a strategic decision to optimize images for specific purposes. High-resolution images, while rich in detail, come with significant drawbacks if not managed properly.
Optimizing for Web and Digital Platforms
One of the primary reasons to decrease image resolution is to enhance web performance. Websites adorned with large, high-resolution images tend to load slowly, frustrating users and negatively impacting SEO. For instance, images intended for a website’s banner or a social media post rarely need the same pixel density as a print-ready photograph. By reducing the resolution, you significantly decrease the file size, allowing pages to load faster, providing a smoother user experience, and improving overall site efficiency. This is crucial for Tophinhanhdep.com’s focus on images for backgrounds, aesthetic collections, and trending styles, where quick loading times are paramount for user engagement. Similarly, when sharing beautiful photography or creative ideas online, a smaller file size ensures faster uploads and downloads for viewers.
Efficient Storage and Sharing
Beyond web optimization, reducing image resolution aids in more efficient storage and sharing. High-resolution images from modern digital cameras or created through digital art applications can consume vast amounts of disk space. For users managing large collections of nature photos, abstract art, or even personal albums, file size management becomes a necessity. Smaller files are easier to store on local drives or cloud services, freeing up valuable space. When sharing images via email, messaging apps, or online portfolios, reduced file sizes prevent lengthy upload times, minimize data usage, and avoid hitting attachment limits, making the sharing process seamless. This directly ties into Tophinhanhdep.com’s mission to provide convenient image tools like compressors and converters.
Meeting Specific Submission Requirements
Many online platforms, job application portals, admission systems, and even some digital art galleries have stringent requirements for image dimensions and file sizes. Submitting an image that exceeds these specifications can lead to rejections or delays. By utilizing tools that allow precise control over width, height, and overall resolution, you can tailor your images to perfectly match these guidelines. Whether it’s a passport size photo for an application or a specific resolution for a graphic design project, accurately decreasing resolution is a key step to ensure compliance.
Understanding Image Resolution: Pixels, DPI, and the File Size Myth
Before diving into the “how-to,” it’s essential to grasp what image resolution truly means and what it doesn’t. A common misconception equates resolution directly with file size, leading many to believe that lowering the resolution automatically shrinks the file. While related, the connection is more nuanced.
The Core of Image Resolution: Pixel Dimensions
At its heart, image resolution is defined by its pixel dimensions – the total number of pixels along its width and height. For example, an image that is 6000 pixels wide and 4000 pixels high has a higher resolution (more total pixels) than one that is 1000 pixels wide and 700 pixels high. These pixel dimensions are the primary determinant of an image’s intrinsic detail and, consequently, its raw file size. More pixels mean more data, resulting in a larger file. When you truly decrease the “resolution” in a way that impacts file size, you are, in essence, reducing these pixel dimensions.
DPI vs. PPI: What Do They Really Mean?
The terms DPI (Dots Per Inch) and PPI (Pixels Per Inch) are often used interchangeably, but they refer to slightly different concepts:
- PPI (Pixels Per Inch): This metric describes the pixel density of a digital image. It indicates how many pixels are contained within one inch of the image when it is displayed on a screen or prepared for print. A higher PPI generally means a sharper, more detailed image on a screen, assuming the screen’s own resolution supports it.
- DPI (Dots Per Inch): This relates to print resolution. It refers to the number of ink dots a printer can place within one inch of paper. A higher DPI results in a finer, more detailed print.
While 300 PPI/DPI is a common standard for high-quality prints, and many screens traditionally display at around 72-96 PPI, it’s crucial to understand their primary function. These values primarily dictate how large an image will print or how it might scale on certain displays, not its fundamental digital file size.
Dispelling the 72ppi Web Resolution Myth
A persistent myth suggests that images uploaded to the web must be 72 PPI (or DPI) to be optimized. This is largely false. As Tophinhanhdep.com explains, the resolution value (like 72 PPI) primarily controls the print size of an image. For digital display on a screen, an image’s actual dimensions in pixels (e.g., 1920x1080 pixels) are what matter for how large it appears and how much data it contains.
Consider an image that is 6000x4000 pixels. If you change its resolution metadata from 300 PPI to 72 PPI without resampling, the image still retains its 6000x4000 pixels. Its file size remains unchanged because the pixel count hasn’t changed. The only thing that changes is that a program would calculate its print size to be much larger (since fewer pixels are packed per inch). For the web, an image’s pixel dimensions (width x height) are the true “resolution” that influences its download speed and visual size on a screen.
The Critical Role of Resampling
The key to truly reducing an image’s file size by decreasing its resolution lies in a process called resampling. When you resample an image, you are either adding or removing pixels.
- Downsampling (Reducing Resolution): This involves removing pixels from the image. When you specify a new, smaller pixel dimension (e.g., changing 6000x4000 to 1920x1280), the software algorithm discards pixels to fit the new size. This directly reduces the amount of data, thus shrinking the file size.
- Upsampling (Increasing Resolution): This involves adding pixels to the image. When you enlarge an image beyond its original pixel dimensions, the software interpolates new pixels based on existing ones. While it increases pixel count, it often leads to a loss of sharpness and introduces artifacts, as the software is essentially “guessing” what new pixels should look like.
Therefore, to decrease the resolution of an image in a way that reduces its file size for web or storage, resampling (specifically downsampling) is the method you need to employ.
Practical Methods for Decreasing Image Resolution
Now that we understand the theory, let’s explore practical tools and methods available to reduce image resolution. Tophinhanhdep.com offers a robust online tool, and various desktop applications provide similar functionalities.
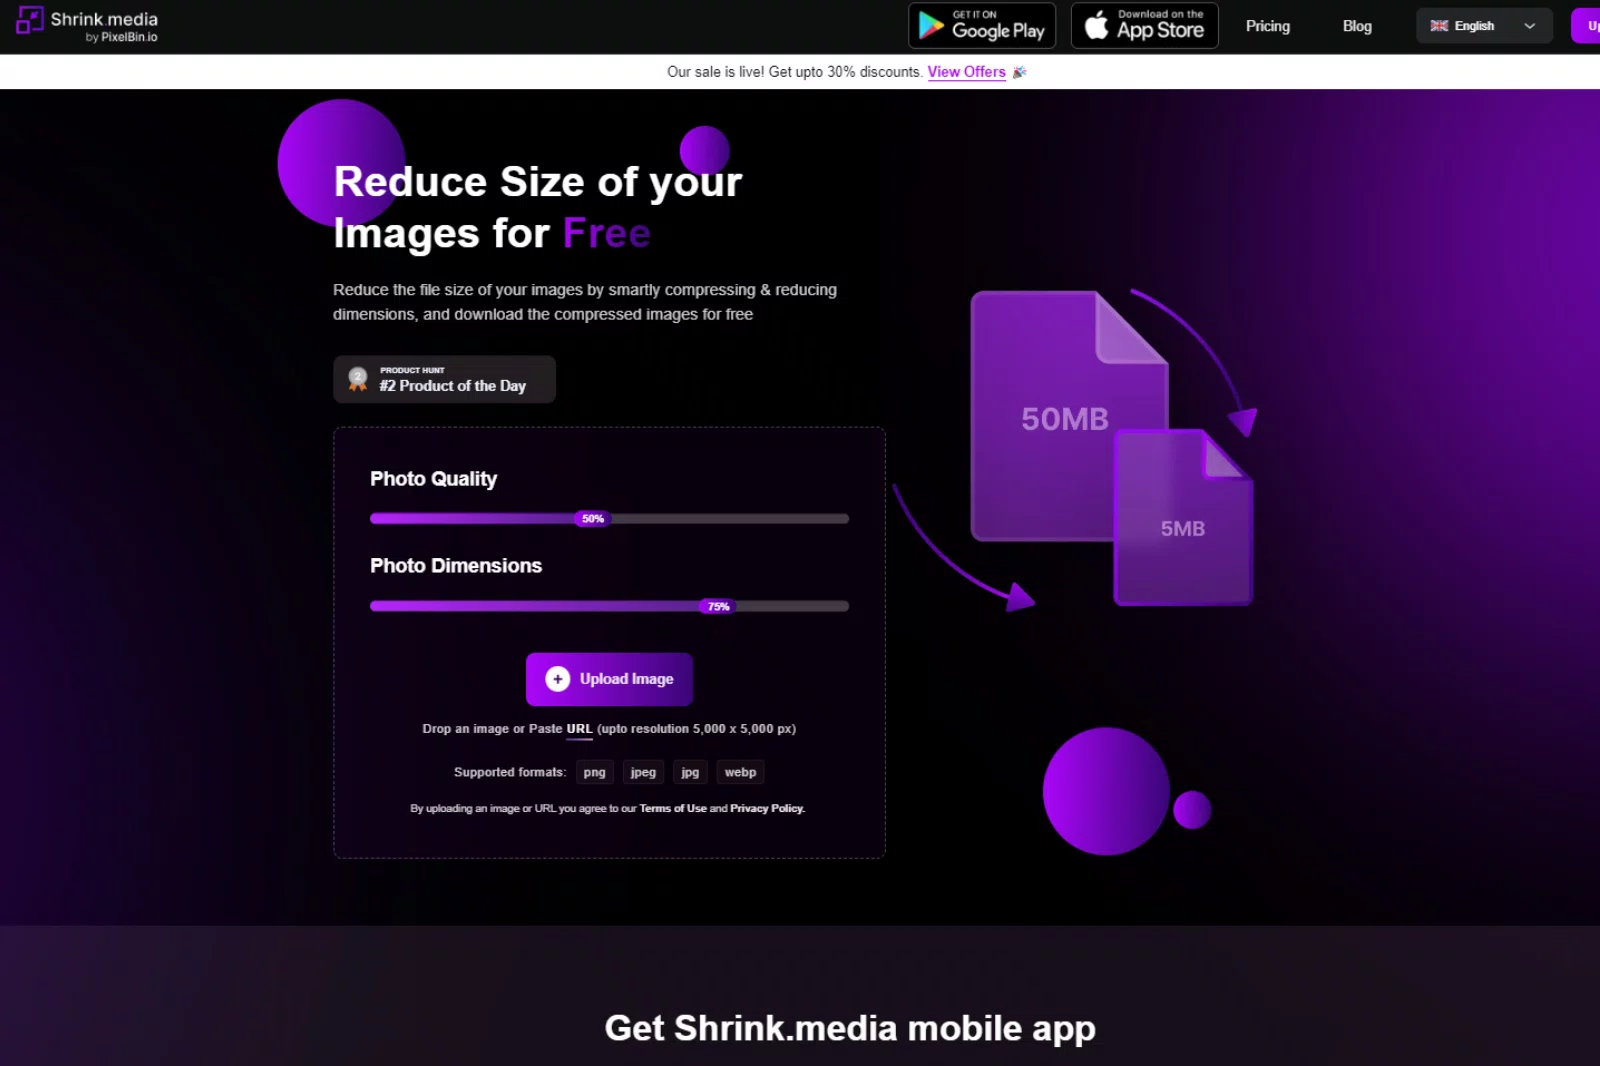
Online Tools: The Tophinhanhdep.com Image Resolution Reducer
Tophinhanhdep.com provides an intuitive and efficient online photo resolution reducer, perfect for quick adjustments without software installation. Whether you’re preparing images for job applications, admission portals, or simply optimizing for web, this tool offers a hassle-free experience.
Key Features of Tophinhanhdep.com’s Resolution Reducer Tool:
- Easy Resolution Reduction: With just a few clicks, you can easily decrease the resolution of your images. The tool allows you to specify a desired width and height in pixels, ensuring your images meet specific requirements.
- Web-Based Convenience: As an online photo size reducer, it’s accessible from any device with an internet connection, eliminating the need for downloads or installations. Simply visit the website, upload your images, and let the tool do the work.
- Versatile Format Support: Tophinhanhdep.com supports various image formats, including JPG, PNG, and more. You can change the size of your images regardless of their original format, making it a versatile solution for all your needs.
- Bulk Image Processing: For those with multiple images to process, the tool supports reducing the resolution of up to 10 images simultaneously, saving valuable time and effort.
- Compression Options: Alongside resolution reduction, Tophinhanhdep.com often offers options to compress the image further (low, medium, or high compression), allowing you to fine-tune the balance between quality and file size. Medium compression is often recommended for the best quality-to-file-size ratio.
How to Reduce Image Resolution with Tophinhanhdep.com:
- Upload Your Images: Click on the “Select Images” button or simply drag and drop up to 10 images into the designated area.
- Define New Dimensions: Specify the desired width and height for your images in pixels. You can choose to maintain the aspect ratio to prevent distortion or adjust independently if needed (though maintaining aspect ratio is generally recommended).
- Apply Reduction: Click the “Reduce Resolution” button. The tool will quickly process your images.
- Download: Once processed, download your resized images, ready for use in your job applications, admission portals, or online sharing.
For even larger batches of images (500+), Tophinhanhdep.com might offer a specialized bulk image resizer tool, accessible through their platform, demonstrating their commitment to comprehensive image management.
Desktop Software Solutions
For users who prefer offline solutions or require more advanced control, several desktop applications provide robust features for image resolution reduction.
Reducing Resolution in Microsoft Office Applications
Programs like Word, PowerPoint, and Excel within Microsoft Office suite offer built-in compression tools to reduce image file sizes, which indirectly involves adjusting resolution for display.
Steps to Compress Pictures in Microsoft Office:
- Insert Image: Open your document and insert the picture(s) you wish to compress.
- Select Picture: Click on the picture to select it. This will reveal the “Picture Tools” or “Picture Format” tab in the ribbon.
- Access Compress Pictures: On the “Format” tab, locate the “Adjust” group and click “Compress Pictures.” (You might see an icon with arrows pointing inwards if the screen size is small).
- Choose Compression Options: In the dialog box, you’ll have options to:
- Apply only to this picture: Check this box to compress only the selected image, or uncheck to apply to all images in the document.
- Target Output: Select a target resolution based on your intended use (e.g., “Web (96 ppi): good for web pages and projectors” or “E-mail (96 ppi): minimize document size for sharing”). These options reduce the pixel dimensions of the image.
- Confirm: Click “OK” to apply the compression.
Office applications also allow you to change the default picture resolution for all new documents or discard picture editing data to further reduce file size.
Leveraging GIMP for Image Scaling
GIMP (GNU Image Manipulation Program) is a free, open-source photo editor offering functionality similar to commercial software like Photoshop. It’s a powerful tool for visual design and photo manipulation.
Steps to Reduce Resolution with GIMP:
- Open Image: Launch GIMP and open your image by going to
File > Open. - Access Scale Image: Navigate to
Image > Scale Image. A dialog box will appear. - Adjust Dimensions: In the “Image Size” section, you’ll see the current width and height in pixels. Enter your desired new, smaller pixel dimensions. Ensure the chain icon next to width and height is linked to maintain the aspect ratio.
- Interpolation Method: Below the dimensions, select an “Interpolation” method. For downscaling, “Cubic” or “LoHalo” often provide good results, minimizing artifacts.
- Scale: Click the “Scale” button. The new resolution will be applied instantly.
- Export: Save your image with the new resolution by going to
File > Export As....
Adjusting Image Size with Preview on Mac
Mac users have a straightforward built-in tool, Preview, which allows for quick image adjustments.
Steps to Reduce Resolution with Preview:
- Open Image: Right-click on your image file in Finder, then select
Open with > Preview. - Access Adjust Size: Go to the
Toolstab in the menu bar and selectAdjust Size.... A dialog box will pop up. - Enter New Dimensions: In the “Image Dimensions” section, you can enter new width and height values in pixels. Make sure “Scale proportionally” is checked to maintain the aspect ratio. You can also directly change the “Resolution” (PPI) here, which will adjust the pixel dimensions if “Resample image” is checked.
- Apply Changes: Click
OKto apply the changes. - Save: Save the modified image by going to
File > SaveorFile > Export....
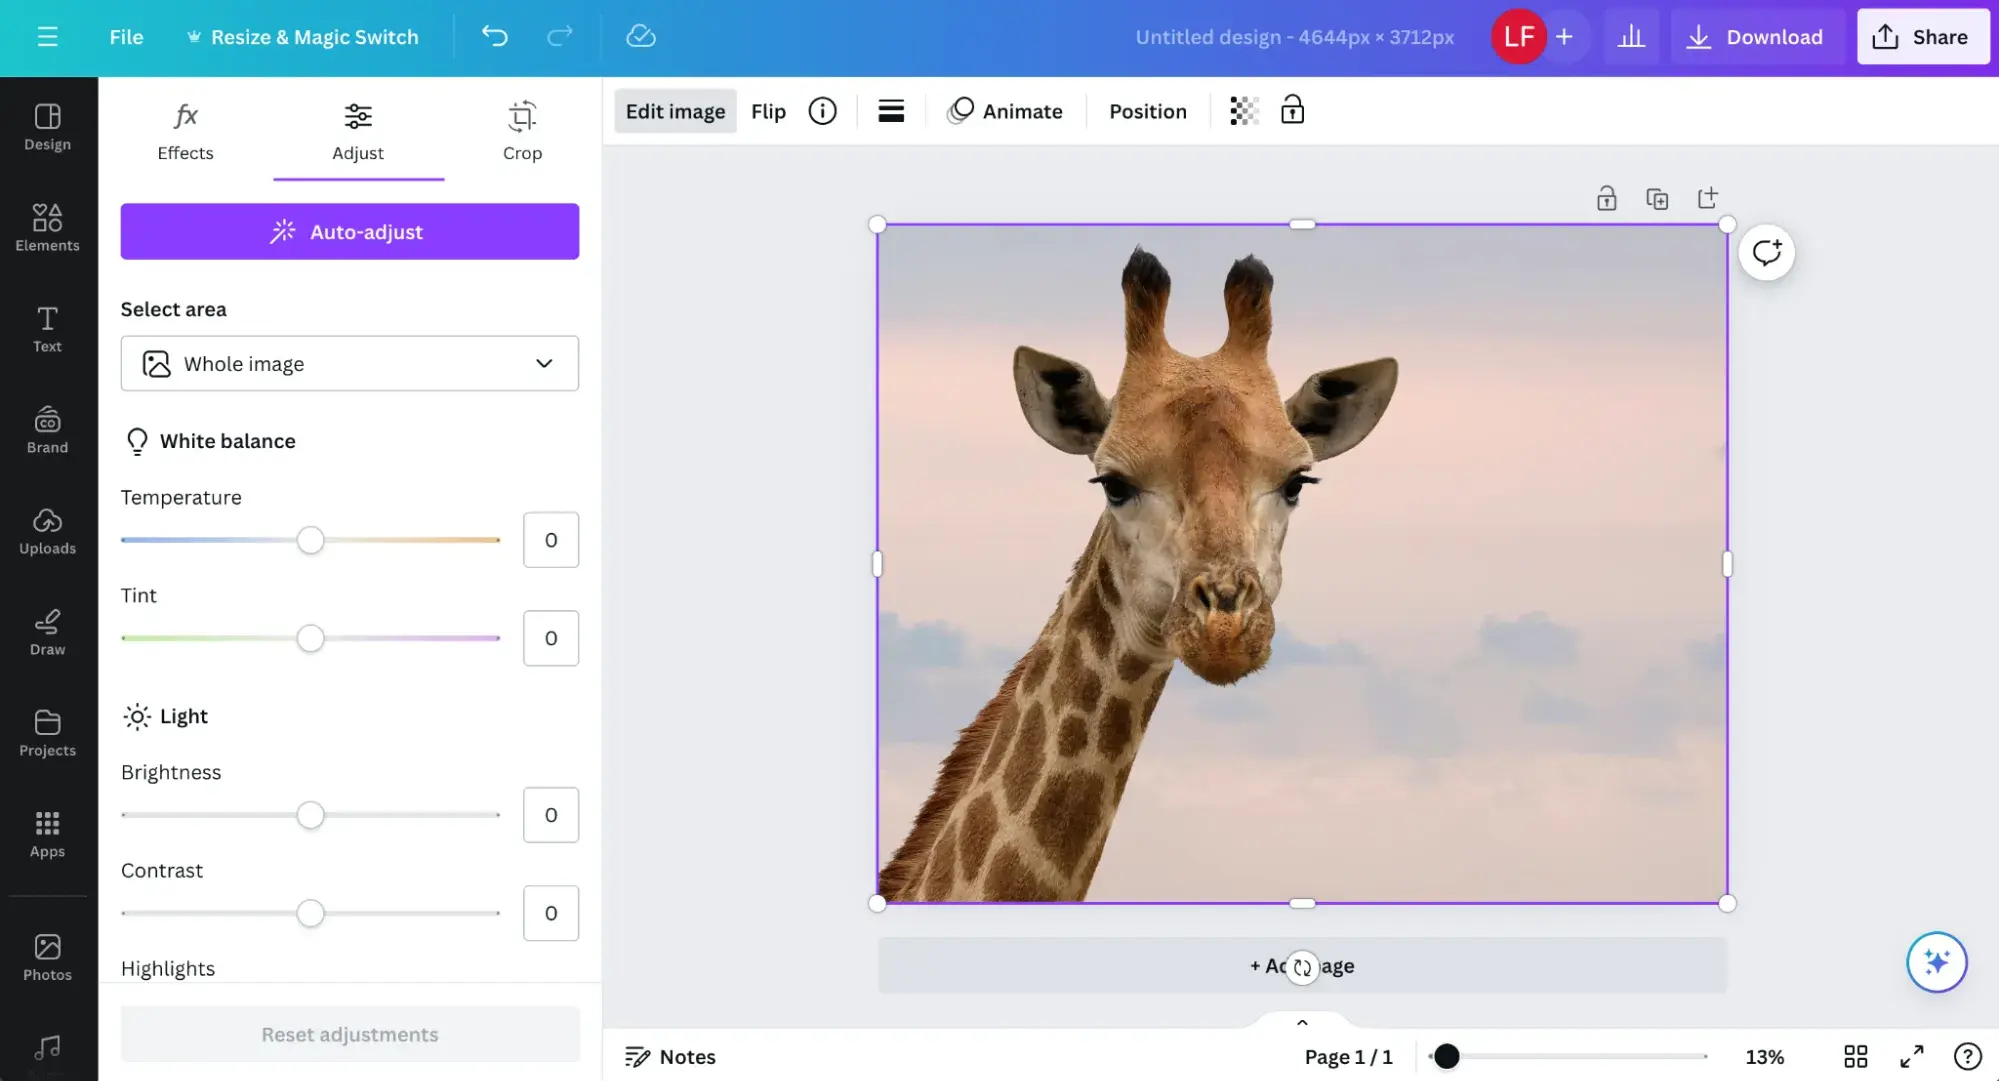
Advanced Resolution Control in Adobe Photoshop
For professional photographers, graphic designers, and digital artists, Adobe Photoshop offers the most precise control over image resolution, file size, and quality.
Steps to Change Image Resolution in Photoshop (with Resampling):
- Open Image: Open your image in Photoshop.
- Access Image Size: Go to
Image > Image Size...(or use the shortcutAlt + Ctrl + Ion Windows,Option + Command + Ion Mac). - Understand the Dialog Box: The
Image Sizedialog box shows current pixel dimensions, document size (print dimensions), and resolution (PPI). - Enable Resampling: Crucially, ensure the
Resamplecheckbox is ticked. This allows you to change the pixel dimensions. - Set New Dimensions: In the
Dimensionssection, enter your desired newWidthandHeightin pixels. If the chain icon is linked, changing one value will automatically adjust the other to maintain the aspect ratio. - Choose Resampling Method: For downsampling (reducing resolution), select
Bicubic Sharper (reduction)orPreserve Details (enlargement/reduction)from theResampledropdown menu.Bicubic Sharperis often excellent for reducing images while maintaining sharpness. - Adjust Resolution (Optional but Recommended for Print Prep): While not directly affecting web file size, if you are preparing for print, you might also set the
Resolution(e.g., to 300 PPI), ensuring it aligns with the desired print quality after you’ve set your pixel dimensions. For web, the pixel dimensions are paramount. - Confirm: Click
OK. - Sharpen (Optional): After reducing resolution, images can sometimes appear slightly soft. You can apply a subtle sharpening effect via
Filter > Sharpen > Unsharp Mask...to restore definition. - Save for Web/Export: For web optimization, use
File > Export > Save for Web (Legacy)...orFile > Export > Export As...to further compress and save your image in an optimized format (like JPG with quality settings).
Best Practices for Image Resolution Management
Effective image resolution management involves more than just knowing how to use the tools; it’s about understanding when and how to apply them for the best results.
Maintaining Quality and Visual Integrity
When decreasing resolution, always aim for the smallest pixel dimensions that still serve your purpose without noticeable loss of quality. Downsampling too aggressively can lead to pixelation or blurriness, especially if the original image was already low quality. It’s generally advisable to keep a high-resolution master copy of your images and only create reduced-resolution versions for specific needs. This practice ensures that your beautiful photography, digital art, or abstract designs retain their full potential for future uses, while optimized versions cater to immediate requirements.
Batch Processing for Enhanced Workflow
For managing large collections of images, such as a series of nature photos or an entire gallery of aesthetic backgrounds, batch processing is a game-changer. Tophinhanhdep.com’s ability to process up to 10 images at once is a great start. For even larger volumes, dedicated desktop software or more advanced online tools often provide batch automation features. This streamlines your workflow significantly, saving hours of manual resizing.
When to Seek Professional Tools and AI Upscalers
While this guide focuses on reducing resolution, it’s worth noting that there are situations where you might need to increase resolution or enhance image quality. For such cases, Tophinhanhdep.com also offers AI Upscalers. These advanced tools use artificial intelligence to intelligently add pixels and detail, allowing for the enlargement of images without the typical quality degradation associated with traditional upsampling. This can be invaluable for restoring old photographs, preparing smaller images for larger displays, or enhancing stock photos for specific visual design projects.
In conclusion, understanding and mastering the art of decreasing image resolution is a vital skill in the digital age. By leveraging tools like the Tophinhanhdep.com Image Resolution Reducer, along with desktop software and sound best practices, you can ensure your images are perfectly optimized for any platform, purpose, or audience, enhancing both performance and visual appeal across all your image, photography, and visual design endeavors.