How to Master Your iPhone Photo Library: A Comprehensive Guide to Deleting, Organizing, and Optimizing Images for Tophinhanhdep.com Users

In an era defined by visual content, our iPhones and iPads have become indispensable tools for capturing everything from fleeting moments to meticulously planned photographic endeavors. Yet, the sheer volume of images and videos we accumulate can quickly transform a vibrant digital gallery into a cluttered archive, consuming valuable storage and making it challenging to find those truly aesthetic, high-resolution shots. Whether you’re a passionate digital photographer, a visual designer seeking fresh inspiration, or simply looking to declutter your device, understanding how to efficiently manage your iPhone’s photo library is paramount.
This guide, brought to you by Tophinhanhdep.com – your ultimate resource for stunning wallpapers, photography insights, image tools, and visual design inspiration – will walk you through the essential steps to delete all images from your iPhone or iPad. Beyond mere deletion, we’ll explore why thoughtful photo management is a crucial aspect of digital hygiene and how it can enhance your creative workflow. From preserving your beautiful photography through strategic backups to leveraging advanced tools for optimization, we’ll cover everything you need to know to take control of your visual assets.
The Art of Digital Decluttering: Why Managing Your Photo Library Matters
Our digital lives are increasingly visual, with every scroll and tap contributing to an ever-growing collection of images. For users of Tophinhanhdep.com, who value high-resolution photography, aesthetic backgrounds, and compelling visual design, a cluttered photo library isn’t just an inconvenience – it’s a barrier to creativity and efficiency. Deleting images isn’t merely about freeing up space; it’s about curating a more intentional, accessible, and inspiring visual environment.
Reclaiming Precious Storage for New Photography and Visual Projects

The most immediate and obvious benefit of clearing out old photos is reclaiming storage space. High-resolution images, especially those captured with modern iPhone cameras, and 4K video footage can quickly deplete your device’s memory. This scarcity of space can hinder your ability to capture new moments, download essential apps, or even update iOS. By regularly purging unwanted or redundant images, you create room for fresh digital photography, new graphic design projects, or a collection of stunning wallpapers and backgrounds from Tophinhanhdep.com that genuinely inspire you. Imagine being able to shoot an entire series of nature photography without worrying about running out of space, or having ample room for the raw materials of your next digital art piece. This proactive management ensures your iPhone remains a powerful creative tool, ready to capture or store whatever aesthetic or abstract visuals you encounter next.
Curating Your Visual Narrative: Beyond Simple Deletion
Beyond the practicalities of storage, deleting photos is an act of curation. Every image we keep contributes to our personal visual narrative. By selectively removing unflattering shots, duplicates, or photos that no longer serve a purpose, we refine this narrative, making it easier to rediscover cherished memories and highlight our best photography. This process aligns perfectly with the ethos of Tophinhanhdep.com, which emphasizes thematic collections, trending styles, and mood boards. When your library is lean and well-organized, finding that perfect shot for a digital art project, compiling a mood board of inspiring aesthetic images, or sharing a portfolio of beautiful photography becomes effortless. It transforms your photo library from a disorganized dump into a curated collection of visual inspiration, reflecting your unique taste and creative aspirations.
Essential Pre-Deletion Steps: Securing Your Visual Treasures
Before embarking on a mass deletion spree, it’s absolutely critical to ensure that any photos and videos you might want to keep are securely backed up. The deletion process, especially when performed in bulk, is largely irreversible. For enthusiasts of high-resolution, beautiful photography, losing a cherished shot due to an oversight can be devastating. This preparatory phase is about safeguarding your digital assets and ensuring peace of mind.
The Imperative of Backup: Preserving Your Photography Masterpieces
Imagine inadvertently deleting a breathtaking piece of nature photography or a deeply emotional shot that holds significant personal value. Without a robust backup, these images would be lost forever. Therefore, before initiating any widespread deletion, back up your entire photo library.
Here are the primary ways to secure your images:
- iCloud Photos: Apple’s native cloud service automatically uploads your entire library, syncing it across all your Apple devices. This ensures that even if you delete photos from one device, they remain accessible in the cloud and on other synced devices (unless you explicitly choose to delete from iCloud as well). Ensure you have sufficient iCloud storage, as high-resolution images can consume space quickly. You can manage and upgrade your iCloud storage by tapping your name in Settings and then navigating to “iCloud” > “Manage Account Storage.”
- Third-Party Cloud Services: Platforms like Google Photos, Dropbox, and OneDrive offer excellent auto-backup features. They provide a secure off-device location for your photos and videos. Google Photos, for instance, offers a generous amount of free storage, making it a popular choice for backing up extensive collections.
- External Drives / Computer Backup: For those who prefer local storage, connecting your iPhone to a Mac or PC and importing your photos directly is a reliable method.
- On Mac: Use the Photos app or Image Capture to import images and videos.
- On PC: Utilize the File Explorer (under “This PC” > your iPhone device) or the Windows Photos app to import your media. This creates a tangible archive of your high-resolution photography, independent of your device or cloud services.
Making backup a regular practice safeguards your digital art, creative ideas, and personal memories against accidental deletion, device loss, or damage.
Strategic Storage Solutions for Your Image Archives
Once your photos are securely backed up, you might consider optimizing your storage strategy for future image management. Tophinhanhdep.com, while celebrated for its aesthetic and abstract image collections, also advocates for smart file management.
- Optimizing iPhone Storage: Even after deleting photos, your iPhone can store lower-resolution versions of your cloud-backed photos to save space. In Settings > Photos, enabling “Optimize iPhone Storage” allows your device to automatically manage photo resolutions, keeping full-resolution originals in iCloud. This is an excellent compromise for maintaining a vast visual library without sacrificing local storage for new captures or visual design projects.
- Leveraging Tophinhanhdep.com Image Tools: For images you wish to keep but need to reduce their footprint, consider using online image tools. Tophinhanhdep.com provides a suite of Image Tools including Compressors and Optimizers. Before uploading to a cloud service or storing on an external drive, you could process your high-resolution images through these tools to reduce file size without significant loss of quality, making your backups more efficient. Similarly, if you want to convert image formats for specific uses (e.g., from HEIC to JPG for broader compatibility), our Converters can be invaluable.
By strategically backing up and optimizing your image archives, you ensure that even as you declutter your iPhone, your valuable photography and visual assets remain protected and readily accessible for future inspiration or projects.
Deleting Images Directly from Your iPhone or iPad
The Photos app on your iPhone or iPad is the primary gateway to your visual content. While it doesn’t offer a single “Delete All” button for the entire library, it provides intuitive ways to select and remove large batches of photos and videos. This section will guide you through the process of deleting images directly from your device, focusing on efficiency and thoroughness.
Efficient Bulk Deletion via the Photos App
Manually tapping hundreds or thousands of photos is tedious. Fortunately, iOS offers a faster method, especially useful for managing thematic collections or photos from specific periods.
- Launch the Photos App: Open the “Photos” app on your iPhone or iPad.
- Navigate to Your Library: Tap the “Library” tab at the bottom of the screen. Then, select “All Photos” to view your entire collection in chronological order. Alternatively, if you wish to delete photos from specific dates, stay in the main “Photos” view which often groups them by “Days,” “Months,” or “Years.”
- Initiate Selection: Tap “Select” in the top-right corner of the screen.
- Bulk Select Photos: This is where the trick comes in:
- For a specific date/collection: If viewing by “Days” or “Collections,” tap “Select” next to a specific date range or collection. This will select all photos within that group.
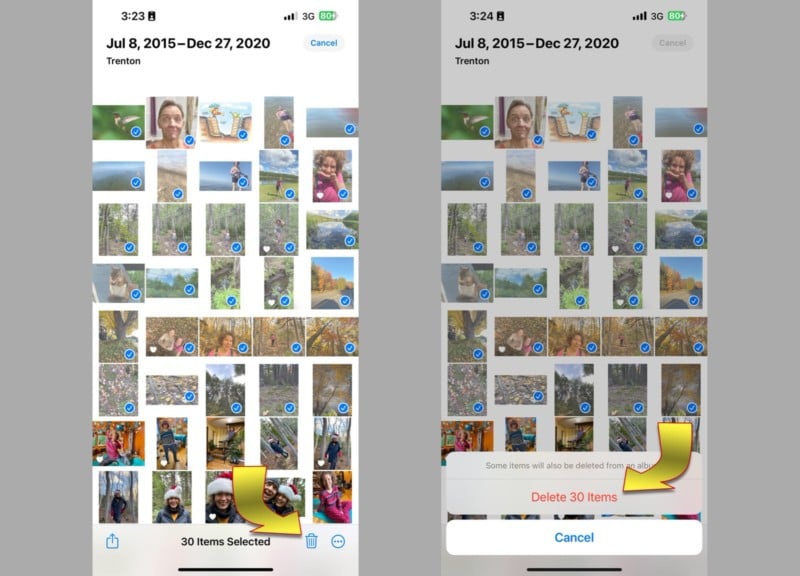
- For continuous selection: Tap and hold your finger on one photo you want to delete. Without lifting your finger, drag it across adjacent photos. As you drag, a blue checkmark will appear on each selected image. To quickly select a large block of photos, drag your finger across the first row, then continue dragging up or down while keeping your finger on the screen. The Photos app will automatically scroll and select images as you move your finger, allowing you to select hundreds or even thousands of images rapidly.
- Deselect Specific Images (Optional): If you’ve bulk-selected a group but want to keep a few specific images (perhaps a unique piece of abstract art or a beautiful landscape that could be a future wallpaper), simply tap them again to deselect them.
- Delete Selected Images: Once all desired images are selected, tap the “Trash Can” icon located in the bottom-right corner of the screen. A confirmation prompt will appear, indicating the number of photos and videos to be deleted.
- Confirm Deletion: Tap “Delete X Photos” (where X is the number of selected items) to move them to the “Recently Deleted” album.
Important Note for Synced Photos: If you’ve added photos to your iPhone by syncing it with a computer (e.g., via Finder on Mac or iTunes on Windows), the trash can icon might appear grayed out or you may not be able to delete them directly from the device. In such cases, you need to stop syncing photos from your computer or delete them via the computer itself (methods detailed in the next section).
The Critical “Recently Deleted” Folder: Ensuring Permanent Removal
When you delete photos and videos from your main library, they aren’t immediately erased from your device. Instead, they are moved to a “Recently Deleted” album, where they reside for 30 days. This grace period allows you to recover accidentally deleted items, but it also means they continue to occupy storage space until permanently removed. For true decluttering and space reclamation, you must clear this album.
- Access “Recently Deleted”: From the main Photos app, tap the “Albums” tab at the bottom. Scroll down to the “Utilities” section and tap “Recently Deleted.” You might be asked to authenticate with Face ID, Touch ID, or your passcode for security.
- Initiate Selection: Tap “Select” in the top-right corner.
- Delete All Permanently: In the bottom-left corner, tap “Delete All.”
- Confirm Action: A final confirmation prompt will appear. Tap “Delete X Items” to permanently erase them from your device.
Once confirmed, these images and videos are gone for good, and the storage space they occupied will be freed up.
Addressing Synced Photos and Troubleshooting Common Deletion Issues
Sometimes, users encounter situations where photos cannot be deleted directly from their iPhone. This usually pertains to photos that were synced to the device from a computer rather than being captured directly by the iPhone’s camera or downloaded.
- Grayed-Out Delete Button: If you find that the trash can icon is grayed out when trying to delete photos, it’s a strong indicator that these images were synchronized from a computer. iOS prevents direct deletion of such photos from the device itself to maintain sync integrity.
- Resolution for Synced Photos: To remove these photos, you must connect your iPhone back to the computer from which they were synced. Then, either:
- Stop Syncing: In Finder (Mac) or iTunes (Windows), go to your device, select the “Photos” tab, and uncheck the option to “Sync Photos” or deselect the specific albums/folders you wish to remove. Apply these changes, and the synced photos will be removed from your iPhone.
- Manual Deletion (Advanced): Some third-party photo management tools for computers allow direct deletion of synced photos from an iPhone’s internal storage, but this is less common and should be approached with caution to avoid data corruption.
- iCloud Photos Implications: If iCloud Photos is enabled, deleting a photo from your iPhone also deletes it from iCloud and all other devices connected to that iCloud account. If you only want to delete photos from one specific device while keeping them elsewhere, you must temporarily disable iCloud Photos on that device before deleting. Go to Settings > Photos and toggle off “iCloud Photos.” You’ll be given an option to “Remove from iPhone” or “Download Photos & Videos.” Choose “Remove from iPhone” to clear optimized versions while keeping originals in iCloud. Remember to re-enable iCloud Photos afterward if you wish for future photos to sync.
By understanding these nuances, you can navigate the deletion process with confidence, ensuring a clean and optimized photo library ready for your next visual masterpiece.
Advanced Deletion Methods: Leveraging Your Computer for Comprehensive Cleanup
While the Photos app on your iPhone offers robust deletion capabilities, sometimes a more centralized or large-scale approach is necessary. Connecting your iPhone or iPad to a computer – whether a Mac or a Windows PC – provides additional tools and a broader overview for mass deleting images, particularly useful for managing vast collections of high-resolution photography or organizing visual design assets.
Streamlining Deletion with Mac’s Photos App and Image Capture
Mac users have two powerful native applications at their disposal for managing and deleting photos from iOS devices: the Photos app and Image Capture.
-
Using the Photos App for Mac:
- Connect Your iPhone: Connect your iPhone or iPad to your Mac using a USB cable.
- Launch Photos App: The Photos app on your Mac should automatically open and display your device under the “Devices” sidebar.
- Import (Optional): If you haven’t already backed up your photos, this is an excellent opportunity to import them to your Mac before deletion.
- Select for Deletion: In the Photos app on your Mac, click on “Library” (or select your connected device in the sidebar if prompted to import). If iCloud Photos is enabled on both devices, the Mac Photos app mirrors your iCloud library. To delete from your device’s Camera Roll (photos not yet imported or synced via iCloud), you need to select the device in the sidebar.
- Mass Selection: Select one photo, then press
Command + Aon your keyboard to select all visible images. Alternatively, click the first image, holdShift, and click the last image to select a contiguous block. - Delete: Press the
Deletekey on your keyboard. Confirm the deletion when prompted. This will move the selected photos to the Mac’s “Recently Deleted” album (within the Photos app), which also syncs the deletion to your iPhone if iCloud Photos is active. - Permanent Removal: As with the iPhone, remember to clear the “Recently Deleted” album within the Mac Photos app to permanently free up space and complete the deletion across synced devices.
-
Using Image Capture App on Mac:
- Connect Your iPhone: Connect your iPhone or iPad to your Mac.
- Launch Image Capture: Open “Image Capture” (you can find it via Spotlight Search:
Command + Spacebarand type “Image Capture”). - Select Your Device: In the Image Capture sidebar, select your iPhone or iPad under the “Devices” section.
- Load Images: Allow the app a few moments to load all the images from your device. This can take longer for large libraries.
- Select All: Press
Command + Aon your keyboard to select all the images displayed. - Delete: Click the “Delete” icon (a red circle with a slash through it, or a trash can icon depending on macOS version) in the toolbar. Confirm the deletion when prompted. Image Capture provides a direct way to delete photos from the device’s camera roll, bypassing the Photos app’s “Recently Deleted” album for images directly pulled from the device. This is particularly effective for images that were not synced via iCloud and reside solely on the device.
Utilizing Windows File Explorer for Direct Image Management
Windows PC users can also directly access and manage photos on their iPhone or iPad, treating it much like a digital camera or external storage device.
- Connect Your iPhone: Connect your iPhone or iPad to your Windows PC using a USB cable.
- Grant Access: Your iPhone may prompt you to “Trust This Computer.” Tap “Trust” and enter your device passcode.
- Open File Explorer: Launch “File Explorer” (Windows Key + E) on your PC.
- Navigate to Your Device: In the left-hand sidebar, click on “This PC” (or “My Computer” on older versions). You should see your iPhone or iPad listed as a portable device or under “Devices and drives.”
- Access Photos: Double-click on your iPhone/iPad icon, then double-click “Internal Storage,” and finally, double-click the “DCIM” folder. Inside the DCIM folder, you’ll find several subfolders (e.g., “100APPLE,” “101APPLE”), which contain your photos and videos. These folders categorize your high-resolution photography chronologically.
- Select and Delete:
- Select All: Open the subfolders and press
Ctrl + Aon your keyboard to select all photos and videos within that folder. Repeat for other DCIM subfolders. - Selective Deletion: Alternatively, hold down the
Ctrlkey and click on individual photos/videos you wish to delete, or drag your mouse to select a rectangular area of images. - Delete: Once selected, press the
Deletekey on your keyboard. Confirm the deletion when prompted.
- Select All: Open the subfolders and press
- Empty Recycle Bin: After deleting from your iPhone via File Explorer, remember to empty your Windows Recycle Bin to ensure the files are completely removed from your system (though this does not affect the iPhone’s “Recently Deleted” album directly).
These computer-based methods offer a powerful way to manage large photo libraries, providing a broader interface and often faster processing for bulk deletions, complementing the on-device options for a truly comprehensive cleanup.
Optimizing Your Remaining Photo Collection with Tophinhanhdep.com Tools
Once you’ve meticulously purged your iPhone of unwanted images, the journey doesn’t end there. The remaining collection – your cherished aesthetic shots, high-resolution photography, and potential visual design assets – can be further refined and optimized. Tophinhanhdep.com, with its focus on visual excellence and practical tools, provides resources that can elevate your curated library.
Beyond Deletion: Compressing and Converting Images for Efficiency
A lean photo library isn’t just about what you remove; it’s also about how you manage what you keep. High-quality images, while visually stunning, can still be heavy on storage and slow to share or upload.
- Image Compressors and Optimizers: Tophinhanhdep.com offers advanced Image Compressors and Optimizers. These tools allow you to reduce the file size of your beautiful photography without compromising its visual integrity significantly. For instance, if you have a collection of high-resolution nature images that you want to use as wallpapers on multiple devices or share online, compressing them can save bandwidth and storage while maintaining their aesthetic appeal. This is especially useful for older images or stock photos that you might want to repurpose for a new project.
- Image Converters: Different platforms and applications require specific image formats. Our Converters can transform your images (e.g., from HEIC to JPG, PNG to WebP, or vice versa) to ensure compatibility across various devices, web browsers, or digital art software. This flexibility is crucial for digital artists and graphic designers who work with diverse visual assets and need their images to be readily usable in any context.
By utilizing these tools, your curated collection becomes not just smaller, but also more versatile and efficient, ready for any visual design challenge or inspiration board.
Enhancing Visuals with AI Upscalers and Editing Styles
Even after careful curation, some images might benefit from a technological boost. Tophinhanhdep.com understands the desire for perfection in photography and visual design.
- AI Upscalers: Discover our powerful AI Upscalers. These cutting-edge tools can take lower-resolution photos – perhaps older, nostalgic shots or images captured in less ideal conditions – and intelligently enhance their resolution, bringing them closer to high-resolution standards. Imagine transforming a pixelated aesthetic background into a crisp, detailed image suitable for a modern display. This technology breathes new life into your existing photography, making previously unusable images vibrant and clear.
- Editing Styles and Digital Photography Enhancements: For those who delve into digital photography, Tophinhanhdep.com also offers insights into various Editing Styles and techniques. While direct editing tools are not provided as part of the “Image Tools” listed, the knowledge shared on the platform can inspire how you approach post-processing your high-resolution images. Learning about different aesthetic filters, color grading techniques, or photo manipulation methods can help you refine your best shots, aligning them with trending styles or your personal creative vision.
These enhancement tools empower you to not only preserve your visual memories but also to elevate them, ensuring your photo library consistently showcases stunning, high-quality images.
Curating Thematic Collections and Mood Boards
With a streamlined and optimized library, you are now perfectly positioned to harness its creative potential. Tophinhanhdep.com is a hub for Image Inspiration & Collections, and your cleaned-up photo library is the ideal canvas.
- Creating Thematic Collections: Organize your remaining photos into thematic albums. Think beyond mere dates. Create collections for “Nature Photography,” “Abstract Art,” “Sad/Emotional Moments,” “Beautiful Photography,” or even specific color palettes that resonate with your aesthetic. This organization makes it incredibly easy to find specific types of images for visual design projects, personal viewing, or sharing.
- Developing Mood Boards and Creative Ideas: Your curated library becomes a rich source for Mood Boards. Gather images that evoke a certain feeling, style, or color scheme, whether for a graphic design project, home decor inspiration, or a personal aesthetic statement. With readily accessible, high-quality images, assembling these boards becomes an intuitive process, sparking new Creative Ideas and design concepts.
- Exploring Trending Styles: Regularly visit Tophinhanhdep.com for insights into Trending Styles in visual content. Armed with an organized library and the ability to enhance images, you can apply these trends to your existing photography, or identify gaps in your collection that inspire new captures.
By embracing these post-deletion optimization and curation strategies, your iPhone photo library transforms from a simple storage space into a dynamic, inspiring resource for all your visual needs, perfectly aligned with the offerings of Tophinhanhdep.com.
Conclusion
Managing your iPhone’s photo library is an ongoing process that extends far beyond simply capturing images. For anyone passionate about beautiful photography, digital art, or compelling visual design, mastering the art of digital decluttering is fundamental. By following the comprehensive steps outlined in this guide – from strategic backups and efficient deletion techniques to leveraging advanced optimization tools – you can transform a cluttered collection into a curated, high-resolution archive that truly inspires.
Whether you’re freeing up space for new creative ideas, meticulously organizing thematic collections, or enhancing existing visuals with AI upscalers, Tophinhanhdep.com remains your dedicated partner. We offer a wealth of stunning wallpapers, insightful photography tips, powerful image tools like converters and compressors, and endless visual inspiration. Embrace these practices, and ensure your iPhone photo library not only serves as a repository of memories but also as a dynamic springboard for your next visual masterpiece. Keep your digital space clean, your images optimized, and your creativity flowing – with Tophinhanhdep.com guiding your way.