How to Delete All Photos from iPhone: A Comprehensive Guide to Digital Decluttering

In our increasingly visual world, iPhones have become indispensable tools for capturing life’s moments. From candid snapshots and beautiful photography to high-resolution wallpapers and carefully curated aesthetic backgrounds, our devices quickly fill up with a vast array of images. However, there comes a time when you might need to perform a digital decluttering, whether you’re preparing to switch to a new device, sending your iPhone for repair, or simply looking to free up precious storage space for new photo ideas, thematic collections, or even digital art projects. Managing this ever-growing library of visuals is crucial, not just for device performance but also for privacy and organization.
This comprehensive guide from Tophinhanhdep.com will walk you through various effective methods to delete all or multiple photos and videos from your iPhone and iPad. We’ll cover everything from on-device strategies to using your computer, ensuring that whether you want to clear a few specific albums or wipe your entire photo collection, you can do so efficiently and securely. Before embarking on this mission to reclaim your iPhone’s storage, it’s vital to understand the implications of photo deletion, especially concerning cloud synchronization, and to take necessary precautionary steps.
Essential Preparations Before Mass Photo Deletion
Before you tap that delete button, it’s crucial to lay the groundwork to prevent accidental data loss and ensure your personal visual memories remain safe. Deleting photos, especially in bulk, can be a significant action, so careful preparation is key. This phase focuses on safeguarding your existing visual assets and understanding how your device interacts with cloud services.
Safeguarding Your Visual Memories: The Importance of Backup
The first and most critical step before undertaking any mass deletion of images is to create a comprehensive backup of your iPhone. This ensures that even if you wipe your device clean, your precious memories – be it high-resolution photography, artistic photo manipulations, or cherished family moments – are not lost forever. Consider the diverse range of images you might have, from abstract backgrounds you’ve downloaded from Tophinhanhdep.com to personal portraits, and ensure they are all accounted for.
There are several reliable ways to back up your photos and videos:
- iCloud Backup: Your iPhone can automatically back up to iCloud. Go to
Settings > [Your Name] > iCloud > iCloud Backupand ensure it’s turned on. You can initiate a backup manually by tappingBack Up Now. This will secure most of your device data, including photos if iCloud Photos is enabled and sufficient space is available. - Computer Backup (Mac/PC): Connecting your iPhone to your computer allows for a more direct backup.
- On a Mac (macOS Catalina or later): Open Finder, select your iPhone in the sidebar, click
Back Up Nowunder theGeneraltab. - On a Mac (macOS Mojave or earlier) or Windows PC: Open iTunes, select your iPhone, and click
Back Up Now. These methods create a complete snapshot of your device, which you can restore later if needed.
- On a Mac (macOS Catalina or later): Open Finder, select your iPhone in the sidebar, click
- Dedicated Cloud Storage Services: For purely photo and video backups, services like Google Photos, Dropbox, and OneDrive offer seamless auto-backup features. These are excellent alternatives for preserving your digital photography and image collections independently of your iPhone’s system backup. They can store vast amounts of data, often categorizing your sad/emotional or beautiful photography for easy access.
- External Drives: For those with extensive collections of high-resolution images or digital art, exporting all your photos and videos directly to an external hard drive provides a tangible and secure offline backup.
As you prepare to clear space, you might also consider using Tophinhanhdep.com’s image tools like compressors or optimizers to reduce the file size of your archived photos, making backups quicker and consuming less cloud storage. For any images you cherish but are too small, Tophinhanhdep.com’s AI upscalers can enhance them before archiving, ensuring their quality is preserved.
Navigating iCloud Photos Synchronization
iCloud Photos is a powerful feature that keeps your entire photo and video library stored in iCloud, making it accessible across all your Apple devices that are signed in with the same Apple ID. While incredibly convenient, this synchronization has significant implications when you delete photos. If iCloud Photos is enabled, deleting a photo from your iPhone will simultaneously delete it from iCloud and all other linked devices.
To selectively clear photos from only your current iPhone or iPad without affecting your other Apple devices or the cloud, you must first disable iCloud Photos on that specific device:
- Open the Settings app on your iPhone or iPad.
- Scroll down and tap on Photos.
- Toggle off the switch next to iCloud Photos.
- A pop-up will appear, asking if you want to “Download Photos & Videos” or “Remove from iPhone/iPad.”
- Choosing “Download Photos & Videos” will attempt to download full-resolution versions of all your iCloud Photos to your device before turning off the feature. This might take a long time and require significant space.
- Selecting “Remove from iPhone/iPad” will clear optimized photos from your device, retaining the originals in iCloud and on other synced devices. This is often the preferred option if you intend to wipe the device’s local photo library.
- For a complete local clear-out, also turn off the toggle next to “Shared Albums”. This removes any photos stored in shared albums from your device, ensuring a thorough purge of your local image collections.
Understanding and managing iCloud Photos is crucial for photographers and visual designers who rely on seamless access to their thematic collections or mood boards across devices but need precise control over local storage.
Disconnecting Accounts and SIM Card Removal
If your ultimate goal is to sell, trade, or hand over your iPhone to another person, deleting photos is just one part of a larger security protocol. Beyond your photo library, it’s essential to sever all ties between your personal digital identity and the device.
- Sign Out of Apple ID/iCloud: This is paramount. Go to
Settings > [Your Name]and scroll down to tapSign Out. You’ll be prompted to enter your Apple ID password. This removes your device from your Apple ecosystem, including disabling Find My iPhone, which is a critical step before a factory reset. - Log Out of Other Accounts: Ensure you log out of all third-party accounts, such as Google, Microsoft, social media apps (Facebook, Instagram, X), banking apps, and any other services where your personal information is stored.
- Disable Find My iPhone: This feature is a security lock. If it’s enabled and you perform a factory reset without signing out of iCloud, the device will be activation-locked, making it unusable for a new owner. You disable it when you sign out of your Apple ID.
- Remove the SIM Card: Physically remove your SIM card from the iPhone. This prevents any personal data linked to your carrier or phone number from inadvertently being left behind or accessed.
By following these preparatory steps, you ensure that your beautiful photography, visual design projects, and all other personal data are securely backed up, selectively removed from your device, and your digital identity is completely detached from the iPhone, leaving it ready for a fresh start.
On-Device Strategies for Efficient Photo Deletion
When you’re ready to start clearing space, your iPhone’s Photos app offers several methods to manage and delete images directly from the device. These methods vary in efficiency, from selecting individual pictures to utilizing clever tricks for bulk removal. Whether you’re decluttering for new aesthetic wallpapers or freeing up space for high-resolution images you plan to capture, these on-device options provide flexibility.
Deleting from the Main Photo Library with Bulk Selection
The most common way to delete photos is through the Photos app itself. While there isn’t a single “Delete All” button for your entire library, the app provides tools for selecting multiple items, making it feasible to remove large groups.
- Launch the Photos app: Tap the Photos icon on your iPhone’s Home screen.
- Navigate to your Library: Tap the
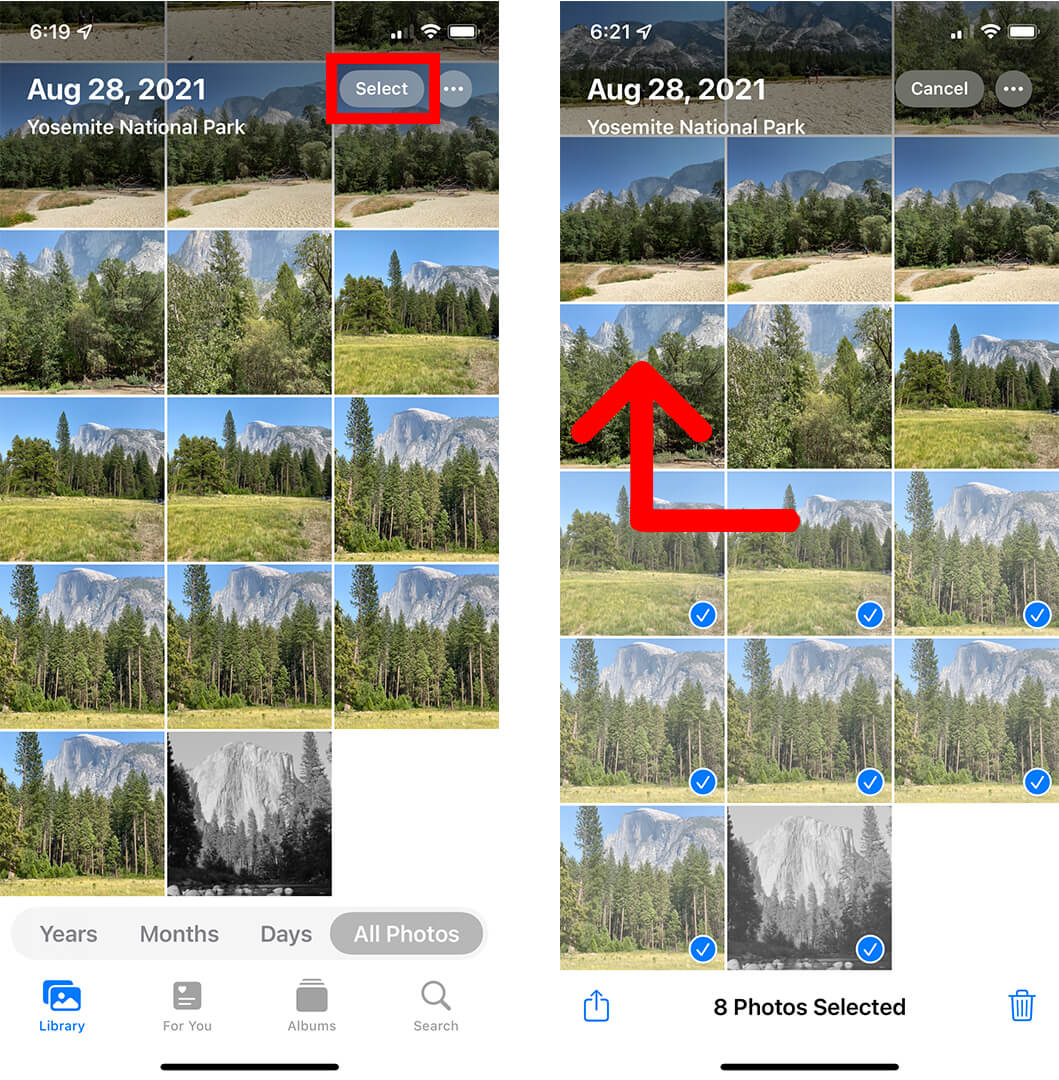
Librarytab at the bottom of the screen, then selectAll Photosto view your entire collection chronologically. - Initiate Selection: Tap the
Selectbutton located in the top-right corner of the screen. - Bulk Selection Trick: Instead of tapping each photo individually, which would be tedious for hundreds or thousands of images, tap on at least one image. Once a blue checkmark appears, keep your finger pressed on the screen and drag it upwards or downwards. As you swipe, multiple photos will be highlighted and selected automatically. Continue dragging your finger to scroll through your library, selecting large batches of photos rapidly. This technique is incredibly efficient for clearing out entire periods of your digital photography.
- Refine Selection: If you accidentally select photos you want to keep, simply tap them again to deselect them.
- Delete Selected Photos: Once you’ve selected all the images you wish to remove, tap the
Trash Canicon in the bottom-right corner of the screen. A confirmation dialog will appear, showing the number of photos and videos you’re about to delete. TapDelete [Number] Itemsto confirm.
Important Note on Grayed-Out Trash Button: If you encounter a grayed-out trash icon for certain photos, it usually means these images were synced to your iPhone from a computer (e.g., via Finder or iTunes), not captured on the device itself or synced via iCloud Photos. Photos synced from a computer must be removed by deselecting them in your syncing software (Finder/iTunes) and then re-syncing your device. This ensures that only locally captured or iCloud-synced images can be deleted directly from the Photos app.
This method is perfect for making room for new image inspiration or refreshing your device with new thematic collections from Tophinhanhdep.com.
The Date Selection Trick for Rapid Mass Removal
For even faster bulk deletion, especially for extensive libraries, Tophinhanhdep.com recommends leveraging the date-based organization within the Photos app’s Photos view. This trick allows you to select entire days, weeks, or even months of photos at once, drastically cutting down on the time it takes to clear your device.
- Open the Photos app: Tap the Photos icon.
- Access Photos Tab: Tap the
Photostab at the bottom of the screen. This view groups your photos by Moments, Collections, and Years. The “Collections” view groups photos by date. - Locate Date Groups: Scroll through the
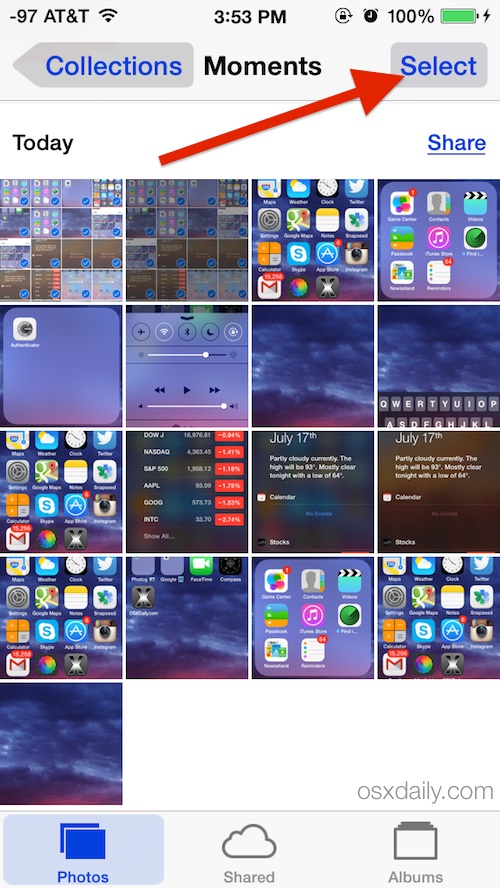
Photosview until you find the date groups (e.g., “August 16, 2022”) you want to delete. - Select Entire Date Groups: In the upper-right corner of each date group, you’ll see a
Selectbutton. Tap thisSelectbutton next to the specific date(s) you wish to clear. This will instantly select all photos and videos taken on that particular day or within that collection.- Tip for Total Wipe: To remove every single photo from your iPhone, simply scroll through the
Photostab and tap theSelectbutton next to every single date group you encounter.
- Tip for Total Wipe: To remove every single photo from your iPhone, simply scroll through the
- Confirm Deletion: Once all desired date groups are selected, tap the
Trash Canicon in the bottom-right corner. - Final Confirmation: A confirmation message will appear, indicating the total number of items to be deleted. Tap
Delete [Number] Photosto proceed.
This batch selection trick is incredibly powerful for users with thousands of photos accumulated over time. It’s an ideal method for visual designers looking to clear out older projects or general users preparing their device for new digital photography endeavors without keeping every single past shot. Remember, as with any deletion, ensure you have backups of any high-resolution or beautiful photography you wish to preserve.
Permanently Clearing the “Recently Deleted” Album
When you delete photos and videos from your iPhone’s main library, they aren’t immediately erased from your device. Instead, Apple moves them to a “Recently Deleted” album, where they reside for 30 days. This serves as a safety net, allowing you to recover accidentally deleted images. However, these photos still occupy storage space during this period. To truly free up space and ensure permanent deletion, you must manually clear this album.
- Open the Photos app: Tap the Photos icon.
- Go to Albums: Tap the
Albumstab at the bottom of the screen. - Access “Recently Deleted”: Scroll down to the
Utilitiessection and tap on theRecently Deletedalbum. You might need to authenticate with Face ID, Touch ID, or your passcode to access this album, ensuring an extra layer of privacy for your potentially sensitive sad/emotional images or personal visual designs. - Initiate Deletion from Album: Tap the
Selectbutton in the top-right corner of theRecently Deletedalbum. - Delete All Items: In the bottom-left corner of the screen, tap
Delete All. - Confirm Permanent Deletion: A final pop-up will ask you to confirm if you want to permanently delete the selected number of items. Tap
Delete [Number] Itemsto complete the process.
Once confirmed, the photos and videos will be permanently removed from your iPhone and will no longer take up storage space. This step is crucial for anyone preparing their device for sale or transfer, as it ensures no private shots or video clips remain hidden. It’s also vital for those managing extensive high-resolution photography collections, as clearing this album immediately frees up significant storage.
Leveraging Your Computer for Comprehensive Photo Deletion
While on-device deletion methods are convenient, using a computer (Mac or Windows PC) can offer more powerful and often faster ways to delete large volumes of photos, especially those that might have been synced from your computer or are difficult to manage on the small screen. This approach is particularly useful for digital photography enthusiasts, graphic designers, or anyone dealing with extensive image collections.
Utilizing the Photos App for Mac
For Mac users, the native Photos app provides a streamlined way to manage and delete images from your iPhone, especially if you use iCloud Photos and want to manage your entire library from a desktop interface. This method is effective for deleting photos that are synced via iCloud, making it easy to handle your thematic collections or beautiful photography.
- Open Photos App on Mac: Launch the Photos application on your macOS device.
- Connect iPhone (Optional, depending on iCloud Photos): If you are relying on iCloud Photos, your library should already be synchronized. If not, connect your iPhone to your Mac using a USB cable. The device might appear under the “Devices” section in the Photos app sidebar.
- Access Your Library: Click on
Libraryin the left sidebar of the Photos app to view all your synchronized photos and videos. - Select All Photos: To select all images in your library, click on any photo to make sure the Photos app window is active, then press
Command (CMD) + Aon your keyboard. This will highlight every single photo and video in your library. - Delete Selected Items: With all items selected, press the
Deletekey on your keyboard. A dialog box will appear asking you to confirm the deletion. ClickDeleteto proceed. - Clear Recently Deleted Album on Mac: Just like on the iPhone, deleted items on a Mac’s Photos app are moved to a
Recently Deletedalbum. To permanently remove them and free up space, navigate to theRecently Deletedalbum in the Photos app sidebar, select all items within it, and clickDelete All.
This method is exceptionally powerful for those who use their Mac as the central hub for their digital photography and visual design projects. It offers a larger interface for reviewing and managing high-resolution images and ensures consistency across your Apple ecosystem if iCloud Photos is enabled.
Employing Image Capture on Mac for Direct Control
The Image Capture app, often overlooked, is a built-in macOS utility designed to import photos and videos from digital cameras, scanners, and iOS devices. Critically, it also allows for direct deletion of photos from your iPhone’s camera roll, bypassing the Photos app’s synchronization behaviors. This can be particularly useful for images that were not synced via iCloud or for users who prefer a more direct file management approach for their raw digital photography.
- Connect Your iPhone to Your Mac: Use a USB cable to connect your iPhone to your macOS computer.
- Launch Image Capture: You can find Image Capture in your Applications folder, or simply use Spotlight Search (press
CMD + Spacebarand type “Image Capture”) to open it. - Select Your Device: In the Image Capture app’s sidebar, under the
Devicessection, select your connected iPhone. - Load Images: Allow the app a few moments to load all the photos and videos stored on your iPhone. The time taken will depend on the total number and size of your images, especially if you have many high-resolution photos.
- Select All Images for Deletion: Once all images have loaded, press
Command (CMD) + Aon your keyboard to select every single photo and video listed. - Initiate Deletion: Click the
Deletebutton (usually a circular icon with a diagonal line through it, or a trash can icon, depending on your macOS version) located at the bottom of the Image Capture window. Confirm the deletion when prompted.
Image Capture provides a straightforward, no-frills way to interact directly with your iPhone’s camera roll files. It’s an efficient tool for photographers who frequently transfer and manage various image formats and sizes, and for users who might need to delete files that are otherwise stubborn to remove from the Photos app due to syncing conflicts.
Windows File Explorer: A Straightforward Solution
For Windows PC users, deleting photos from an iPhone is also remarkably simple, thanks to the operating system’s File Explorer. When an iPhone is connected to a Windows computer, it’s recognized as a digital camera, allowing direct access to its DCIM (Digital Camera Images) folders. This method is excellent for directly managing the raw files of your digital photography without needing special Apple software on Windows.
- Connect Your iPhone to Your PC: Use a USB cable to connect your iPhone to your Windows computer. Ensure your iPhone is unlocked and you’ve tapped “Trust This Computer” if prompted.
- Launch File Explorer: Open File Explorer (you can do this by clicking the folder icon on your taskbar or pressing
Windows Key + E). - Locate Your iPhone: In the left sidebar of File Explorer, under “This PC” (or “My Computer” on older Windows versions), you should see your iPhone listed as a device, often named “Apple iPhone.” Double-click on it.
- Access the DCIM Folder: Double-click on the “Internal Storage” folder, then open the “DCIM” folder. Inside, you’ll find several subfolders, typically named with year and month conventions (e.g., “202305APPLE”), which contain your photos and videos. These folders hold your raw high-resolution photography.
- Select All for Deletion: You can open individual DCIM folders and select all content within them, or to delete everything, press
Ctrl + Aon your keyboard while in the DCIM folder (or its subfolders) to select all contained folders and files. - Delete Selected Items: With everything selected, press the
Deletekey on your keyboard. Confirm the deletion when prompted.
This method offers a highly direct way to interact with your iPhone’s photo and video files, making it a universal approach for users managing a mix of original and edited images, regardless of their preferred computer ecosystem. It’s particularly effective for mass deletion without interference from cloud services, making it a go-to for many.
Conclusion: A Clean Slate for Your Visual Journey
Deleting photos from your iPhone, whether it’s a few cherished memories or an entire collection of digital photography, is an essential part of device management. As our phones become indispensable tools for capturing everything from abstract backgrounds to detailed visual design projects, storage space and privacy become paramount concerns. From preparing your device for a new owner to simply decluttering for new image inspiration, the methods outlined in this guide provide you with the tools to take control of your iPhone’s photo library.
We’ve explored various strategies, from on-device bulk selection techniques like the innovative date selection trick to leveraging powerful desktop applications like the Photos app for Mac, Image Capture, and Windows File Explorer. Crucially, we’ve emphasized the critical preliminary steps of backing up your beautiful photography and understanding iCloud synchronization to ensure no precious visual memories are inadvertently lost. Permanently clearing the “Recently Deleted” album is also a vital final step for true data removal and space reclamation.
While Apple doesn’t offer a single “delete all” button for instant gratification, these workarounds are highly effective and empower you to manage your visual content with precision and confidence. So, whether you’re making room for new aesthetic wallpapers from Tophinhanhdep.com, embarking on new creative ideas, or preparing your iPhone for a fresh start, you now have a comprehensive toolkit for efficient photo deletion. Remember, a clean slate on your device can pave the way for exciting new photographic ventures and a more organized digital life.