How to Delete Images on Instagram: A Comprehensive Guide for Curating Your Visual Story

In the dynamic world of social media, Instagram stands as a premier platform for visual expression, where millions share everything from breathtaking nature photography to intricate digital art, personal milestones, and professional portfolios. For creators, photographers, and visual enthusiasts, Instagram is more than just an app; it’s a living gallery, a mood board, and a source of constant inspiration. At Tophinhanhdep.com, we understand the immense value of maintaining a pristine and impactful visual presence. Whether you’re showcasing high-resolution stock photos, experimenting with new editing styles, or simply sharing aesthetic backgrounds and wallpapers, the quality and relevance of your posted images are paramount.
However, even the most meticulous curators can find themselves needing to adjust their digital masterpieces. Perhaps a high-resolution image was uploaded with an unintended blur, an aesthetic filter choice no longer aligns with your evolving brand, or an old photo dump no longer fits your thematic collection. The ability to remove or refine your shared visuals is crucial for maintaining the integrity of your online persona and ensuring your feed consistently reflects your best work. This comprehensive guide, brought to you by Tophinhanhdep.com, will walk you through every aspect of deleting images on Instagram, from single photos within a carousel to the complete deactivation or deletion of your account. We’ll also touch upon how effective image management, combined with Tophinhanhdep.com’s advanced image tools, can help you cultivate a truly captivating visual narrative.
The Art of Digital Curation: Why Image Management Matters on Instagram
Instagram is a testament to the power of visual communication. For many, it’s a primary channel for displaying digital photography, graphic design projects, and creative ideas. Our community at Tophinhanhdep.com frequently seeks inspiration for wallpapers, backgrounds, and thematic collections, always striving for beauty and high resolution. Given this emphasis on visual excellence, the content you share on Instagram directly reflects your aesthetic sensibilities, your skills in photo manipulation, and your understanding of trending styles.
Mistakes happen, or tastes evolve. A photo that once seemed fitting for your feed might, over time, appear out of place, detract from your current visual design, or simply be of lower quality compared to your latest digital photography advancements. Old images with suboptimal editing styles, low resolution, or even ones that generate sad/emotional reactions for the wrong reasons can dilute the impact of your curated profile. Effective image management, therefore, isn’t just about removing “bad” photos; it’s a strategic move to optimize your visual narrative. It ensures that every scroll through your profile reinforces your desired aesthetic, whether that’s showcasing abstract art, stunning nature photography, or a cohesive set of beautiful photography. By understanding how to efficiently delete and manage your images, you empower yourself to continuously refine your online gallery, keeping it fresh, engaging, and reflective of your highest visual standards. This proactive approach to content management, much like using Tophinhanhdep.com’s tools for image optimization or AI upscaling, is key to maintaining a distinguished presence in the visually-driven world of Instagram.
Deleting a Single Image from an Instagram Carousel Post

Instagram carousels, often affectionately dubbed “photo dumps,” are incredibly popular for sharing multiple moments, showcasing different angles of a beautiful landscape, or presenting a series of abstract art pieces. These multi-image posts can receive significantly higher engagement than single-image posts, making it even more important that every visual within them is flawless. However, what if you discover an imperfection – a stray object in a background, a photo that no longer fits the aesthetic, or a high-resolution image that was accidentally duplicated? The good news, as emphasized by visual design experts, is that you don’t have to delete the entire carousel and start over. Instagram offers a flexible solution, allowing you to remove individual images from a published carousel without sacrificing the whole post.
Can You Delete One Photo from an Instagram Carousel After Posting?
Absolutely, you can! This capability was a game-changer when Instagram introduced it in November 2021, bringing immense relief to photographers, digital artists, and social media managers who meticulously craft their content. Before this update, a single misstep meant deleting an entire carousel, losing all its engagement, comments, and the carefully selected collection of images. Now, you have the power to fine-tune your visual stories post-publication, ensuring your aesthetic backgrounds, beautiful photography, or digital art carousels remain polished and professional.
This feature is particularly beneficial for those who use Instagram as a portfolio, like many Tophinhanhdep.com users who share their high-resolution images or creative ideas. It allows for quick corrections to maintain a consistent visual design and uphold the quality associated with their work.
However, there is one crucial condition to keep in mind: you cannot delete a single photo from a carousel that contains only two images. The Instagram platform requires a carousel to have at least two images to function as a carousel. If your post originally had three or more images, you can delete down to two, but you cannot reduce it to a single image. This means you can’t transform a multi-image carousel into a standard, single-photo post without deleting and re-uploading the remaining picture separately. So, if your carousel has three or more photos, you’re good to go; if it only has two, you’ll need to consider deleting the entire post if you want to remove one of them.
Step-by-Step: How to Delete a Single Photo from a Published Carousel
To illustrate, let’s imagine you’ve shared a stunning carousel of nature photography or aesthetic abstract images, but one of them, perhaps a photo of a cute animal or a specific detail, no longer aligns with your thematic collection or visual design goals. Here’s how Tophinhanhdep.com recommends you refine your post:
Step 1: Navigate to the Carousel Post Open the Instagram application on your mobile device. Go to your profile and locate the specific carousel post you wish to edit. Carousel posts are identifiable by a small, two-square icon in the top right corner of the post thumbnail, indicating multiple images or videos. Tap on the post to view it.
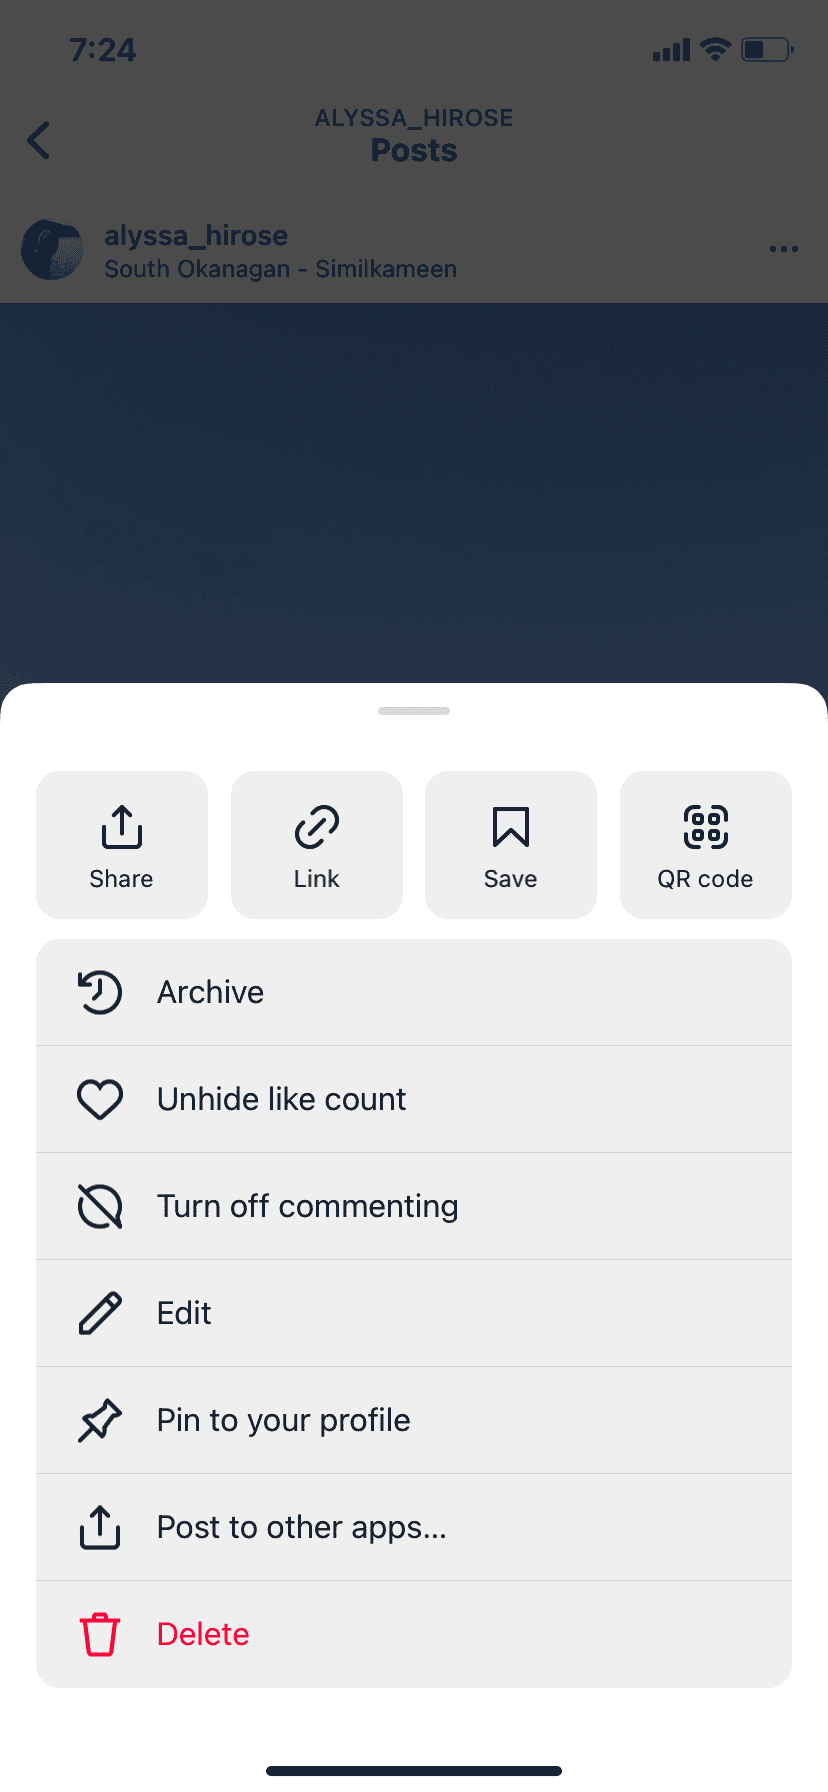
Step 2: Access the Edit Options Once you’re viewing the carousel post, look for the three-dots icon (ellipsis) typically found in the top right corner of the post (above the images). Tap this icon to open a menu of options. From this menu, select “Edit.” This will take you into the editing interface for your post.
Step 3: Identify and Delete the Unwanted Image Within the edit screen, you’ll be able to swipe through the images in your carousel. Locate the specific photo or video you intend to delete. In the top-left corner of each individual image within the carousel, you will see a small trash bin icon. Tap this icon on the image you wish to remove.
Step 4: Confirm Your Deletion Instagram will prompt you with a confirmation message, asking if you are sure you want to delete the image. Tap “Delete” to proceed. It’s important to note that Instagram offers a grace period: you can restore the deleted image for up to 30 days after its removal. This provides a safety net should you change your mind or accidentally delete the wrong photo.
Step 5: Save Your Changes After deleting the image(s), look for the “Done” button, usually located in the top right corner of your screen. Tap “Done” to save all the edits you’ve made to the carousel. This final step is crucial, as failing to save will revert the post to its original state, and your deletion will not be applied. Your updated carousel, now free of the unwanted image, will be visible on your profile, showcasing your refined visual design.
Troubleshooting Common Issues During Carousel Image Deletion
While the process of deleting images from Instagram carousels is generally smooth, users occasionally encounter minor hiccups. As Tophinhanhdep.com users are often focused on high-resolution images and flawless digital photography, we want to ensure your experience is as seamless as possible. Here are a couple of common issues and how to resolve them:
1. “There was an error saving your changes” Message: After meticulously removing an image from your beautiful photography carousel and hitting “Done,” you might sometimes see a banner notification stating, “There was an error saving your changes.” This can be frustrating, especially when you’ve taken time to curate your thematic collection.
- Solution: Often, this is a temporary display glitch. Don’t panic. Force quit the Instagram app (close it completely from your device’s multitasking menu) and then reopen it. Navigate back to your profile and check the carousel post. In most cases, you will find that the image you intended to delete has, in fact, been successfully removed. If not, ensure you have a stable internet connection and attempt the steps again. A poor connection can sometimes interfere with saving changes.
2. Deleted Image Still Appears in the Carousel: You’ve followed all the steps, confirmed the deletion, and even closed and reopened the app, but the unwanted image stubbornly remains in your carousel. This can be particularly annoying if you’re trying to maintain a very specific aesthetic or visual design.
- Solution: First, try pulling down on your profile screen to refresh it. This action forces Instagram to reload your content. If the image persists, proceed with force-quitting and reopening the app as described above. These refresh methods typically resolve display inconsistencies, and the removed media should then be gone. If the problem persists after multiple attempts and ensuring a strong internet connection, you might consider clearing Instagram’s cache on your device (in your phone’s app settings, not within Instagram itself) or, as a last resort, reinstalling the app. However, these more drastic measures are rarely needed for this specific issue.
Restoring a Deleted Photo to an Instagram Carousel
Sometimes, a creative idea evolves, or a decision to remove an image, perhaps a sad/emotional piece or a background element, turns out to be premature. Instagram understands this, and thankfully, it provides a way to recover recently deleted content. This “Recently Deleted” feature is a savior for digital artists and photographers, allowing them to retrieve images that were part of their high-resolution photography collections or aesthetic mood boards. Remember, you have a 30-day window to restore content from your carousels.
Here’s how to bring back a photo or video you’ve deleted from an Instagram carousel, ensuring your visual design remains as flexible as your creative process:
Step 1: Access Your Activity Menu From your Instagram profile screen, tap on the three horizontal lines (or a hamburger menu icon) located in the top right corner. This action will open a side menu. From this menu, select “Your activity.” This section is Instagram’s hub for your past interactions and content changes.
Step 2: Navigate to “Recently Deleted” Within the “Your activity” menu, scroll down until you find the “Recently Deleted” option and tap on it. This area functions like a recycling bin for your Instagram content. Here, you’ll see all the photos, videos, Reels, and Stories you’ve deleted in the last 30 days. Content older than 30 days is permanently removed.
Step 3: Select the Photo to Restore Browse through your recently deleted media to find the specific image or video that was previously part of your carousel post and that you wish to restore. Tap on it to open a preview.
Step 4: Initiate the Restoration Process Once you’re viewing the deleted image, tap the three dots icon (ellipsis) which will typically be in the bottom right or top right corner of the screen. A pop-up menu will appear. From this menu, select “Restore.”
Step 5: Confirm Restoration Instagram will ask you to confirm if you’re sure you want to restore the media. Tap “Restore” once more to finalize the action. The image will then be reinserted into its original carousel post, exactly where it was before deletion. This means your high-resolution images or digital art pieces can seamlessly rejoin your existing thematic collection.
This restoration feature is invaluable for Tophinhanhdep.com users who might be experimenting with different editing styles or creative ideas and need the flexibility to revert changes without losing valuable content. It ensures that your curated feed of beautiful photography and aesthetic content remains adaptable to your evolving vision.
Deleting or Deactivating Your Entire Instagram Account
While managing individual images in carousels is about refining specific posts, there might come a time when you consider a more significant step: either temporarily deactivating or permanently deleting your entire Instagram account. This decision, often driven by a desire for digital privacy, a shift in focus from social media, or a need to completely overhaul one’s online presence, is a powerful move in visual design and personal branding. For Tophinhanhdep.com users who cultivate meticulous image inspiration & collections, and value high-resolution photography, understanding these options is crucial for maintaining control over their digital footprint.
Understanding the Difference: Deletion vs. Deactivation
Before you proceed, it’s vital to grasp the distinction between deleting and deactivating your Instagram account, as the consequences are quite different. This knowledge will help you make an informed decision aligned with your visual design goals and personal privacy preferences.
Account Deactivation (Temporary): Deactivating your Instagram account is like putting your profile on pause. When you deactivate your account:
- Your profile, photos, videos, comments, and likes are hidden from other users. No one can see your aesthetic backgrounds, your nature photography, or your abstract art posts.
- Your account is not permanently deleted. All your data, including your meticulously curated thematic collections and digital photography, remains stored by Instagram.
- You can reactivate your account at any time by simply logging back in with your username and password. Once reactivated, everything will reappear exactly as it was when you left, including all your high-resolution images and personal data.
- This option is ideal if you need a short-term break from social media, are doing a “digital detox,” or want to remove your presence temporarily without the commitment of permanent deletion.
Account Deletion (Permanent): Deleting your Instagram account is a final and irreversible action. When you delete your account:
- Your profile, photos, videos, comments, likes, and followers are permanently removed from Instagram. This means all your beautiful photography, graphic design projects, and image inspiration will be gone forever.
- Instagram typically implements a 30-day deactivation period before permanent deletion. During this window, your account is hidden, but you can log back in to cancel the deletion request.
- After the 30-day period, all your data is permanently erased and cannot be recovered. This is a crucial consideration for those who have invested heavily in building their visual design portfolio or extensive thematic collections on the platform.
- This option is best if you are certain you no longer wish to use Instagram, want to sever ties completely for privacy reasons, or plan a total migration of your digital photography to other platforms or your Tophinhanhdep.com galleries.
Choosing between deactivation and deletion depends entirely on your long-term goals for your digital presence and visual content management.
How to Permanently Delete Your Instagram Account
If you’ve decided to permanently remove your Instagram presence, perhaps to focus on new creative ideas or to manage your high-resolution images exclusively through Tophinhanhdep.com’s tools, follow these steps. Remember, this action is irreversible after the 30-day grace period.
Deleting via Mobile App (iOS/Android): The process for deleting your account has become more streamlined within the app.
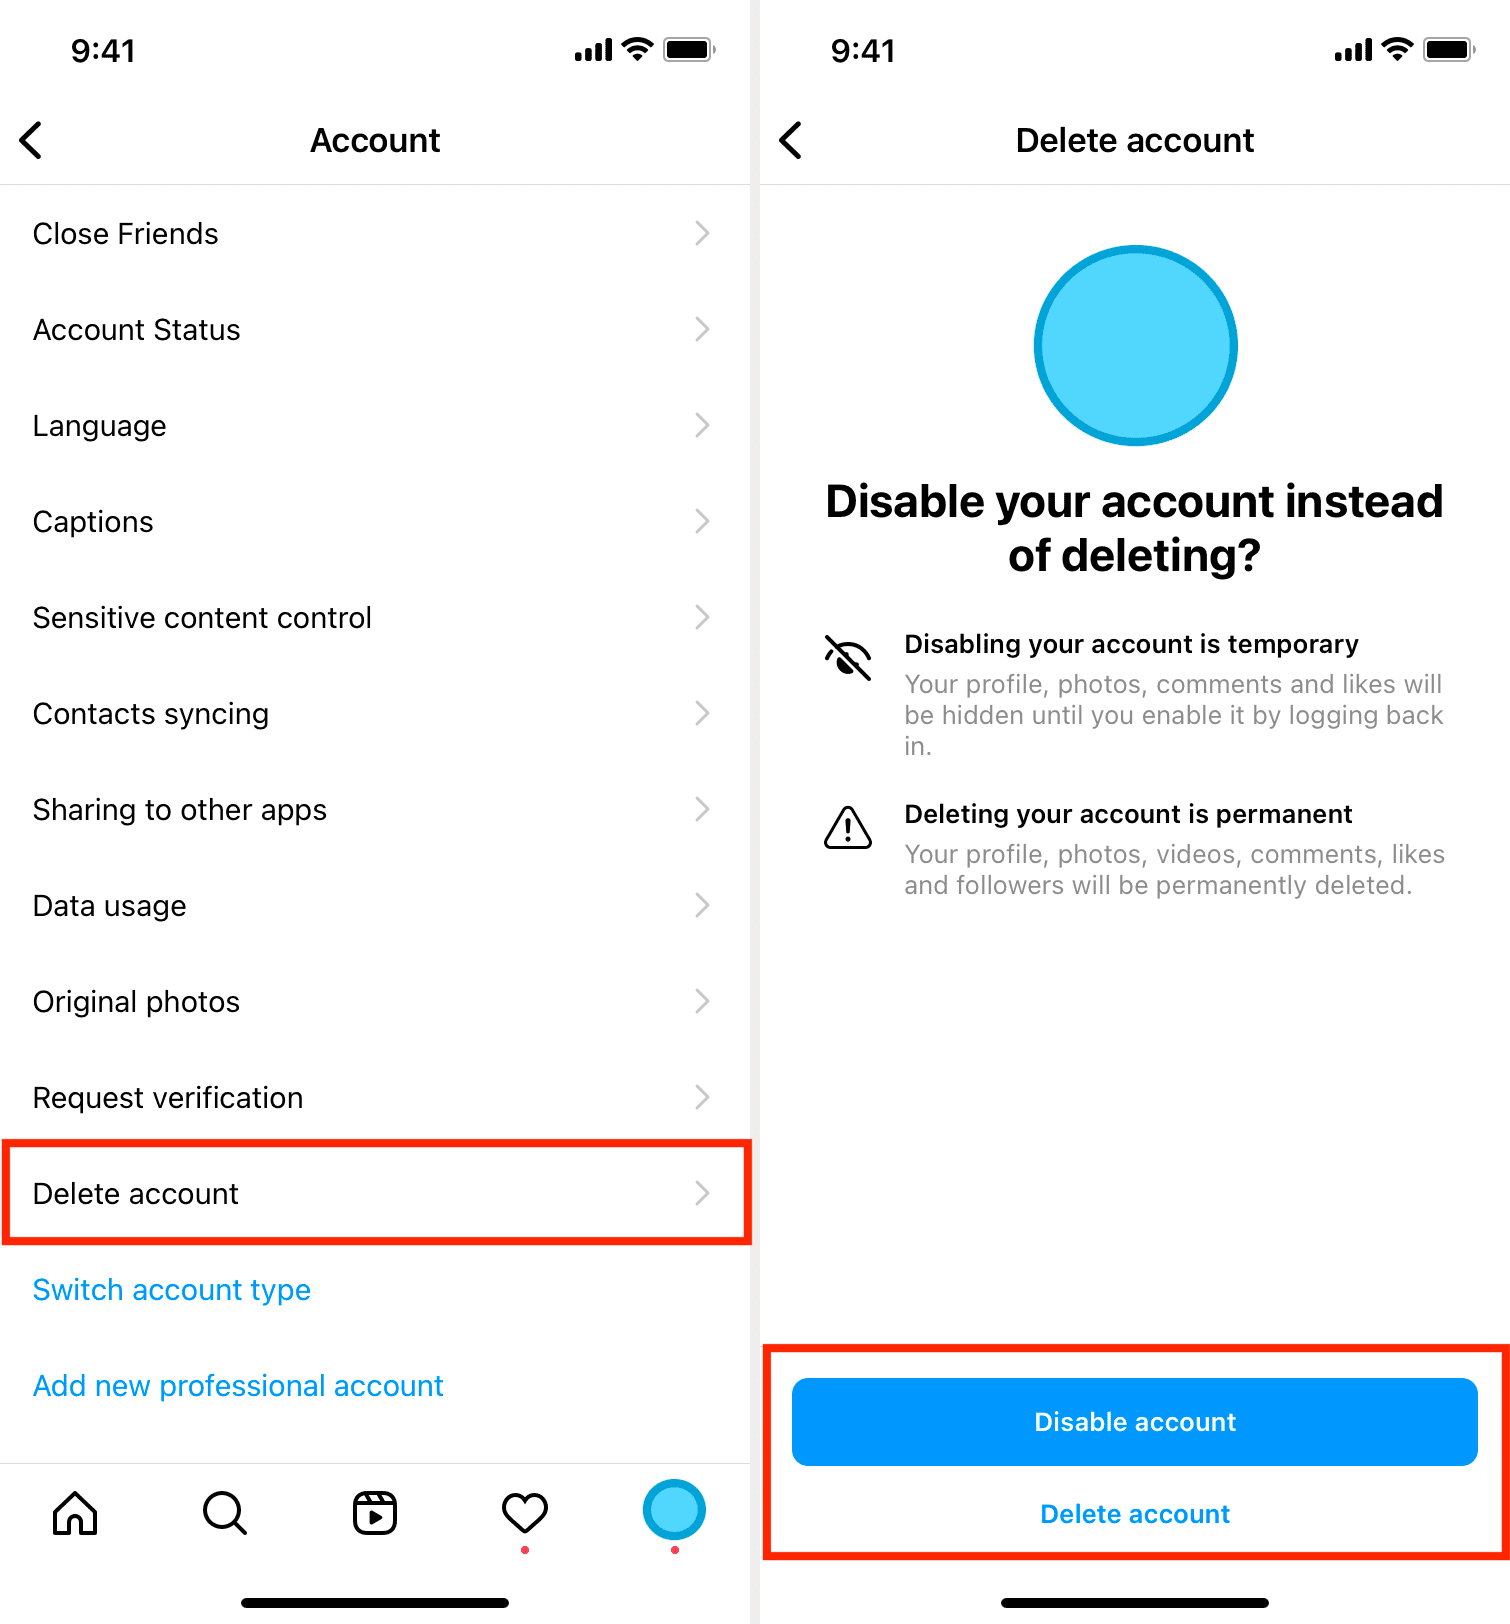
- Access Settings: Open the Instagram app. Tap on your Profile icon (bottom right). Then tap the Menu icon (three horizontal lines, top right) to open the side menu. Select Settings and privacy.
- Navigate to Accounts Center: Within “Settings and privacy,” find and tap on Accounts Center (usually at the very top, under “Meta”).
- Find Account Ownership: In Accounts Center, tap Personal details. Then, tap Account ownership and control.
- Select Deactivation or Deletion: Choose the Deactivation or deletion option.
- Choose Account and Action: Select the specific Instagram account you wish to delete (if you have multiple linked accounts). Then, select Delete account (it should be pre-selected or easily switchable from Deactivate). Tap Continue.
- Provide Reason and Confirm: Instagram will ask you to re-enter your password for security. After doing so, you’ll be prompted to choose a reason for leaving from a provided list. Select the most appropriate reason, then tap Continue. Finally, confirm your decision by tapping Delete account again.
Your account will now be scheduled for permanent deletion in 30 days. During this period, your profile will be hidden. If you log back in during these 30 days, the deletion request will be canceled, and your account will be reactivated.
Deleting via PC or Mac (Web Browser): For those who prefer a larger screen or find desktop navigation easier, you can also initiate account deletion through a web browser.
- Log In: Go to Instagram.com in your web browser and log into the account you wish to delete.
- Access Settings: Click the More icon (three horizontal lines, bottom left sidebar), then select Settings.
- Navigate to Accounts Center: In the Settings menu, click on Accounts Center.
- Find Account Ownership: Click Personal details on the left sidebar. Then, click Account ownership and control.
- Select Deactivation or Deletion: Click Deactivation or deletion.
- Choose Account and Action: Select your Instagram account. Choose Delete account, then click Continue.
- Provide Reason and Confirm: Enter your password, select a reason for deletion, then click Continue and finally Delete account to confirm.
Another direct route on desktop is to visit Instagram’s “Delete Your Account” page (you’ll need to be logged in first). This page typically presents a similar flow to the Accounts Center method, requiring you to select a reason and re-enter your password.
How to Temporarily Deactivate Your Instagram Account
If you’re seeking a temporary retreat, perhaps to gather new image inspiration or refine your digital art skills without losing your existing aesthetic backgrounds and high-resolution images, deactivating your account is the perfect solution.
Deactivating via Mobile App (iOS/Android):
- Access Settings: Open the Instagram app, tap your Profile icon, then the Menu icon (three horizontal lines). Select Settings and privacy.
- Navigate to Accounts Center: Tap Accounts Center (at the top).
- Find Account Ownership: Tap Personal details. Then, tap Account ownership and control.
- Select Deactivation or Deletion: Choose the Deactivation or deletion option.
- Choose Account and Action: Select the Instagram account you want to deactivate. Ensure Deactivate account is selected. Tap Continue.
- Provide Reason and Confirm: Re-enter your password for security. Instagram will ask you to select a reason for deactivating. Choose a reason, then tap Continue. Finally, confirm your decision by tapping Deactivate account.
Your account will now be hidden from all users. Your followers won’t see your posts, and your profile won’t appear in searches.
Deactivating via PC or Mac (Web Browser):
- Log In: Go to Instagram.com and log into your account.
- Access Settings: Click the More icon (bottom left), then select Settings.
- Navigate to Accounts Center: Click Accounts Center.
- Find Account Ownership: Click Personal details on the left. Then, click Account ownership and control.
- Select Deactivation or Deletion: Click Deactivation or deletion.
- Choose Account and Action: Select your Instagram account. Ensure Deactivate account is selected, then click Continue.
- Provide Reason and Confirm: Enter your password, select a reason for deactivating, then click Continue and finally Deactivate account to confirm.
Reactivating Your Instagram Account
Reactivating your Instagram account after a period of deactivation is incredibly simple and offers a seamless return to your curated visual space. Whether you’ve been working on new graphic design projects, developing fresh editing styles, or simply taking a break, your account will be exactly as you left it.
To reactivate your Instagram account: Simply log back into the Instagram app on your mobile device or through the Instagram website on your computer using your username and password. Once you successfully log in, your account will instantly be reactivated, and your profile, along with all your posts, followers, and interactions, will become visible again to other users. This means your high-resolution images, aesthetic backgrounds, and thematic collections will be back online for everyone to enjoy.
It’s crucial to remember that this straightforward reactivation process applies only to accounts that were deactivated. If you initiated a permanent deletion request, you must log back in within the 30-day grace period to cancel the deletion. If you miss this window, your account and all its content will be permanently removed and cannot be restored. Therefore, if you value your digital photography portfolio or visual design history on the platform, always be mindful of whether you choose temporary deactivation or permanent deletion.
Beyond Deletion: Proactive Strategies for a Pristine Instagram Feed
While knowing how to delete images on Instagram is an essential skill for any visual creator, true mastery of your digital presence comes from proactive content strategy. At Tophinhanhdep.com, we champion the creation of stunning, impactful visuals – from beautiful photography and aesthetic backgrounds to intricate digital art and high-resolution images. Our goal is to empower you to create content so compelling that the need for deletion becomes minimal.
Consider the role of Image Tools in your workflow. Before uploading, utilize Tophinhanhdep.com’s resources for:
- Compressors and Optimizers: Ensure your images load quickly without sacrificing the high resolution and clarity that define quality digital photography. Efficient file sizes reduce potential upload errors and enhance user experience.
- AI Upscalers: Transform older, lower-resolution images or personal photos into stunning high-resolution visuals, making them suitable for your curated feed of trending styles and thematic collections. This can breathe new life into existing content, eliminating the need to delete it due to pixelation.
- Editing Styles and Photo Manipulation: Explore our guides on advanced editing techniques. A well-edited image, perfected with the right filters and adjustments, is less likely to be deemed an “oopsie” that needs to be erased. Focus on developing a consistent editing style that aligns with your overall visual design and personal brand.
Furthermore, a strong foundation in Visual Design and leveraging Image Inspiration & Collections can significantly reduce the need for reactive deletion:
- Graphic Design Principles: Apply principles of composition, color theory, and visual hierarchy to every post. Thoughtful graphic design can elevate even simple backgrounds or abstract concepts into captivating visuals.
- Creative Ideas and Mood Boards: Plan your content using mood boards to ensure cohesion across your feed. By pre-visualizing your thematic collections and aligning them with current photo ideas or trending styles, you can avoid posting images that later feel out of place. This strategic planning prevents the fragmented visual storytelling that often leads to deletions.
- Quality Control: Always review your digital photography and generated images for quality (high resolution, sharp focus, correct exposure) before publishing. A quick check can prevent the headache of editing a carousel later.
In conclusion, the ability to delete images on Instagram provides vital flexibility for maintaining a dynamic and visually appealing online presence. However, by combining these reactive measures with proactive strategies – utilizing Tophinhanhdep.com’s innovative image tools for optimization and upscaling, adhering to strong visual design principles, and drawing from rich image inspiration and collections – you can cultivate an Instagram feed that consistently showcases your best work. This approach not only saves you time and effort in managing your content but also ensures that your platform remains a true reflection of your artistic vision and commitment to beautiful photography.