How to Determine the DPI of an Image

In the vast and vibrant world of digital imagery, where every pixel contributes to the aesthetic and informational value of a picture, understanding technical specifications like DPI (Dots Per Inch) is paramount. For creators, photographers, and enthusiasts alike, whether you’re curating breathtaking wallpapers, designing compelling graphic art, or preparing high-resolution stock photos for print, knowing an image’s DPI is a fundamental step. At Tophinhanhdep.com, a hub for stunning images, photography insights, and powerful image tools, we recognize the critical role DPI plays in achieving visual excellence. This comprehensive guide will walk you through the various methods of determining an image’s DPI, elucidating its importance, and showcasing how Tophinhanhdep.com empowers you to manage and enhance your visual assets effectively.
Understanding DPI: The Foundation of Image Quality on Tophinhanhdep.com
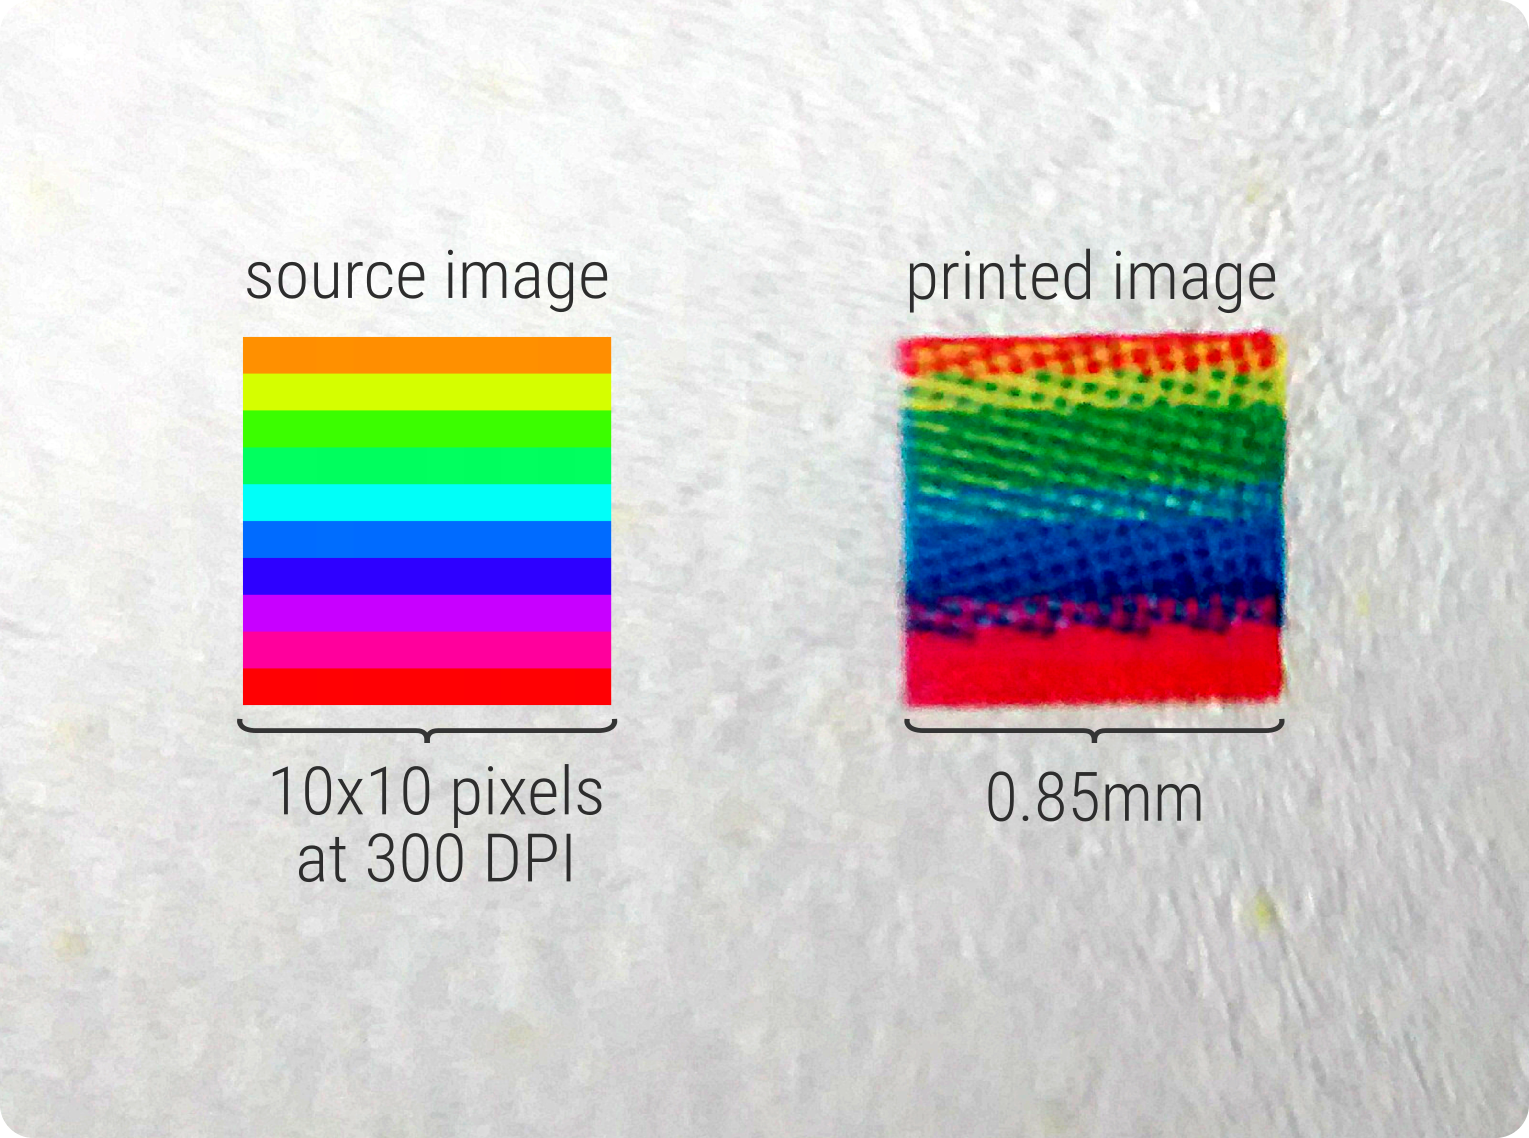
DPI, or Dots Per Inch, is a measurement of spatial dot density, specifically the number of individual dots that can be placed in a linear inch during printing. While often used interchangeably with PPI (Pixels Per Inch), especially in digital contexts, DPI technically refers to print resolution, while PPI describes the pixel density of a digital image on a screen. However, in common parlance, “DPI” is frequently used to discuss an image’s overall resolution and suitability for various applications, particularly printing. A higher DPI generally signifies a greater density of information, leading to a sharper, more detailed image, especially when printed.

Why DPI is Crucial for Your Visual Projects
The significance of an image’s DPI cannot be overstated, particularly for anyone involved in visual design, photography, or simply appreciating high-quality imagery. For users browsing Tophinhanhdep.com’s vast collections of nature, abstract, or beautiful photography, while screen resolution (PPI) primarily dictates digital display quality, the underlying DPI of the source file is crucial for its versatility.
Here’s why DPI matters across various Tophinhanhdep.com categories:
- For Printing Wallpapers and Backgrounds: If you download a stunning nature photograph or an aesthetic abstract image from Tophinhanhdep.com with the intention of printing it large-scale – perhaps as a wall art piece or a custom background for a physical display – a high DPI is essential. A low-DPI image, when enlarged for print, will appear pixelated, blurry, and lack detail, ruining the intended visual impact. We recommend a minimum of 300 DPI for high-quality prints.
- For Professional Photography and Stock Photos: Photographers uploading their high-resolution work to platforms like Tophinhanhdep.com for stock photo collections need to ensure their images meet industry standards. Clients often require specific DPI values for various publications, brochures, or marketing materials. Knowing and maintaining appropriate DPI ensures your beautiful photography is always print-ready and marketable.
- For Visual Design and Graphic Art: Graphic designers and digital artists utilizing images for creative projects, photo manipulation, or branding need to integrate visuals seamlessly. A consistent and adequate DPI across all elements prevents resolution mismatches and ensures the final design output, whether digital or print, maintains a professional appearance. For instance, when creating a mood board with trending styles, the quality of each image, influenced by its DPI, contributes to the overall coherence and impact.
- For Image Tools and Optimization: Tophinhanhdep.com offers image tools like compressors and optimizers. While these tools often focus on file size and web loading speed, understanding DPI helps users make informed decisions. An image optimized for the web might have a lower effective DPI (or PPI) because screens don’t require the same density as print, but the original high-DPI file is preserved for other uses. Our AI Upscalers, on the other hand, actively work to enhance perceived detail, which can be critical for images starting with lower DPI.
In essence, determining DPI is not just a technicality; it’s a gateway to unlocking the full potential of your images, ensuring they look their best across all mediums.
DPI vs. PPI: A Quick Clarification for Digital Artists
While often used interchangeably, especially outside of professional print circles, it’s worth briefly distinguishing between DPI (Dots Per Inch) and PPI (Pixels Per Inch) for clarity, particularly for those engaged in digital art and photography on Tophinhanhdep.com.
- PPI (Pixels Per Inch): This refers to the density of pixels in a digital image displayed on a screen. It’s an attribute of the image file itself. A digital image has a fixed number of pixels (e.g., 1920x1080 pixels). When you assign a PPI value to that image, you are telling software (like a photo editor or a printer driver) how large to render those pixels per inch. For instance, a 1920x1080 image at 72 PPI will appear larger on screen than the same image at 300 PPI, because the software is attempting to make fewer pixels occupy a larger physical space. For web images and digital displays, 72 PPI or 96 PPI is common, as most screens display at this density.
- DPI (Dots Per Inch): This is a characteristic of a printer’s output. It describes how many ink dots a printer can place within one linear inch. The more dots a printer can lay down, the finer the detail and smoother the gradients in the printed output. Printers often use multiple dots of ink to create a single pixel’s color, so a printer’s DPI (e.g., 1200 DPI) is usually much higher than an image’s PPI (e.g., 300 PPI) to achieve high-quality prints.
When you’re checking “DPI” of a digital image, you’re almost always looking at its assigned PPI value, which then influences how it’s treated by printers or other software. For practical purposes, especially when considering print quality, the term “DPI” is widely accepted and understood to refer to this pixel density. At Tophinhanhdep.com, we use the term “DPI” in this common context, emphasizing its role in achieving high-quality print results from your beautiful digital assets.
Practical Methods for Checking Image DPI on Windows
For Windows users engaging with images from Tophinhanhdep.com, there are several straightforward ways to ascertain the DPI of your files. These methods are built into the operating system and require no additional software, making them quick and accessible for everyone from casual users downloading aesthetic backgrounds to professional photographers managing high-resolution assets.
Using the Image Properties Menu
This is arguably the simplest and most common method for checking an image’s DPI on a Windows computer. It’s ideal for a quick check on any image file you’ve acquired, perhaps a stunning abstract image or a captivating piece of digital art from Tophinhanhdep.com.
- Navigate to the Image: Open your File Explorer (you can do this by clicking the folder icon on your taskbar or pressing
Windows key + E). Browse to the folder where your image file is stored. - Right-Click and Select Properties: Locate the image file you wish to inspect. Right-click on it to bring up the context menu. From this menu, click on “Properties” – usually the last option at the bottom.
- Access the Details Tab: A new “Properties” window will appear. At the top of this window, you’ll see several tabs. Click on the “Details” tab. This tab provides a wealth of metadata about the file, including its dimensions and resolution.
- View the Resolution Information: Scroll down within the “Details” tab until you find the “Image” section. Here, you will see “Horizontal resolution” and “Vertical resolution.” The values displayed next to these headers are your image’s DPI (or more accurately, its PPI). For instance, if you see “300 dpi,” that’s your image’s resolution.
This method gives you immediate access to the resolution data, which is crucial if you’re evaluating if a downloaded wallpaper from Tophinhanhdep.com is suitable for a large print, or if a stock photo meets specific submission requirements.
Customizing File Explorer Columns for Quick Access
If you frequently work with numerous images, such as managing large collections of high-resolution photography or sorting through thematic collections from Tophinhanhdep.com, repeatedly opening the Properties menu for each file can be cumbersome. Windows File Explorer offers a convenient way to display DPI directly as a column, allowing for quick comparisons and sorting.
- Open File Explorer and Navigate: As before, open File Explorer and go to the folder containing your images.
- Switch to Details View: In the File Explorer window, look for the “View” tab at the top. Click it, then select “Details” from the “Layout” section. This will display your files in a list format with various columns.
- Add Resolution Columns: Right-click on any of the existing column headers (e.g., “Name,” “Date modified,” “Type”). A context menu will appear. Click on “More…” at the very bottom.
- Select “Horizontal resolution” and “Vertical resolution”: The “Choose Details” window will pop up. Scroll through the list until you find “Horizontal resolution” and “Vertical resolution.” Check the boxes next to both of these options.
- Confirm and View: Click “OK.” The File Explorer window will now feature two new columns displaying the DPI for each image file in that folder. You can even click these column headers to sort your images by resolution, making it easy to identify your highest-quality visuals from Tophinhanhdep.com.
This customization is incredibly useful for photographers and visual designers who need to quickly assess the print readiness of multiple images, ensuring their beautiful photography or digital art meets specific resolution demands without individual checks.
Discovering DPI with Microsoft Paint
Microsoft Paint, a staple application on Windows, provides another simple way to check an image’s DPI. While not an advanced image editing tool, it’s readily available and straightforward for a quick DPI check, especially for aesthetic images or backgrounds that might be less complex.
- Locate the Image File: Find the image file on your computer using File Explorer.
- Open with Paint: Right-click on the image file. Hover your mouse over the “Open with” option, and then click “Paint” from the list of applications. If Paint isn’t immediately visible, you might need to select “Choose another app” and then find it. The image will then open within the Paint application.
- Access Image Properties: Once the image is open in Paint, click on the “File” tab located at the top-left corner of the Paint window. From the dropdown menu, select “Properties” (it usually has a small document icon next to it).
- Find the Resolution: A new “Image Properties” window will appear. Within this window, you’ll see a “Resolution” section. The value displayed there, such as “96 dpi” or “300 dpi,” indicates your image’s DPI.
This method is convenient for a quick assessment and can be particularly helpful for checking images that might not be destined for large-scale printing but where a basic understanding of their resolution is still desired. While Paint doesn’t offer the extensive features of Tophinhanhdep.com’s AI Upscalers or professional image editing software, it’s a solid, built-in option for a basic DPI check.
Checking DPI on macOS: The Preview Application
For users on macOS, determining an image’s DPI is equally straightforward, primarily thanks to the versatile “Preview” application, which comes pre-installed on every Mac. Preview is an excellent tool not just for viewing images but also for accessing their detailed information, including DPI, making it perfect for checking aesthetic images, nature photography, or any visual content downloaded from Tophinhanhdep.com.
-
Navigate to and Open the Image:
- Use Finder (the smiley face icon in your Dock) to locate the image file you want to check.
- Once you’ve found it, you can open it in Preview in a few ways:
- Double-click the image file (Preview is the default image viewer for most image types on macOS).
- Right-click (or Control-click) the image file, select “Open With,” and then choose “Preview.” The image will now be displayed in the Preview application.
-
Access the Tools Menu:
- With the image open in Preview, look at the menu bar at the very top of your screen.
- Click on the “Tools” menu. This menu contains various options for manipulating and inspecting the image.
-
Select “Show Inspector”:
- From the “Tools” dropdown menu, select “Show Inspector” (you can also use the keyboard shortcut
Command (⌘) + I). - This action will open a new, small panel, often referred to as the “Inspector” or “Information” window.
- From the “Tools” dropdown menu, select “Show Inspector” (you can also use the keyboard shortcut
-
Find the Image DPI:
- Within the Inspector window, you’ll see several tabs. Click on the “i” (Information) tab, which often looks like a circle with a lowercase “i” inside.
- In this tab, you’ll find detailed information about the image. Look for the section titled “Image DPI.” The value displayed here (e.g., “72 DPI,” “300 DPI”) is the resolution of your image. You’ll also typically see the image dimensions in pixels here, providing a complete picture of its inherent size and quality.
Preview’s Inspector is a powerful and user-friendly feature for Mac users, allowing for quick verification of DPI for all types of images, from sad/emotional photography to abstract art, ensuring they meet the necessary quality standards for both digital display and potential printing projects. This integrated approach aligns with Tophinhanhdep.com’s goal of providing comprehensive resources for managing visual content effectively.
Advanced DPI Analysis and Enhancement with Tophinhanhdep.com’s Tools
While system-level tools like Windows Properties, File Explorer, Paint, and macOS Preview are excellent for checking DPI, Tophinhanhdep.com recognizes that many users require more sophisticated capabilities – not just to see DPI, but to manipulate and enhance it. This is where specialized image tools and professional software come into play, offering granular control over resolution, crucial for high-stakes visual design projects, detailed photo manipulation, or preparing digital art for large-format printing.
Utilizing Professional Image Editing Software
For those deeply involved in photography, graphic design, and digital art, dedicated image editing software offers the most comprehensive control over an image’s DPI. While Tophinhanhdep.com encourages the use of its own powerful suite of online image tools, understanding the general functionality of such desktop applications is beneficial.
Such software typically allows you to:
- Open the Image: Load your image, perhaps a high-resolution piece of beautiful photography or a complex digital art creation from Tophinhanhdep.com, into the program.
- Access Image Size/Resolution Settings: Navigate to the “Image” menu and select “Image Size” (or a similar option like “Scale Image”).
- View and Adjust Resolution: Within this dialog box, you’ll find the image’s current resolution, usually labeled as “Resolution” or “DPI/PPI,” along with its dimensions in pixels, inches, or centimeters. Crucially, you can also modify this value.
- Changing DPI Without Resampling: If you simply change the DPI without “resampling” the image, you’re telling the software to print the existing pixels at a different density. The total number of pixels in the image remains the same, but its physical print size changes. A 1000-pixel wide image at 100 DPI prints at 10 inches; at 200 DPI, it prints at 5 inches.
- Changing DPI With Resampling: If you enable “resampling,” the software will either add (upsample) or remove (downsample) pixels to achieve the new resolution and desired physical dimensions. Upsampling, while increasing DPI, often leads to a loss of sharpness and can introduce artifacts, as the software is essentially guessing new pixel data. This is where advanced tools like Tophinhanhdep.com’s AI Upscalers shine.
Tophinhanhdep.com supports users in every aspect of their creative journey, whether they are using sophisticated desktop software for detailed editing or our accessible online tools for quick enhancements.
Enhancing Resolution with Tophinhanhdep.com’s AI Upscalers
One of the standout offerings at Tophinhanhdep.com in the “Image Tools” category is our suite of AI Upscalers. These tools are specifically designed to address the challenges associated with low-DPI images or those that need to be enlarged without sacrificing quality. Traditional upsampling methods often result in blurry, pixelated, or artificial-looking images because they simply interpolate pixel data. Our AI Upscalers go far beyond this.
How Tophinhanhdep.com’s AI Upscalers work:
- Intelligent Pixel Generation: Instead of simple interpolation, our AI algorithms analyze the image content – recognizing patterns, textures, and edges. They then intelligently generate new pixels that are consistent with the image’s original detail, effectively “filling in” missing information in a much more sophisticated way.
- Preserving and Enhancing Detail: This process results in images that not only have a higher pixel count (and thus can be assigned a higher effective DPI for printing) but also retain and often enhance fine details, sharpness, and clarity. This is invaluable for:
- Vintage Photography Restoration: Breathing new life into old, low-resolution photographs.
- Small Web Images for Print: Preparing aesthetic images or backgrounds initially designed for screens to be printed at larger sizes.
- Zooming into High-Resolution Photography: Enabling deeper dives into digital photography without losing integrity.
- Improving Visual Design Assets: Ensuring all elements in a graphic design project are consistently high quality.
By leveraging Tophinhanhdep.com’s AI Upscalers, users can overcome the limitations of initially low-DPI images, transforming them into high-resolution assets suitable for virtually any application. This tool is a game-changer for anyone looking to maximize the quality and versatility of their image collections, from beautiful nature shots to intricate abstract art.
Beyond AI Upscalers, Tophinhanhdep.com also offers other “Image Tools” like Converters (for changing image formats, which can sometimes impact how DPI is handled or embedded), Compressors (for reducing file size while maintaining visual quality, especially for web use), and Optimizers (for fine-tuning images for specific platforms or purposes). These tools collectively empower users to manage their image assets comprehensively, ensuring optimal quality and performance regardless of the target medium or desired aesthetic.
DPI Best Practices for Printing and Digital Design
Understanding how to determine an image’s DPI is just the first step. The true value lies in applying this knowledge to ensure your visual projects – whether they are stunning prints, captivating web elements, or intricate digital art – achieve their intended impact. At Tophinhanhdep.com, we champion the creation and utilization of high-quality images, and adhering to DPI best practices is fundamental to this mission.
Optimal DPI for Stunning Prints
When it comes to printing, the DPI requirement is significantly higher than for digital display. The goal is to avoid visible pixelation and achieve smooth, continuous tones and sharp details.
- Standard High-Quality Prints (Photos, Magazines, Brochures): For most professional-quality prints, a resolution of 300 DPI is considered the industry standard. At this density, individual dots of ink are virtually indistinguishable to the naked eye, resulting in crisp text, sharp images, and vibrant colors. This is especially crucial for “beautiful photography” and “high resolution” stock photos from Tophinhanhdep.com that are intended for portfolios, fine art prints, or advertising materials.
- Large Format Prints (Posters, Billboards): Counter-intuitively, very large prints, like posters, banners, or billboards, sometimes require a lower DPI. This is because they are viewed from a greater distance. For example, a billboard might only need 20-50 DPI, while a large poster might be acceptable at 150-200 DPI. However, for “wallpapers” printed for close viewing, maintaining 300 DPI (or as high as possible) ensures maximum impact.
- Specialty Prints (Glossy, Fine Art): For prints on glossy paper or high-end fine art materials where detail is paramount, some professionals might opt for 600 DPI or even higher, depending on the printer’s capability and the desired level of detail. Tophinhanhdep.com recommends assessing your specific printing needs and printer capabilities to determine the ideal DPI.
Practical Tip: Always check the printer’s specifications or consult with your print shop. They can provide precise DPI recommendations for their equipment and your chosen paper type. Starting with a high-resolution image from Tophinhanhdep.com (e.g., a “high resolution” nature shot) gives you the flexibility to meet various print demands.
DPI Considerations for Web and Digital Art
While DPI is primarily a print metric, its digital counterpart, PPI (Pixels Per Inch), is still relevant for how images are prepared and interpreted across digital platforms. For “backgrounds,” “aesthetic” images, and “digital art” curated on Tophinhanhdep.com for online viewing, the focus shifts from dot density to pixel dimensions and file size.
- Web and Screen Display: For images displayed exclusively on screens (websites, social media, digital presentations), the actual DPI value assigned to the file has little impact on how sharp or large it appears. What truly matters are the pixel dimensions (e.g., 1920x1080 pixels). Most screens display images effectively at 72 PPI or 96 PPI. Uploading a 300 DPI image to a website won’t make it look sharper than a 72 DPI image of the same pixel dimensions; it will only result in a larger file size, leading to slower loading times. Tophinhanhdep.com’s “Compressors” and “Optimizers” are perfect for preparing images for web use, reducing file size while maintaining visual quality.
- Digital Art and Photo Manipulation: When creating “digital art” or performing “photo manipulation,” the canvas resolution (PPI) chosen at the outset is critical. A higher initial PPI (e.g., 300 PPI) allows for greater detail and flexibility if the artwork is ever intended for print. It also provides more room for cropping and resizing without immediate pixelation. Even if the final output is digital, starting with a higher resolution gives you a “future-proof” master file.
- Image Inspiration & Collections (Mood Boards, Trending Styles): When gathering images for “mood boards” or “thematic collections” from Tophinhanhdep.com, consider the source quality. While low-res images might suffice for inspiration, high-resolution source images offer more versatility if you decide to incorporate them into a larger project. Our “Image Tools” can help you identify higher-quality alternatives or improve existing ones.
By understanding these nuances, users of Tophinhanhdep.com can strategically prepare their images. Whether you’re displaying stunning “abstract” art online, archiving “sad/emotional” photography, or designing promotional materials, mastering DPI and its digital implications ensures your visuals always communicate quality and professionalism.
Conclusion
The ability to determine an image’s DPI is an indispensable skill in today’s visually-driven world. It serves as a cornerstone for anyone creating, sharing, or consuming digital imagery, profoundly impacting everything from the clarity of a printed wallpaper to the intricate details of professional photography. As a leading resource for “Images,” “Photography,” “Image Tools,” “Visual Design,” and “Image Inspiration & Collections,” Tophinhanhdep.com is committed to empowering its users with the knowledge and resources to achieve unparalleled visual excellence.
Whether you rely on the built-in functionalities of Windows or macOS, delve into advanced professional editing suites, or leverage the cutting-edge capabilities of Tophinhanhdep.com’s AI Upscalers, understanding DPI opens up a world of creative possibilities. It ensures that your “high resolution” stock photos are always print-ready, your “digital art” maintains its integrity across mediums, and your curated “thematic collections” from Tophinhanhdep.com consistently radiate quality.
By mastering the methods outlined in this guide and utilizing the comprehensive “Image Tools” available on Tophinhanhdep.com, you are well-equipped to manage, optimize, and enhance your visual assets with confidence. Dive into Tophinhanhdep.com’s vast reservoir of “wallpapers,” “backgrounds,” “aesthetic” imagery, “nature” photographs, and “abstract” art, assured that you have the expertise to make every dot and pixel count in your journey towards visual mastery.