How to Precisely Determine the DPI of Your Digital Images

In the vast and vibrant world of digital imagery, where every pixel contributes to the aesthetic and functional integrity of a visual, understanding key metrics like DPI (Dots Per Inch) is paramount. Whether you’re a professional photographer curating a high-resolution stock photo collection, a graphic designer crafting stunning digital art, or simply an enthusiast seeking the perfect wallpaper or background for your device, the DPI of an image directly influences its quality, print readiness, and overall visual impact. At Tophinhanhdep.com, we specialize in providing an extensive array of beautiful photography, abstract art, nature scenes, and aesthetic visuals, all while equipping our users with the knowledge and tools to manage their images effectively. This comprehensive guide will demystify DPI, explain its significance, and walk you through various methods to accurately determine the DPI of your digital images across different operating systems and applications.

Understanding Dots Per Inch (DPI): The Cornerstone of Image Resolution
Before delving into the practical methods of checking an image’s DPI, it’s essential to grasp what DPI truly represents and why it holds such importance in the realm of visual media. DPI is a measurement standard primarily used to describe the resolution of a physical image when printed. It quantifies the number of individual ink dots that a printer places within a linear inch of paper. The higher the DPI value, the more dots are packed into each inch, resulting in a finer detail, smoother gradients, and ultimately, a higher-quality printed output.
For digital images displayed on screens, a related but distinct term, PPI (Pixels Per Inch), is often used. While DPI refers to print resolution, PPI refers to the density of pixels on a digital screen. However, in common parlance and within the context of many image editing software, “DPI” is frequently used interchangeably with “PPI” to broadly describe the resolution or quality metric of an image file itself, especially when discussing its suitability for printing. A higher DPI (or PPI) generally indicates a richer, more detailed image, which is a hallmark of the high-resolution photography and digital art available on Tophinhanhdep.com.
DPI vs. PPI: Clarifying the Terminology
While often used interchangeably, understanding the subtle difference between DPI and PPI is beneficial for anyone involved in visual design and digital photography.
DPI (Dots Per Inch): This metric is strictly relevant to physical printing. It’s a hardware-dependent value that dictates how many ink dots a printer can lay down per inch. For instance, a high-quality photo printer might operate at 1440 DPI, meaning it can place 1440 dots of ink in a one-inch line. The image file itself doesn’t have a “DPI” in the same way; rather, the image has a pixel dimension (e.g., 3000x2000 pixels) and an embedded resolution value (often expressed in PPI) that tells software how many of those pixels should occupy an inch when printed.
PPI (Pixels Per Inch): This refers to the density of pixels within a digital image’s data. An image might be specified as 300 PPI, meaning that for every inch of physical space it occupies when printed, 300 of its pixels should be rendered. On a screen, PPI describes the pixel density of the display itself (e.g., a Retina display has a very high PPI). When you view a wallpaper or background from Tophinhanhdep.com, its quality on your screen is largely determined by its pixel dimensions relative to your screen’s PPI.
For the purpose of this article, and consistent with how many applications present this information, we will largely use “DPI” to refer to the resolution value embedded within an image file, understanding its direct impact on print quality and its broader implication for overall image detail.
Why DPI is Crucial for High-Quality Visuals
The significance of DPI extends across various applications and directly impacts the perceived quality of an image:
- For Printing: This is where DPI’s role is most direct. A low-DPI image (e.g., 72 DPI, common for web images) printed at a large size will appear pixelated and blurry. Conversely, a high-DPI image (e.g., 300 DPI for standard photo prints, or 600 DPI for fine art prints) ensures sharp details and vibrant colors, which is essential for showcasing beautiful photography or intricate digital art from Tophinhanhdep.com.
- For Visual Design and Graphic Design: Designers constantly work with images destined for various outputs. Knowing an image’s DPI helps them select appropriate stock photos, ensure logos and graphics scale correctly, and prepare files for print media like brochures, posters, or even large-format displays without compromising quality.
- For Digital Photography and Editing Styles: Photographers aiming for high-resolution output need to monitor DPI from capture to final edit. Understanding DPI helps in cropping, resizing, and applying editing styles without degrading the image quality. When images are prepared for Tophinhanhdep.com, special attention is paid to ensuring they maintain optimal DPI for various uses.
- For Web Content and Wallpapers: While web images are typically optimized for lower DPI (e.g., 72-96 DPI) to ensure fast loading times, the underlying pixel dimensions of a high-resolution image contribute to its versatility. Users downloading wallpapers or backgrounds from Tophinhanhdep.com benefit from images with generous pixel dimensions, allowing them to scale well across different screen sizes, even if their effective “DPI” on screen varies.
Now that we understand the foundational concepts, let’s explore how you can practically determine the DPI of your images.
Practical Methods for Checking DPI on Windows Systems
Windows operating systems offer several straightforward ways to inspect the DPI (or more accurately, the embedded PPI) of your image files without needing specialized software. These methods are quick and accessible for anyone working with images on a Windows 10 or Windows 11 computer.
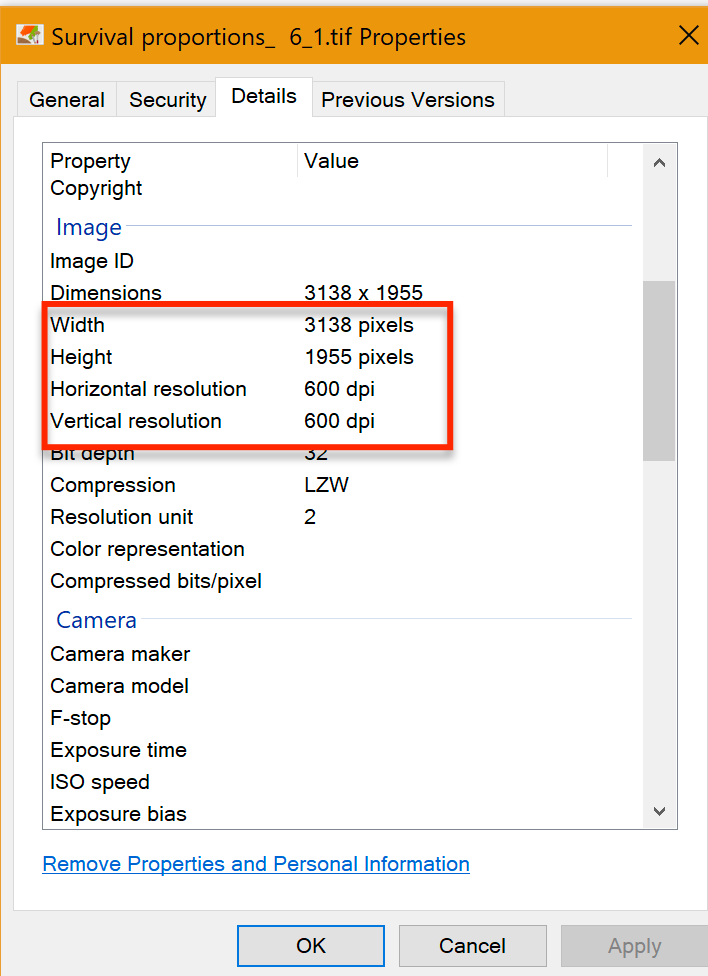
Method 1: The Image Properties Window
This is perhaps the most common and simplest way to find an image’s resolution details on Windows.
- Locate Your Image: Open File Explorer and navigate to the folder where the image file is stored.
- Access Properties: Right-click on the image file you wish to check. From the context menu that appears, select “Properties” (usually the last option).
- Navigate to Details Tab: In the “Properties” window, you’ll see several tabs at the top. Click on the “Details” tab.
- View Resolution Information: Scroll down the “Details” tab until you find the “Image” section. Here, you will see “Horizontal Resolution” and “Vertical Resolution” listed. The values displayed next to these are the DPI (or PPI) of your image. For example, “300 dpi” or “96 dpi”.
This method provides a quick snapshot of the image’s resolution and is ideal for individual checks.
Method 2: Customizing File Explorer Details
For users who frequently work with multiple image files and need to see their DPI information at a glance, customizing File Explorer’s column headers can be a significant time-saver.
- Open File Explorer and Navigate: Press
Windows Key + Eto open File Explorer. Go to the folder containing your image files. - Switch to Details View: In the File Explorer ribbon at the top, click on the “View” tab. Then, select “Details” from the “Layout” section. This will display your files in a list format with columns for various attributes.
- Add Resolution Columns: Right-click on any of the existing column headers (e.g., “Name,” “Date modified,” “Type”). From the context menu, select “More…”.
- Choose Details: A “Choose Details” pop-up window will appear. Scroll through the extensive list of available attributes and find “Horizontal resolution” and “Vertical resolution.” Check the boxes next to both of these options.
- Apply Changes: Click “OK” to save your selection.
- View DPI in Columns: You will now see two new columns in your File Explorer displaying the horizontal and vertical DPI values for all images in that folder. You can even sort your images by these values to quickly find high-resolution assets for your next visual design project or a high-quality background from Tophinhanhdep.com.
Method 3: Utilizing Microsoft Paint
Microsoft Paint, the default image editor pre-installed with Windows, also offers a simple way to check an image’s resolution.
- Open with Paint: Locate the image file in File Explorer. Right-click on it, hover over “Open with,” and then select “Paint.”
- Access Image Properties in Paint: Once the image is open in Paint, click on the “File” tab in the top-left corner of the window.
- View Resolution: From the “File” menu, select “Properties.” A new “Image Properties” window will pop up, displaying information including the image’s “Resolution” in DPI. This is a reliable way to confirm the embedded DPI value.
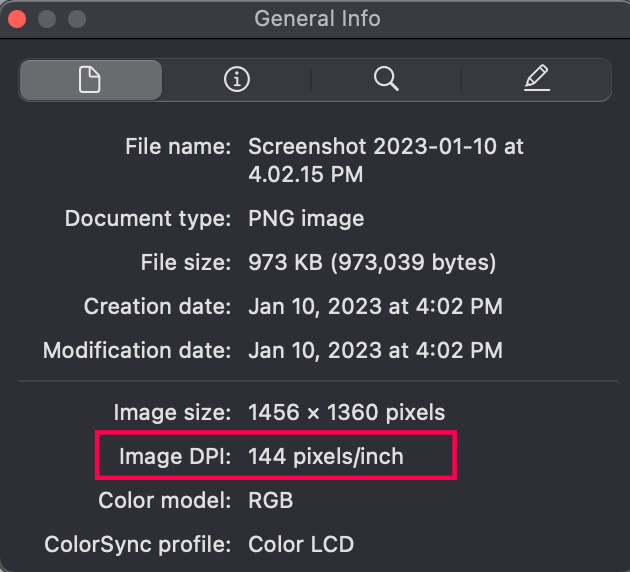
Discovering DPI on macOS: The Preview Application
Mac users also have an integrated and user-friendly tool for checking image DPI: the Preview application. Preview is macOS’s default image and PDF viewer, and it provides detailed information about your files.
- Locate Your Image: Open Finder and navigate to the image file whose DPI you want to check.
- Open with Preview: Right-click (or Control-click) on the image file. Select “Open With,” and then choose “Preview.” The image will open in the Preview application.
- Access the Inspector: In the menu bar at the top of your screen, click on “Tools.” From the dropdown menu, select “Show Inspector” (or simply press
Command + I). - Find Image DPI: The Inspector panel will appear, providing various details about your image. Look for the “Image DPI” field. This will display the resolution of your image in dots per inch.
This method is quick, efficient, and doesn’t require any third-party software, making it perfect for photographers and designers working with Mac devices to prepare images for Tophinhanhdep.com or other platforms.
Advanced DPI Inspection with Professional Image Editing Software
For those deeply involved in digital photography, graphic design, and photo manipulation, professional image editing software offers more comprehensive ways to not only check DPI but also understand its implications and even modify it. These tools are indispensable for creating high-resolution, pixel-perfect images, including the stunning visuals you find on Tophinhanhdep.com.
Adobe Photoshop: The Industry Standard
Adobe Photoshop is widely considered the industry standard for image editing, offering unparalleled control over every aspect of an image, including its resolution.
- Open Image in Photoshop: Launch Adobe Photoshop and open the image file you wish to inspect (File > Open).
- Access Image Size: Once the image is open, go to the “Image” menu in the top toolbar. From the dropdown, select “Image Size…” (or use the shortcut
Alt + Ctrl + Ion Windows, orOption + Command + Ion Mac). - View and Adjust Resolution: The “Image Size” dialog box will appear. In the “Document Size” section, you’ll find a field labeled “Resolution.” Make sure the adjacent dropdown menu is set to “Pixels/Inch.” The value displayed here is your image’s PPI, which directly corresponds to its effective DPI for printing.
Photoshop not only shows you the DPI but also allows you to understand the relationship between pixel dimensions, physical dimensions, and resolution. You can easily resample the image to change its DPI, or simply adjust the resolution without resampling if you only need to change its embedded print size. This level of detail is crucial for professional users who might be creating digital art, fine-tuning stock photos, or manipulating images for specific print outputs.
GIMP: A Powerful Open-Source Alternative
GIMP (GNU Image Manipulation Program) is a free and open-source alternative to Photoshop, offering a robust set of features for image editing and graphic design. It’s an excellent choice for users who need advanced capabilities without the subscription cost.
- Open Image in GIMP: Launch GIMP and open your image file (File > Open).
- Access Scale Image Dialog: In the top menu bar, click on the “Image” tab. From the dropdown, select “Scale Image…”.
- Inspect X/Y Resolution: The “Scale Image” dialog box will open. Here, you’ll see fields for “X resolution” and “Y resolution.” Ensure the unit dropdown menu next to these fields is set to “pixels/in” (pixels per inch). The values displayed are the image’s PPI, serving as its DPI.
Similar to Photoshop, GIMP allows you to scale the image and adjust its resolution, providing flexibility for various visual design and photography needs. This makes it a valuable tool for anyone managing images, whether for aesthetic collections or professional use.
Beyond Checking: Optimizing DPI for Your Projects with Tophinhanhdep.com Tools
Knowing an image’s DPI is merely the first step. The true power lies in understanding how to optimize it for your specific needs. At Tophinhanhdep.com, we understand that our users look for versatile images, and we also provide a suite of Image Tools (Converters, Compressors, Optimizers, AI Upscalers, Image-to-Text) to help you manage and enhance your visuals efficiently.
Achieving Optimal Print Quality
For any image destined for print – whether it’s a cherished family photo, a piece of digital art for a gallery, or a professional brochure – DPI is critical.
- Standard Photo Prints: Aim for at least 300 DPI. This density ensures that your printed images are sharp, detailed, and professional-looking. Many of the beautiful photography and nature images on Tophinhanhdep.com are perfect candidates for high-quality prints.
- Large Format Prints: For very large prints (like billboards or banners) viewed from a distance, a lower DPI (e.g., 150-200 DPI) might suffice, as the human eye won’t discern individual dots from afar.
- Fine Art and High-End Publications: For the absolute best quality, such as in art books or museum-quality prints, 600 DPI or even higher is often recommended.
If you find an image has a low DPI but you need it for high-quality printing, simply changing the DPI value in software like Photoshop or GIMP without increasing the pixel dimensions (resampling) will only reduce its physical print size. To truly improve print quality, you often need more pixel data. This is where Tophinhanhdep.com’s AI Upscalers can be revolutionary, intelligently adding detail and increasing pixel dimensions to boost effective DPI for printing without significant loss of quality.
Enhancing Digital Display and Web Performance
While DPI is less directly relevant for screen display (where PPI matters more for the device), the pixel dimensions of an image dictate its quality on various screens and its performance on the web.
- Web Optimization: For websites, images are often downscaled to 72-96 DPI with appropriate pixel dimensions to ensure fast loading times. Tophinhanhdep.com’s Compressors and Optimizers can help you reduce file size while maintaining visual quality for web-ready images, ensuring that your aesthetic and abstract backgrounds load quickly.
- High-Resolution Displays: For wallpapers and backgrounds on 4K or 5K monitors, having images with very high pixel dimensions is key, even if the “DPI” displayed on screen is lower than print standards. This allows the image to fill the screen crisply. Our collection of high-resolution images is ideal for this purpose.
Leveraging Tophinhanhdep.com’s Image Tools for DPI Adjustments
Tophinhanhdep.com isn’t just a repository of stunning visuals; it’s also a hub for powerful image management tools designed to meet your diverse needs.
- AI Upscalers: If you have an image with low DPI or small pixel dimensions that you want to use for a larger print or a high-resolution display, our AI Upscalers can intelligently increase its resolution, adding details that traditional resizing cannot. This is perfect for transforming a standard image into a high-resolution masterpiece for your digital art or photography projects.
- Image Converters: Easily convert image formats to suit specific requirements, which can sometimes impact how DPI information is handled or displayed.
- Image Compressors and Optimizers: For web use, where smaller file sizes are crucial for performance, these tools help you reduce the data footprint of your images while preserving visual integrity. This is essential for ensuring that your beautiful backgrounds and aesthetic wallpapers load quickly without compromising on quality.
- Creative Ideas and Mood Boards: When building mood boards or exploring thematic collections, knowing the DPI of source images helps ensure consistency and quality across your visual design elements.
In conclusion, understanding and checking the DPI of your images is a fundamental skill for anyone interacting with digital media. Whether you’re preparing files for print, optimizing for the web, or simply appreciating high-quality aesthetic backgrounds, knowing this metric empowers you to make informed decisions. With the diverse collections and powerful image tools offered by Tophinhanhdep.com, you have everything you need to manage, enhance, and utilize your images to their fullest potential, ensuring every visual you create or enjoy is of the highest possible standard.