Mastering Image Distortion in Photoshop: From Subtle Tweaks to Surreal Art

Image distortion in Adobe Photoshop is a powerful technique that allows artists, photographers, and graphic designers to reshape, manipulate, and transform visual elements with incredible flexibility and precision. Whether you’re aiming for a subtle correction in a portrait, creating a whimsical digital artwork, or crafting a breathtaking surreal landscape, Photoshop’s distortion tools open up a world of creative possibilities. These techniques are fundamental for anyone engaged in Visual Design or Digital Art, providing a robust foundation for Photo Manipulation and generating unique Creative Ideas.
In the ever-evolving landscape of Digital Photography and Image Editing Styles, the ability to expertly distort images is a hallmark of professional-grade work. This comprehensive guide, drawing on insights from Tophinhanhdep.com, will walk you through the various distortion tools available in Photoshop, from the enhanced Warp command to the versatile Liquify filter and the classic Transform options. You’ll learn how to apply these techniques to produce stunning Aesthetic results, refine Beautiful Photography, and even venture into the realm of Abstract and Surreal Art, turning everyday Images into extraordinary visual narratives.
Understanding Photoshop’s Core Distortion Tools
At the heart of Photoshop’s image manipulation capabilities lie several key distortion tools, each offering a unique approach to reshaping pixels. Mastering these tools is crucial for both corrective adjustments and imaginative artistic expression. This section will introduce you to the foundational elements of image distortion, ensuring you have a solid understanding before diving into more advanced techniques.
The Enhanced Warp Tool in Photoshop
![]()
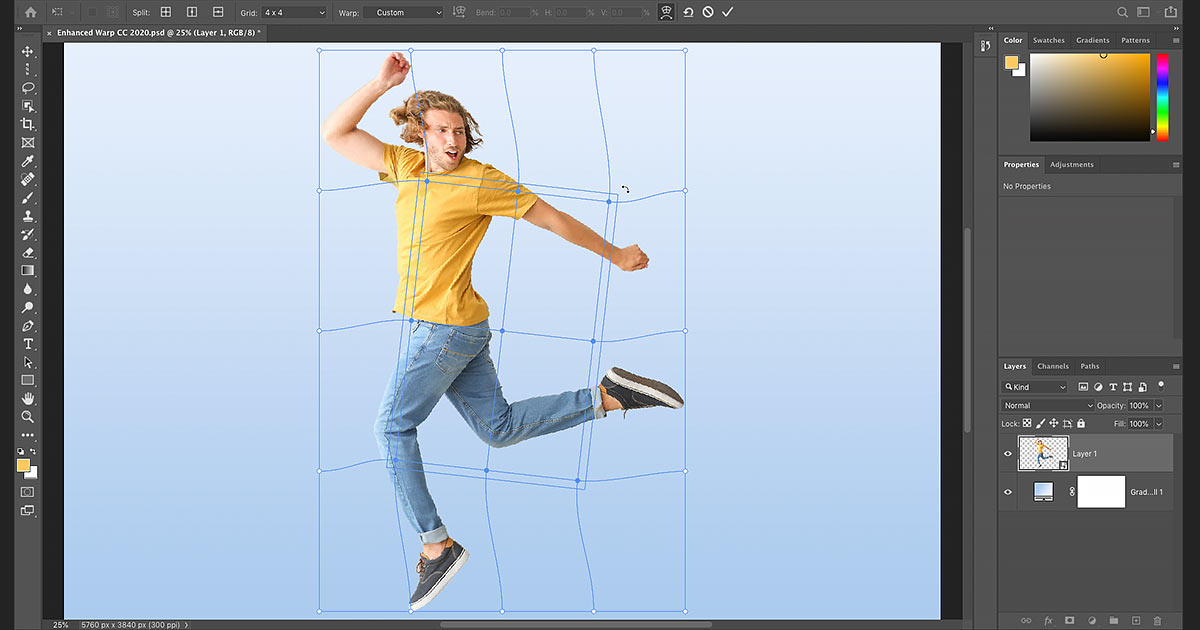
One of the most significant advancements in recent Photoshop versions is the enhanced Warp command. This tool has evolved from a relatively basic reshaping utility into a sophisticated instrument for highly controlled image distortion. The beauty of modern Photoshop is its emphasis on non-destructive editing, a practice you should always adopt. Before applying any significant transformation, including Warp, it is highly recommended to convert your layer into a Smart Object. This ensures that the original pixel data remains intact, allowing you to re-edit the warp or revert to the original image at any time without any loss in quality—a crucial aspect for maintaining High Resolution in your Photography and Images.
To convert your layer to a Smart Object, simply right-click on the layer in the Layers panel and choose “Convert to Smart Object.” A small icon will appear on the layer’s thumbnail, confirming its conversion.
There are two primary ways to access the Warp command:
- Direct Access: Go to Edit > Transform > Warp in the Menu Bar.
- Via Free Transform: Press Ctrl+T (Win) / Command+T (Mac) to activate Free Transform, then click the Warp icon in the Options Bar at the top of the screen.
Upon selecting Warp, Photoshop places a bounding box around your layer’s content. With the default settings, you can:
- Freely Warp: Click and drag anywhere inside the bounding box to push and pull the image’s shape.
- Use Corner Points: Drag the square control points located at each corner of the box to reshape larger sections.
- Utilize Control Handles: Each corner point has extending Bézier handles. Clicking and dragging these handles allows you to control the curvature of the adjacent edges, offering finer adjustments to the distortion.
Mistakes happen, especially when experimenting. Thankfully, Photoshop CC 2020 and newer versions offer multiple undos for Warp and Free Transform. You can press Ctrl+Z (Win) / Command+Z (Mac) repeatedly to undo previous steps, or click the Reset button in the Options Bar to completely undo all warp changes and return your image to its original state. This iterative process is vital for creative exploration, allowing you to generate numerous Photo Ideas for your Mood Boards and Thematic Collections.
Precision with Custom Grids and Control Points
While the default Warp controls are useful for broad distortions, the true power of the enhanced Warp tool lies in its grid system, offering unparalleled control for detailed Photo Manipulation and Digital Art.
Warp Grid Presets: New in Photoshop, you can apply pre-defined grids to your warp transformation. In the Options Bar, click the “Grid” dropdown and select from:
- 3x3 Grid: Introduces a grid with a 3x3 division, providing 16 control points.
- 4x4 Grid: Offers even more control with a 4x4 division.
- 5x5 Grid: Provides the highest density of control points among the presets.
Once a grid is active, the manipulation possibilities expand significantly:
- Dragging Control Points: Click and drag any of the numerous control points at the intersection of grid lines to independently warp specific areas of your image.
- Dragging Control Handles: Similar to the corner points in the default mode, each control point now has Bézier handles. Dragging these handles allows you to precisely control the curvature of the grid lines emanating from that point.
- Rotating Control Points: By dragging a control handle clockwise or counter-clockwise, you can rotate the image around that specific control point, enabling dynamic twists and turns within your Visual Design.
- Warping Grid Lines: You don’t just have to use points; you can also click and drag directly on a grid line between two points to curve and reshape that segment, offering intuitive control over larger areas.
Manipulating Multiple Control Points: For more efficient workflow and complex distortions, the enhanced Warp tool allows you to select and manipulate multiple control points simultaneously.
- Selecting Points: Hold down the Shift key and click on individual points, or click and drag a marquee selection box around a group of points. To deselect a point, hold Shift and click it again.
- Moving Selected Points: Once multiple points are selected, click and drag inside the bounding box that appears around them to move all selected points together.
- Scaling Selected Points: Drag any of the corners of the selection box to scale the area encompassed by the selected points.
- Rotating Selected Points: Move your cursor just outside the selection box until it changes to a rotate icon, then click and drag to rotate the selected area independently.
Creating a Custom Warp Grid: If the presets aren’t enough, Photoshop allows you to define your own grid density. In the Options Bar, set the “Grid” option to “Custom”. A dialog box will appear where you can specify the number of Columns and Rows needed. This provides ultimate control, though be mindful that changing the grid size after initial warping will discard previous changes. This level of customization is invaluable for Graphic Design projects requiring bespoke distortions.
Adding Your Own Warp Grid Lines: For surgical precision, you can dynamically add new grid lines wherever needed. In the Options Bar, locate the “Split” option with three icons:
- Split Crosswise: Adds both a vertical and horizontal grid line at your click point, creating a new control point at the intersection. This is often the most useful.
- Split Vertical: Adds a vertical grid line.
- Split Horizontal: Adds a horizontal grid line.
Simply select the desired split type, then click on the image where you want to add the line. A faster way is to hold Alt (Win) / Option (Mac) and click. Photoshop will intelligently choose the best split option based on your click location. New grid lines and control points can then be dragged and manipulated like any other, without discarding previous changes.
Deleting Custom Grid Lines: If you add a line in the wrong spot, select a control point on that line, then right-click (Win) / Control-click (Mac) and choose “Remove Warp Split” from the contextual menu.
To finalize your warp, click the checkmark in the Options Bar, or click the Cancel button to discard changes. This detailed control makes the Warp tool a cornerstone for intricate Image Manipulation and Creative Ideas on Tophinhanhdep.com.
Unleashing Creativity with Advanced Distortion Techniques
Beyond the robust Warp tool, Photoshop offers an array of advanced distortion techniques that can elevate your Visual Design and Digital Art. These tools allow for everything from fluid organic reshaping to precise perspective corrections, crucial for transforming ordinary Images into captivating Thematic Collections.
Mastering the Liquify Tool
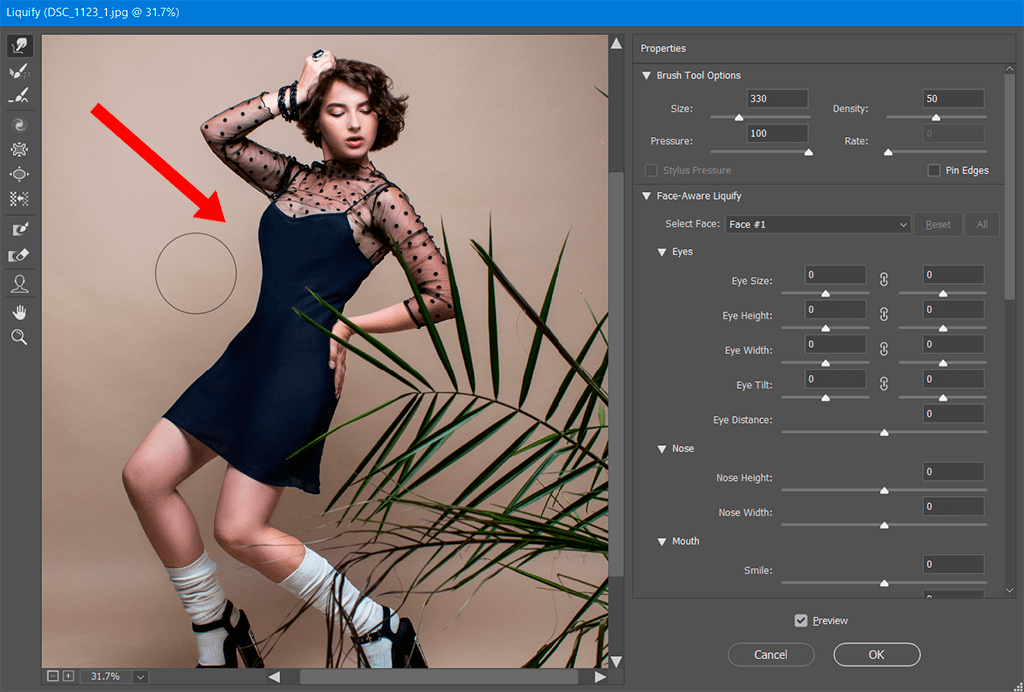
The Liquify filter is a fan-favorite for its ability to push, pull, rotate, reflect, pucker, and bloat pixels, making it ideal for everything from subtle portrait retouching to extreme caricatures. It’s a dedicated workspace for fluid manipulation, offering unparalled control over form and shape, making it a powerful Image Tool.
To access the Liquify filter:
- Ensure your target layer is selected (ideally a Smart Object for non-destructive editing).
- Go to Filter > Liquify in the Menu Bar. A new dialog window will open, presenting your image within the Liquify environment.
Inside the Liquify window, you’ll find a panel of tools on the left and various options on the right:
- Forward Warp Tool (W): The most commonly used tool, it acts like a paint brush that pushes pixels in the direction you drag. Adjust Brush Size, Brush Density, and Brush Pressure in the options panel for varying effects.
- Reconstruct Tool (E): This tool is your “undo brush.” It allows you to selectively revert parts of your image to their original state, which is incredibly useful for fine-tuning distortions.
- Other Tools: Explore tools like Twirl Clockwise, Pucker, Bloat, Push Left, and Mirror for specialized distortions.
- Show Mesh: In the options panel, enabling “Show Mesh” overlays a grid on your image, helping you visualize the distortion and maintain control, similar to the Warp tool’s grid. You can also adjust Mesh Size and Mesh Color.
Advanced Liquify Techniques with Masking: For more intricate control, especially when dealing with complex subjects in Stock Photos, Liquify offers advanced masking options. You can use the Freeze Mask Tool (F) to paint over areas you want to protect from distortion, preventing them from being affected by your brush strokes. The Thaw Mask Tool (D) removes these protected areas. This allows for highly localized distortions, maintaining the integrity of surrounding elements. While Liquify itself doesn’t directly use “pins” like Puppet Warp, its localized brush control and masking capabilities offer similar granular precision, enabling realistic Photo Manipulation.
The Transform Tool: Skew, Distort, and Perspective
The overarching Free Transform (Ctrl+T / Cmd+T) command in Photoshop is not just for resizing and rotating; it’s a gateway to several fundamental distortion operations, including Skew, Distort, and Perspective. These options provide structured ways to manipulate an image’s geometry, essential for Graphic Design, Backgrounds, and Aesthetic compositions.
To access these sub-options:
- Select the layer you want to transform.
- Press Ctrl+T (Win) / Cmd+T (Mac) to activate Free Transform. A bounding box will appear around your layer.
- Right-click (Win) / Control-click (Mac) anywhere inside the bounding box to reveal a context menu with various transformation options.
Here’s a breakdown of the key modes:
| Feature | Description | Shortcut (within Free Transform) |
|---|---|---|
| Free Transform | Resizes, rotates, and skews the image freely. | Ctrl+T / Cmd+T |
| Warp | Provides a grid to manipulate the shape of the image, offering curved distortions. | Click Warp icon (Options Bar) |
| Skew | Slants or angles the sides of the image, creating a shearing effect. | Right-click > Skew |
| Distort | Allows you to pull and manipulate individual corner handles independently, changing the image’s perspective more dramatically. | Right-click > Distort |
| Perspective | Adjusts opposing sides of the image proportionally, allowing for natural perspective correction. | Right-click > Perspective |
- Skew: When “Skew” is active, dragging a corner handle will slant the entire side of the bounding box. For example, dragging a top-left handle horizontally will cause both the top and bottom edges to skew in that direction. This is useful for simulating angles or adding a leaning effect to elements within your Visual Design.
- Distort: The “Distort” command is incredibly versatile. It allows you to independently drag each of the four corner handles of the bounding box. This means you can stretch, squash, or pull the corners to change the image’s overall shape in a non-uniform way. It’s perfect for fitting an image onto a non-rectangular surface or fixing complex perspective issues in Photography.
- Perspective: This mode is specifically designed for correcting or exaggerating perspective. When you drag one corner handle (e.g., top-left), the corresponding corner on the opposite side (e.g., top-right) will move in the opposite horizontal direction, maintaining a consistent perspective. This is invaluable for aligning elements in a scene, such as making a building appear taller or correcting lens distortions in Nature or architectural Photography.
When using any of these transform options, you can hold down the Shift key during Free Transform to maintain proportions (for scaling), or hold Alt (Win) / Option (Mac) to transform from the center. Always press Enter (Win) / Return (Mac) to apply the transformation or Esc to cancel it. These tools, particularly Distort and Perspective, are essential for seamlessly integrating manipulated elements into a composite image, contributing to believable Photo Manipulation.
Practical Applications and Expert Tips for Distortion
Mastering image distortion in Photoshop goes beyond knowing which buttons to press; it’s about understanding how to apply these tools creatively and effectively in real-world scenarios. From crafting Aesthetic digital art to refining Beautiful Photography, these practical applications and expert tips from Tophinhanhdep.com will help you achieve professional-grade results in your Visual Design projects.
Creative Photo Manipulation and Surreal Effects
Image distortion is a cornerstone of surreal and abstract art. Photoshop’s tools empower you to bend reality, create dreamlike Backgrounds, or integrate disparate elements into a cohesive Digital Art piece.
The Power of Polar Coordinates: One fascinating filter for creating surreal effects is Polar Coordinates.
- Open your image. For best results, use an image where the horizon line is roughly in the middle, and strong horizontal elements will react dramatically.
- Go to Filter > Distort > Polar Coordinates.
- Choose “Rectangular to Polar” to wrap a rectangular image into a circular shape. This can turn a straight landscape into a “tiny planet” or a swirling vortex, perfect for creating unique Wallpapers or Abstract art.
- Experiment with “Polar to Rectangular” on already distorted images or radial elements to create outward-stretching effects.
Combining Polar Coordinates with Free Transform (Warp mode) allows for extraordinary results. You can apply Polar Coordinates, then use Warp to refine the distorted shape, adding curves and twists to make it even more otherworldly. Imagine turning a city skyline into a spherical world, then warping sections to create gravity-defying structures. This process is detailed in many Photo Manipulation tutorials on Tophinhanhdep.com, inspiring Creative Ideas.
Building Surreal Landscapes:
The psdvault.com source (now Tophinhanhdep.com) example of creating a surreal landscape using distortions is a prime illustration. This involved:
- Initial Radical Distortion: Using Polar Coordinates to dramatically reshape a landscape image into an oval base.
- Free Transform and Warp Refinements: Scaling, rotating, and warping the initial distortion to hide seams and achieve a harmonious, balanced perspective.
- Layered Elements: Distorting additional landscape fragments with Warp to fit the curved perspective, creating new hills or features.
- Puppet Warp for Organic Forms: Applying Puppet Warp to hills or mountains, placing pins, and pulling them to create jagged peaks or flowing terrains that match the surreal aesthetic.
- Blending with Masks: Crucially, using layer masks with organic brushes (like “Oil Pastel Large”) to blend distorted elements seamlessly, making the transitions appear natural despite the extreme manipulation.
- Creating Celestial Bodies: Even the planets in a surreal sky can be generated from the same source image, stretched with Free Transform, blurred with Motion Blur, and then spherized repeatedly with Filter > Distort > Spherize to create realistic-looking spheres.
These techniques demonstrate that distortion isn’t just about fixing flaws; it’s a powerful tool for imaginative composition, transforming ordinary Images into extraordinary Digital Art for Thematic Collections.
Essential Workflow Practices and Common Pitfalls
To master image distortion, a solid workflow and awareness of common mistakes are just as important as knowing the tools. These tips will help you optimize your process for High Resolution outputs and maintain the quality of your Stock Photos.
Non-Destructive Workflow:
- Always Duplicate Layers: Before any significant transformation, press Ctrl+J (Win) / Cmd+J (Mac) to duplicate your layer. This creates a safety net, allowing you to revert if something goes wrong.
- Use Smart Objects: As emphasized, convert layers to Smart Objects before applying Warp, Transform, or Liquify. This embeds the original image data, making transformations fully editable and preventing pixel degradation with repeated edits. This is a core Editing Style for professionals.
- Layer Masks: Instead of erasing pixels, use layer masks to selectively hide parts of your warped images. This allows for flexible blending and easy adjustments. For natural forms like trees or clouds, use textured, organic brushes (as discussed in the
psdvault.comtutorial) on your masks.
Managing Large Files and Performance:
- Crop Tool with “Delete Cropped Pixels”: When dealing with extremely large distorted images, unwanted pixels outside the canvas can consume memory. Use the Crop Tool (C) with the “Delete Cropped Pixels” option checked to reduce file size, but only after you are satisfied with the composition, as this is a destructive step for those outer pixels.
- Resize Image: For very large images causing performance issues, consider temporarily resizing the image (Image > Image Size) while working on details, then reverting to the original size or upscaling with AI Upscalers when finished.
Blending and Integration:
- Dodge and Burn for Lighting: To integrate distorted elements naturally, use the Dodge and Burn tools (on a new layer set to Overlay blending mode) to subtly enhance highlights and shadows, matching the overall lighting of your scene. This adds depth and realism to Photo Manipulation.
- Gradient Fills for Atmosphere: Use Gradient Fill adjustment layers (set to appropriate blending modes like “Overlay” or “Linear Dodge (Add)”) to introduce atmospheric effects, color shifts, or directional lighting that unify your distorted elements with the Backgrounds.
Common Mistakes to Avoid:
- Over-Warping: Don’t go overboard. Excessive distortion can make your image look unnatural and pixelated. Aim for subtlety unless an extreme effect is your artistic goal.
- Ignoring Edges: Pay close attention to the outer edges of your distorted elements. Distorting too much can create jagged or unnatural outlines. Use layer masks and careful blending to smooth these transitions.
- Misplacing Control Points: Especially with Puppet Warp or advanced Warp grids, misplacing pins or control points can lead to unexpected and undesirable distortions. Place them thoughtfully and strategically.
Expert Tips for Better Results:
- Use the Mesh: Always keep the mesh visible when using Warp or Liquify. It provides a visual guide for your distortions and helps you track changes.
- Experiment with Warp Styles: Beyond the standard Warp, explore the various preset warp styles (Arch, Flag, Fish, Inflate, etc.) available in the Options Bar for quick, interesting effects.
- Save Your Work Frequently: It’s a fundamental rule. Press Ctrl+S (Win) / Cmd+S (Mac) often to prevent losing progress, especially when dealing with complex Photo Manipulation projects.
- Combine Tools: Don’t limit yourself to one tool. Often, the best results come from combining Warp with Liquify, Puppet Warp, and Free Transform options for multi-faceted distortion. For instance, outlining an object with a selection tool (like the Lasso tool) before warping can give perfect results for specific Images or text elements.
By integrating these techniques and practices, you’ll not only learn how to distort images in Photoshop but also master the art of transforming your Photography and Visual Design into captivating works. Tophinhanhdep.com offers a wealth of tutorials and Image Inspiration to further hone your skills.
In conclusion, Photoshop’s distortion tools are an indispensable part of any digital artist or photographer’s arsenal. From the precise control of the enhanced Warp tool to the fluid reshaping of Liquify and the geometric transformations of Skew, Distort, and Perspective, these features empower you to transcend conventional editing. Whether you’re correcting subtle lens aberrations, crafting stunning Aesthetic compositions, or venturing into the imaginative realm of Surreal Art, the ability to expertly manipulate images is a gateway to boundless Creative Ideas. Continue your journey with Tophinhanhdep.com to explore more Image Tools, refine your Editing Styles, and turn every Photo Idea into a masterpiece.