How to Perform a Reverse Image Search on Your iPhone

In our visually-driven world, images are everywhere—from the captivating wallpapers and aesthetic backgrounds on our iPhones to the high-resolution stock photos that populate digital spaces. Sometimes, we encounter an image that sparks curiosity: Where did it come from? Who created it? Are there similar stunning nature scenes or abstract artworks available? This is precisely where the power of reverse image search comes into play. Far more than a mere technical trick, reverse image search is a versatile tool for photographers, designers, researchers, and casual users alike, opening up new avenues for discovery, verification, and inspiration right from your iPhone.
Whether you’re an avid fan of beautiful photography seeking the original artist, a content creator needing to verify the authenticity of an image, or simply someone who stumbled upon a striking visual and wants to learn more, knowing how to perform a reverse image search on your iPhone is invaluable. This guide will walk you through various methods using popular browsers like Chrome and Safari, as well as the dedicated Google app, ensuring you can uncover the stories behind the images that catch your eye. Furthermore, we’ll explore how this capability complements the comprehensive suite of resources available at Tophinhanhdep.com, enhancing your ability to explore, manipulate, and be inspired by the vast world of digital imagery.
The Power of Reverse Image Search: Beyond Simple Identification
Reverse image search is a technological marvel that transforms an image into a query. Instead of typing keywords to find images, you upload an image to find information related to it. This fundamental shift unlocks a multitude of applications, greatly expanding its utility for anyone engaged with visual content, from professional photographers to enthusiasts curating mood boards. For users of Tophinhanhdep.com, this tool is a natural extension of our commitment to high-quality images, digital photography, and visual design.
Uncovering Image Origins and Copyrights
One of the primary and most critical applications of reverse image search is identifying the original source of an image. In an age where images are easily shared and often stripped of their attribution, this feature is a lifesaver for copyright holders and conscientious users.
- Finding the Original Source: Have you ever seen a stunning piece of nature photography or a captivating abstract image online and wondered where it first appeared? A reverse image search can trace an image back to its earliest known online appearance, revealing the original photographer, publication, or artist. This is particularly useful for appreciating the true provenance of beautiful photography and ensuring proper credit.
- Tracking Copyright Usage and Violations: For photographers and visual artists, their work is their livelihood. Reverse image search provides a powerful mechanism to monitor how their digital photography is being used across the internet. By searching for their own images, they can discover unauthorized uses, potential copyright infringements, or instances where their high-resolution stock photos are being used without permission. This allows them to take appropriate action, whether it’s requesting attribution or pursuing compensation.
- Verifying Authenticity and Combating Misinformation: In the realm of news and information, images can be powerful but also misleading. Reverse image search is a crucial tool for fact-checking and verifying the authenticity of an image. By comparing a suspicious image with its original sources, one can quickly identify if it has been manipulated, taken out of context, or is entirely fake. This helps ensure that the visual content we consume is truthful, especially important when dealing with sensitive or trending styles.

Fueling Creativity and Visual Inspiration
Beyond its investigative capabilities, reverse image search serves as an incredible wellspring of inspiration, a direct link to the “Image Inspiration & Collections” offered on Tophinhanhdep.com.
- Discovering Similar Visuals and Aesthetics: Imagine you’ve found a wallpaper with a specific aesthetic, a background with a unique color palette, or a sad/emotional image that deeply resonates. A reverse image search can help you find visually similar images, different perspectives, or variations of the same subject. This is invaluable for generating “Photo Ideas” or building rich “Mood Boards” for graphic design projects, digital art, or photo manipulation. If you appreciate a particular style, whether it’s abstract, nature-focused, or a beautiful photograph, this search method can lead you to entire collections that match your preferences.
- Exploring Thematic Collections and Trending Styles: For visual designers and artists, staying abreast of “Trending Styles” is key. If you see a design element or photographic technique gaining traction, a reverse image search can lead you to numerous examples, allowing you to dissect and understand the thematic collections it belongs to. This iterative discovery process helps in refining your creative ideas and pushing the boundaries of your own digital art.
- Enhancing Visual Design Projects: Whether you’re working on a new website, a presentation, or a personal art piece, finding the right visual elements is crucial. A reverse image search can help you locate specific graphic design elements, textures, or even identify fonts used within an image, empowering your creative process and ensuring your visual design is cohesive and impactful.
Practical Applications for Everyday Users
The usefulness of reverse image search extends beyond professional applications, offering practical benefits for everyday iPhone users.
- Identifying Objects, Landmarks, and Products: Stumbled upon a unique plant during a hike? Saw a piece of furniture you loved in a picture? Took a photo of a famous landmark but forgot its name? A reverse image search can quickly identify objects, landmarks, animals, plants, or even specific products shown in an image. This is incredibly helpful for learning more about your surroundings or finding where to purchase an item, making your iPhone an even more powerful tool for exploration.
- Solving Visual Puzzles: Sometimes, an image is just a puzzle waiting to be solved. Perhaps it’s a meme whose origin you’re curious about, a historical photograph you want to contextualize, or a picture from a social profile you want to verify. Reverse image search acts as a visual detective, providing clues and answers that traditional text searches might miss. It can even help identify the original source of viral content, giving you the full picture.
In essence, reverse image search is not just about finding an image; it’s about finding information from an image. It’s a bridge between the visual world and the vast sea of knowledge online, making it an indispensable tool for anyone who interacts with images, elevating their experience from passive viewing to active discovery and creation.
Essential Methods for Reverse Image Searching on Your iPhone
Performing a reverse image search on your iPhone is more straightforward than many realize, with several accessible methods depending on your preferred browser or app. While Safari is the default browser, Google Chrome and the dedicated Google app offer equally robust capabilities, often leveraging Google Lens for intelligent image analysis.
Leveraging Google Chrome for Seamless Searches
Google Chrome is a popular choice for iPhone users, and it integrates a powerful reverse image search feature via Google Lens. You can search images found on the web, images saved to your camera roll, or even images copied to your clipboard.
1. Searching an Image from a Webpage: This method is incredibly convenient for images you encounter while browsing:
- Open the Google Chrome app on your iPhone.
- Navigate to the webpage containing the image you wish to search.
- Tap and hold down on the image. A pop-up menu will appear.
- Select “Search Google for This Image” (or similar wording).
- Chrome will then open Google Lens, displaying results matching or similar to that image, including its source, related visuals, and other pertinent information.
2. Searching an Image from Your Photos App (Camera Roll): If the image is already saved on your iPhone, here’s how to search it:
- Open the Google Chrome app.
- Go to Google.com in the Chrome browser.
- Tap the small camera icon in the search field. This icon represents Google Lens. The first time you use it, you may need to grant Chrome access to your photo library.
- You will be presented with options: either take a photo of something in front of you using your camera, or select an image from your camera roll. To use a saved image, tap the “Library” button (or scroll through your recent photos).
- Select the image you want to search from your photos.
- Resize the search area by dragging the white corners to focus on a specific part of the image, if desired.
- Google Lens will then display results matching that image, allowing you to scroll through and tap links for more details.
3. Searching an Image Copied to Your Clipboard: Chrome offers a quick shortcut if you’ve recently copied an image:
- Open your iPhone’s Photos app or any app where you can access an image.
- Tap and hold the image you want to search until the Share menu appears.
- Select “Copy” to copy the image to your clipboard.
- Open the Google Chrome app.
- Tap the search bar. Chrome is often intelligent enough to detect an image on your clipboard.
- At the top of the search suggestions list, you may see an option like “Image You Copied.” Tap this option.
- Google will perform the reverse image search, presenting related images and often an identification of the image content. You can then refine the results by typing additional keywords into the search bar.
Mastering Safari for Your Reverse Image Needs
Safari, as the default browser on iPhones, also provides robust options for reverse image searching, primarily through Google Lens and a clever workaround for traditional image uploads.
1. Using Google Lens via Google.com: This is the most direct way to use Google’s powerful image recognition in Safari:
- Open Safari on your iPhone.
- Go to Google.com in the browser.
- Tap the camera icon in the search field. This will activate Google Lens. As with Chrome, you may need to grant Safari access to your photo library the first time.
- You can then choose to “Search with Your Camera” for a new photo, or select an image from your photo library. Safari often groups “Screenshots” at the top, making it easy to search images you’ve captured. You can also tap “View All” or scroll down to “All Images” to browse your entire camera roll.
- Tap the photo you wish to search.
- Resize the search area by dragging the white corners to focus on specific elements.
- Google will display relevant results, allowing you to explore the image’s origins, similar visuals, and more.
2. The “Request Desktop Site” Trick for Google Images: For those who prefer the classic Google Images upload interface, this method recreates the desktop experience:
- Open Safari.
- Go to images.google.com.
- Tap the “Share” button (the square with an arrow pointing upwards) at the bottom of the screen.
- Scroll through the options in the Share Sheet until you find and tap “Request Desktop Site.”
- The page will reload, displaying Google Images as it would appear on a desktop. You will now see a camera icon near the search bar.
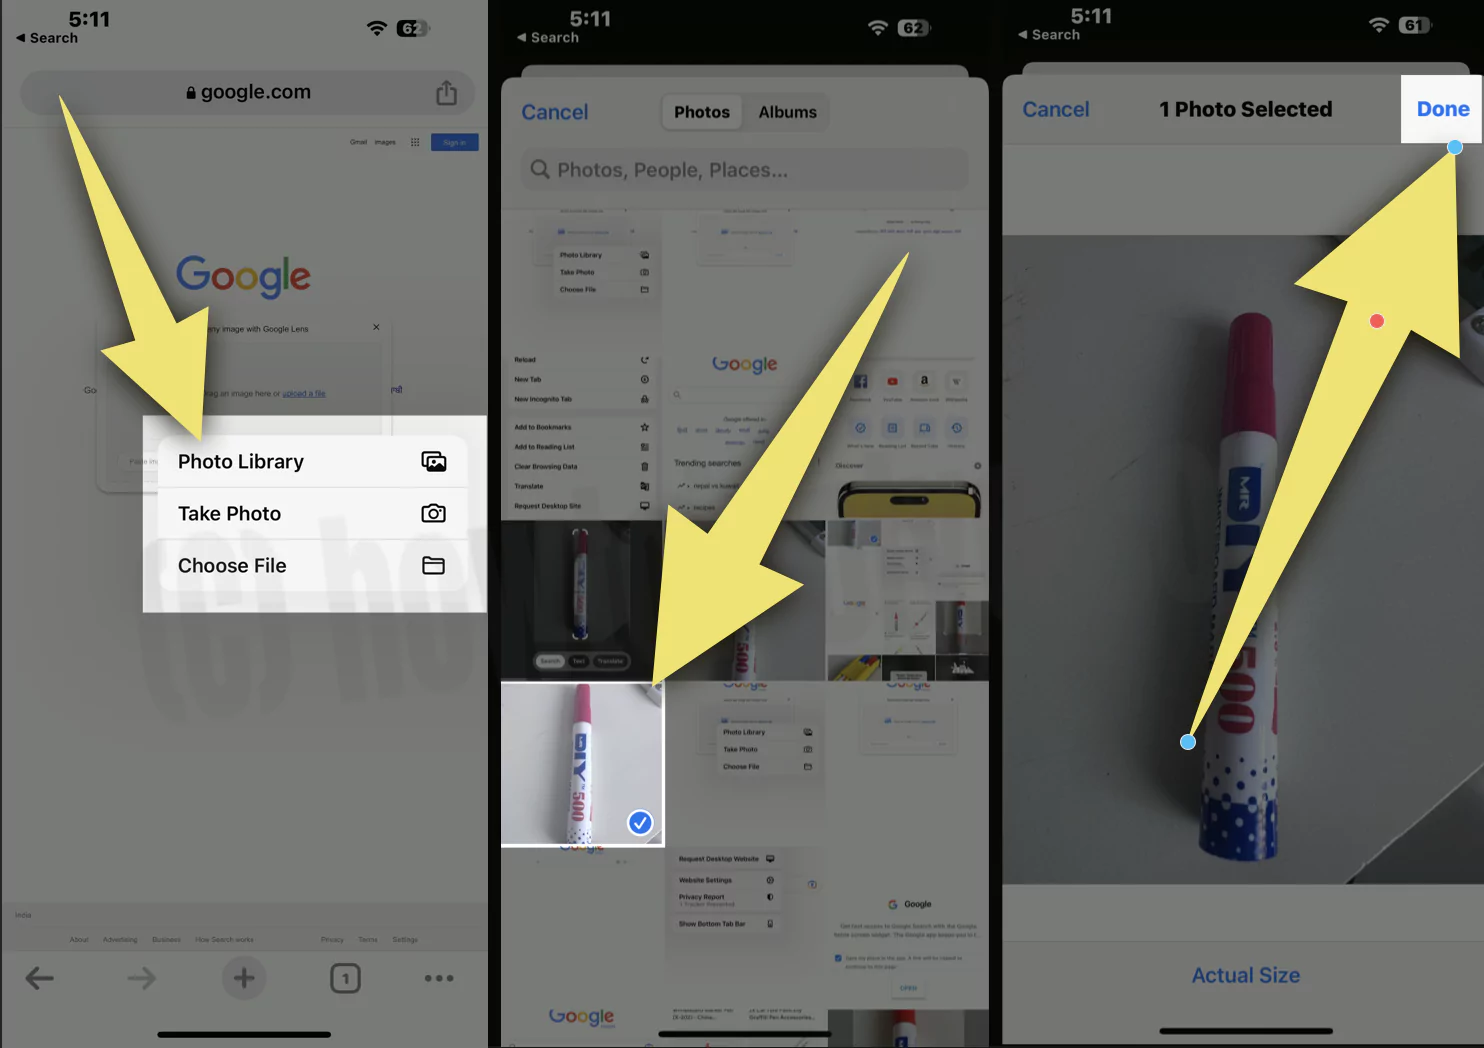
- Tap the camera icon. You will be prompted to either “Upload an image” or “Paste image URL.”
- Choose “Upload an image,” then select “Photo Library” to pick an image from your iPhone’s saved photos or “Take Photo or Video” to use your camera.
- Select your image, and Google will perform the reverse image search.
3. Finding Related Images from a Google Image Search: This method is excellent for visual discovery based on existing online images:
- Open Safari and perform a regular keyword search on Google that includes “images” (e.g., “nature wallpapers images”).
- Tap on an image from the search results that is close to what you’re looking for.
- Below the selected image, you’ll often see a viewfinder icon (a square with a dot in the middle). Tap this icon.
- Google Lens will then present related images and information based on the visual characteristics of the selected image, helping you dive deeper into similar aesthetic backgrounds or photographic styles.
Utilizing the Dedicated Google App for Enhanced Capabilities
The standalone Google app for iPhone provides a centralized hub for all Google services, including a very accessible and powerful reverse image search feature through Google Lens.
- Download and Open the Google App: If you don’t have it, install the “Google” app from the App Store.
- Tap the Lens Icon: On the main screen of the Google app, you’ll see a search bar. Tap the colorful camera-shaped Lens icon within or next to the search bar (it’s often next to the microphone icon). If you have the Google widget on your home screen, you can also tap the Lens icon there directly.
- Choose Your Source: Google Lens will activate. You can either:
- “Search with your camera”: Point your iPhone camera at an object, landmark, or image in your physical environment, and tap the shutter button. Google Lens will analyze what it sees.
- Select from your photo library: At the bottom, you’ll see thumbnails of your recent photos, often with a dedicated “Screenshots” album or “Recents.” Tap on the image you wish to search, or tap “View all” to access your full photo library.
- Refine Your Search: Once the search results appear, you can drag the bar at the top of the results upward to expand the panel. Here, you’ll find an option to “Add to your search.” This allows you to type in keywords to narrow down the results, which is particularly useful if the initial visual search yields broad or unexpected matches. For instance, if you searched for an abstract image but got results for a specific artist, you could add “style guide” or “painting technique” to refine it.
These essential methods ensure that no matter how you encounter an image on your iPhone, you have a reliable way to uncover its secrets, track its origins, or simply find more visuals that inspire you.
Beyond Google: Exploring Other Tools and Techniques with Tophinhanhdep.com Integration
While Google’s offerings are undoubtedly dominant for reverse image searching, other search engines and, more importantly, the comprehensive suite of tools and resources on Tophinhanhdep.com can significantly enhance your visual journey. Reverse image search is often the starting point; Tophinhanhdep.com provides the destination for all things imagery.
Bing Visual Search: A Strong Alternative
Microsoft’s Bing search engine offers its own visual search capability that functions similarly to Google Lens. It’s a robust alternative, particularly if you prefer the Bing ecosystem or want a different set of results.
- Accessing Bing Visual Search in Any Browser:
- Open Safari, Chrome, or any other browser on your iPhone.
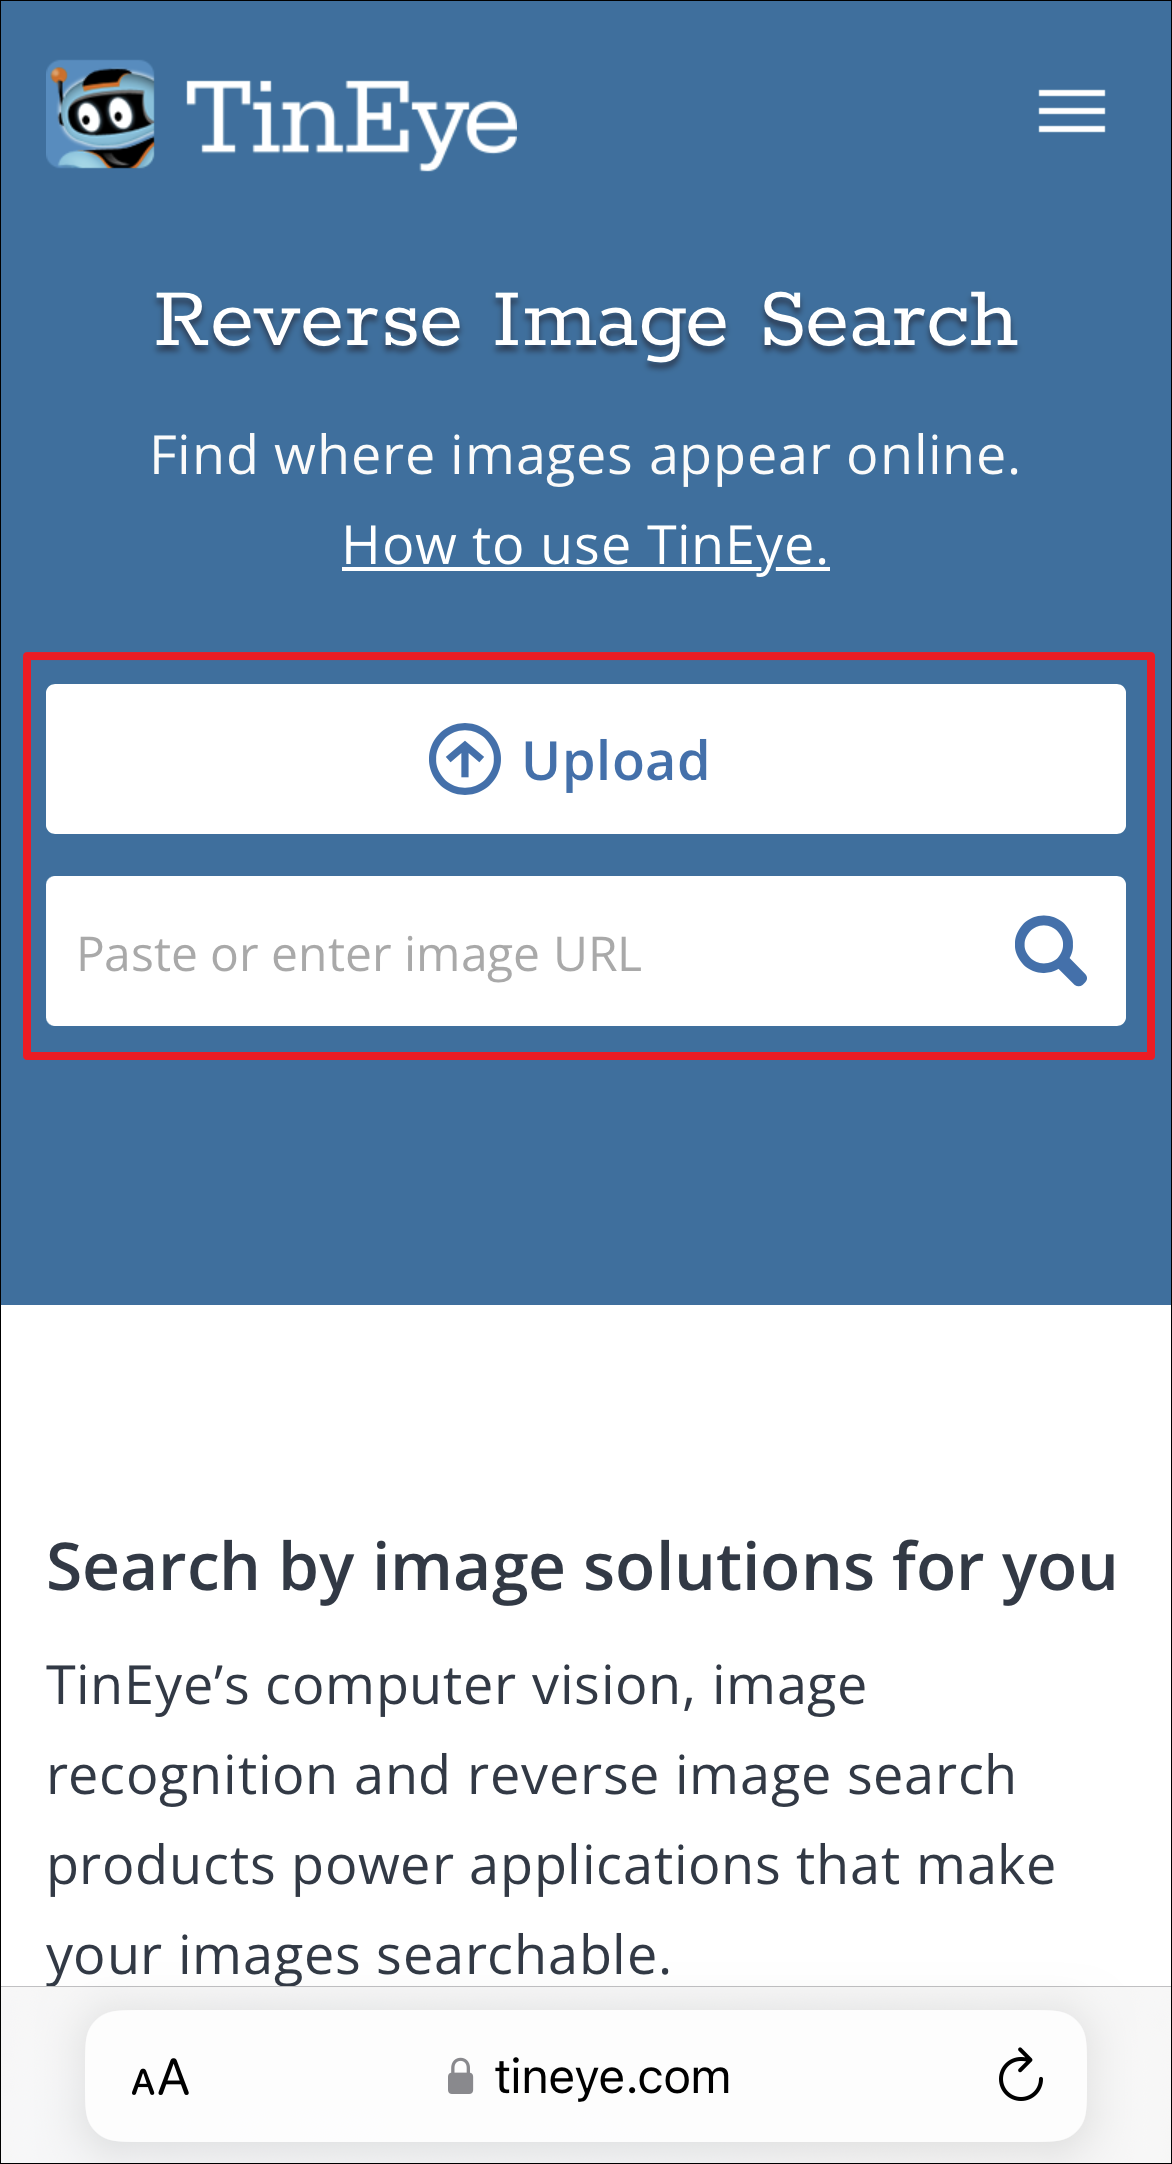
- Go to Bing.com.
- In the search bar, you’ll find a viewfinder or camera icon (often on the right). Tap this icon.
- Bing Visual Search will activate your iPhone’s camera. You can then point it at an object and tap the search button to identify it, or you can tap the photos icon (usually on the left of the search button) to “Choose Photo Library” (to select from your saved images) or “Choose File” (to browse for image files).
- After selecting your image, Bing will perform a visual search, presenting related content and similar images. While powerful, Bing currently doesn’t offer the same level of keyword refinement for visual searches as Google does.
Tophinhanhdep.com’s Complementary Image Tools: Enhancing Your Discoveries
Once you’ve performed a reverse image search and found the image you were looking for, or discovered a new visual that sparks your interest, Tophinhanhdep.com becomes your ultimate resource. Our platform isn’t just about showing you how to find images; it’s about providing the “Image Tools” and “Visual Design” resources to optimize, transform, and draw inspiration from those discoveries.
1. Optimizing and Converting Your Found Images: You’ve used reverse image search to find a high-resolution version of a beautiful photograph or a unique abstract background. What’s next? Tophinhanhdep.com offers:
- Converters: Easily change the format of your image (e.g., from WebP to JPG or PNG) for compatibility with various devices or applications.
- Compressors: If the image you found is too large for your wallpaper or website, our compressors can reduce file size without significant loss of quality, maintaining the integrity of that stunning nature scene or aesthetic design.
- Optimizers: Fine-tune images for web use, ensuring fast loading times for your digital photography portfolios or graphic design projects.
2. Enhancing Image Quality with AI Upscalers: Sometimes, even with reverse image search, you might only find a lower-resolution version of an image you love, perhaps a rare piece of digital art or an old, sad/emotional photograph. This is where Tophinhanhdep.com’s advanced “Image Tools” shine:
- AI Upscalers: Our AI upscalers can intelligently increase the resolution of your images, making pixelated or small photos crisp and clear. This means you can transform a small found image into a high-resolution wallpaper or a usable element for photo manipulation without compromising its visual appeal.
3. Extracting Information with Image-to-Text Converters: If the image you’ve identified through reverse search contains text—perhaps a quote embedded in an aesthetic background, an infographic, or details on a stock photo—Tophinhanhdep.com’s “Image-to-Text” tool is incredibly useful. This optical character recognition (OCR) technology allows you to extract editable text, saving you time and ensuring accuracy.
4. Fueling Your Creative Ideas with Tophinhanhdep.com’s Collections: Reverse image search is fantastic for discovery. Tophinhanhdep.com then acts as a curated library and inspiration hub:
- Image Inspiration & Collections: If you find a style you adore, delve into our “Photo Ideas,” “Mood Boards,” “Thematic Collections,” and “Trending Styles” to further your creative journey. Whether you’re into nature, abstract, or aesthetic images, we provide rich resources to expand on your initial discoveries.
- Visual Design Resources: Our platform offers guidance and tools for “Graphic Design,” “Digital Art,” and “Photo Manipulation.” If reverse image search helped you identify a technique or an artist, Tophinhanhdep.com can provide the “Creative Ideas” and tutorials to help you replicate or evolve that inspiration into your own work. You might find a beautiful photography style and then explore our editing styles guides to achieve a similar look.
In conclusion, knowing how to perform a reverse image search on your iPhone is a powerful skill in today’s visual landscape. It empowers you to uncover origins, verify authenticity, and discover endless inspiration. When combined with the comprehensive “Image Tools,” vast “Image Collections,” and “Visual Design” insights available on Tophinhanhdep.com, your iPhone becomes an even more formidable device for navigating, creating, and appreciating the incredible world of digital imagery. Happy searching, and happy creating!