How to Master the Mirror Image Effect in Photoshop for Stunning Visuals

Welcome to Tophinhanhdep.com, your ultimate resource for captivating images, cutting-edge photography techniques, and innovative visual design. Today, we delve into one of the most classic and versatile photo manipulation techniques: creating a mirror image effect in Adobe Photoshop. This popular effect, often seen gracing album covers, movie posters, and striking digital art, is a cornerstone of creative editing, transforming ordinary photographs into extraordinary, symmetrical designs. Whether you’re looking to craft abstract wallpapers, enhance aesthetic backgrounds, or simply explore new dimensions in your digital photography, mastering the mirror image technique is an invaluable skill.
Photoshop stands as an unparalleled image tool, constantly evolving from its classic roots to the modern prowess of Photoshop CC. It serves as a dynamic canvas for both beginners and seasoned professionals alike, allowing for everything from high-resolution photo manipulation to intricate graphic design. In this comprehensive guide from Tophinhanhdep.com, we will walk you through the precise steps to mirror an image, covering both full image reflections and selective mirroring of specific elements, ensuring you can produce breathtaking visual content that elevates your image collections.

The Classic Full Image Mirror Effect: A Step-by-Step Guide
The simplest yet most impactful way to create a mirror image is by applying the effect across your entire photograph. This technique is fantastic for generating surreal landscapes, symmetrical architectural shots, or artistic portraits that offer a fresh perspective. Follow these detailed steps to achieve this iconic look, perfect for adding unique pieces to your aesthetic and abstract image collections on Tophinhanhdep.com.
Initial Setup: Opening and Duplicating Your Image
Before diving into any significant photo manipulation, it’s crucial to set up your workspace correctly. This ensures a non-destructive editing process, preserving your original high-resolution photography while you experiment with creative ideas.
- Open Your Image in Photoshop: Launch Adobe Photoshop and open the image you wish to mirror. You can do this by going to
File > Openfrom the top menu bar, or simply dragging your image file directly into the Photoshop interface. For this tutorial, we recommend choosing an image with a clear focal point or an interesting symmetrical potential, perhaps from Tophinhanhdep.com’s diverse collection of nature photography or abstract designs. - Duplicate the Document for Safety: To prevent accidentally saving your mirrored version over the original, always work on a duplicate. Navigate to
Image > Duplicatein the Menu Bar. In the dialog box that appears, you can name your new document (e.g., “Mirror Image”) and clickOK. This creates an identical copy of your entire Photoshop document. You can then close the original document tab, ensuring all your edits are applied to the copy. This practice aligns with Tophinhanhdep.com’s emphasis on best practices in digital photography and image editing styles.
Strategic Cropping for Symmetry
The mirror effect relies on a central axis for reflection. Precise cropping is key to defining this axis and setting the stage for a perfect symmetrical design.
- Select the Crop Tool: From the Photoshop Toolbar (usually on the left side of your screen), select the Crop Tool (it looks like two overlapping right angles).
- Set the Aspect Ratio to Ratio: In the Options Bar at the top of the screen (while the Crop Tool is active), ensure the
Aspect Ratiois set toRatio. This allows you to freely adjust the cropping border, which is essential for defining your mirror point. - Define Your Mirror Point: Click and drag one side of the cropping border (either left or right, depending on which side you want to mirror) to the exact spot where you want the image to reflect. For example, if you’re mirroring a portrait, you might drag the side to the center of the person’s face.
- Crop Away Unwanted Space (Optional but Recommended): You may also want to crop away any unnecessary areas on the opposite side of your defined mirror point. Drag the other side of the cropping border inward to refine your composition. This focuses the viewer’s eye on the symmetrical design you are about to create, contributing to a more aesthetic visual.
- Enable “Delete Cropped Pixels”: Before finalizing the crop, make sure
Delete Cropped Pixelsis checked in the Options Bar. This ensures that any pixels outside your new canvas dimensions are permanently removed, simplifying subsequent steps. - Execute the Crop: Click the checkmark icon in the Options Bar or press
Enter/Returnon your keyboard to apply the crop. Your image is now perfectly prepared for mirroring.
Duplicating Layers and Applying Free Transform
With your canvas prepped, the next phase involves duplicating your image content and transforming it to create the reflection. This is where the magic of photo manipulation truly begins.
- Duplicate the Background Layer: In the Layers panel (typically on the right side of your screen), your cropped image will likely reside on a layer named “Background.” Drag this “Background” layer down onto the
Add New Layericon (a square with a plus sign inside) at the bottom of the Layers panel. This creates a duplicate layer, usually named “Background copy,” which is essential for non-destructive editing. - Access Free Transform: Ensure your “Background copy” layer is selected. Go to
Edit > Free Transformfrom the Menu Bar, or use the handy keyboard shortcutCtrl+T(Windows) /Command+T(Mac). A bounding box with handles will appear around your image, along with a target icon in the center—this is the reference point. - Position the Reference Point: The reference point determines the origin of any transformation. To mirror your image along the edge you defined with your crop, drag this reference point onto the side handle of the bounding box that is closest to your desired mirror axis. For instance, if you want to flip from left to right, drag the reference point to the right-side handle. If the reference point is not visible, check the
Toggle Reference Pointcheckbox in the Options Bar. - Perform the Flip: While the Free Transform tool is still active, right-click (Windows) / Control-click (Mac) anywhere inside the image. A contextual menu will appear. Choose
Flip Horizontalif you want to create a left-to-right reflection, orFlip Verticalfor an up-and-down reflection. It might not look like the image has flipped immediately; instead, the Free Transform box will extend into the empty canvas area you created earlier. - Commit the Transformation: Click the checkmark icon in the Options Bar or press
Enter/Returnto apply the transformation and exit Free Transform mode.
Revealing Your Mirrored Masterpiece
The final step is to expand your canvas to reveal the newly mirrored portion of your image, bringing your symmetrical design to life.
- Remove Crop Border (if visible): If a cropping border is still visible, it means the Crop Tool is active. Press the letter
Mon your keyboard to quickly switch to the Rectangular Marquee Tool and clear the border. - Execute “Reveal All”: Go to
Image > Reveal Allfrom the Menu Bar. This powerful command instantly expands your Photoshop canvas to reveal all hidden pixel data, including the mirrored half that was previously off-canvas. - Fit to Screen: To view your entire magnificent mirror effect on screen, press
Ctrl+0(Windows) /Command+0(Mac).
Congratulations! You have successfully created a classic mirror image effect. This technique is excellent for generating abstract images, unique wallpapers, or captivating backgrounds that reflect the high-resolution quality and aesthetic standards found on Tophinhanhdep.com.
Beyond Full Flips: Mirroring Specific Selections in Photoshop
While mirroring the entire image is powerful, sometimes your creative vision calls for a more localized reflection. Mirroring specific selections allows for intricate photo manipulation, enabling you to duplicate and flip individual elements within your image. This method is crucial for advanced digital art and graphic design projects, adding depth and dynamic flair to your compositions.
Isolating Your Subject with Precision Selection Tools
The first step in selective mirroring is to accurately define the area or object you wish to duplicate and flip. Photoshop offers a range of sophisticated selection tools to help you achieve this precision, which is vital for high-resolution photography edits.
- Choose Your Selection Tool: Depending on the complexity of your subject, select the most appropriate tool from the Toolbar:
- Rectangular Marquee Tool (M): Ideal for basic, geometric selections like squares or rectangles.
- Elliptical Marquee Tool (M): For circular or elliptical selections. Holding
Shiftwhile dragging constrains it to a perfect circle. - Lasso Tool (L): For freehand selections.
- Polygonal Lasso Tool (L): For straight-edged selections.
- Magnetic Lasso Tool (L): Snaps to edges of high-contrast areas.
- Quick Selection Tool (W): Intelligent tool that “paints” a selection by detecting edges.
- Magic Wand Tool (W): Selects areas of similar color.
- Pen Tool (P): For the most precise and editable selections, creating paths that can be converted into selections.
- Make Your Selection: Carefully use your chosen tool to select the exact part of the image you want to mirror. Zoom in (
Ctrl/Cmd + +) for accuracy and refine your selection as needed usingAdd to SelectionorSubtract from Selectionmodes in the Options Bar. This attention to detail is paramount for creating truly beautiful photography and professional visual design.
Duplicating and Transforming Your Selection
Once your selection is precise, you can duplicate it onto a new layer and apply the mirroring transformation. This ensures that the original image remains untouched while you work on the duplicated element.
- Duplicate the Selection to a New Layer: With your desired area still actively selected (you’ll see the “marching ants” border), use the keyboard shortcut
Ctrl + J(Windows) orCommand + J(Mac). This command creates a new layer in your Layers panel, containing only the selected pixels. This is a crucial step in non-destructive photo manipulation, allowing you complete freedom to experiment. - Access Flip Options via Transform: Ensure this new duplicated layer is actively highlighted in the Layers panel.
- Go to
Edit > Transform > Flip HorizontalorFlip Vertical. This will immediately flip the content of that specific layer. - Alternatively, you can use
Edit > Free Transform(Ctrl+T/Command+T), then right-click (Windows) / Control-click (Mac) inside the bounding box and chooseFlip HorizontalorFlip Verticalfrom the contextual menu. Using Free Transform also gives you the flexibility to move and resize the flipped selection immediately after flipping.
- Go to
- Commit the Transformation: If using Free Transform, click the checkmark in the Options Bar or press
Enter/Returnto apply the changes.
Blending and Refinement for Seamless Integration
After flipping your selection, the next crucial step is to integrate it seamlessly into your overall composition. This involves precise positioning and potentially adjusting its appearance to blend naturally or create a stylized effect.
- Position with the Move Tool: Activate the Move Tool (V) from the Toolbar. Click and drag your flipped selection to its desired spot on the canvas. For perfect alignment, use guides. Drag new guides from the rulers (if rulers aren’t visible, go to
View > Rulers) to create reference lines for symmetrical placement. This attention to detail is key for high-resolution photography and visual design. - Refine with Layer Masks: If you want to subtly blend the mirrored selection with the original image, or hide unwanted portions without permanently erasing them, add a Layer Mask. Click the
Add Layer Maskicon (a rectangle with a circle inside) at the bottom of the Layers panel. Then, use a soft black brush on the mask to gently paint away parts of the flipped layer, revealing the original layer beneath. This technique is invaluable for sophisticated photo manipulation and aesthetic adjustments. - Experiment with Blend Modes: To create unique visual effects or make the mirrored section interact creatively with the underlying layers, experiment with the
Blend Modeoptions in the Layers panel. Options likeOverlay,Soft Light,Screen, orMultiplycan produce stunning results, contributing to diverse editing styles and inspiring new image ideas for Tophinhanhdep.com. - Merge and Save: Once you are satisfied with the placement and blending, it’s time to finalize your edits. You can merge the layers by selecting the top layer, right-clicking, and choosing
Merge Down(to merge with the layer below it) orMerge Visible(to merge all visible layers). Finally, save your masterpiece by going toFile > Save As(to create a new file and preserve your layered document) orFile > Save(Ctrl+S/Command+S) if you are confident in your changes.
By mastering selective mirroring, you unlock incredible potential for intricate digital art, advanced photo manipulation, and creating unique visual content that stands out in any collection.
Creative Horizons: Unleashing Visual Design with Mirror Images
The mirror image effect in Photoshop is far more than a simple flip; it’s a gateway to boundless creative possibilities in visual design. At Tophinhanhdep.com, we believe in inspiring innovative photo ideas and contributing to diverse thematic collections. Let’s explore how this technique can transform your images into captivating works of art, ideal for wallpapers, backgrounds, and aesthetic imagery.
Crafting Abstract and Aesthetic Compositions
Mirroring offers a unique way to recontextualize familiar scenes, transforming them into mesmerizing abstract designs and aesthetic photography.
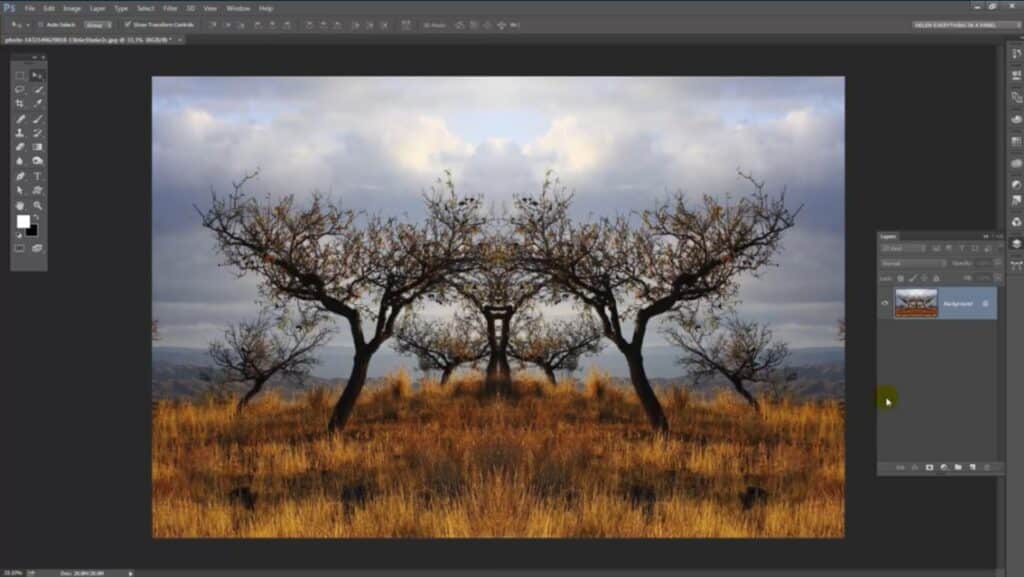
- Surreal Landscapes and Architecture: Take a scenic landscape or a striking architectural photograph and apply a horizontal mirror effect. Buildings can appear to stretch infinitely into the sky and ground, or natural elements like mountains and rivers can form intricate, symmetrical patterns. This creates a surreal, dreamlike quality that can elevate simple photos into profound digital art, perfect for abstract or aesthetic image collections on Tophinhanhdep.com.
- Emotional Portraits and Figures: A mirrored portrait can evoke a sense of duality, introspection, or even unease. Flipping a figure vertically can create a powerful, almost spiritual reflection, especially if blended subtly. These techniques are excellent for conveying deeper emotional narratives, contributing to the “Sad/Emotional” or “Beautiful Photography” categories.
- Nature’s Hidden Symmetries: Even seemingly asymmetrical natural elements like trees, flowers, or rock formations can reveal unexpected beauty when mirrored. This process allows you to discover hidden symmetries, turning organic shapes into geometric wonders and providing fresh inspiration for nature photography.
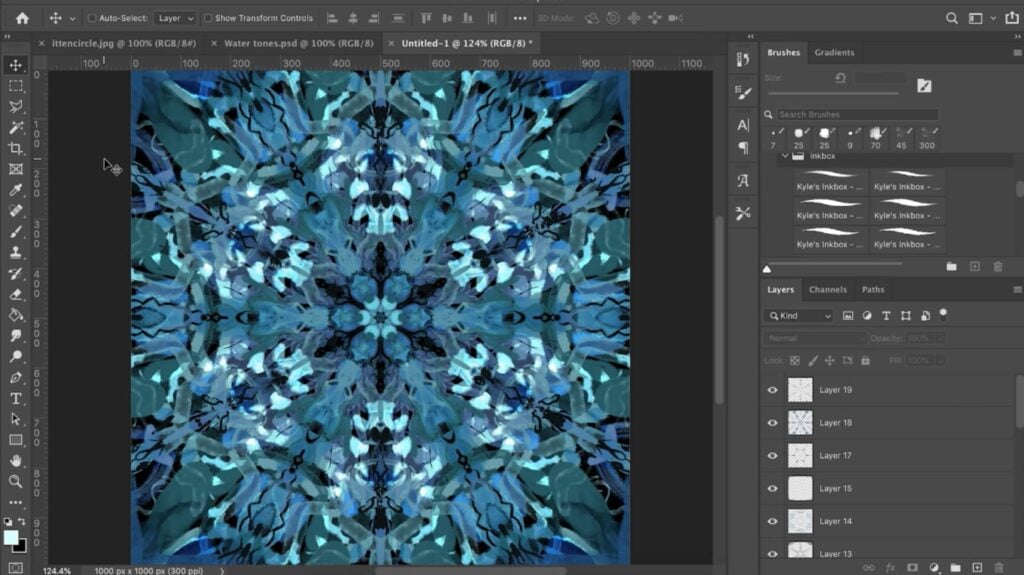
Dynamic Patterns and Kaleidoscopic Visions
Beyond simple reflections, mirroring multiple times can lead to complex, repeating patterns and stunning kaleidoscopic effects, opening new avenues for graphic design and creative ideas.
- Repeating Tile Patterns: By mirroring a selection horizontally and then vertically, you can create a repeating tile effect. This is particularly effective for backgrounds, wallpapers, or texture generation. Start with a captivating element, mirror it to create a two-part symmetrical image, then duplicate and mirror that entire image to expand the pattern.
- Intricate Kaleidoscopic Designs: For truly dazzling digital art, take a central element, mirror it, then duplicate the entire mirrored composition and rotate it by 90 or 180 degrees, mirroring again. Repeating this process creates complex, radial symmetries reminiscent of kaleidoscopes. This advanced photo manipulation technique allows for endless variations, producing unique visual elements suitable for high-resolution backgrounds and trending styles on Tophinhanhdep.com.
- Geometric Art from Organic Forms: Even a small, organic detail from a nature photograph, when mirrored and repeated, can become the building block for intricate geometric art, showcasing the versatility of digital photography editing styles.
Enhancing Visual Storytelling and Mood Boards
Mirror images aren’t just about aesthetics; they can also be powerful tools for storytelling and mood creation, enriching your photo ideas and thematic collections.
- Duality and Reflection: Use mirroring to symbolize duality, inner conflict, or a metaphorical reflection of a subject’s state. This can add a profound layer to your visual narrative, especially in emotional photography.
- Surrealism and Fantasy: The inherent unnaturalness of perfect mirroring can lend itself well to surreal or fantastical themes. Imagine a city skyline reflected perfectly upside down, suggesting an alternate reality. This pushes the boundaries of creative ideas in digital art.
- Mood Board Enhancement: Incorporate mirrored elements into your mood boards to convey specific visual themes or artistic directions. The symmetrical balance can bring a sense of calm, while dynamic patterns can suggest energy or complexity, providing rich inspiration for your next photo manipulation project.
By embracing these creative applications, you move beyond basic image editing into the realm of true visual design, crafting images that not only look beautiful but also tell a story and evoke emotion, perfectly aligning with Tophinhanhdep.com’s mission to foster inspiring image collections.
Essential Tips and Troubleshooting for Mirror Image Perfection
Even with a clear understanding of the steps, minor issues can arise during the mirror imaging process in Photoshop. Tophinhanhdep.com is here to provide you with expert tips and troubleshooting advice to ensure your photo manipulation efforts yield flawless results, maintaining the high quality expected in digital photography.
Key Considerations for Flawless Mirroring
Optimizing your workflow and understanding subtle nuances can significantly improve the outcome of your mirrored images.
- Canvas Space Adjustments: If your mirrored selection extends beyond the current canvas boundaries, Photoshop will crop it. To avoid this, consider increasing your canvas size before mirroring. Go to
Image > Canvas Sizeand adjust the width or height as needed, ensuring you have ample space for your flipped elements. This proactive step saves time and preserves your entire visual design. - Flipping vs. Rotating: Know the Difference: It’s easy to confuse these two transformations, but their effects are strikingly different.
- Flipping (Mirroring): Creates a reflection along an axis (horizontal or vertical), like looking in a mirror. The left becomes right, and vice-versa. This is achieved via
Edit > Transform > Flip Horizontal/VerticalorImage > Image Rotation > Flip Canvas Horizontal/Vertical. - Rotating: Changes the orientation of the image or layer by degrees (e.g., 90°, 180°). This is done via
Edit > Transform > RotateorImage > Image Rotation > 90° CW/CCW. Always ensure you select the correct command for your desired effect to avoid unintended outcomes in your photo manipulation.
- Flipping (Mirroring): Creates a reflection along an axis (horizontal or vertical), like looking in a mirror. The left becomes right, and vice-versa. This is achieved via
- Importance of Smart Objects: For non-destructive editing, especially when resizing or repeatedly transforming a layer, convert it to a Smart Object before applying transformations. Right-click on the layer in the Layers panel and choose
Convert to Smart Object. This preserves the original pixel data, allowing you to scale, rotate, and flip without losing image quality, a crucial aspect for high-resolution photography. - Leveraging Keyboard Shortcuts: Mastering Photoshop shortcuts can dramatically speed up your workflow.
Ctrl+T(Win) /Command+T(Mac): Free TransformCtrl+J(Win) /Command+J(Mac): Duplicate Layer/SelectionCtrl+0(Win) /Command+0(Mac): Fit on ScreenM: Rectangular Marquee Tool (useful for clearing active crop borders) These shortcuts will make your image editing process smoother and more efficient.
Addressing Common Challenges
Even experienced users encounter hiccups. Here’s how to troubleshoot some common problems when creating mirror images.
- “Can’t Locate the Flip Option”: If you’re using a different version of Photoshop and the menu paths seem unfamiliar, don’t fret. Go to
Helpin the top menu bar and use the search function to look for “flip.” Photoshop’s integrated help system will guide you to the correct location of the feature for your specific version, ensuring you can continue your visual design project without delay. - “Logo or Text Flipped Unintentionally”: This often happens when you use
Image > Image Rotation > Flip Canvas Horizontal/Vertical. This command flips the entire canvas, affecting all layers including text and logos, rendering them unreadable. The solution is to flip only the specific layer containing the image content you want mirrored. Ensure your text/logo is on a separate layer, then select only the image layer and useEdit > Transform > Flip Horizontal/Verticalinstead. This maintains the integrity of your graphic design elements. - “Image is Flipped the Wrong Way”: Sometimes, you might inadvertently choose
Flip Verticalinstead ofFlip Horizontal, or vice-versa. This is a quick fix: simply undo (Ctrl+Z/Command+Z) and re-apply the correct flip command. Pay close attention to the orientation desired for your aesthetic image. - “People Look Unnatural in Mirrored Compositions”: Our brains are accustomed to certain human asymmetries. A perfectly mirrored face or body can sometimes appear uncanny or unnatural. To mitigate this, consider these approaches:
- Selective Mirroring: Instead of flipping the entire person, mirror only a portion (e.g., one side of a face to exaggerate symmetry, then blend).
- Subtle Blending: Use layer masks with a soft brush to gently blend the mirrored half, introducing slight imperfections that make it more believable.
- Contextual Framing: Place the mirrored person within an abstract or surreal environment where unnaturalness is part of the artistic intent, turning a potential flaw into a creative strength for your digital art.
By internalizing these tips and troubleshooting strategies, you’ll be well-equipped to navigate the complexities of Photoshop and consistently produce high-quality, captivating mirror images, further enriching the creative possibilities offered by Tophinhanhdep.com.
Conclusion
Mastering the mirror image effect in Adobe Photoshop is an indispensable skill for anyone passionate about digital photography, graphic design, and innovative visual design. As demonstrated, this powerful photo manipulation technique allows you to create stunning symmetrical compositions, from classic full-image reflections to intricate selective mirroring. It opens up a world of creative ideas, enabling you to produce abstract wallpapers, aesthetic backgrounds, and profound visual narratives that resonate with emotion and artistic flair.
At Tophinhanhdep.com, we are dedicated to providing the inspiration, tools, and knowledge you need to transform your photographic visions into reality. Whether you’re exploring high-resolution stock photos, experimenting with new editing styles, or curating thematic image collections, the mirror effect is a versatile addition to your creative arsenal. We encourage you to experiment with these techniques, push the boundaries of your imagination, and discover the endless possibilities that lie within your images. Keep practicing, keep creating, and let Tophinhanhdep.com be your guide in the ever-evolving landscape of digital art and photography.