How to Download an Image on a Chromebook: Your Gateway to Tophinhanhdep.com's Visual World

Chromebooks, with their streamlined ChromeOS and cloud-centric design, have become indispensable tools for productivity, learning, and entertainment. Their simplicity often belies their powerful capabilities, especially when it comes to managing digital assets. For anyone looking to enrich their digital life with captivating visuals, understanding how to download images effectively on a Chromebook is a fundamental skill. Whether you’re a student compiling research, a graphic designer seeking inspiration, or simply someone who loves to personalize their device with stunning wallpapers, your Chromebook, combined with the extensive resources available on Tophinhanhdep.com, provides a seamless experience.
Tophinhanhdep.com is your ultimate destination for a vast array of visual content, offering everything from breathtaking high-resolution stock photos to a diverse collection of wallpapers and backgrounds spanning aesthetic, nature, abstract, and even sad/emotional themes. Beyond just offering images, Tophinhanhdep.com empowers creators and enthusiasts with a suite of image tools like converters, compressors, optimizers, and even AI upscalers, along with a rich source of visual design insights and image inspiration. This guide will walk you through various methods of downloading and saving images on your Chromebook, ensuring you can harness the full potential of both your device and the incredible resources at Tophinhanhdep.com.
Downloading Images from the Web on Your Chromebook
The internet is a treasure trove of visual content, and your Chromebook makes it incredibly straightforward to capture these images for your personal projects, aesthetic collections, or simply as memorable keepsakes. Tophinhanhdep.com, for instance, offers an expansive gallery of images perfect for any need – from vibrant abstract art to serene nature photography. Knowing the basic steps to download these images directly from a webpage is your first step into a world of visual creativity.
The Standard ‘Save Image As’ Method

This is the most common and direct way to download an image you find on a website, including any of the beautiful photography featured on Tophinhanhdep.com.
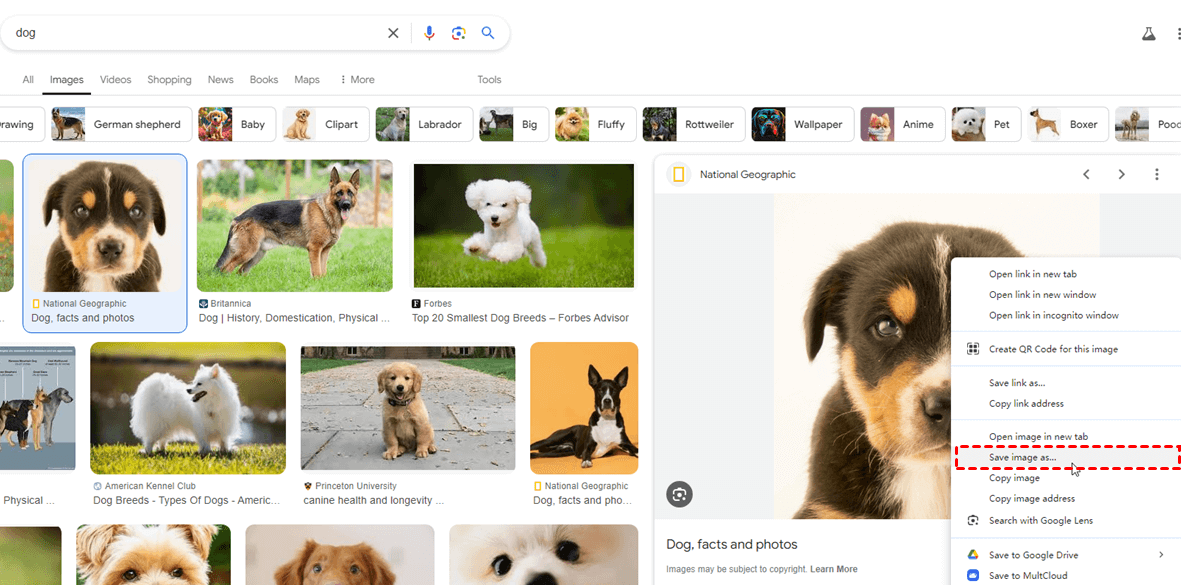
- Navigate to the Image: Open the webpage or website where the image you wish to download is located. For example, if you’re browsing Tophinhanhdep.com for new wallpapers or high-resolution stock photos, locate the specific image you desire.
- Initiate the Save Command:
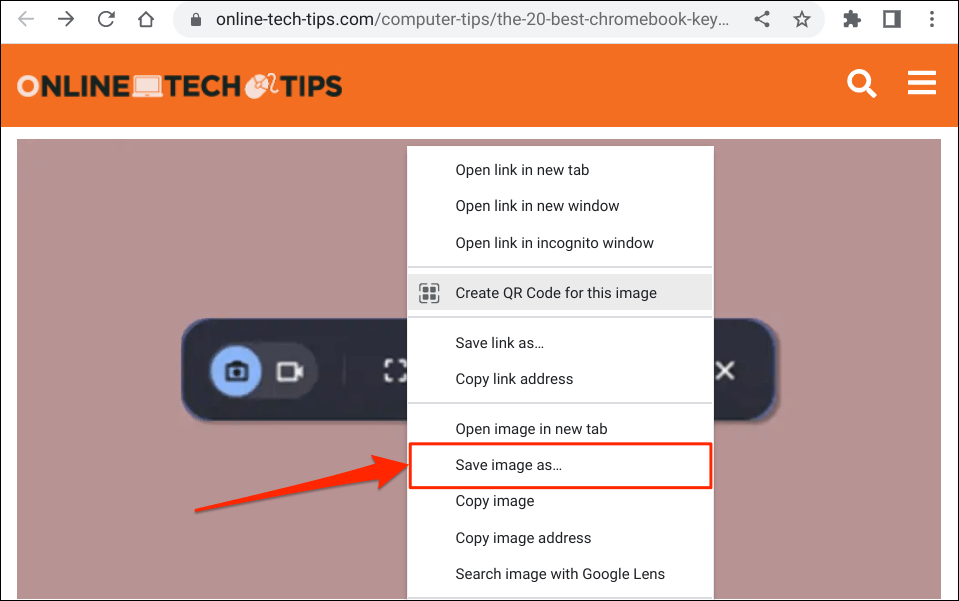
- Using a Mouse or Trackpad: Place your cursor over the image. Right-click (or tap the trackpad with two fingers if you’re using a Chromebook’s built-in trackpad). A context menu will appear.
- Using a Touchscreen: If your Chromebook features a touchscreen, simply tap and hold the image until the context menu pops up.
- Select “Save image as…”: From the context menu, choose the option that says “Save image as…” This will open a “Save file as” window.
- Choose Your Destination: By default, ChromeOS will suggest saving the image to your “Downloads” folder. This folder is stored locally on your Chromebook. However, you have the flexibility to change this:
- Rename the File: In the “Save file as” window, you can give the image a more descriptive name, which is particularly useful if you’re curating a collection of aesthetic images or photos for a specific project.
- Select a New Folder: You can navigate through your Chromebook’s file system to choose a different local folder.
- Save to Cloud Storage: For seamless access across multiple devices, consider saving directly to your Google Drive. This is an excellent practice for preserving your collection of digital photography or important visual design assets. Simply select the Google Drive option in the left-hand column of the “Save file as” window.
- External Storage: If you have an external storage device, such as a USB drive or SD card, connected to your Chromebook, you can also select that as your destination.
- Confirm the Download: Once you’ve chosen your desired filename and location, click the “Save” button or press Enter on your keyboard.
- Verify Download: A “Download complete” notification will briefly appear in the bottom-right corner of your Chromebook’s screen. You can click “Show in folder” to immediately open the Files app and view your newly downloaded image.
By following these simple steps, you can quickly and efficiently download any image, whether it’s a stunning nature photo from Tophinhanhdep.com or a crucial graphic for a project.
Utilizing the Chromebook Clipboard for Quick Image Transfers
Sometimes, you don’t need to save an entire image file to your storage. Instead, you might want to quickly grab an image and paste it directly into a document, a presentation, or a messaging app. Your Chromebook’s clipboard offers a swift and convenient way to achieve this, making it ideal for visual designers rapidly prototyping ideas or students incorporating images into assignments.
Copying Images for Instant Use
The “Copy image” function is perfect for immediate, temporary use of a visual.
- Locate the Image: Just as with downloading, find the image on Tophinhanhdep.com or any other webpage that you wish to copy.
- Access the Context Menu: Right-click the image (or tap and hold if on a touchscreen, or two-finger tap on the trackpad).
- Select “Copy image”: From the context menu, choose “Copy image.” This action places the image onto your Chromebook’s clipboard.
- Paste into Your Application: Open the application or document where you want to use the image (e.g., Google Docs, Google Slides, an online photo editor, or even a messaging app).
- Insert the Image: Right-click (or two-finger tap/tap and hold) at the desired insertion point within the application. Select “Paste” from the context menu. The image will now appear in your document or app.
This method is particularly efficient for incorporating elements into your visual design projects or for quick photo manipulation tasks without generating multiple files on your storage.
Leveraging the ChromeOS Clipboard History
ChromeOS enhances the basic copy-paste functionality with a robust clipboard history feature. This means you’re not limited to pasting only the very last item you copied.
- Copy Multiple Items: You can copy several images (or text snippets) sequentially using the “Copy image” method described above. Each copied item is stored in your clipboard history.
- Access Clipboard History: In your document or app, place your cursor where you want to insert an image. Press the Search key + V on your keyboard. This will open the ChromeOS clipboard history panel, displaying a list of your recently copied items.
- Select and Paste: Click or tap on the specific image from the clipboard history that you wish to insert. It will immediately appear in your document.
This feature is a game-changer for visual designers and anyone involved in graphic design or creating mood boards, allowing for greater flexibility and speed when assembling content from various sources, including the diverse thematic collections found on Tophinhanhdep.com.
Seamlessly Saving from Google Photos to Your Chromebook
For many, Google Photos serves as the primary repository for personal digital photography, housing countless memories and important images. If you’ve uploaded your photos to Google Photos, downloading them back to your Chromebook is a simple process, allowing you to access, edit, or utilize your high-resolution photography locally.
- Open Google Photos: Launch the Google Photos app on your Chromebook.
- Select Your Image: Browse through your library and click on the specific image you want to download.
- Access Download Options: In the top-right corner of the screen, you’ll see either an “Info” icon (an ‘i’ in a circle) or a three-dot menu icon. Click on one of these to reveal additional options.
- Select “Download”: From the menu that appears, choose the “Download” option.
- Automatic Saving: The Photos app will automatically save your selected picture or photo to the “Downloads” folder in your Chromebook’s Files app.
While this process is typically smooth, sometimes users encounter issues. If Google Photos isn’t downloading to your Chromebook, consider these common troubleshooting steps:
- Storage Issues: Ensure your Chromebook has sufficient local storage space. If it’s low, downloading large, high-resolution images might fail. You can check your storage in your Chromebook’s Settings.
- Internet Problems: A slow or unstable internet connection can interrupt downloads. Verify your Wi-Fi connection and try again.
- Outdated Software: Make sure your ChromeOS is up to date. Outdated software can sometimes cause compatibility issues with apps like Google Photos.
- Permission Settings: Confirm that the Google Photos app has the necessary permissions to download files to your device. You can usually manage app permissions in your Chromebook’s Settings.
- Cache/Data Corruption: Corrupt app data or browser cache might interfere. Try clearing the cache for Google Photos or your Chrome browser.
By keeping these points in mind, you can effectively manage your digital photography and ensure your personal collections are accessible on your Chromebook.
Capturing Screenshots: A Versatile Image Saving Method
Beyond directly downloading or copying images, screenshots offer a powerful and flexible way to capture specific visual content on your Chromebook. This method is incredibly useful for extracting parts of documents, web pages, or even visual design elements for photo manipulation. Whether you need a full-screen capture or just a snippet, ChromeOS provides intuitive tools to get the job done.
Mastering the ChromeOS Screen Capture Tool
The built-in screen capture tool on ChromeOS allows for various types of screenshots, making it highly adaptable for different needs.
- Activate the Tool:
- Keyboard Shortcut: Press Ctrl + Shift + Show Window keys simultaneously. (The “Show Window” key usually looks like a rectangle with two vertical lines on the right, found in the top row of your keyboard).
- System Tray: Alternatively, click on the date and time in the bottom-right corner of your screen (the system tray) and select the “Screen capture” icon.
- Choose Your Capture Type: Once the screen capture tool is active, a toolbar will appear at the bottom of your screen. You’ll have several options:
- Take a Full Screenshot: Captures the entire screen.
- Take a Partial Screenshot: This is often the most useful for capturing specific images. Select the “Take partial screenshot” icon (it typically looks like a dashed rectangle). Your cursor will change to a crosshair. Click and drag the crosshair to draw a box around the image or area you want to capture.
- Take a Window Screenshot: Captures a specific open window.
- Record Screen: The tool also offers the option to record your screen, which can be useful for tutorials or dynamic visual content.
- Confirm Capture: After selecting your area (for partial screenshots) or choosing the full/window option, click the “Capture” button (or release your mouse/trackpad for partial captures). The screenshot will be automatically saved.
- Locate Your Screenshot: By default, all screenshots are saved as PNG images to your Chromebook’s “Downloads” folder. A “Screenshot taken” notification will appear, allowing you to “Show in folder” for quick access.
Beyond Basic Screenshots: Advanced Capture Options
While the default “Downloads” folder is convenient, you might want to organize your captured images more meticulously, especially if you’re collecting images for graphic design projects or thematic collections from Tophinhanhdep.com.
- Customizing Save Location: Before taking a screenshot, while the screen capture toolbar is active, you can click the gear icon (Settings) on the toolbar. From there, select “Select folder” and choose your preferred destination. This could be a specific project folder, a dedicated “Aesthetic Screenshots” folder, or even a folder on your Google Drive for cloud backup.
- Image Format Considerations: ChromeOS saves screenshots as PNG files. While PNGs are excellent for retaining image quality, especially for graphics with sharp lines and text, some online platforms or editing software might prefer other formats like JPEG or TIFF. If you download an image from Tophinhanhdep.com that is in WEBP format (a modern, efficient format that many websites use), or if your screenshot needs to be in a different format, you can use online tools or browser extensions. Tophinhanhdep.com, in its commitment to providing comprehensive image tools, offers excellent Converters that allow you to easily transform images between various formats, ensuring compatibility for all your creative ideas and projects.
Screenshots are an invaluable resource for gathering visual content, whether it’s for reference, inspiration, or direct incorporation into your digital art and visual design endeavors.
Optimizing Your Downloaded Images with Tophinhanhdep.com’s Tools and Resources
Once you’ve successfully downloaded images to your Chromebook, the journey often doesn’t end there. Whether you’re working with high-resolution stock photos, personal digital photography, or aesthetic wallpapers from Tophinhanhdep.com, you might need to process, optimize, or even transform these images to fit your specific needs. This is where Tophinhanhdep.com truly shines, providing not just an endless source of visual inspiration but also practical tools to enhance your creative workflow.
Image Formats and Conversion Needs
The digital world is awash with various image formats, each with its own advantages. You’ll frequently encounter JPEG (Joint Photographic Experts Group), PNG (Portable Network Graphics), GIF (Graphics Interchange Format), and increasingly, WEBP (WebP). WEBP, in particular, is gaining popularity for its superior compression, leading to smaller file sizes and faster webpage loading times. However, not all applications or platforms fully support WEBP yet.
If you download a stunning nature background or an abstract image from Tophinhanhdep.com and find it’s in WEBP format but your specific photo editor or project requires a JPEG or PNG, fear not. Tophinhanhdep.com offers powerful Image Tools, specifically its Converters. These tools allow you to effortlessly convert images from one format to another (e.g., WEBP to JPG, PNG to TIFF, etc.) directly within our platform. This ensures that every high-resolution image or piece of digital art you acquire is perfectly suited for your creative ideas, whether for graphic design, photo manipulation, or simply setting a new wallpaper.
Enhancing Your Visuals: Tophinhanhdep.com’s Image Tools
Beyond simple format conversion, Tophinhanhdep.com’s suite of image tools empowers you to take full control of your downloaded visuals. These tools are designed to address common challenges faced by photographers, designers, and everyday users.
- Compressors: High-resolution photography can result in large file sizes, which can be problematic for web use, email attachments, or limited storage. Our Compressors allow you to reduce file size without significantly compromising image quality. This is ideal for optimizing images for social media posts, blog content, or sharing collections of beautiful photography.
- Optimizers: Similar to compressors, Optimizers refine images for specific uses, often targeting web performance. They fine-tune various aspects of an image to ensure it loads quickly and efficiently, crucial for visual design projects that need to be fast and responsive online.
- AI Upscalers: Have you ever found a perfect image, perhaps an older piece of digital art or a fantastic stock photo, but its resolution is too low for your project? Tophinhanhdep.com’s AI Upscalers are a game-changer. These advanced tools use artificial intelligence to intelligently increase the resolution of an image, making it appear sharper and larger without pixelation. This can transform a small, less-than-ideal image into a high-resolution asset suitable for large prints, detailed graphic design, or even a full-screen background.
- Image-to-Text: For researchers, students, or anyone needing to extract information from images, our Image-to-Text tool is invaluable. This feature uses Optical Character Recognition (OCR) technology to convert text found within an image (like an infographic, chart, or scanned document) into editable text. This saves immense time and effort compared to manual transcription and is perfect for academic projects or compiling reference materials.
These tools, accessible directly through Tophinhanhdep.com, transform your Chromebook into a powerful hub for digital photography and visual design, allowing you to manipulate and prepare images for any purpose or creative endeavor.
Discovering Inspiration and Collections on Tophinhanhdep.com
Tophinhanhdep.com isn’t just about the tools; it’s also a vibrant source of inspiration and ready-to-use content. After mastering image downloading and optimization on your Chromebook, you’ll want to explore the extensive galleries that fuel creativity.
- Diverse Image Categories: Dive into vast collections of Wallpapers and Backgrounds to personalize your Chromebook or other devices. Explore captivating Aesthetic imagery, serene Nature photography, thought-provoking Abstract art, or emotionally resonant Sad/Emotional visuals for mood boards or expressive projects. Our Beautiful Photography section showcases stunning high-resolution images that inspire and delight.
- Photography Resources: For aspiring or professional photographers, Tophinhanhdep.com is a hub for High Resolution and Stock Photos, ideal for commercial projects or enhancing your Digital Photography portfolio. Explore different Editing Styles to learn and experiment.
- Visual Design Elements: Artists and designers will find a wealth of resources covering Graphic Design, Digital Art, and Photo Manipulation techniques. Our platform provides Creative Ideas and assets that can kickstart your next project.
- Inspiration & Collections: Stuck for ideas? Browse our Image Inspiration & Collections. Discover new Photo Ideas, create compelling Mood Boards with our diverse imagery, explore curated Thematic Collections, and stay updated with Trending Styles in the visual world.
By integrating the seamless downloading capabilities of your Chromebook with the rich ecosystem of Tophinhanhdep.com, you unlock a world where visual content is not only easily accessible but also fully manageable and transformable to meet your highest creative aspirations.
Conclusion
Downloading images on a Chromebook is a straightforward process, offering multiple convenient methods tailored to different needs. Whether you’re saving files directly from a webpage, copying them to your clipboard for quick insertion, retrieving personal memories from Google Photos, or capturing specific screen elements, your Chromebook provides the necessary tools for efficient image acquisition.
However, the true power of your downloaded images is unlocked when combined with the comprehensive resources available at Tophinhanhdep.com. From the moment you discover a captivating wallpaper or a high-resolution stock photo, Tophinhanhdep.com supports your creative journey. Our vast collections provide endless inspiration across genres like nature, abstract, and aesthetic photography, while our cutting-edge image tools – including converters, compressors, optimizers, and AI upscalers – ensure that every visual you acquire is perfectly prepared for your specific project.
Embrace the simplicity and power of your Chromebook, and let Tophinhanhdep.com be your trusted partner in exploring, creating, and manipulating the incredible world of digital imagery. Start downloading, designing, and inspiring today by exploring the rich visual tapestry and innovative tools waiting for you on Tophinhanhdep.com.