Mastering Image Extraction from Google Docs: Your Comprehensive Guide to High-Quality Visuals

In the collaborative digital workspace of today, Google Docs stands as an indispensable tool for everything from drafting blog posts to outlining complex business strategies. It’s a platform celebrated for its accessibility, real-time collaboration, and robust text editing capabilities. However, when it comes to managing embedded images, users often encounter a peculiar challenge: the seemingly simple task of downloading an image from a Google Document isn’t as intuitive as one might expect. Unlike web pages where a quick right-click often brings up a “Save image as…” option, Google Docs requires a bit more finesse.
This guide aims to demystify the process, providing you with a comprehensive suite of methods to effortlessly download images from your Google Docs in 2024. Whether you’re an avid blogger curating captivating content, a digital artist sourcing inspiration, a graphic designer in need of specific elements, or simply someone looking to save cherished photos embedded in a document, understanding these techniques is paramount. We’ll explore various approaches, from quick single-image saves to efficient batch downloads, ensuring you can extract and utilize your visual assets effectively. Furthermore, we’ll connect these practical steps to the broader world of visual content, emphasizing how these images can enrich your projects, from creating stunning wallpapers and backgrounds to enhancing your digital photography and visual design endeavors.
Why Download Images from Google Docs? Beyond Simple Document Creation
Images are far more than mere embellishments; they are critical components of engaging content, powerful storytelling, and effective communication. The ability to extract these visuals from Google Docs opens up a world of possibilities, seamlessly integrating your document’s content with your wider creative and professional needs.
Enhancing Visual Design and Creative Projects
For those immersed in the realm of visual design and graphic design, images from Google Docs can serve as crucial building blocks. Perhaps you’ve drafted an initial concept for a logo or layout, incorporating various visual elements directly into your document. Downloading these images allows you to then refine them in specialized digital art software, performing photo manipulation to achieve a desired aesthetic. These extracted visuals can be instrumental in developing mood boards, helping you flesh out creative ideas and explore trending styles for marketing campaigns, presentations, or personal art projects. An image that started as a placeholder in a document can, with the right tools and creative vision, transform into a striking element of a larger design.
Optimizing Photography and High-Resolution Content
Photography, whether it’s high-resolution landscapes or carefully selected stock photos, is often an integral part of modern documents. When these images are embedded in Google Docs, you might need to extract them for further processing. This could involve applying specific editing styles, enhancing their quality using AI upscalers, or preparing them for print. Documents often house important visual records or samples of beautiful photography that you need to preserve in their original or improved quality. Downloading them ensures you maintain control over the resolution and format, ready for any subsequent digital photography workflow. It allows you to move beyond the limitations of the document viewer and truly leverage the potential of your visual assets.
Curating Thematic Collections and Wallpapers
Imagine you’ve compiled a Google Doc filled with inspirational visuals – perhaps nature scenes, abstract patterns, or even deeply sad/emotional photography – intended for a personal project or a public thematic collection. Downloading these images is the first step in curating these collections. You might want to use them as dynamic wallpapers for your devices, compile them into compelling backgrounds for presentations, or simply gather them for photo ideas and future inspiration. The ability to pull these images out of their document context allows for greater flexibility in how you organize, share, and appreciate your visual library, contributing to a rich personal or professional image inspiration repository.
Core Methods for Extracting Images from Google Docs (Desktop)
While Google Docs doesn’t offer a single, universally obvious “download image” button, there are several effective workarounds. Each method has its own strengths, catering to different scenarios, whether you need to download a single image quickly or extract an entire gallery.
Method 1: The HTML File Download – Ideal for Batch Extraction
By far, the most efficient method for downloading multiple images simultaneously is to save your entire Google Document as an HTML file. This technique is particularly valuable for comprehensive projects where you have numerous visuals embedded, allowing you to bypass the tedious process of saving each image individually.
Step-by-Step Guide:
- Open Your Google Document: Navigate to the Google Doc containing the images you wish to download.
- Access the Download Option: Go to
Filein the top menu bar. - Select Web Page Format: Hover over
Download, then chooseWeb Page (.html, zipped). - Unzip the File: Your browser will download a
.zipfile to your computer. Once downloaded, locate the file (usually in your “Downloads” folder) and double-click to unzip it. - Locate the Images Folder: Inside the unzipped folder, you will find an “images” subfolder. All images from your Google Doc will be neatly organized within this folder.
Why this method shines: This approach is a lifesaver for image collections and thematic collections, as it extracts all embedded images in one go. The images are saved as standard file types (e.g., JPEG, PNG), making them immediately ready for integration into your visual design software, digital art projects, or for further processing with image tools like compressors or AI upscalers. While the default filenames (image1, image2, etc.) may not be descriptive, it’s a simple matter to rename them for better organization and on-page SEO best practices if they are intended for a website. This method provides the raw visual data, perfect for anyone looking to maintain high resolution photography for future editing styles.
Method 2: Publishing to the Web – A Direct Right-Click Solution
Another effective method, especially useful when you need to download specific images and prefer a familiar web browsing experience, is to temporarily publish your Google Document to the web. This makes the document accessible via a unique URL, allowing you to interact with its content, including images, as if it were any other webpage.
Step-by-Step Guide:
- Open Your Google Document: Open the document from which you want to save images.
- Initiate Publishing: Go to
Filein the top menu bar. - Choose “Publish to the web”: Hover over
Share, then selectPublish to the web. - Confirm Publication: In the dialog box, ensure “Link” is selected, then click the
Publishbutton. A confirmation pop-up will appear; clickOK. - Copy and Open the Link: Google Docs will provide you with a URL. Copy this link and paste it into a new tab in your web browser.
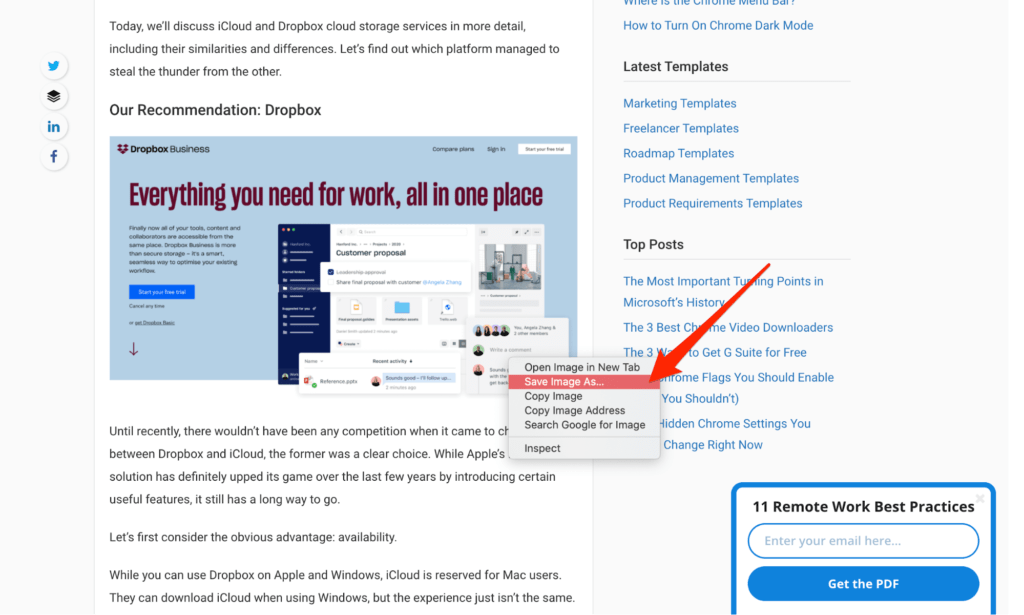
- Save Images: Your document will appear as a simple webpage. Now, you can simply right-click on any image and select
Save image as...to download it to your computer.
Tip: If you only need a few images from a very long document and don’t want to publish the entire content, you can copy the desired images to a new, blank Google Doc, then publish only that new document.
Relevance to website topics: This method is fantastic for quickly grabbing an aesthetic image or a sample of beautiful photography to use in a mood board or as a temporary background. The immediate access to images via right-click makes it highly convenient for designers who are rapidly iterating on creative ideas or testing visual design concepts. Once downloaded, these images can be run through image compressors or optimizers to prepare them for web use, ensuring fast loading times for your website or blog.
Method 3: Leveraging Google Keep – For Selective Image Saving
When your goal is to extract just one or a handful of images from a large document, without the need to download the entire file or publish it, Google Keep provides an elegant and integrated solution. Google Keep is Google’s note-taking application, and its seamless integration with Google Docs makes it a quick tool for isolated image extraction.
Step-by-Step Guide:
- Open Your Google Document in Chrome: Ensure your Google Doc is open in the Google Chrome browser.
- Right-Click on the Image: Right-click on the specific image you want to download.
- Select “Save to Keep”: In the context menu, choose
Save to Keep(you might need to clickView more optionsfirst). - Access Google Keep Sidebar: A Google Keep sidebar will appear on the right side of your document, displaying your selected image as a new note.
- Download from Keep: Right-click on the image within the Google Keep sidebar and select
Save image as...to download it to your computer.
Benefit for visual creatives: This method is perfect for capturing individual photo ideas or specific elements for digital art projects. It allows for a focused approach, letting you pick out images that align with particular editing styles or thematic collections without sifting through a larger download. The immediate transfer to Google Keep also makes it easy to add notes or context to the image, aiding in your image inspiration workflow.
Method 4: Exporting as Microsoft Word (.docx) – A Flexible Alternative
While Google Docs is a primary platform, sometimes converting to a familiar format like Microsoft Word can unlock hidden options for image extraction. This method is particularly useful if you’re accustomed to working within Word’s environment or if you require the images to be within a .docx file for other purposes before saving them individually.
Step-by-Step Guide:
- Open Your Google Document: Open the document from which you wish to save images.
- Access the Download Option: Go to
Filein the top menu bar. - Choose Microsoft Word Format: Hover over
Download, then selectMicrosoft Word (.docx). - Open the .docx File: The document will download as a Word file. Open this file on your computer using Microsoft Word or a compatible program.
- Save Images from Word: Within the Word document, right-click on the image you want to save. Select
Save as Picture...from the context menu. You can then choose your desired location and filename.
Practical applications: This method offers flexibility for users who frequently toggle between Google Docs and Microsoft Word for their visual design or documentation needs. Once in Word, images can be manipulated, cropped, and saved individually, providing another layer of control. This can be useful for preparing images for print or integrating them into desktop publishing projects that might prefer the .docx format initially.
Method 5: Using the Snipping Tool / Screenshot – Quick & Dirty
For situations demanding immediate image capture, such as grabbing a small detail or a non-critical visual element, the snipping tool or a simple screenshot is the fastest way to get an image out of Google Docs. While this method might compromise the original high-resolution quality, it’s incredibly convenient for quick photo ideas or mood board captures.
Step-by-Step Guide:
- Open Your Google Document: Navigate to the image you want to capture in your Google Doc.
- Activate Snipping Tool:
- Windows: Search for “Snipping Tool” or use the shortcut
Windows key + Shift + S. - macOS: Use
Command + Shift + 4for a crosshair, orCommand + Shift + 3for a full screen capture.
- Windows: Search for “Snipping Tool” or use the shortcut
- Select and Capture: Drag your mouse to select the area of the image you want to capture.
- Save the Screenshot: The captured image will usually appear in your clipboard or as a preview. Save it as an image file (e.g., PNG, JPEG) to your desired location.
Considerations for quality: While expedient, this method captures whatever is displayed on your screen, which may not be the image’s original resolution. For high-resolution photography or professional visual design projects, you might need to use an AI upscaler later if the quality is too low. However, for quick references, aesthetic captures, or simple backgrounds for internal use, it’s a perfectly acceptable solution.
Method 6: Using Google Docs Add-ons – For Enhanced Functionality
For users seeking more specialized or automated image extraction, Google Docs offers a marketplace of add-ons that can extend its native capabilities. Tools like “Image Extractor” (or similar add-ons) are designed specifically to simplify the process of pulling images from documents.
Step-by-Step Guide (General for Image Extractor Add-on):
- Open Your Google Document: Open the relevant Google Doc.
- Access Add-ons: Go to
Extensionsin the top menu bar, thenAdd-ons, and selectGet add-ons. - Search and Install: In the Google Workspace Marketplace, search for “Image Extractor” or a similar image management add-on. Install it, granting the necessary permissions.
- Run the Add-on: Once installed, go back to
Extensions, select the newly installed add-on, and follow its specific instructions (e.g.,Start,Extract images to Drive). - Retrieve Images: The add-on will typically extract images and save them to a designated folder in your Google Drive, from where you can download them to your computer.
Benefits for power users: Add-ons can streamline workflows, especially when dealing with large volumes of images across many documents or when specific sorting/naming conventions are required. While some advanced features might require a premium subscription, even free versions often provide valuable functionality for managing thematic collections or extracting images for digital photography portfolios.
Downloading Images from Google Docs on Mobile Devices
Accessing and downloading images from Google Docs on mobile phones and tablets presents its own set of challenges, often with more limitations compared to desktop methods. The official Google Docs mobile app, for instance, doesn’t always offer a straightforward “Save image” option.
iPhone App Limitations and Workarounds
On iOS devices, the process of saving images from Google Docs usually involves a workaround that prioritizes accessibility over original image quality.
Step-by-Step Guide:
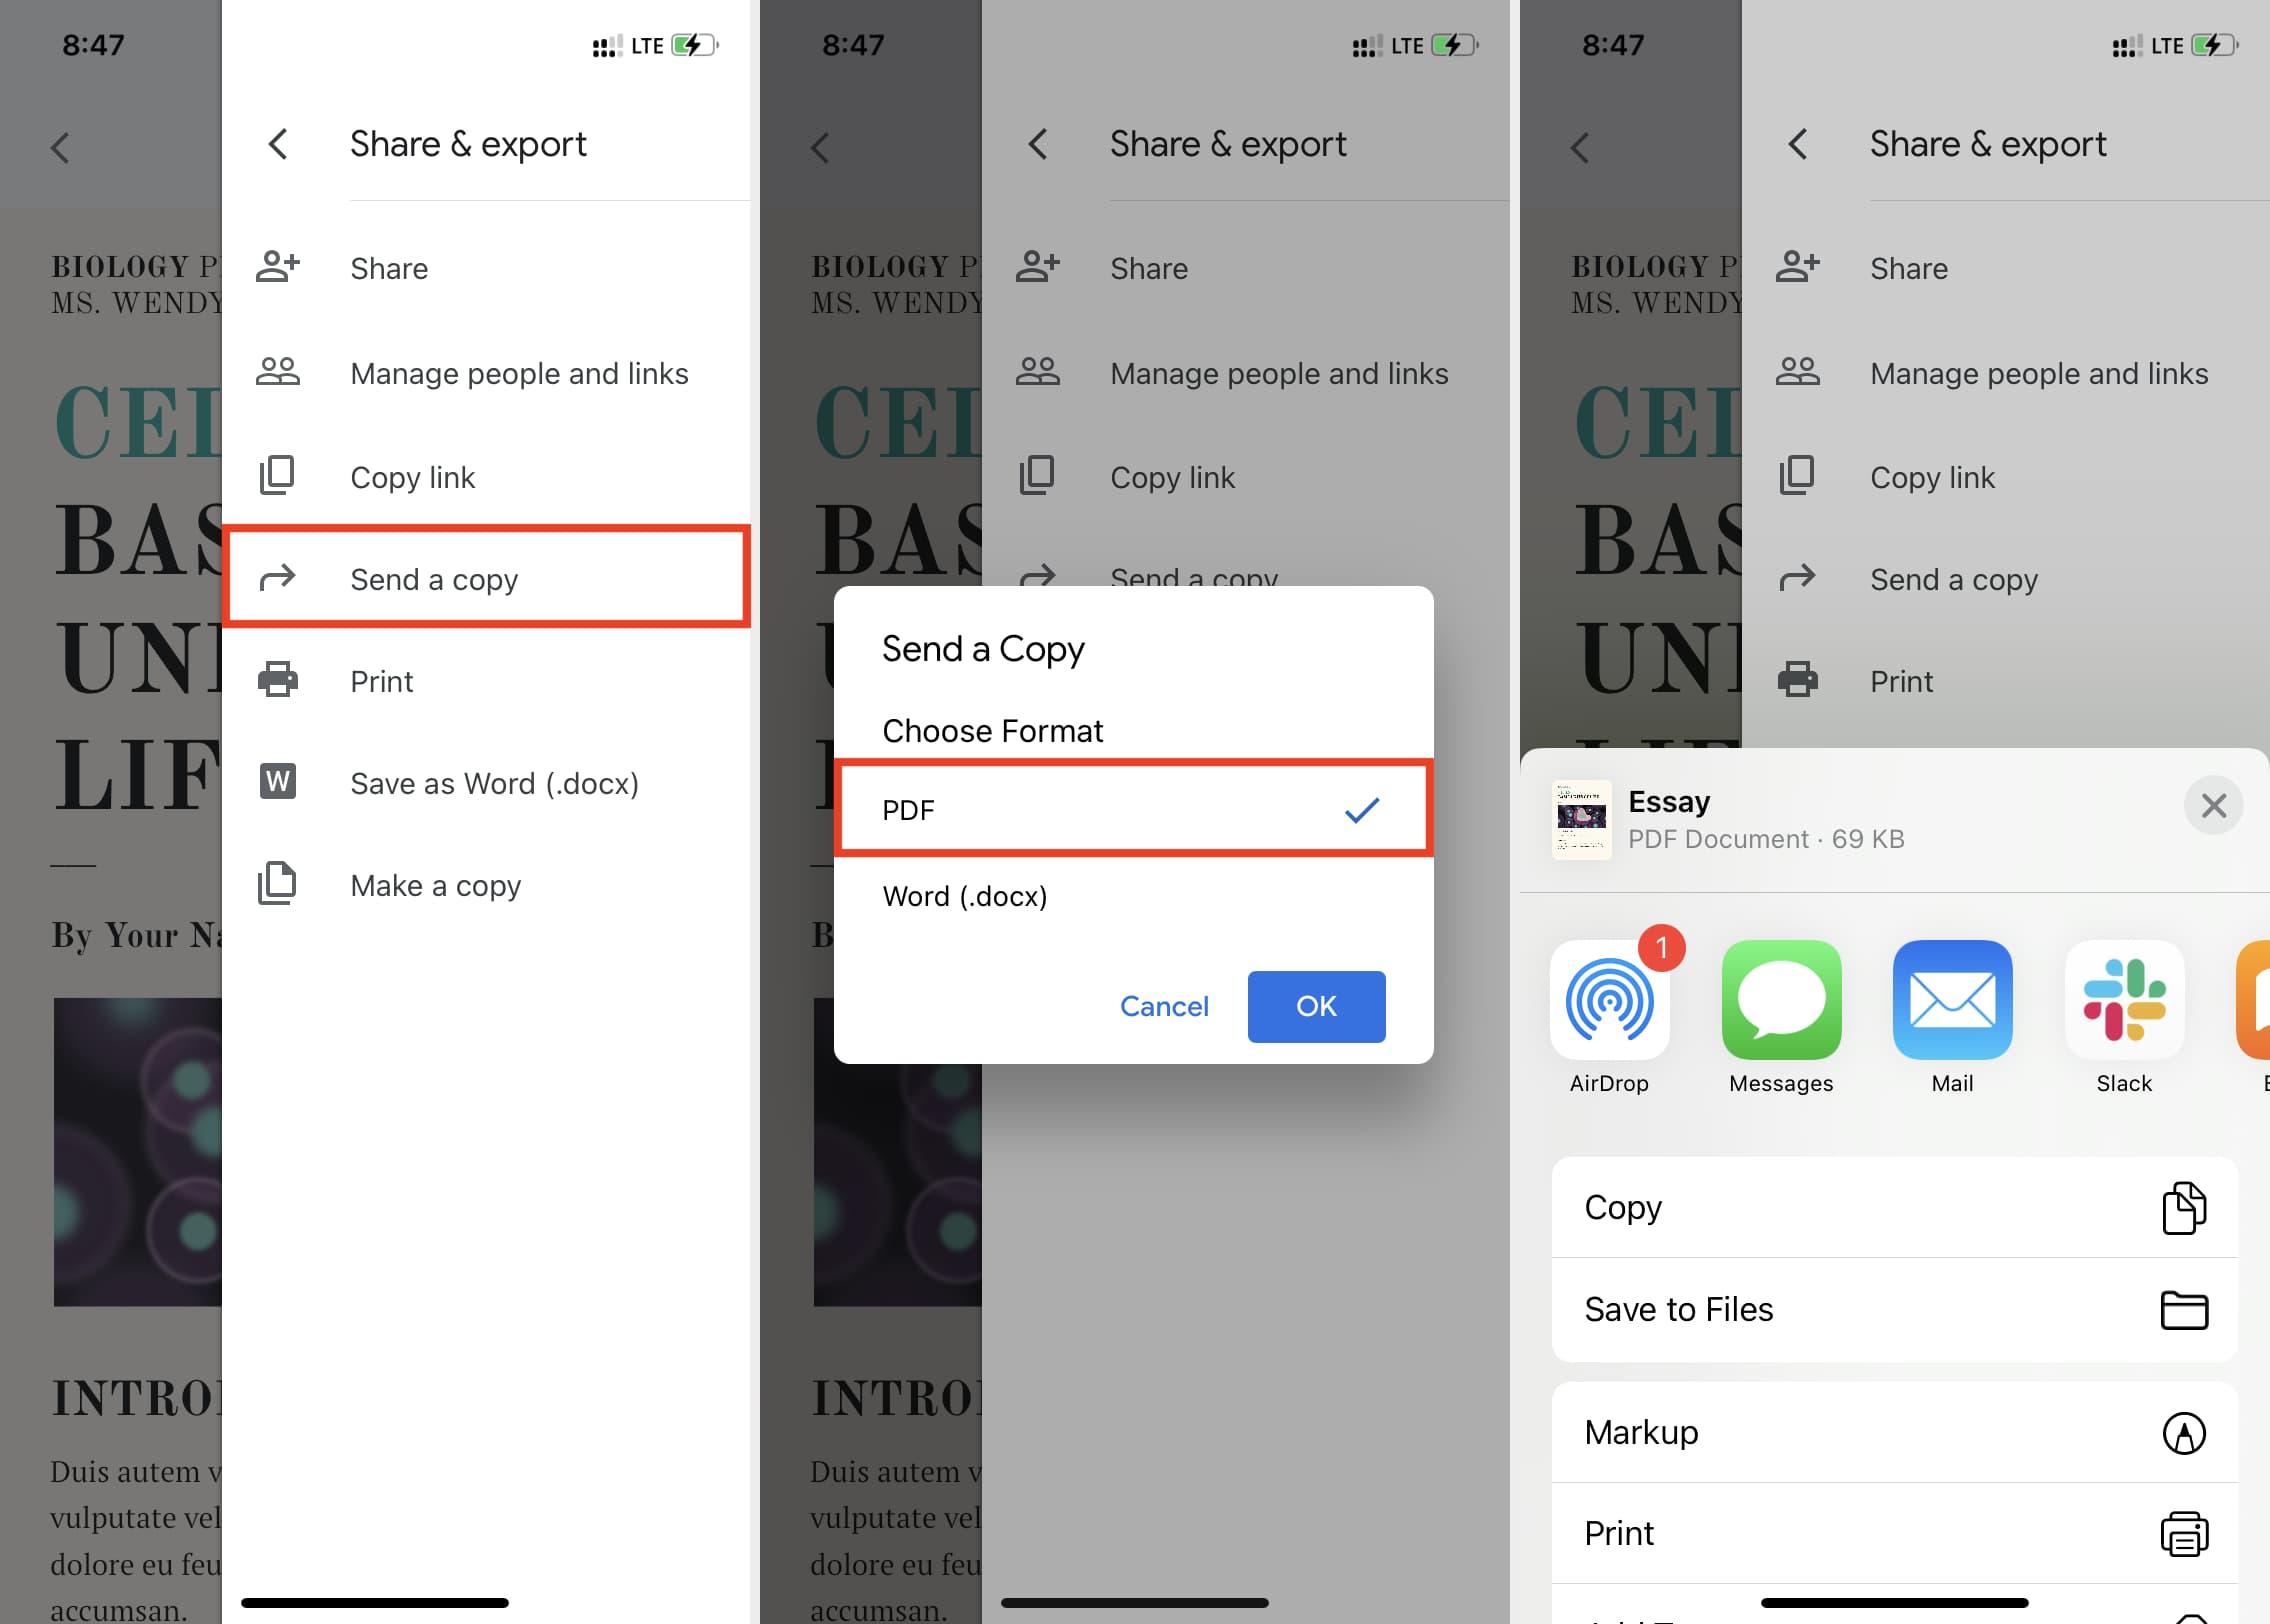
- Open Document and Copy Image: Open the Google Doc in the Google Docs app. Tap on the image you want to save, then tap
Copy. - Paste into Another Document or Note: You can then paste the image into another Google Doc, a note-taking app, or even an email draft. From some of these applications, you might be able to long-press and
Save Imageto your camera roll. - Publish to Web (via Desktop or Mobile Browser): If a direct save isn’t available or if you need better quality, the most reliable method remains the “Publish to web” approach (Method 2, described above).
- Perform the “Publish to web” steps on a desktop, or if absolutely necessary, try to access the Google Docs web interface via a mobile browser (like Safari or Chrome on your phone), request the desktop site, and follow Method 2.
- Once you have the published URL, open it in your mobile browser. You should then be able to long-press on the image and select
Save to Photos(iOS) orDownload image(Android).
Quality considerations on mobile: It’s important to note that images saved directly from the mobile app (via copy-pasting) might be of lower quality, often optimized for screen display rather than for high-resolution photography or detailed visual design. For critical images intended for digital art, professional photo manipulation, or print, it’s always recommended to revert to desktop methods to ensure the highest possible quality. However, for quick shares, informal photo ideas, or using images as casual wallpapers on your device, mobile methods offer sufficient convenience.
Post-Download Best Practices: Optimizing Your Visual Content
Once you’ve successfully downloaded images from your Google Docs, the journey isn’t over. To truly leverage these visuals for your projects, whether they are for a blog, a thematic collection, or a digital photography portfolio, certain best practices are crucial.
Understanding Image Copyright and Licensing
A vital consideration immediately after downloading any image is its copyright status. The images you include in a Google Doc may originate from various sources, and their inclusion in your document does not automatically grant you rights to use them elsewhere.
- Check the Source: Always know where your images come from. If you didn’t create it, assume it’s copyrighted.
- Permissions: If you plan to use an image on your blog, website, social media, or any public platform, ensure you have explicit permission or a license. Using images without proper rights can lead to legal issues.
- Personal Use vs. Public Use: If you are unsure of the image’s origin or licensing, limit its use to personal, private projects. Do not publish it publicly.
- Sourcing Safe Images: For public or commercial use, rely on stock photos from reputable platforms, images licensed under Creative Commons, or, ideally, your own digital photography and digital art creations. Tophinhanhdep.com, for instance, emphasizes providing high-quality visuals for various creative endeavors, often sourced or designed to offer clarity on usage.
Responsible image usage is a cornerstone of ethical content creation and professional visual design.
Image Optimization for Web and Digital Use
Images downloaded from Google Docs, especially those captured via screenshot or copied directly, might not be optimized for web performance. Large, uncompressed images can significantly slow down your website, negatively impacting user experience and search engine optimization (SEO).
- Compression: Before uploading images to a website, blog, or sharing them widely, use image compressors to reduce their file size without significantly compromising visual quality. Many online image tools offer free compression, or you can use plugins on platforms like WordPress.
- Resizing: Ensure images are appropriately sized for their intended display area. A high-resolution photography piece intended for a banner doesn’t need to be delivered in its full print-ready resolution if it’s only displayed at 800 pixels wide.
- Format Conversion: Depending on the context, you might want to convert image formats using image converters. JPEG is generally preferred for photographs (like nature scenes or beautiful photography), while PNG is better for images with transparency or sharp lines (e.g., logos, abstract graphics).
- Benefits: Optimized images lead to faster website loading times, which improves SEO rankings, enhances user engagement, and conserves bandwidth for both you and your visitors. This is especially crucial for showcasing diverse visual content, from wallpapers to aesthetic backgrounds, efficiently.
Enhancing and Managing Your Downloaded Images
The images you download are raw materials. To make them truly shine and integrate seamlessly into your projects, consider these steps:
- Renaming Files: Give your downloaded images descriptive filenames (e.g.,
tropical-beach-sunset-wallpaper.jpginstead ofimage1.jpeg). This aids in organization, makes files easier to find, and contributes to better SEO for web-based content. - AI Upscaling: If you used a screenshot method or found that the downloaded image lacked desired resolution, AI upscalers can intelligently increase the image size and detail, making it suitable for larger displays or print applications, effectively transforming a good visual into high-resolution photography.
- **Further Editing and Photo Manipulation: ** Use dedicated photo editing software to apply desired editing styles, crop, adjust colors, or perform more complex photo manipulation. This is where your creative ideas truly come to life, turning a generic image into a personalized piece of digital art.
- Thematic Organization: For extensive collections, organize your images into thematic folders (e.g., “Nature Landscapes,” “Abstract Art,” “Aesthetic Mood Board Elements”). This supports future image inspiration and efficient retrieval for various visual design projects.
- Image-to-Text Tools: For documents or images containing text, consider using image-to-text tools to extract textual information, which can then be used for captions, metadata, or searchable content, further enriching your digital assets.
By applying these post-download best practices, you transform simple image extractions into valuable, optimized, and ready-to-use visual assets that enhance all aspects of your digital presence.
Conclusion: Empowering Your Visual Journey with Tophinhanhdep.com
The journey of extracting images from Google Docs, while initially appearing complex, is ultimately a gateway to unlocking greater creative control and flexibility over your visual content. As we’ve explored, whether you opt for the batch efficiency of the HTML download, the directness of publishing to the web, the precision of Google Keep, the flexibility of a Word export, the immediacy of a screenshot, or the automation of an add-on, each method serves a distinct purpose in your digital toolkit.
Understanding these techniques empowers you to effortlessly bring your images – be they vibrant wallpapers, evocative backgrounds, striking aesthetic compositions, serene nature shots, thought-provoking abstract art, deeply sad/emotional expressions, or breathtaking beautiful photography – out of your documents and into your broader creative ecosystem. You can then refine these visuals, applying various editing styles, optimizing them with image tools like converters, compressors, optimizers, and even advanced AI upscalers, to fit any visual design project.
Remember that the true power of an image lies not just in its capture, but in its strategic use. Always be mindful of image copyright, prioritize high resolution where needed, and constantly seek image inspiration & collections to fuel your next creative ideas.
For those continuously seeking high-quality visuals and the tools to manage them, Tophinhanhdep.com serves as an excellent resource. By mastering image extraction from Google Docs and applying these post-download best practices, you’re not just saving files; you’re cultivating a robust visual library ready to elevate your graphic design, digital art, photo manipulation, and all other photography-driven endeavors. Go forth and make your visuals shine!