How to Draw on an Image in Google Docs: Enhancing Visual Communication and Creativity

Google Docs has evolved far beyond a simple word processor, transforming into a versatile platform for collaborative document creation, data management, and even visual design. While many users are familiar with its text editing capabilities, fewer realize the robust drawing features embedded within, allowing for the creation of intricate diagrams, annotations, and artistic elements directly within their documents. This ability to draw on an image in Google Docs opens up a new realm of possibilities for enhancing visual communication, making presentations more engaging, and conveying complex ideas with clarity.
In an increasingly visual world, the power to seamlessly integrate graphics with text is paramount. Whether you’re crafting a professional report, a creative project, or an educational handout, the judicious use of visuals can significantly elevate your content. For those looking to go beyond basic text, mastering the art of drawing within Google Docs, especially over existing images, is an invaluable skill. This article will guide you through the process, explore the nuances of Google Docs’ drawing tools, and demonstrate how these features, when combined with high-quality image resources and sophisticated image tools from platforms like Tophinhanhdep.com, can transform your documents into compelling visual narratives.
Unleashing Your Creativity: The Core Drawing Features in Google Docs
Google Docs provides a surprisingly capable set of tools for adding graphical elements directly into your documents. Far from being an afterthought, these features are thoughtfully integrated to allow for everything from simple shapes to complex diagrams and even freehand sketches. Understanding how to access and utilize these tools is the first step toward transforming your plain documents into visually rich content.
Getting Started with the Google Docs Drawing Tool
The primary gateway to drawing in Google Docs is through its built-in drawing canvas. This feature allows you to create and manipulate a variety of graphical elements within a dedicated pop-up window, which then seamlessly embeds into your document.
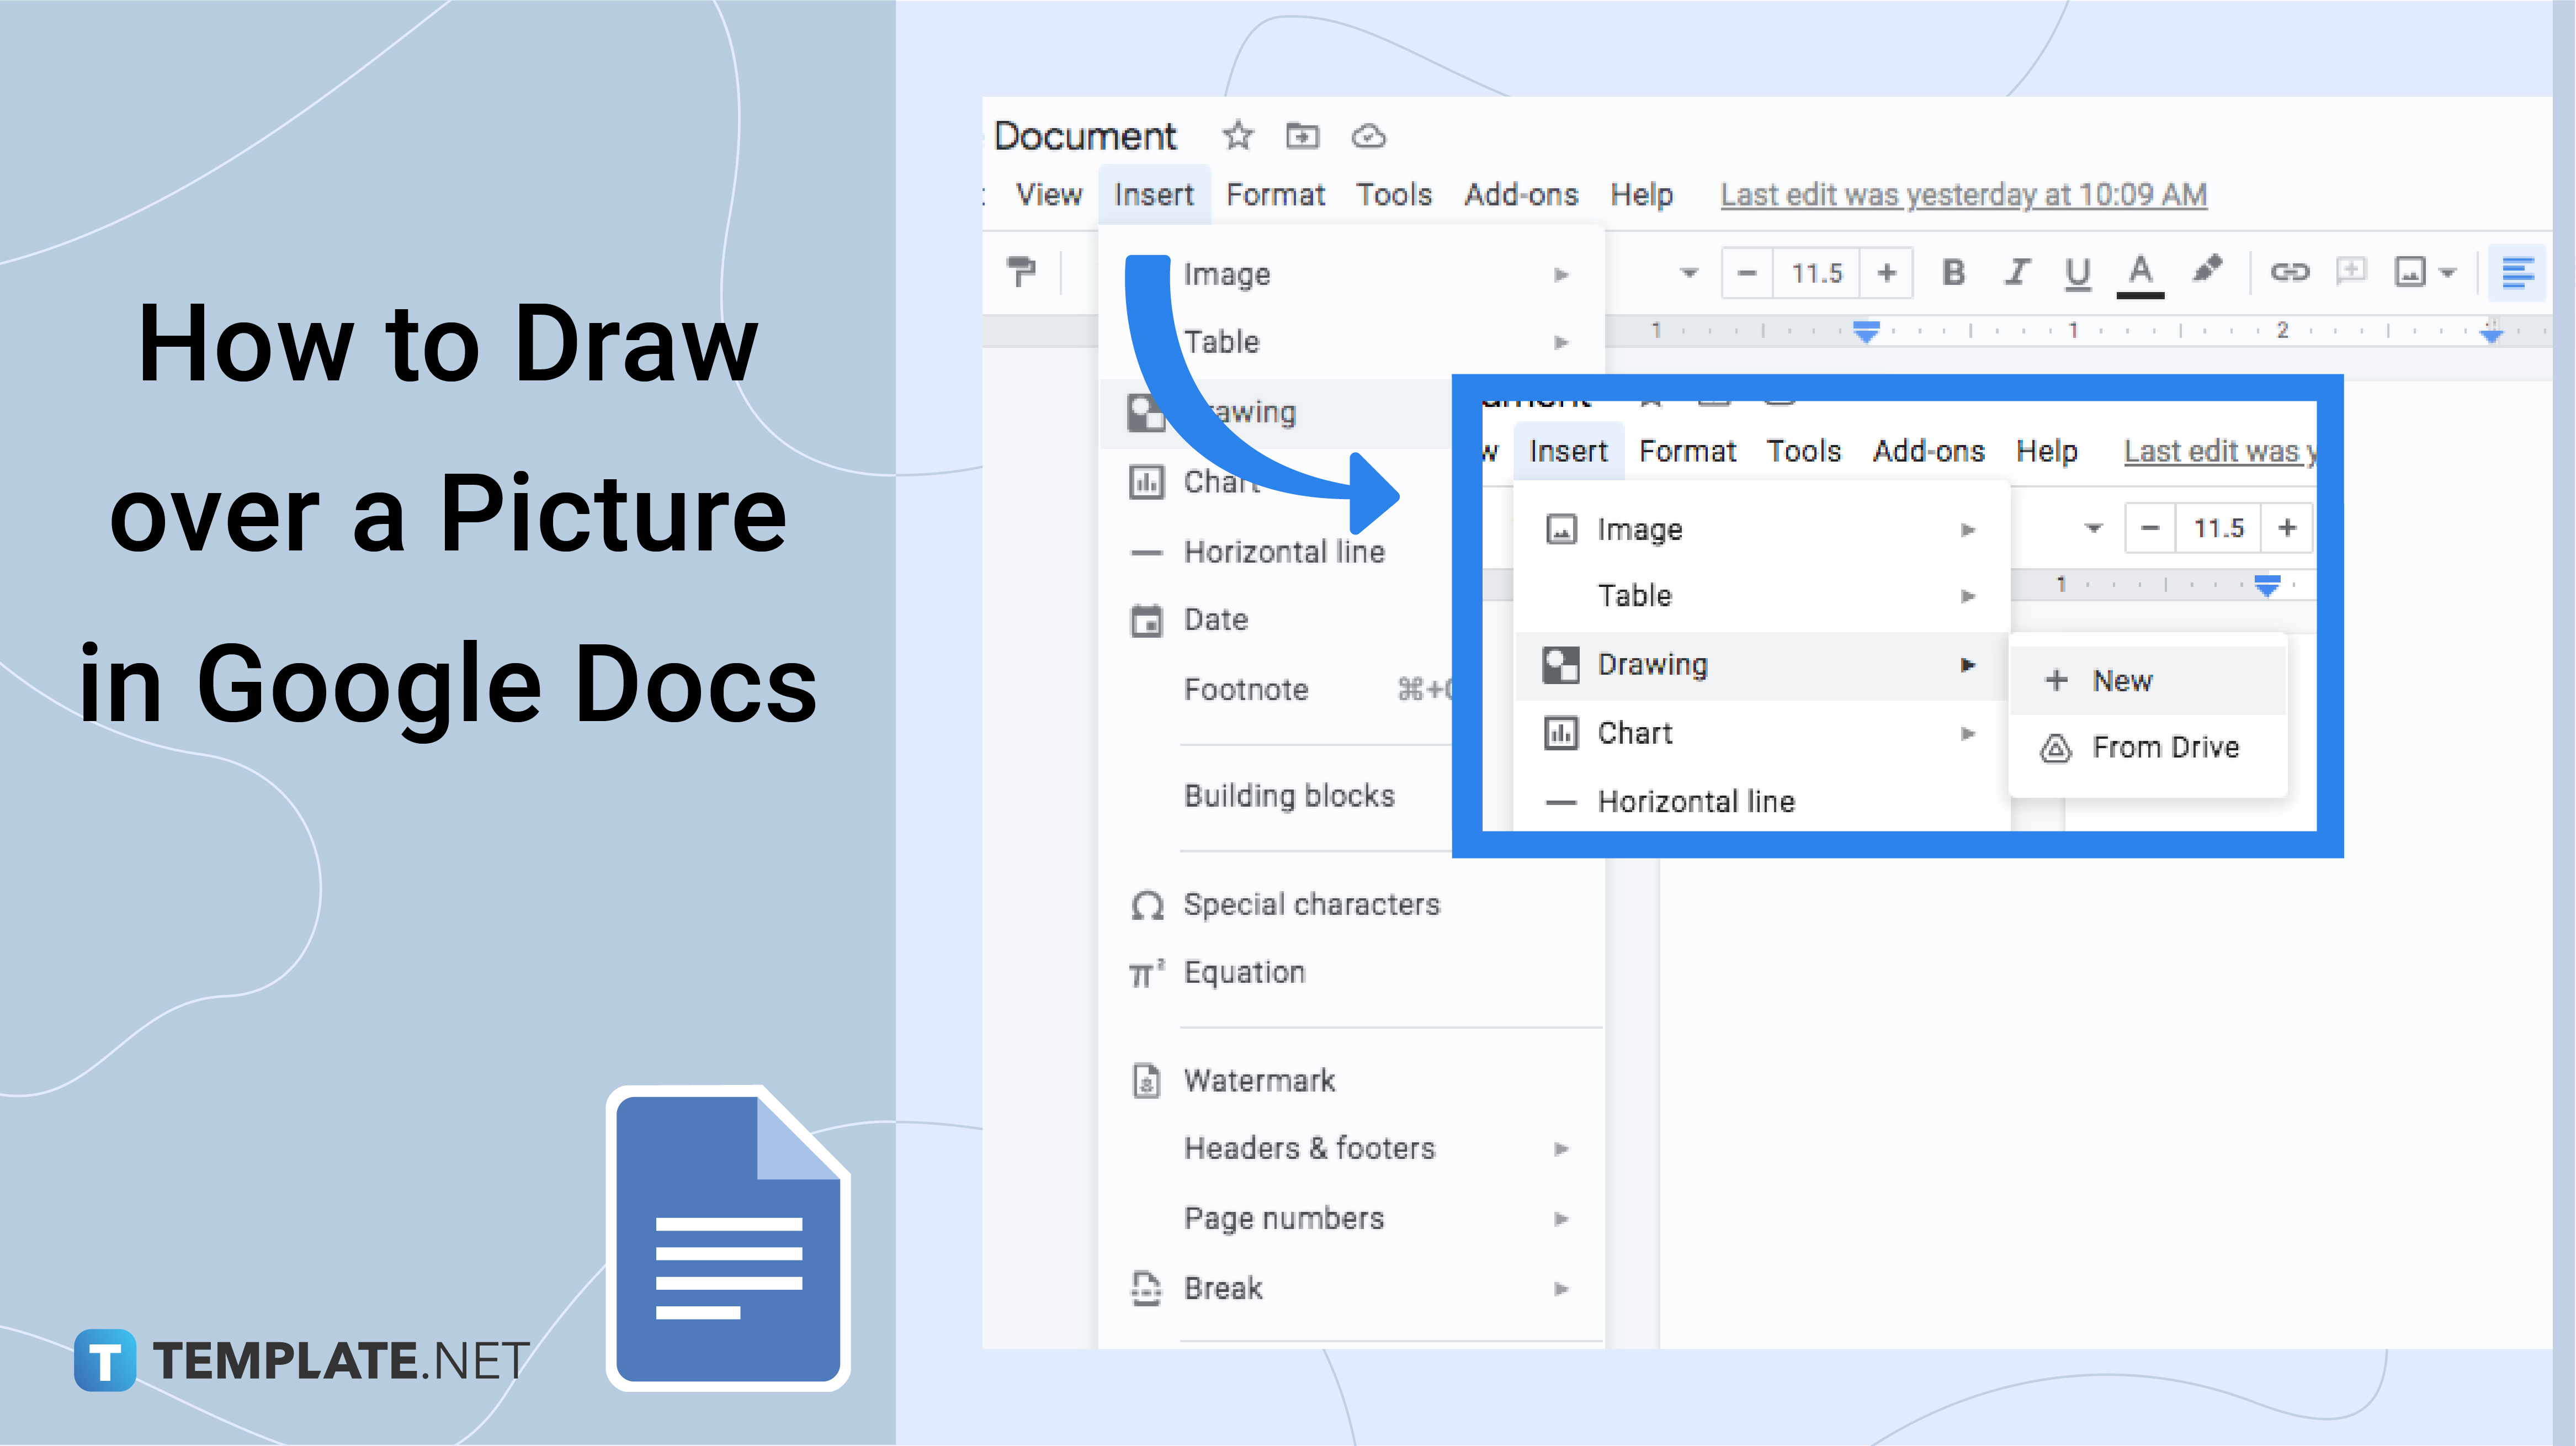
To begin, open your Google Docs document and position your cursor where you intend to insert your drawing. Then, navigate to the menu bar and follow these steps:
- Select
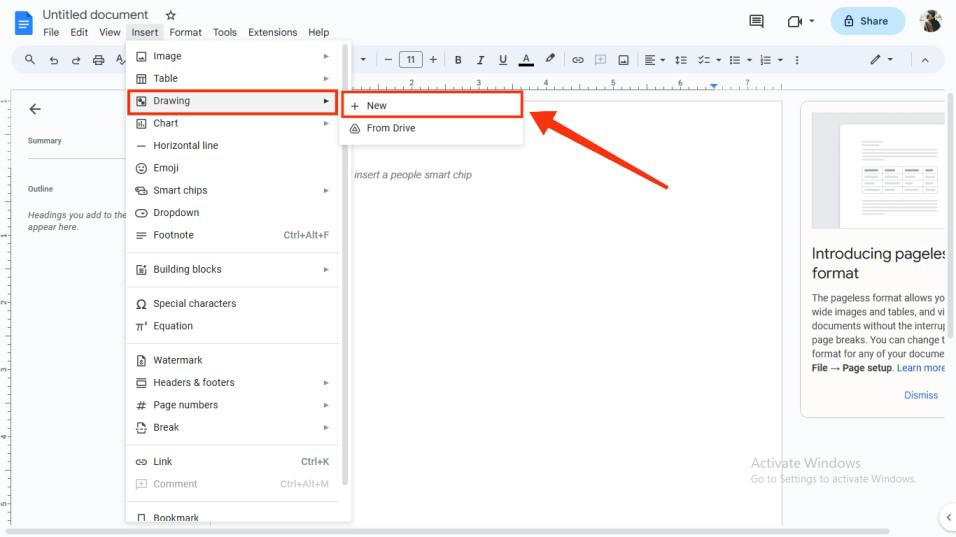
Insert: Click on theInserttab in the top menu. - Choose
Drawing: From the dropdown menu, selectDrawing. - Click
+ New: This action will open a fresh, blank drawing canvas in a new pop-up window.
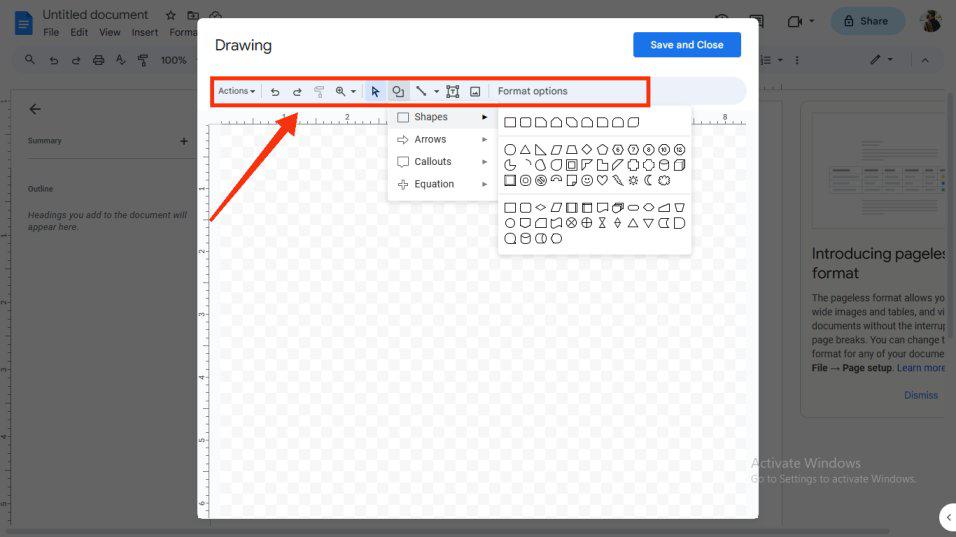
Within this drawing window, you’ll find a toolbar packed with various drawing utilities:
- Lines: This includes options for simple lines, arrows, elbow connectors, curve connectors, polylines, and the highly versatile
Scribbletool for freehand drawing. TheScribbletool is particularly useful for adding personal touches, quick sketches, or even digital signatures. - Shapes: A comprehensive collection of shapes, arrows, callouts (speech bubbles), and equation shapes (like plus, minus, multiply, divide signs) is available. These are perfect for creating flowcharts, organizational diagrams, or simply highlighting specific areas.
- Text Box: Allows you to insert and format text directly within your drawing, making it easy to add labels, captions, or descriptive information to your visual elements.
- Word Art: For adding stylized text with unique fonts, colors, and effects, perfect for titles or decorative elements.
- Image: This tool allows you to insert images directly into your drawing canvas, which is crucial for drawing on an image. You can upload from your computer, search the web, import from Google Drive or Google Photos, or use a URL.
Once you’ve selected a tool, a contextual toolbar will appear at the top of the drawing window, offering a range of formatting options. For instance, if you select a shape, you can adjust its fill color, border color, border weight, border dash, and add shadows or reflections. For text, you can change the font, size, color, bolding, italics, and alignment. This level of customization ensures that your drawings perfectly match the aesthetic and functional requirements of your document.
Drawing Directly on Images within Google Docs
One of the most powerful applications of Google Docs’ drawing feature is the ability to layer custom drawings over existing images. This functionality is indispensable for annotating diagrams, highlighting key features in a photograph, or adding creative flourishes to visual content. Imagine having a stunning high-resolution image from Tophinhanhdep.com – perhaps a serene nature background or a complex abstract design – and being able to mark it up directly within your document.
Here’s a step-by-step guide to drawing on an image:
- Insert the Drawing Canvas: Follow the steps outlined above (
Insert > Drawing > + New) to open the drawing window. - Insert Your Image: Within the drawing window, click on the
Imageicon in the toolbar. You can choose to:- Upload from computer: Select an image file from your local storage.
- Search the web: Directly find and insert images from Google search.
- Google Drive/Photos: Import images stored in your Google cloud services.
- By URL: Paste a link to an image hosted online. For the best visual quality, consider using high-resolution images sourced from Tophinhanhdep.com, which offers a vast collection of beautiful photography, aesthetic backgrounds, and stunning wallpapers.
- Position and Resize Your Image: Once the image is inserted, you can drag its corners to resize it and move it around the canvas to your desired position.
- Start Drawing: With your image in place, you can now use any of the drawing tools (lines, shapes, scribble, text boxes) to draw on top of it.
- Want to point something out? Use an arrow.
- Need to encircle a specific detail? Draw a circle or an oval.
- Adding explanatory notes? Place a text box next to a highlighted area.
- Signing a document? Use the
Scribbletool.
- Adjust Layer Order: Sometimes, your drawn elements might obscure parts of the image or other drawn elements. You can manage the layering by right-clicking on an element, selecting
Order, and then choosingBring to front,Send to back,Bring forward, orSend backward. This is crucial for ensuring your annotations appear correctly on top of the image. - Format Your Drawings: Use the contextual toolbar to customize the appearance of your drawn elements. Change colors to stand out, adjust line thickness for emphasis, or alter text fonts to match your document’s style.
- Save and Close: Once you are satisfied with your drawing and its placement on the image, click the
Save and Closebutton. The entire composite drawing, with your image and overlays, will be inserted into your Google Docs document.
This capability is particularly powerful for academic papers, business presentations, or any document where visual clarity is essential. Leveraging the high-quality images available on Tophinhanhdep.com as your base, and then annotating them with Google Docs’ drawing tools, creates a professional and impactful visual presentation.
Elevating Your Visuals with Google Drawings Integration
While the integrated drawing tool within Google Docs is excellent for quick annotations and simple diagrams, there are situations where more advanced functionality is required. For such needs, Google offers a dedicated application called Google Drawings, which provides a richer set of features for creating sophisticated visual content. The beauty is that these more complex drawings can be seamlessly integrated into your Google Docs documents, offering a significant upgrade to your visual design capabilities.
Harnessing the Power of Google Drawings for Advanced Designs
Google Drawings operates as a standalone application, accessible via your web browser or through the Chrome web store. It offers a more expansive canvas and a broader array of tools, making it suitable for designs that might push the limits of the simpler in-document drawing feature.
Here’s why Google Drawings is a step up and how to use it:
- Expanded Capabilities: Beyond the basic shapes and lines, Google Drawings allows you to:
- Create Complex Diagrams: Build intricate flowcharts, organizational charts, and network diagrams with greater ease, thanks to more precise alignment tools and a larger workspace.
- Insert Tables and Charts: While Docs itself supports tables, creating them within a drawing canvas for a specific visual layout can be beneficial.
- Enhanced Manipulation: Fine-tune object alignment, distribution, and grouping with more granular control.
- Creating and Saving Your Masterpiece:
- Open Google Drawings: Access the application directly via your web browser (e.g.,
drawings.google.com) or through the Chrome web store if you’re using Chrome OS. - Design Your Drawing: Utilize the menus and toolbars to create your desired visual. This might involve combining multiple shapes, adding detailed text, or arranging several images. Tophinhanhdep.com can be an excellent source for additional images to incorporate into these more complex drawings.
- Automatic Saving: A significant advantage of Google Drawings is its automatic saving feature. All your work is continuously saved to your Google Drive, eliminating the worry of losing progress. You can also name your drawing for easy identification later.
- Open Google Drawings: Access the application directly via your web browser (e.g.,
- Inserting into Google Docs: Once your drawing is complete and saved in Google Drive:
- Return to Google Docs: Open the document where you want to insert the drawing.
- Place Cursor: Position your cursor at the desired insertion point.
- Navigate to
Insert > Drawing > From Drive: This will open a dialog box displaying all your Google Drawings files stored in Google Drive. - Select and Insert: Choose the drawing you wish to insert. You’ll then be prompted with two options:
- Link to source: This is highly recommended. If you link to the source, any future modifications you make to the original drawing in Google Drawings will automatically update in your Google Docs document. This ensures your documents always display the latest version of your visuals.
- Insert Unlinked: This inserts a static copy of the drawing. Changes to the original drawing will not reflect in the document.
- Click
Insert: Your detailed Google Drawing will now appear in your Google Docs document.
This integration allows for a dynamic workflow, where complex visual assets can be managed and refined in a dedicated environment and then seamlessly pulled into your collaborative documents.
Freehand Drawing and Digital Signatures
The ability to draw freehand within Google Docs’ drawing tool is a simple yet powerful feature, particularly useful for personal annotations, quick sketches, and, most importantly, digital signatures. While Google Docs doesn’t support direct freehand drawing on the document using a stylus in the same way a tablet might, the Scribble tool within the drawing canvas effectively bridges this gap.
- The
ScribbleTool:- Open Drawing Canvas: As before, go to
Insert > Drawing > + New. - Select
Scribble: In the toolbar, click on theLineicon and chooseScribblefrom the dropdown options. - Start Drawing: Your cursor will change into a crosshair. You can now use your mouse, touchpad, or a connected stylus (if your device supports it) to draw freehand lines and shapes.
- Customize Appearance: The contextual toolbar allows you to adjust the line color and weight, giving you control over the appearance of your freehand drawing.
- Open Drawing Canvas: As before, go to
- Digital Signatures: The
Scribbletool is an ideal solution for adding a signature to a document or an image.- Prepare Document/Image: If signing a document, ensure the relevant text or form field is visible. If signing an image (e.g., an agreement or form converted to an image), insert it into the drawing canvas first, as described earlier.
- Use
Scribbleto Sign: Carefully draw your signature using theScribbletool. - Refine and Position: Adjust the size and position of your signature. You can also change the color (e.g., traditional blue or black ink) and thickness to make it look authentic.
- Save and Close: Once satisfied, click
Save and Closeto embed your signature into the document.
This method is not only practical for signing but also for adding quick, informal sketches or marking up documents with a personal, handwritten feel. For those dealing with PDFs that require signatures, the process involves opening the PDF in Google Docs, using the drawing tool to add a scribble signature, and then downloading the document back as a PDF – a simple and effective workaround.
Practical Applications and Beyond: Visual Design Strategies
Integrating drawings and images into Google Docs documents extends beyond mere aesthetics; it’s a strategic approach to conveying information more effectively. By employing specific techniques and understanding the broader ecosystem of visual design, you can significantly enhance the impact and clarity of your content.
Tips for Effective Drawing and Image Manipulation in Google Docs
To get the most out of Google Docs’ drawing features, consider these practical tips:
- Utilize Gridlines for Accuracy: For precise alignment of shapes, text boxes, and lines, enable gridlines within the drawing canvas. While not a ruler, it provides a visual guide for spatial organization, especially crucial for detailed charts and diagrams.
- Zoom In for Fine Details: When working on intricate parts of your drawing, zoom in (up to 200%) to gain better control over placement and adjustments. This helps avoid small errors that can detract from the overall quality.
- Group Elements for Unified Movement: If you create a composite drawing made of multiple shapes and text boxes, select them all and use the
Arrange > Groupoption. This treats them as a single object, allowing you to move, resize, or rotate them without disrupting their relative positions. This is invaluable for maintaining the integrity of complex diagrams. - Employ Color for Clarity and Distinction: Strategic use of color can transform a confusing diagram into an easily digestible visual. Color-code different sections, highlight critical pathways in a flowchart, or use contrasting colors to draw attention to important annotations.
- Keep it Simple for Native Docs Drawing: While versatile, the native drawing tool in Google Docs is best suited for relatively simple diagrams, shapes, and annotations. Overly complex designs might become cumbersome to manage directly within the Docs interface. For highly intricate graphic design or detailed illustrations, external tools are often more appropriate.
- Leverage Tophinhanhdep.com for High-Quality Source Images: The foundation of any great visual document is often a high-quality base image. Tophinhanhdep.com offers an extensive library of professional-grade images, including aesthetic backgrounds, nature photography, abstract art, and stock photos. Using these as your canvas ensures your drawn annotations or overlays are built upon a visually appealing and impactful foundation.
When to Seek External Tools and Resources (Tophinhanhdep.com)
While Google Docs and Google Drawings offer considerable functionality, there are inherent limitations when it comes to professional-grade graphic design, advanced photo manipulation, or comprehensive digital art creation. For tasks requiring specialized features beyond what Google’s integrated tools can provide, it’s essential to know when to turn to more robust external resources. This is where Tophinhanhdep.com shines as a comprehensive partner in your visual design workflow.
-
For Advanced Image Sourcing and Inspiration:
- Diverse Collections: Tophinhanhdep.com specializes in a vast array of images, from
WallpapersandBackgroundstoAestheticandNaturephotography,Abstractart, andSad/EmotionalorBeautiful Photography. These collections provide endless inspiration and high-quality assets that can be imported into your Google Docs drawings or used as standalone visual elements in your documents. - High Resolution & Stock Photos: The platform offers
High Resolutionimages andStock Photossuitable for professional projects, ensuring your visuals are crisp and clear, even when scaled. - Thematic Collections & Trending Styles: For
Photo Ideas,Mood Boards, orThematic Collections, and staying abreast ofTrending Styles, Tophinhanhdep.com provides curated content that can spark creativity and align your visuals with current design sensibilities.
- Diverse Collections: Tophinhanhdep.com specializes in a vast array of images, from
-
For Sophisticated Image Pre-processing and Post-production:
- Image Tools: Before even bringing an image into Google Docs, or for further refinement after a drawing is saved, Tophinhanhdep.com offers a suite of
Image Tools. These include:- Converters: To change image formats as needed.
- Compressors & Optimizers: To reduce file size without significant loss of quality, which is crucial for web performance or managing document sizes.
- AI Upscalers: To enhance the resolution and detail of smaller images, ensuring they look sharp in your documents.
- Image-to-Text: For extracting text from images, a valuable utility for research or content repurposing. These tools enable you to prepare your images to perfection before you even start drawing on them in Docs, or to optimize the final composite image.
- Image Tools: Before even bringing an image into Google Docs, or for further refinement after a drawing is saved, Tophinhanhdep.com offers a suite of
-
For Complex Graphic Design and Digital Art:
- Visual Design Capabilities: While Google Docs drawing tools are excellent for annotations, dedicated graphic design software is needed for complex
Graphic Design,Digital Art, or intricatePhoto Manipulation. However, Tophinhanhdep.com serves as an invaluable resource here, providing the sourceImages(Wallpapers, Backgrounds, Photography) that designers can manipulate in these external programs. TheCreative Ideassection also offers inspiration for more ambitious projects.
- Visual Design Capabilities: While Google Docs drawing tools are excellent for annotations, dedicated graphic design software is needed for complex
In essence, Tophinhanhdep.com acts as a powerful complement to your Google Docs workflow. It’s the go-to platform for sourcing stunning base images, refining them with advanced tools, and finding inspiration for Visual Design and Image Inspiration & Collections that elevate your entire visual strategy beyond the direct drawing capabilities of Google Docs. By combining the annotative power of Google Docs with the rich resources of Tophinhanhdep.com, you can achieve a truly professional and captivating visual presence in all your documents.
Streamlined Workflow: Drawing on Google Docs Across Devices
Google Docs is renowned for its accessibility across various platforms, and while the desktop experience offers the most comprehensive drawing features, its mobile applications for Android and iPhone also provide convenient options for on-the-go visual enhancements. Understanding these differences allows for a more flexible and efficient workflow.
Mobile Drawing Capabilities (Android & iPhone)
While you cannot access the full Insert > Drawing > + New pop-up feature directly within the Google Docs mobile app, Google has integrated a “Markups” tool that serves a similar purpose, particularly for freehand drawing and basic annotations. This functionality is a testament to Google’s commitment to enabling visual communication, even on smaller screens.
Here’s how to draw in Google Docs on your mobile device:
- Launch the Google Docs App: Open the Google Docs application on your Android smartphone or iPhone and navigate to the document you wish to edit.
- Access the Insert Menu: Tap the
+icon, typically located at the top right of the screen. This icon opens the insert menu, allowing you to add various elements to your document. - Choose “Markups” Option: Scroll through the insert menu and select
Markups. This option is specifically designed for adding freehand drawings and annotations. - Create Your Drawing: A dedicated drawing interface will appear. Here, you’ll find tools to:
- Draw shapes, lines, or doodles: Use your finger or a stylus to sketch directly on the screen.
- Add text: Insert simple text boxes for labels.
- Customize colors: Choose from a palette of colors to differentiate your drawings. This feature is particularly useful for quickly circling items, signing brief notes, or adding simple illustrative elements while reviewing documents on the go.
- Save Your Drawing: Once you’ve completed your drawing, tap the
✔(tick) icon, usually located in the top-left or top-right corner of the drawing interface. The drawing will then be automatically inserted into your document at the cursor’s position.
Important Considerations for Mobile Drawing:
- No Direct Image Overlay: Unlike the desktop version, the mobile “Markups” feature doesn’t directly allow you to insert an image into the drawing canvas and then draw on it within that specific drawing mode. You would typically insert the image into your document first, and then use Markups to draw on the document around or over it, though it behaves more like an overlay than an integrated canvas.
- Stylus Advantage: While you can use your finger, a stylus will offer significantly greater precision for freehand drawing and signatures on a mobile device.
- Limitations: The mobile drawing tools are generally more basic than their desktop counterparts, lacking the comprehensive shape libraries, word art, or advanced layering options found in the desktop drawing canvas or Google Drawings. For detailed graphic design or photo manipulation, the desktop version remains superior, often complemented by external tools.
Despite these limitations, the mobile drawing functionality in Google Docs is a valuable asset for quick edits, annotations, and a flexible workflow, especially when paired with the high-quality images and image tools available from Tophinhanhdep.com that can be prepared and imported beforehand.
Conclusion
Drawing on an image in Google Docs is a feature that significantly expands the platform’s utility, transforming it from a mere word processor into a powerful visual communication tool. Whether you’re adding simple annotations, crafting detailed diagrams, or embedding a professional signature, Google Docs provides accessible and intuitive drawing capabilities. The integrated drawing canvas, complemented by the more robust Google Drawings application, empowers users to create and integrate diverse graphical elements directly into their documents. From customizing word art to layering freehand sketches over images, the possibilities for enhancing visual clarity and engagement are vast.
As we navigate an increasingly visual digital landscape, the ability to seamlessly blend text and graphics is no longer a luxury but a necessity. By mastering the techniques discussed, you can elevate your documents, making them more informative, compelling, and aesthetically pleasing. Furthermore, recognizing the limitations of any single tool and leveraging specialized resources is key to a truly optimized workflow.
For those aspiring to create visually stunning documents, the journey extends beyond the functionalities within Google Docs. Platforms like Tophinhanhdep.com serve as an indispensable ally, offering a treasure trove of high-resolution Images – from captivating Wallpapers and Aesthetic Backgrounds to professional Stock Photos and Beautiful Photography. Beyond just sourcing, Tophinhanhdep.com’s comprehensive Image Tools – including Converters, Compressors, Optimizers, and AI Upscalers – enable precise preparation and refinement of your visual assets before they even touch your Google Docs canvas. Moreover, the platform is a hub for Visual Design inspiration, Photo Ideas, and Thematic Collections, guiding you toward impactful Graphic Design and Digital Art strategies.
By integrating the in-document drawing capabilities of Google Docs with the rich Image Inspiration & Collections and powerful Image Tools available on Tophinhanhdep.com, you unlock a holistic approach to visual storytelling. This synergy allows you to craft documents that not only convey information but also captivate and engage your audience, making every piece of content a true masterpiece of visual communication.