How to Elevate Your Visuals: Mastering Image Editing in Microsoft Word with Tophinhanhdep.com Insights

Microsoft Word, often perceived as a mere word processor, holds a surprising array of built-in features that transform it into a capable tool for basic image editing. In our increasingly visual world, a strategically chosen and thoughtfully edited image can elevate a mundane document into an engaging, professional, or aesthetically pleasing masterpiece. Whether you’re compiling a comprehensive business report, designing an eye-catching school presentation, or curating a personal collection, understanding how to manipulate images directly within Word is an invaluable skill. This guide will navigate you through the essential steps and advanced tricks for editing pictures in Microsoft Word, connecting these functionalities to the broader world of visual design and photography as championed by Tophinhanhdep.com. Our objective is to empower you to create high-quality, visually appealing materials that resonate with your audience, by leveraging Word’s inherent capabilities and Tophinhanhdep.com’s extensive resources spanning Images, Photography, Image Tools, Visual Design, and Image Inspiration & Collections.
The Foundation: Inserting and Basic Adjustments in Word
The journey to perfectly integrated images in your Word documents begins with the basics: inserting the picture and applying fundamental corrections. These initial steps are crucial for laying a strong visual groundwork.
Getting Started: Inserting Your Image
The very first step is to bring your image into the Word document. This is a straightforward process:
- Navigate to the “Insert” tab: Located in the top menu bar of Microsoft Word.
- Select “Picture”: Click on the “Picture” icon, which will usually prompt a dialogue box to appear, allowing you to browse your computer’s files.
- Choose your image: Select the desired image from your system and click “Insert.”
For optimal results, it is highly recommended to start with high-quality source images. Tophinhanhdep.com’s Photography section offers a vast collection of High Resolution and Stock Photos that can serve as excellent starting points for your documents. Whether you’re looking for vibrant Nature shots or sophisticated Abstract patterns, commencing with a superior image ensures a better outcome for any subsequent editing. Word supports a variety of image formats, including JPEG, PNG, and GIF, making it flexible for most common uses.
Essential Enhancements: Brightness, Contrast, and Sharpness
Once your picture is inserted, Word provides tools to quickly improve its visual quality. These are akin to the fundamental adjustments made in professional photo editing, but simplified for document integration.
- Select the Picture: Click on the image within your document. This action will automatically activate the “Format” tab in the Word ribbon.
- Access “Corrections”: Within the “Format” tab, locate the “Corrections” option. Here, you’ll find various presets for adjusting brightness, contrast, and sharpness.
- Apply Adjustments: Experiment with different options to enhance your image. Increasing brightness can illuminate a dark photo, while adjusting contrast can add depth and definition. Sharpness can bring out finer details, making an image appear crisper.

These subtle adjustments directly influence the overall Aesthetic of the image and how it integrates with your document’s design. They fall under the umbrella of basic Photography Editing Styles, allowing you to fine-tune the visual impact. If you find yourself needing to undo any changes, Word conveniently provides a “Reset Picture” option within the “Format” tab, allowing you to revert to the original state of the image at any time.
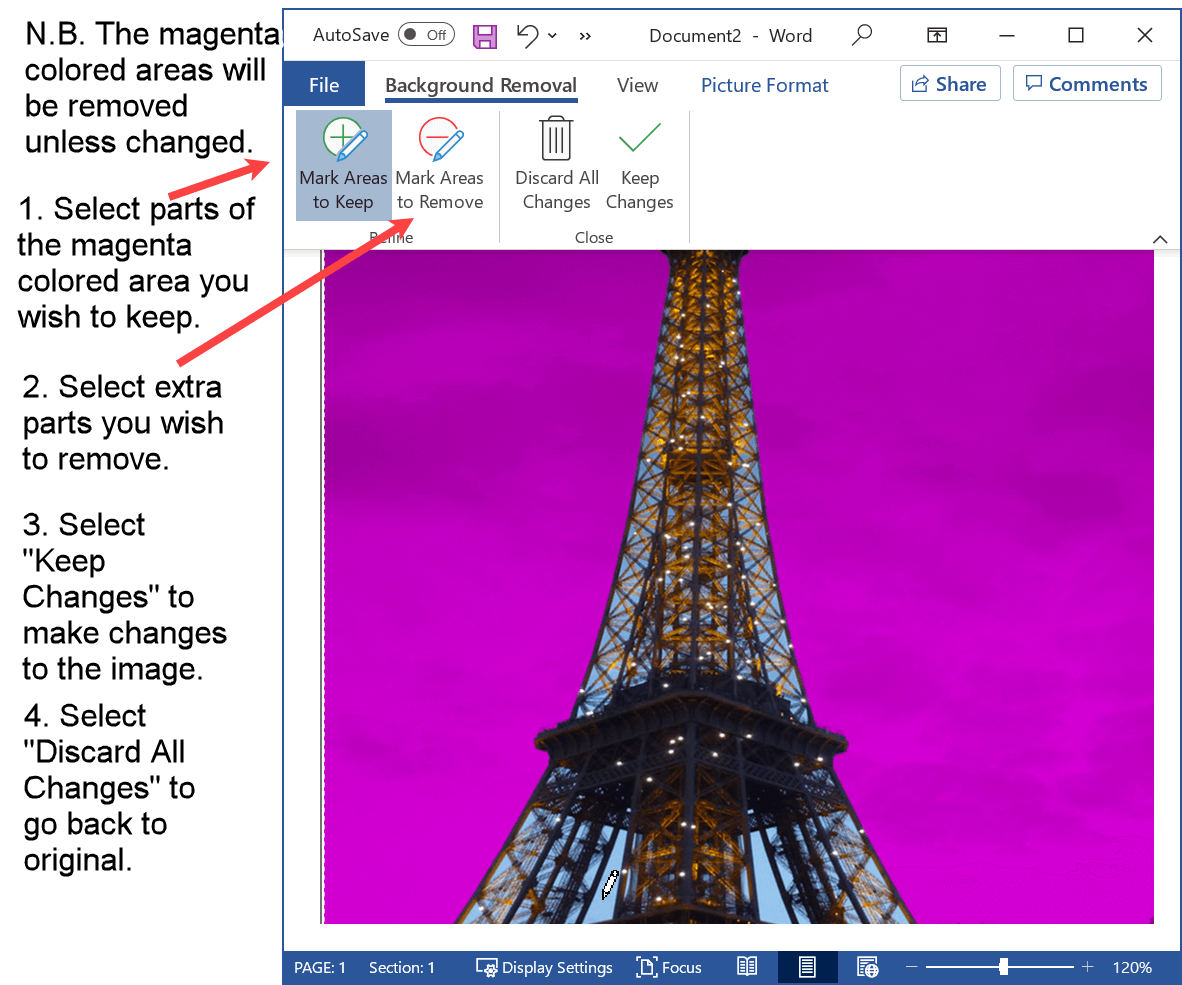
Focusing Your Subject: Removing Backgrounds
Sometimes, the background of an image can be distracting or simply not fit the document’s theme. Word’s “Remove Background” tool offers a surprisingly effective solution for isolating your subject.
- Select the Picture: Again, click on the image to reveal the “Format” tab.
- Click “Remove Background”: This feature will attempt to automatically identify the background and highlight it in magenta.
- Refine Selection: Use the “Mark Areas to Keep” and “Mark Areas to Remove” tools to meticulously define the edges of your subject. Word provides a live preview, allowing you to adjust until the desired look is achieved.
- Keep Changes: Once satisfied, click “Keep Changes.”
This powerful feature can transform images, making subjects stand out against a clean backdrop. It’s a practical application of Visual Design Photo Manipulation that helps create focused visuals, especially useful when incorporating product shots or professional portraits into your documents. For unique Backgrounds or Wallpapers, you can then layer your subject onto a design sourced from Tophinhanhdep.com’s diverse collections.
Refining Your Visuals: Advanced Editing Techniques in Word
Beyond basic corrections, Microsoft Word offers more sophisticated tools to give your images a unique character and integrate them seamlessly into your document’s narrative. These techniques allow for greater creative expression and optimization.
Artistic Flair: Applying Creative Effects
For moments when a standard photograph needs a touch of artistic interpretation, Word’s “Artistic Effects” can transform your visuals.
- Select the Picture: Ensure the image is selected to bring up the “Format” tab.
- Choose “Artistic Effects”: This dropdown menu provides a variety of stylistic filters, such as “Paint Strokes,” “Pencil Sketch,” “Blur,” “Glass,” and many more.
- Experiment and Apply: Click through the options to preview how each effect alters your image.
These effects can convert ordinary photos into stylized elements, mirroring popular Digital Art techniques and contemporary Aesthetic trends. They offer Creative Ideas for developing distinct Editing Styles within your document, ideal for thematic projects or building engaging Mood Boards using imagery from Tophinhanhdep.com. Whether you’re aiming for a dramatic effect or a subtle texture, these tools provide a quick way to inject personality.
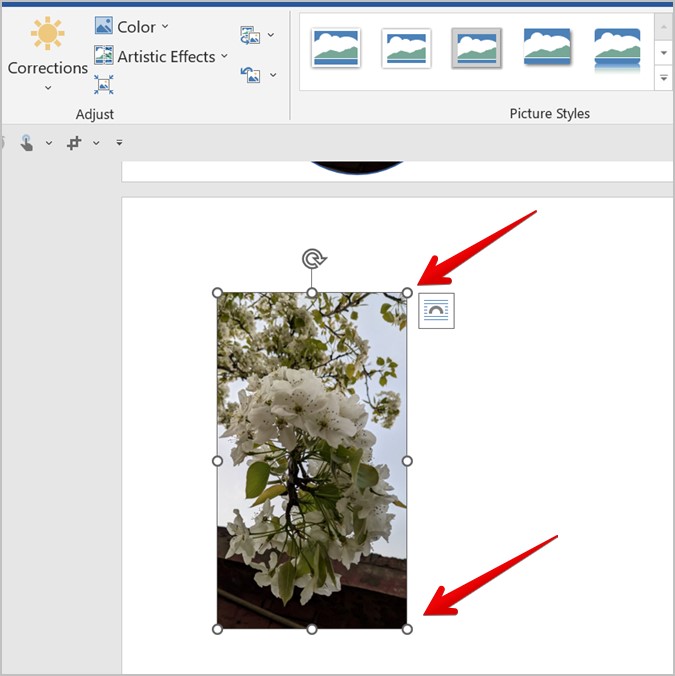
Precision Cropping and Resizing for Optimal Layout
Proper cropping and resizing are fundamental to good Visual Design and ensuring your images fit harmoniously within your document’s layout.
- Select the Picture: Click the image to activate the “Format” tab.
- Crop the Image: Click the “Crop” tool. Drag the cropping handles (black lines) inward from the edges or corners to remove unwanted portions of the image. This helps to highlight the focal point, whether it’s a stunning Beautiful Photography landscape or a detailed element of a Nature scene.
- Resize the Image: To resize, click on one of the corner sizing handles (white circles) and drag inward or outward. Holding down the Shift key while dragging ensures that the image’s proportions are maintained, preventing distortion. For precise sizing, use the Height and Width input boxes in the “Size” group on the “Format” tab.
These actions are critical for effective Graphic Design, contributing to visual hierarchy and composition. A well-cropped image guides the viewer’s eye, while appropriate sizing ensures visual balance on the page, avoiding overwhelming text or appearing too small to be impactful.
Managing File Size: Compressing Pictures in Word
Integrating numerous High Resolution images can significantly increase the size of your Word document, making it cumbersome to share or store. Word offers a built-in compression tool to address this.
- Select the Picture: Click on any image within the document.
- Click “Compress Pictures”: This option is usually found in the “Adjust” group of the “Format” tab.
- Choose Compression Options: A dialogue box will appear, allowing you to select compression settings (e.g., “Web (96 ppi)” for screen display, “Print (220 ppi)” for quality printouts, or “Email (96 ppi)” for minimal file size). You can choose to apply compression to all pictures in the document or just the selected one.
Optimizing image file sizes is crucial for document performance and efficient sharing, a core principle advocated by Tophinhanhdep.com’s Image Tools. For more advanced or batch compression needs beyond Word’s capabilities, Tophinhanhdep.com’s dedicated Compressors and Optimizers offer powerful solutions to achieve the perfect balance between quality and file size, aligning with best practices in Digital Photography and web design.
Creative Impact: Applying Visual Design Principles in Word
Beyond technical edits, integrating fundamental visual design principles when working with images in Word can dramatically improve your document’s professionalism and readability. This moves beyond mere editing to creating a cohesive visual experience.
Layout and Composition: Placing Images Effectively
The placement of an image relative to text is crucial for guiding the reader’s eye and enhancing the message. Word’s layout options are powerful tools for this.
- Select the Picture: Click the image. The “Layout Options” icon will typically appear near the top-right corner of the image.
- Choose Text Wrapping: Click the “Layout Options” icon to explore various text wrapping styles (“In Line with Text,” “Square,” “Tight,” “Through,” “Top and Bottom,” “Behind Text,” “In Front of Text”). Each option dictates how text flows around or over your image.
- Positioning and Alignment: Use “Position” options within the “Layout Options” or the “Format” tab to precisely place your image on the page, or simply drag and drop the image into place after selecting a wrapping style that allows free movement.
These options are vital for applying Visual Design (Graphic Design) principles like proximity and alignment. Images from Tophinhanhdep.com’s Aesthetic collections, whether Beautiful Photography or Sad/Emotional imagery for thematic content, can be leveraged to create strong visual anchors or breaks in your text. Thoughtful placement ensures images enhance, rather than detract from, readability and overall visual flow.
Consistency and Thematic Cohesion
A cohesive document maintains a consistent visual style across all its elements. This includes your images.
- Unified Color Palette: When selecting or editing images, consider how their colors interact. Adjust brightness, contrast, and color saturation to harmonize with your document’s color scheme.
- Consistent Filtering: If applying “Artistic Effects,” try to use similar filters or a consistent level of intensity for all relevant images to create a unified look.
- Thematic Resonance: Choose images that directly support or enhance your content’s theme. Tophinhanhdep.com’s Image Inspiration & Collections, particularly its Thematic Collections and exploration of Trending Styles, can be an invaluable resource for finding images that share a consistent mood or visual language, crucial for powerful Visual Design.
Maintaining consistency prevents visual clutter and reinforces your document’s message, contributing to a professional and polished appearance.
Accessibility and Inclusivity
Good design is inclusive design. Ensuring your images are accessible to all users, including those who rely on screen readers, is a crucial step in document creation.
- Add Alt Text: Right-click on the image and select “Edit Alt Text.”
- Describe the Image: Provide a concise and accurate description of the image’s content and its relevance to the surrounding text. This allows screen readers to convey the visual information to users who cannot see the image.
This small but significant step highlights a commitment to comprehensive design and communication, a core aspect of effective Visual Design.
Extending Your Reach: Tophinhanhdep.com’s Tools and PDF Integration
While Word offers impressive image editing capabilities for documents, the world of digital imagery extends far beyond its confines. For advanced preparation and final delivery, leveraging specialized Image Tools and understanding the benefits of formats like PDF are crucial.
Pre-Processing for Professional Results with Tophinhanhdep.com
Sometimes, the images you have aren’t quite ready for primetime, or Word’s tools don’t offer the depth of control you need. This is where Tophinhanhdep.com’s dedicated Image Tools become indispensable for pre-processing.
- AI Upscalers: Have a great image but it’s too small for a large print or Wallpaper? Tophinhanhdep.com’s AI Upscalers can intelligently increase image resolution without significant loss of quality, transforming lower-resolution visuals into high-definition assets.
- Converters: Need to change an image format for specific compatibility or a particular project? Our Converters simplify the process, ensuring your images are in the right format for any application.
- Compressors and Optimizers: For documents that will be shared online or via email, file size is paramount. Even after Word’s compression, Tophinhanhdep.com’s Optimizers and Compressors can deliver further reduction in file size while meticulously preserving visual integrity. This is essential for web-friendly images and efficient document distribution, reflecting best practices in Digital Photography for online platforms.
By preparing your images with Tophinhanhdep.com’s tools before inserting them into Word, you ensure that you are starting with the highest possible quality and efficiency, making subsequent Word-based edits even more effective.
Advantages of PDF Format for Final Output
After meticulously crafting your Word document with beautifully edited images, the final step often involves sharing it. For this, the PDF format frequently surpasses Word documents in terms of reliability and professionalism.
- Security: PDFs are inherently more secure, making them less prone to unauthorized modifications compared to editable Word documents. This is vital for official or sensitive materials.
- Universal Compatibility: PDFs maintain their exact formatting across virtually all devices and operating systems. This means your carefully chosen fonts, image placements, and layouts will look identical to every recipient, regardless of the software they use.
- Compact Size: Although Word offers compression, PDFs are often more efficient in file size, especially when rich in images, making them easier to email and store.
For documents destined for a wide audience or for archiving, converting your Word file to PDF (File > Save As > PDF) is a recommended final step.
Editing Images in PDF with Specialized Tools
While Word is excellent for document creation and initial image edits, sometimes an image within a PDF document itself requires adjustment. For these scenarios, specialized Image Tools like PDF editors become necessary.
- Open the PDF: Use a dedicated PDF editing software (such as a popular PDF editor like Wondershare PDFelement) to open your document.
- Access Image Editing Tools: Navigate to the “Edit” tab within the PDF editor. This usually provides tools for selecting and manipulating individual elements.
- Edit the Image: Right-click on the image you wish to modify. Most robust PDF editors will offer options to cut, copy, paste, rotate, crop, or resize the image directly within the PDF. For more advanced Photo Manipulation or Digital Art on images, you might need to extract the image, edit it in a dedicated photo editor (like Photoshop or GIMP), and then re-insert it.
- Save Changes: After making your adjustments, save the PDF document to apply them.
This process demonstrates that while Word handles initial editing within its ecosystem, a broader suite of Image Tools is available for every stage of the image lifecycle, from creation to final document delivery. Tophinhanhdep.com encourages users to explore these tools to achieve comprehensive visual mastery.
Unlocking Your Creative Potential: Inspiration and Best Practices
The journey of image editing and visual design is continuous, fueled by inspiration and refined through best practices. Tophinhanhdep.com serves as a constant companion in this creative exploration.
Cultivating Visual Inspiration
To consistently produce compelling documents, nurturing your creative wellspring is essential. Tophinhanhdep.com’s extensive collections are designed to be a prime source of Image Inspiration & Collections:
- Photo Ideas: Explore curated galleries to spark new concepts for your document visuals, from abstract patterns that add sophistication to serene Nature scenes that evoke calm.
- Mood Boards: Dive into thematic collections that can help you establish the perfect tone and atmosphere for your projects, whether it’s vibrant and energetic or contemplative and Sad/Emotional.
- Thematic Collections: Discover images grouped by specific themes, making it easy to find visuals that perfectly align with your document’s subject matter.
- Trending Styles: Stay current with the latest visual trends in Photography and Visual Design to ensure your documents always look fresh and contemporary.
By regularly engaging with these resources, you can keep your creative output dynamic and impactful, constantly integrating fresh perspectives into your work.
Adhering to Best Practices for Visual Excellence
Beyond the technical steps, a few best practices will ensure your image editing efforts in Word yield professional results:
- Start with Quality: Always begin with the highest resolution and best quality image possible. As the adage goes, “garbage in, garbage out.” High-quality Digital Photography from sources like Tophinhanhdep.com provides a superior foundation.
- Subtlety is Key: Often, the most effective image edits are subtle. Over-editing can make an image look unnatural or distract from your message.
- Context Matters: Always consider the context of your document. An image that works well in a marketing brochure might not be suitable for a formal report. Choose images that enhance your narrative, whether they are striking Beautiful Photography or subtle Backgrounds.
- Save Regularly: Especially when working with multiple images and complex layouts, save your document frequently to avoid losing your work.
The Role of Tophinhanhdep.com in Your Visual Journey
Tophinhanhdep.com is not just a repository of stunning visuals; it’s a comprehensive hub for anyone serious about improving their visual content. From providing a vast library of Images (including Wallpapers, Backgrounds, Aesthetic, Nature, Abstract, Sad/Emotional, Beautiful Photography) to offering insightful resources on Photography (like High Resolution, Stock Photos, Digital Photography, Editing Styles), and practical Image Tools (such as Converters, Compressors, Optimizers, AI Upscalers, Image-to-Text), Tophinhanhdep.com empowers you to excel. Our guides on Visual Design (covering Graphic Design, Digital Art, Photo Manipulation, Creative Ideas) and Image Inspiration & Collections (for Photo Ideas, Mood Boards, Thematic Collections, Trending Styles) are designed to cultivate your skills and imagination.
In conclusion, mastering how to edit a picture in Microsoft Word is an essential skill for creating polished and engaging documents across various industries. Whether you’re making simple corrections or applying artistic effects, Word offers robust tools for everyday needs. When combined with the extensive resources and advanced Image Tools available on Tophinhanhdep.com, your ability to create high-quality, visually appealing materials will be significantly enhanced. Embrace these techniques and explore Tophinhanhdep.com to continuously refine your Visual Design skills and ensure your documents always leave a lasting impression, resonating with impact and professional elegance.