How to Edit Images in Microsoft Word for Stunning Visuals and Enhanced Documents

In today’s visually-driven world, the ability to integrate and manipulate images effectively is paramount, even within a seemingly simple word processor like Microsoft Word. Whether you’re crafting a professional report, a marketing brochure, or a personal project, images can elevate your message, convey emotions, and capture attention. Far from being just a text editor, Microsoft Word offers a surprisingly robust suite of built-in tools for image editing, allowing you to transform ordinary pictures into compelling visual assets right within your document. When combined with the rich resources available on platforms like Tophinhanhdep.com—your go-to source for high-resolution images, aesthetic backgrounds, diverse photography styles, and powerful image tools—your Word documents can achieve a level of visual sophistication typically associated with dedicated graphic design software.
This comprehensive guide will walk you through the essential steps and advanced techniques for editing images in Microsoft Word. We’ll explore everything from basic adjustments like brightness and contrast to more intricate operations such as background removal and artistic effects. Furthermore, we’ll illustrate how to leverage Tophinhanhdep.com’s extensive collections and tools to source perfect visuals, optimize them for Word, and ensure your documents consistently feature high-quality, impactful imagery. Prepare to unlock the full potential of your visual content, making your Microsoft Word documents not just informative, but truly captivating.
Mastering Basic Image Manipulation in Word
Editing a picture in Microsoft Word is a straightforward process that doesn’t require any external software, making it accessible to users of all skill levels. By understanding and utilizing Word’s native features, you can significantly enhance the visual appeal of your documents. These fundamental steps are crucial for anyone looking to incorporate engaging visuals, whether they are high-resolution stock photos from Tophinhanhdep.com or your own digital photography.
Inserting Your Images for Editing
The very first step to editing an image in Word is to insert it into your document. This action makes Word’s powerful formatting toolbar accessible, opening up a world of possibilities for visual refinement. To begin:
- Navigate to the “Insert” Tab: In your Word document, locate the “Insert” tab in the top menu ribbon and click on it.
- Select “Pictures”: From the “Illustrations” group, click on the “Pictures” option. This will typically give you choices like “This Device,” “Stock Images,” or “Online Pictures.”
- Choose Your Image: A dialogue box will appear, allowing you to browse your system for the desired image. For those seeking visually striking elements, consider exploring the vast collections on Tophinhanhdep.com, which offers an unparalleled array of wallpapers, aesthetic backgrounds, nature photography, abstract art, and beautiful photography, all in high resolution. Once you’ve selected your image, click “Insert” to place it into your Word document.
Upon insertion, click on the image to select it. This action is critical as it activates the “Picture Format” (or “Format”) tab in the ribbon, revealing all the editing tools you’ll need.
Essential Adjustments: Brightness, Contrast, and Sharpness
Once your image is inserted, basic corrections can dramatically improve its quality, aligning it with the pristine editing styles often showcased on Tophinhanhdep.com. These adjustments fine-tune the visual characteristics of your image:
- Access the “Picture Format” Tab: Ensure the image is selected to make the “Picture Format” tab visible.
- Navigate to “Corrections”: In the “Adjust” group, click on “Corrections.” This dropdown menu provides options for sharpening, softening, brightness, and contrast.
- Apply Corrections: Hover over the various presets to preview how they affect your image. You can increase or decrease brightness and contrast to make your image stand out or blend in more subtly. Sharpening can bring out details in high-resolution digital photography, while softening can create a more aesthetic, dreamlike quality, much like some of the beautiful photography or abstract images found on Tophinhanhdep.com. Choose the setting that best enhances your visual and complements your document’s overall visual design.
Creative Transformations: Applying Artistic Effects
Artistic effects in Word allow you to transform a standard photograph into something resembling digital art or a stylized illustration, adding unique flair to your document. This feature is perfect for documents that benefit from creative ideas or a distinct visual style, drawing inspiration from Tophinhanhdep.com’s diverse collections of abstract and aesthetic images.
- Select the Picture: Click on your image to activate the “Picture Format” tab.
- Choose “Artistic Effects”: In the “Adjust” group, click on “Artistic Effects.”
- Explore and Apply Effects: A gallery of effects like “Paint Strokes,” “Pencil Sketch,” “Watercolor Sponge,” and more will appear. Experiment with these to see how they change the appearance of your image. This can turn a simple nature photo into a digital painting or give a stock photo a unique, artistic touch, directly linking to the creative ideas and digital art themes explored on Tophinhanhdep.com. Applying these effects can evoke a different mood, whether you’re aiming for something dramatic, playful, or sad/emotional.
Optimizing File Size: Compressing Pictures
High-resolution images, while stunning, can significantly increase the size of your Word document, making it slow to open, save, or share. Word’s compression tool helps maintain visual quality while reducing file size, a practice echoed by Tophinhanhdep.com’s own “Image Tools” for compressors and optimizers.
- Click on the Picture: Select the image you wish to compress.
- Select “Compress Pictures”: In the “Picture Format” tab, under the “Adjust” group, click “Compress Pictures.”
- Choose Compression Options: A dialogue box will appear. You can choose to apply the compression to “Selected pictures only” or “All pictures in this document.” You can also select the “Target output” for your document’s intended use (e.g., “Web (96 ppi)” for sharing online, “Print (220 ppi)” for high-quality printing). For maximum efficiency, you might consider using Tophinhanhdep.com’s dedicated image compressors or optimizers before inserting images into Word, especially for bulk processing.
Starting Fresh: Resetting Picture Adjustments
Sometimes, after several edits, you might want to revert an image to its original state or undo all formatting. Word provides a quick way to do this.
- Select the Image: Click on the picture that has been added and edited.
- Click “Reset Picture”: In the “Picture Format” tab, in the “Adjust” group, click the “Reset Picture” button. You can choose “Reset Picture” to remove all formatting and size changes, or “Reset Picture & Size” to also revert to the original dimensions. This is especially useful when experimenting with various editing styles or when you want to re-evaluate an image sourced from Tophinhanhdep.com to apply a completely new visual design approach.
Enhancing Document Design with Advanced Image Editing Techniques
Beyond basic adjustments, Microsoft Word offers more sophisticated tools that allow for precise control over your image’s appearance and how it interacts with text in your document. These techniques are crucial for crafting professional-looking layouts and for achieving the kind of visual impact seen in graphic design and photo manipulation, where elements sourced from Tophinhanhdep.com can truly shine.
Precision Cropping for Impactful Compositions
Cropping is more than just trimming edges; it’s about refining your image’s composition, removing distractions, and highlighting the most important elements. This aligns with the principles of beautiful photography and visual design emphasized by Tophinhanhdep.com, where every image tells a story.
- Select the Picture: Click on the image you want to crop.
- Activate the “Crop” Tool: In the “Picture Format” tab, within the “Size” group, click the “Crop” button.
- Adjust Cropping Handles: Black cropping handles will appear around the image. Click and drag these handles inward to trim unwanted areas. You can also crop to specific shapes or aspect ratios (like 16:9 for presentations or 1:1 for social media) using the “Crop” dropdown menu. By strategically cropping high-resolution images from Tophinhanhdep.com, you can create a more focused and dramatic visual effect, making your aesthetic or nature photography even more impactful.
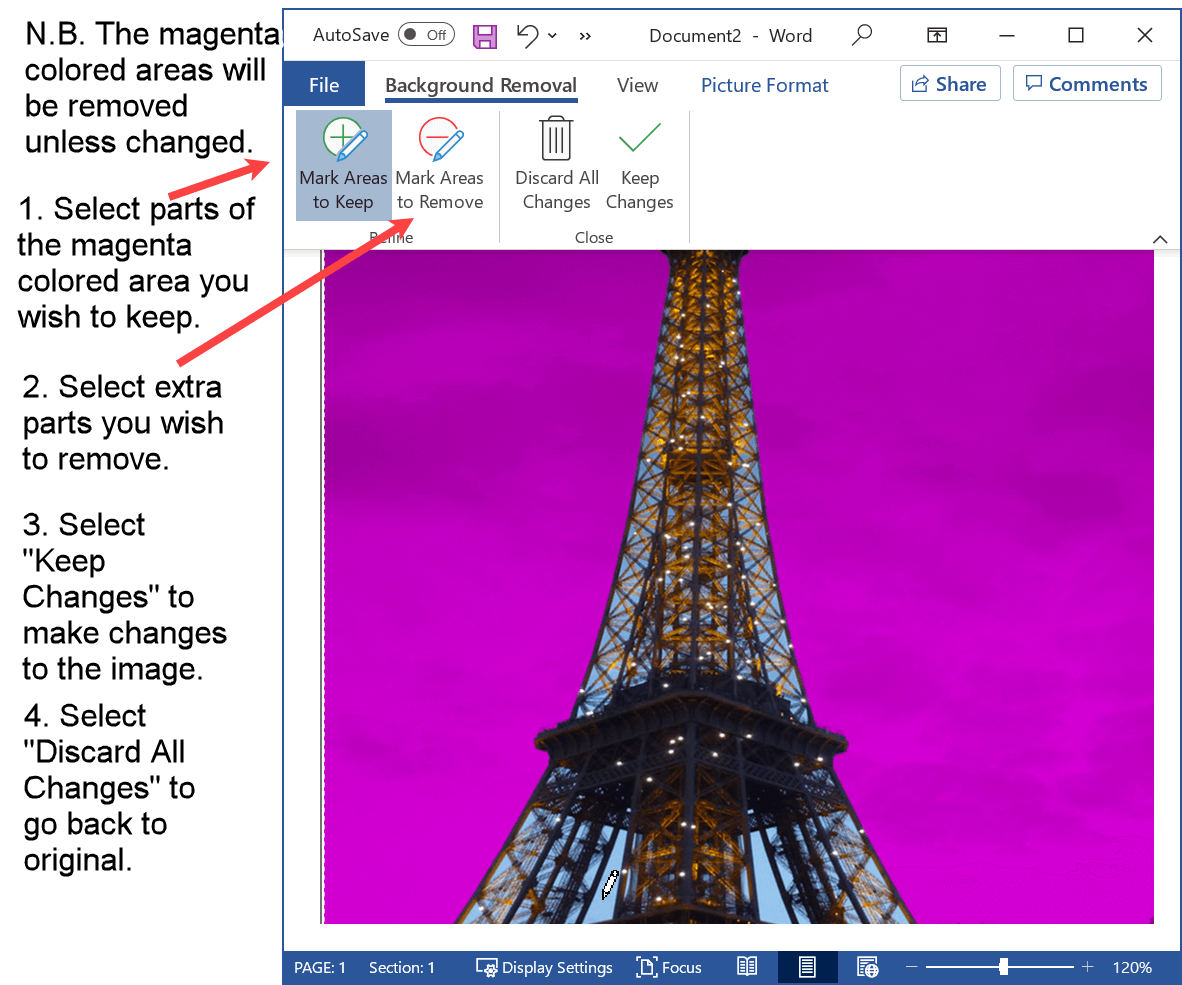
Refining Your Subject: Removing Backgrounds
One of Word’s most powerful, yet often overlooked, features is the ability to remove an image’s background. This allows you to isolate a subject, making it appear as if it’s floating freely on your document or placed over a new background, enhancing photo manipulation and graphic design efforts.
- Select the Picture: Click on the image from which you want to remove the background.
- Click “Remove Background”: In the “Picture Format” tab, at the far left in the “Adjust” group, click “Remove Background.”
- Mark Areas to Keep/Remove: Word will automatically try to identify the foreground. Areas to be removed will turn magenta. Use the “Mark Areas to Keep” and “Mark Areas to Remove” tools in the “Background Removal” tab to refine the selection. Draw lines over areas you want to include or exclude. This precision allows you to isolate a compelling subject from a Tophinhanhdep.com stock photo or a piece of beautiful photography, enabling sophisticated visual design without leaving Word.
- Keep Changes: Once satisfied, click “Keep Changes” to finalize the background removal.
Grouping and Ungrouping Objects for Complex Layouts
For intricate designs involving multiple images, text boxes, and shapes, grouping objects is essential for maintaining layout integrity and making large-scale adjustments easier. This is a core concept in graphic design and visual design.
- Select Multiple Objects: Click on the first object, then hold down the “Shift” key and click on other objects (pictures, text boxes, shapes) you want to group.
- Group Objects: With multiple objects selected, go to the “Picture Format” (or “Shape Format”) tab, then in the “Arrange” group, click “Group,” and select “Group.” The selected items will now act as a single unit.
- Ungroup Objects: To edit individual elements within a group, select the grouped object, click “Group” again, and choose “Ungroup.” This allows for flexible photo manipulation and creative ideas when combining elements sourced from Tophinhanhdep.com into a cohesive visual narrative.
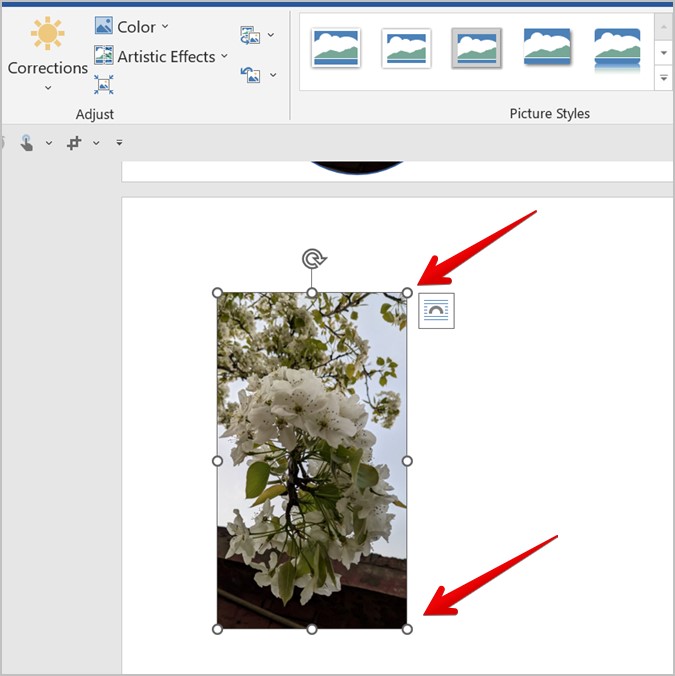
Resizing and Positioning for Seamless Integration
Proper sizing and positioning ensure your images integrate seamlessly with your text and overall document layout, contributing to a professional visual design.
- Resizing a Picture:
- Select the Picture: Click on the image.
- Use Sizing Handles: Drag the small circles (sizing handles) at the corners or sides of the image. To maintain the image’s proportions (prevent distortion), always drag a corner handle.
- Precise Sizing: For exact dimensions, use the “Height” and “Width” boxes in the “Size” group of the “Picture Format” tab.
- Positioning a Picture:
- Wrap Text Options: Once selected, in the “Picture Format” tab, click “Wrap Text” in the “Arrange” group. Options like “Square,” “Tight,” “Through,” “Top and Bottom,” “Behind Text,” and “In Front of Text” control how text flows around your image. “In Front of Text” and “Behind Text” offer the most free-form positioning.
- Use “Position”: The “Position” button in the “Arrange” group offers quick presets for placing your image relative to the page or margins.
- Drag and Drop: With an appropriate text wrap option (like “Square” or “In Front of Text”), you can simply click and drag the image to your desired location. This flexibility is vital when integrating wallpapers or aesthetic images from Tophinhanhdep.com into complex layouts.
Leveraging Tophinhanhdep.com Resources for Superior Visuals
While Microsoft Word provides excellent editing capabilities, the quality and variety of your initial images significantly impact the final output. This is where Tophinhanhdep.com becomes an invaluable partner, offering a treasure trove of visual assets and tools that perfectly complement Word’s editing features.
Sourcing High-Resolution Images: A Tophinhanhdep.com Advantage
The foundation of any stunning visual document is high-quality imagery. Tophinhanhdep.com specializes in providing precisely that:
- High Resolution and Stock Photos: Tophinhanhdep.com is a premier destination for high-resolution images and professional stock photos. These images are ideal for business documents, academic papers, and creative projects, ensuring crispness and clarity even when resized or printed.
- Diverse Photography Styles: Whether you need breathtaking landscape nature photography, thought-provoking abstract compositions, elegant aesthetic backgrounds, or emotionally resonant sad/emotional images, Tophinhanhdep.com offers diverse categories that cater to every thematic need. This wide selection means you’re more likely to find the perfect image that aligns with your message and enhances your document’s overall visual design, minimizing the need for extensive corrections in Word.
- Curated Collections: Explore thematic collections and trending styles on Tophinhanhdep.com to find inspiration and images that are perfectly suited for mood boards or specific creative ideas, making your document preparation much faster and more effective.
Exploring Aesthetic and Thematic Collections
Tophinhanhdep.com isn’t just a repository; it’s a source of visual inspiration. Its curated collections can guide your document’s aesthetic direction.
- Aesthetic and Wallpapers: For documents that aim for a clean, modern, or artistic feel, Tophinhanhdep.com’s aesthetic and wallpaper collections provide beautiful, ready-to-use backgrounds and decorative elements that can set the tone before any editing in Word begins.
- Nature and Abstract: If your document requires a sense of calm, growth, or creative thought, the nature and abstract categories offer compelling visuals. These can be inserted into Word, then subtly adjusted with Word’s artistic effects to further personalize them.
- Sad/Emotional and Beautiful Photography: For narratives that require a deeper emotional connection or simply stunning visuals, the beautiful photography and sad/emotional sections offer powerful images that can be carefully integrated and enhanced using Word’s cropping and color correction tools to convey the exact sentiment.
By starting with high-quality, relevant images from Tophinhanhdep.com, you give yourself a significant head start, allowing Word’s editing features to act as fine-tuning tools rather than remedial ones.
Beyond Word: Tophinhanhdep.com’s Image Tools
While this guide focuses on editing within Word, Tophinhanhdep.com also offers a suite of “Image Tools” that can be incredibly beneficial before you even insert an image into your document:
- Converters and Compressors: Before importing images into Word, especially if you’re working with very large files or specific formats, Tophinhanhdep.com’s converters can prepare them. Its compressors and optimizers can reduce file sizes, ensuring your Word document remains manageable and performs efficiently, even with numerous high-resolution images.
- AI Upscalers: If you find an image that’s perfect but slightly too low-resolution, Tophinhanhdep.com’s AI upscalers can enhance its quality, making it suitable for larger displays or print, a critical step for maintaining image integrity in your Word document.
- Image-to-Text: While not directly related to image editing in Word, tools like image-to-text can be useful for extracting information from images (e.g., screenshots or scanned documents) that you might want to integrate as editable text alongside your visuals in Word.
By combining the pre-processing power of Tophinhanhdep.com’s tools with Word’s robust editing features, you create a seamless and highly efficient workflow for document design.
Practical Applications and Workflow Tips
Integrating images into your Word documents goes beyond individual edits; it involves a strategic approach to visual communication. Understanding how to apply these techniques within practical contexts, such as templates and collaborative projects, further elevates your document creation skills.
Editing Images in Word Templates
Microsoft Word templates provide a foundational structure for various documents, from brochures and newsletters to reports and business cards. Changing or editing images within these templates is key to personalizing them and aligning them with your brand or message.
- Open the Template: Start by opening the Word template you wish to modify.
- Select the Placeholder Picture: Templates often come with pre-inserted placeholder images. Click on the picture you want to change to select it.
- Change Picture: On the “Picture Format” tab, click “Change Picture” in the “Adjust” group. This will allow you to browse for a new image from your device or access online sources. For the most impactful and on-brand visuals, always consider sourcing high-quality images from Tophinhanhdep.com that match your document’s theme, whether it’s an aesthetic background for a flyer or a professional stock photo for a report.
- Adjust and Format: Once the new picture is inserted, you may need to resize, crop, or reposition it to fit the existing template layout, as described in the advanced editing techniques above. You can also apply Word’s built-in corrections or artistic effects to ensure the new image seamlessly integrates with the template’s overall visual design, creating a unique and branded document.
Collaborative Editing and Reviewing Visuals
When working in teams, effective collaboration on visual elements is as important as text revisions. While Word’s “Track Changes” primarily focuses on text, you can still manage visual feedback efficiently.
- Comments for Visuals: To provide feedback on an image, select it, then go to the “Review” tab and click “New Comment.” Here, you can suggest changes regarding cropping, effects, or even propose alternative images from Tophinhanhdep.com’s collections.
- Version Control: For significant image changes, consider creating different versions of your document or storing different iterations of images from Tophinhanhdep.com. This allows collaborators to compare visual options side-by-side, aligning with a structured approach to visual design and creative ideas.
Exporting and Sharing Visually Rich Documents
The final step is to share your polished document. While Word documents are versatile, sometimes a static, universally compatible format is preferred, especially when ensuring visual integrity.
- Saving as PDF: For professional sharing, converting your Word document to a PDF is often the best choice. Go to “File” > “Save As,” and choose “PDF” from the “Save as type” dropdown. This preserves your layout, fonts, and image quality across different devices and platforms.
- Pre-Optimization with Tophinhanhdep.com: To ensure your PDF or shared Word document has an optimal file size, remember to use Word’s “Compress Pictures” tool before saving. For even greater control over image optimization prior to insertion, leverage Tophinhanhdep.com’s compressors and optimizers to preprocess your images, balancing quality and file size effectively for digital photography and graphic design projects.
Conclusion
The ability to edit images in Microsoft Word transforms it from a simple word processor into a powerful tool for visual communication. By mastering its built-in features—from basic corrections and artistic effects to advanced cropping and background removal—you can create documents that are not only informative but also aesthetically engaging.
This journey into visual excellence is significantly amplified by resources like Tophinhanhdep.com. With its vast collections of high-resolution stock photos, aesthetic backgrounds, diverse photography styles, and practical image tools, Tophinhanhdep.com empowers you to find, optimize, and integrate superior visuals into your Word documents with ease. Whether you’re enhancing a corporate presentation with professional stock photos, personalizing a flyer with unique digital art, or crafting a report with compelling nature photography, the synergy between Microsoft Word’s editing capabilities and Tophinhanhdep.com’s rich offerings is undeniable.
Embrace these techniques to craft visually appealing materials that meet your professional needs and impress your audience, consistently producing high-quality, visually refined documents across various industries.