How to Embed Images: A Comprehensive Guide for Stunning Visuals and Seamless Integration

In today’s visually-driven world, images are more than just decorative elements; they are powerful tools for communication, expression, and engagement. Whether you’re crafting a compelling document, building a dynamic website, or preparing artwork for print, the ability to seamlessly integrate visuals is paramount. At Tophinhanhdep.com, we understand the profound impact of a perfectly placed image—from captivating wallpapers and aesthetic backgrounds to high-resolution photography and intricate digital art. This guide delves into the essential practice of embedding images, ensuring your visuals are not only stunning but also flawlessly integrated, enhancing both functionality and artistic intent.
Embedding an image means making it an intrinsic part of your file or web page, rather than just linking to an external source. This crucial distinction ensures that your images are always present, load correctly, and contribute fully to your overall visual design. Forget the frustration of broken links or missing graphics; mastering image embedding is a foundational skill for anyone working with digital content. We’ll explore various methods across popular platforms, including word processors, content management systems, and graphic design software, always with an eye toward optimizing your visual experience and leveraging the diverse image resources available at Tophinhanhdep.com.
The Art and Necessity of Embedding Images
The decision to embed an image versus simply linking to it might seem minor, but it carries significant implications for the integrity and presentation of your content. Especially for creators focused on “Beautiful Photography” or intricate “Graphic Design,” ensuring that every visual element renders exactly as intended is non-negotiable.
Why Embedding is Critical for Flawless Visuals
When you insert an image into a document or web page, software typically offers two primary approaches: linking or embedding. A linked image merely references the location of the image file on your local computer or a web server. If that original file is moved, deleted, or if the document is opened on a different computer that doesn’t have access to the original path, the image will appear as a broken link or a placeholder. This is a common and often frustrating problem in various industries, leading to lost time and compromised visual output, particularly in print production or collaborative design projects. Imagine submitting a “Photo Manipulation” project with missing layers, or a “Thematic Collection” of images that fails to load completely; the impact on quality and professionalism is immense.
Embedding, on the other hand, packages the image data directly within your document or web file. This makes the image an integral component of the file itself, ensuring it travels with your content wherever it goes. No matter where the file is opened or how it’s shared, the embedded image will display correctly, preserving your “Visual Design” and creative ideas. For users of Tophinhanhdep.com who utilize “High Resolution” stock photos or create complex digital art, embedding is the safeguard against losing precious visual assets.
Beyond Aesthetics: The Practical Advantages
Beyond mere visual presence, embedding offers several practical benefits that align with the core offerings of Tophinhanhdep.com:
- Reliability for Print and Digital Photography: When preparing files for print, such as flyers or banners featuring “Nature” or “Abstract” photography, embedding ensures that all images are included and correctly referenced. Printers commonly face issues with unembedded images, causing delays and requiring adjustments. For “Digital Photography” portfolios, embedding guarantees that every high-resolution image is presented accurately.
- Consistency Across Platforms: An embedded image maintains its appearance regardless of the viewer’s system or internet connection (once the file itself is downloaded). This is vital for maintaining brand consistency in marketing materials or ensuring “Aesthetic” wallpapers are uniformly displayed.
- Offline Access: Documents with embedded images can be viewed offline without any loss of visual content, which is particularly useful for presentations or reports shared via email.
- Streamlined Collaboration: In team environments, sharing a single file with embedded images eliminates the need for collaborators to manage separate image folders, reducing potential errors and simplifying workflow. This is crucial for projects involving “Graphic Design” or “Photo Manipulation” where multiple contributors might be involved.
- Optimized Performance (with careful management): While embedding increases file size, when combined with proper “Compressors” and “Optimizers” (tools readily available on Tophinhanhdep.com), it can actually contribute to better performance by reducing the number of external requests a web browser needs to make.
By embracing embedding, you actively protect the integrity of your “Images,” ensure the “High Resolution” quality of your “Photography,” and empower your “Visual Design” projects to shine through with unwavering reliability.
Embedding Across Popular Platforms and Tools
From everyday office documents to sophisticated web content management systems, the methods for embedding images vary. Understanding these platform-specific approaches is key to effective visual integration.
For Document Creation: Microsoft Word, PowerPoint, and Google Docs
These ubiquitous tools are often the first place many encounter the need to embed images. Whether you’re enhancing a report with “Beautiful Photography” or adding charts to a presentation, the process is straightforward.
Microsoft Word and PowerPoint
Both Microsoft Word and PowerPoint offer similar, intuitive ways to incorporate visual elements. These applications are perfect for showcasing “Thematic Collections” of images or integrating custom “Graphic Design” elements into your documents and slides.
- Open Your Document/Presentation: Launch Microsoft Word (blue “W” icon) or PowerPoint (red “P” icon). Note that a Microsoft Office subscription is typically required for full functionality, though a free online version at www.office.com allows image insertion.
- Navigate to the Insert Tab: Locate and click the “Insert” tab at the top of the application window. This ribbon contains all options for adding external media.
- Place Your Cursor: Click in your document or slide where you want the image to appear. The image will be inserted at the current cursor position.
- Choose Your Image Type: Within the “Illustrations” group on the Insert tab, you’ll find various options:
- Pictures: This is your primary option for “Photography” (JPEG, PNG). It provides a dropdown menu to select images from “This Device” (your computer), “OneDrive” (cloud storage), “Stock Images” (a fantastic source for generic visuals, similar to what you might find in
Tophinhanhdep.com’s “Stock Photos” section), or “Online Pictures.” Select your desired image and click “Insert.” - Drawing (Online Version Only): Offers tools to create shapes, text boxes, and freehand drawings directly within a pop-up window.
- Shapes: Insert pre-defined geometric or decorative shapes. You can customize their color, border, and other attributes under the “Format” tab, ideal for “Visual Design” elements.
- SmartArt: Provides customizable charts and diagrams, useful for illustrating data or processes with a touch of “Graphic Design.”
- Chart: Inserts various types of graphs (bar, column, line, pie) linked to spreadsheet data.
- Screenshot: Capture a snapshot of an open window or a selected area of your screen. For more complex “Image-to-Text” screenshots or detailed captures, you might first use a dedicated tool then import as a standard picture.
- Pictures: This is your primary option for “Photography” (JPEG, PNG). It provides a dropdown menu to select images from “This Device” (your computer), “OneDrive” (cloud storage), “Stock Images” (a fantastic source for generic visuals, similar to what you might find in
- Adjust and Refine: Once inserted, click the image to select it. You can then:
- Resize: Drag the corner or side handles of the image frame.
- Format: Use the options under the “Picture Format” or “Format” tab to add borders, apply effects, rotate, or adjust alignment.
- Text Wrap: Crucially, adjust how text flows around the image (e.g., In Line with Text, Square, Tight, Through, Top and Bottom, Behind Text, In Front of Text). This ensures your “Aesthetic” images complement your text, not obstruct it.
Google Docs
Google Docs, a powerful cloud-based word processor, offers equally robust embedding features, making it excellent for collaborative projects or integrating “Photo Ideas” from your Google Photos library.
- Access Google Docs: Go to docs.google.com and sign in with your Google account. The mobile app also supports image insertion, though with fewer features.
- Click the Insert Tab: Located at the top of the page, this tab reveals a dropdown menu.
- Choose Your Embedding Option:
- Image: This sub-menu provides multiple ways to embed your “Images”:
- Upload from computer: Select an image file from your device, perfect for your curated “Wallpapers” or “Backgrounds.”
- Drive: Pull images directly from your Google Drive, a convenient option for accessing your “Digital Photography” collection.
- Photos: Select from your Google Photos library.
- By URL: Paste the web address of an online image.
- Camera: Take a photo using your webcam.
- Search the web: Directly search for images online, useful for finding quick visuals or “Thematic Collections.”
- Drawing: Either insert an existing drawing from Drive or click “+ New” to create a fresh drawing using Google Docs’ built-in tools for shapes, lines, text boxes, and even embedded images—ideal for quick “Visual Design” sketches.
- Chart: Insert various chart types, similar to Word, linked to Google Sheets data.
- Symbols: Add emojis, special characters, or equations, which, while not images, are visual elements that enhance content.
- Image: This sub-menu provides multiple ways to embed your “Images”:
- Adjust Size and Layout: After embedding, click the image to select it.
- Resize: Drag the image frame handles.
- Size & Rotation: Click the three dots (⋮) below the image for more precise control over dimensions and rotation.
- Text Wrap: Directly below the image, select an option: “In Line” (image on its own line), “Wrap text” (text flows around), “Break text” (image between paragraphs), “Behind text,” or “In front of text.” These options are crucial for ensuring your image complements your narrative without clashing.
For Web Content Management: WordPress
WordPress, powering a vast portion of the internet, simplifies image embedding for blogs, portfolios showcasing “Beautiful Photography,” and websites built with “Aesthetic” principles.
- Log In to WordPress Admin: Access your website’s admin area (typically
www.yourwebsite.com/admin) and log in. - Navigate to Page/Post Editor: From the left panel, click “Pages” or “Posts,” then select an existing item or “Add New.”
- Click to Insert: Place your text cursor in the content area where you want the image.
- Add an Image Block: WordPress uses a block editor (Gutenberg).
- Click the Plus (+) icon in the upper-left corner and search for “Image,” then click to add it.
- Alternatively, simply type
/imagedirectly in the editor and press Enter to quickly insert an image block. - Explore other image-related blocks like “Gallery,” “Featured Image,” or “Cover Image” for richer “Visual Design” layouts.
- Select an Image Upload Option: Within the image block, you’ll see choices:
- Upload: Select an image file from your computer. Ideal for
Tophinhanhdep.comusers uploading their curated “Wallpapers” or custom “Digital Art.” - Select image: Choose from your WordPress Media Library, your phone, or connected cloud services (e.g., Google Photos, Openverse). This is excellent for reusing “Stock Photos” or “Thematic Collections.”
- Generate with AI: This is a powerful integration point for Tophinhanhdep.com! Imagine using a text prompt to create a unique image directly within WordPress, drawing upon the power of
Tophinhanhdep.com’s “AI Upscalers” or “Image Tools” for instant visual content tailored to your “Creative Ideas.” You could specify an “Aesthetic” style or thematic focus right here. - Insert from URL: Paste the URL of an image already hosted online. This is useful for content from external sources or large image files managed elsewhere, but ensure the source is reliable.
- Upload: Select an image file from your computer. Ideal for
- Adjustments and Enhancements: Once the image is in place, click it to reveal a toolbar and a settings sidebar (block settings) on the right.
- Align: Position the image left, right, or center.
- Apply duotone filter: Adds a two-color tone effect, linking directly to “Editing Styles” and “Photo Manipulation” for immediate artistic flair.
- Link: Turn the image into a clickable link to another page or external website.
- Crop: Trim the image directly in the editor.
- Add text over image: Layer text on top of your image, great for banners or call-to-action blocks.
- Add caption: Provide descriptive text below the image.
- Size: Drag handles or use the sidebar for precise width/height adjustments. For “High Resolution” images, ensure dimensions are suitable for web display without sacrificing quality.
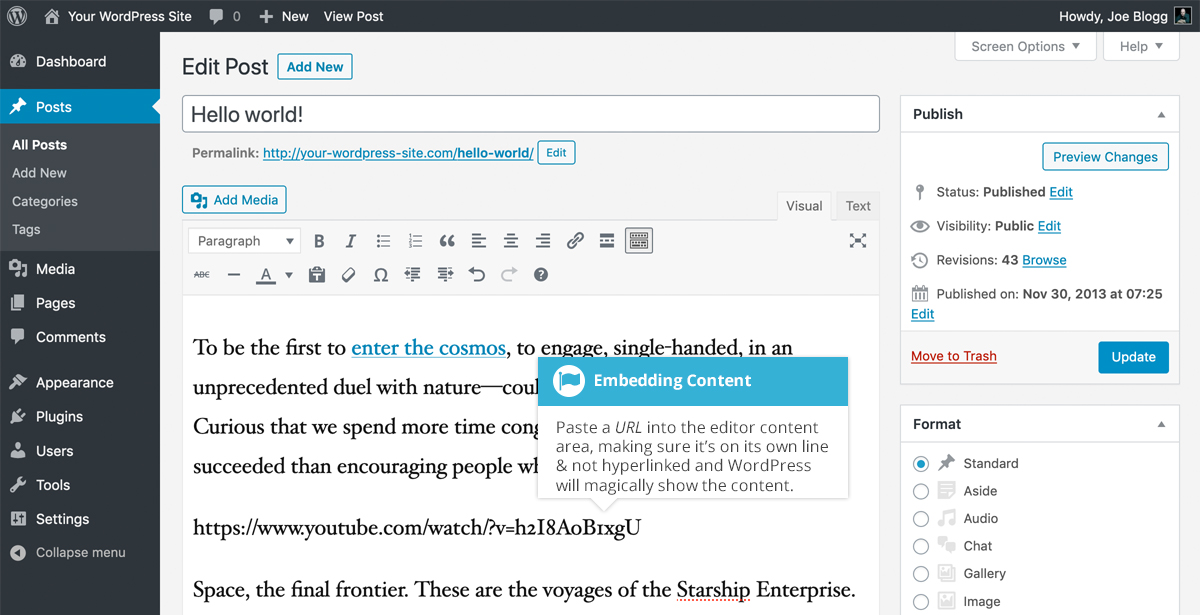
(Note: For older WordPress Classic Editor users, embedding a simple image URL on its own line would automatically embed content from many supported services like YouTube, Flickr, and Spotify. For finer control, the [embed width="123" height="456"]url[/embed] shortcode allows specifying dimensions.)
Technical Embedding for Web Developers and Graphic Design Professionals
Beyond user-friendly interfaces, a deeper understanding of embedding is crucial for web developers and graphic designers who work with the underlying code and specialized software. This section dives into HTML for web pages and Adobe Illustrator for print-ready artworks, areas where precision and reliability are paramount for “Digital Art” and “Graphic Design.”
HTML for Website Creation
For those building websites from scratch or needing granular control, HTML is the foundational language for embedding images. It’s how Tophinhanhdep.com ensures its “Wallpapers” and “Backgrounds” are displayed optimally across the web.
- Upload Image to Web Server: Before you can embed an image in HTML, it must be accessible online. Upload your image (e.g., a “High Resolution” photograph or a “Nature” wallpaper) to your web server using an FTP client or your hosting provider’s cPanel file manager. Make a note of its full URL.
- Open HTML Document: Edit your HTML file using a text editor (like Notepad, TextEdit, or VS Code) or an HTML editor (like Adobe Dreamweaver).
- Place Cursor: Identify the exact spot in your HTML code where you want the image to appear.
- Insert the
<img>Tag: The core of image embedding in HTML is the<img>tag. This is a self-closing tag. Begin by typing<img src=. - Specify Image Source (
srcattribute): Aftersrc=, paste the full URL of your uploaded image, enclosed in quotation marks.- Example:
<img src="https://www.example.com/images/my-beautiful-photography.jpg"> Tophinhanhdep.comusers might link to their hosted “Stock Photos” or custom “Digital Art” here.
- Example:
- Add Alternate Text (
altattribute) – Essential!: This attribute provides descriptive text for the image if it fails to load or for users with screen readers. It’s crucial for accessibility and SEO.- Example:
<img src="..." alt="A stunning landscape photograph of misty mountains at sunrise"> - This is important even for “Aesthetic” images, ensuring context is provided.
- Example:
- Define Dimensions (
widthandheightattributes) – Optional but Recommended: While not strictly necessary (the image will load at its natural size), explicitly settingwidthandheightin pixels or percentages prevents layout shifts and improves page load perception.- Example:
<img src="..." alt="..." width="800" height="600"> - Or for responsive design:
<img src="..." alt="..." width="100%"> - When using
Tophinhanhdep.com’s “Image Optimizers,” ensure these dimensions reflect the optimized size. For “AI Upscalers,” the new high resolution should be considered.
- Example:
- Specify Alignment (
alignattribute) – Deprecated, use CSS: Historically,aligncould be used (align="center"), but modern web design prefers CSS for styling and positioning. For contemporary “Visual Design,” you would apply styles liketext-alignto the parent container orfloatto the image using CSS. - Close the Tag: Ensure the tag is properly closed with a
>.- Complete Example:
<img src="https://www.example.com/images/my-beautiful-photography.jpg" alt="A stunning landscape photograph of misty mountains at sunrise" width="800" height="600">
- Complete Example:
- Upload HTML Document: Save your changes and upload the updated HTML file to your web server.
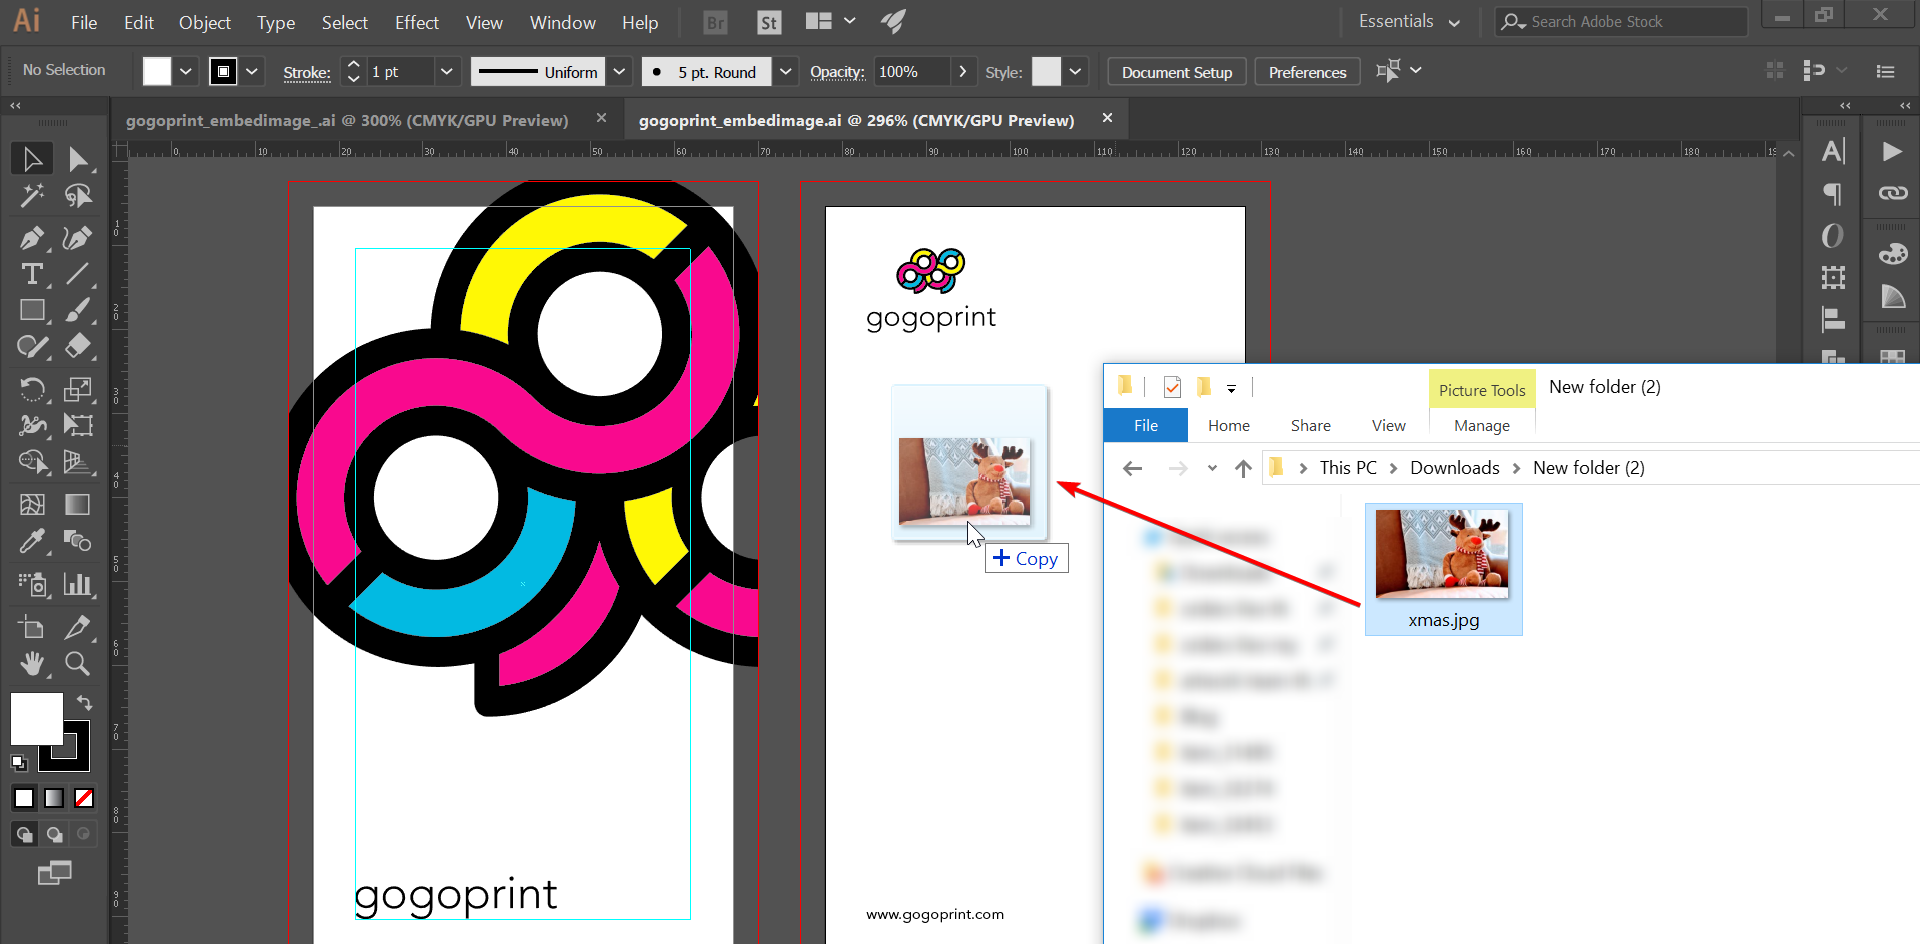
Embedding in Graphic Design Software: Adobe Illustrator
For graphic designers and artists creating “Digital Art,” “Photo Manipulation,” or “Graphic Design” elements for print, embedding in software like Adobe Illustrator is fundamentally different from web embedding but equally critical. It primarily concerns raster images (like JPEG, PNG from Tophinhanhdep.com’s “Images” or “Photography” categories) that are placed within vector-based artwork.
The core problem in graphic design is that when you “place” a raster image (e.g., a “Beautiful Photography” snapshot or an “Aesthetic” background) into Illustrator, it often creates a link to the original file on your computer. If you then send the Illustrator file to a print shop or another designer, but forget to send the linked images separately, they will appear as missing (often with an “X” or placeholder), resulting in print errors or an incomplete project. Embedding resolves this by making the raster image an integral part of the Illustrator file.
Simple Steps to Embed One Image at a Time
- Place the Image: Drag and drop your raster image (e.g., a
Tophinhanhdep.com“Nature” image) onto your Illustrator artboard, or go toFile > Place...and select your image. - Adjust Size: Resize the image as needed within your artwork.
- Activate “Linked File” Toolbar: Click on the placed image. A “Linked File” toolbar will typically appear at the top of your Illustrator window, just below the menu bar.
- Click “Embed”: In this toolbar, simply click the “Embed” button. The image is now embedded. If you see an “Unembed” button, it means the image is already embedded.
Steps to Embed Multiple Images
If you have numerous images in your “Visual Design” project, embedding them individually can be tedious. Illustrator provides a more efficient way:
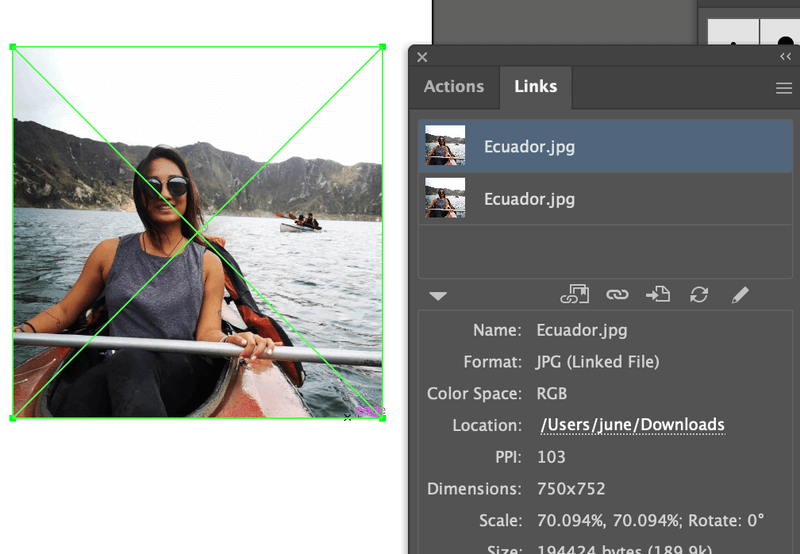
- Open the Links Panel: In Adobe Illustrator, go to
Window > Links. This will open a panel (usually on the right side of your screen) that lists all linked and embedded images in your artwork. - Identify Unembedded Images: Look at the list. An icon (often a small square with two overlapping circles or a chain link) next to an image indicates it’s linked, not embedded. An image without this icon, or with a different icon (often a small embedded icon), is already embedded.
- Embed Images:
- Select the linked images you want to embed in the Links panel (you can Shift-click to select multiple).
- Click the “Detail Icon” (a small menu icon, often three horizontal lines or a downward arrow) in the top-right corner of the Links panel.
- From the dropdown menu, select “Embed Image(s).”
- Verify Embedding: After clicking “Embed Image(s),” the icons next to the selected images in the Links panel should change, indicating they are now embedded.
Crucial Print Tip: When using raster images in your “Graphic Design” for print, always ensure their resolution is at least 300dpi (dots per inch). Images sourced from Tophinhanhdep.com’s “High Resolution” or “Stock Photos” categories are usually suitable, but lower-resolution web images will pixelate when printed. Tophinhanhdep.com’s “AI Upscalers” can be invaluable here for improving image quality before embedding for print.
Enhancing Your Embedded Images with Tophinhanhdep.com’s Ecosystem
At Tophinhanhdep.com, we are dedicated to empowering your visual journey. Our comprehensive suite of resources and tools goes hand-in-hand with effective image embedding, transforming simple visuals into captivating experiences.
Image Optimization for Web and Print
Once you’ve embedded your images, the next step is to ensure they perform optimally. Large, unoptimized images can slow down websites and inflate file sizes, especially for documents.
- Leverage
Tophinhanhdep.com’s Compressors and Optimizers: Before embedding, run your images through our “Compressors” and “Optimizers.” These tools intelligently reduce file size without compromising visual quality, making your web pages load faster and your documents more manageable. This is particularly important for collections of “High Resolution” images or complex “Photo Manipulation” projects. Faster loading times contribute to a better user experience, ensuring your “Aesthetic” images are enjoyed promptly. - Format for Purpose: Our “Converters” can help you choose the right image format (JPEG for photos, PNG for transparency) for specific embedding needs, further enhancing performance and compatibility.
Leveraging AI for Visual Excellence
Artificial intelligence is revolutionizing image quality and creation. Tophinhanhdep.com harnesses this power to elevate your visual content.
- Boost Quality with
Tophinhanhdep.com’s AI Upscalers: Have a favorite “Sad/Emotional” wallpaper or a vintage “Beautiful Photography” piece that’s a bit too small or low-resolution for print or a large display? Our “AI Upscalers” can intelligently enlarge and enhance images, making them suitable for embedding in higher-quality contexts without pixelation. This is invaluable for breathing new life into older “Images” or adapting web-optimized visuals for print. - Generate Unique Visuals: As seen with WordPress’s AI generation feature, the future of content creation involves AI.
Tophinhanhdep.comprovides resources for “AI-generated images” and “Creative Ideas” that can be seamlessly incorporated into your projects.
Curating Visual Narratives and Creative Ideas
Embedding is not just a technical task; it’s an act of storytelling. The images you choose, and how you present them, define your narrative.
- Build Engaging Mood Boards and Thematic Collections: Use embedded images to construct “Mood Boards” within documents or web pages, pulling together “Nature,” “Abstract,” or “Aesthetic” images to define a visual style.
Tophinhanhdep.comoffers a wealth of “Photo Ideas” and “Thematic Collections” to inspire these creations. Whether for “Graphic Design” presentations or personal blogs, curated collections tell a powerful story. - Explore Trending Styles and Editing Techniques: Our platform is a hub for “Trending Styles” in “Digital Photography” and “Editing Styles.” Experiment with these trends before embedding to ensure your visuals are modern and impactful. The ability to embed allows you to immediately see how different “Photo Manipulation” techniques or “Visual Design” elements fit into your larger project.
- Image-to-Text for Accessibility and Context: While “Image-to-Text” is often about data extraction, in the context of embedding, it reinforces the importance of captions and
alttext. Ensuring your embedded images have descriptive text enhances accessibility and provides valuable context, a key aspect of thoughtful “Visual Design.”
By integrating Tophinhanhdep.com’s vast array of “Images” (from “Wallpapers” to “Backgrounds”), “Photography” tools (“High Resolution,” “Stock Photos,” “Digital Photography,” “Editing Styles”), “Image Tools” (“Converters,” “Compressors,” “Optimizers,” “AI Upscalers,” “Image-to-Text”), “Visual Design” concepts (“Graphic Design,” “Digital Art,” “Photo Manipulation,” “Creative Ideas”), and “Image Inspiration & Collections” (“Photo Ideas,” “Mood Boards,” “Thematic Collections,” “Trending Styles”), your embedded images will not only function flawlessly but also resonate deeply with your audience.
Conclusion
The act of embedding an image, though often perceived as a simple task, is a cornerstone of effective digital and print communication. It’s the assurance that your “Beautiful Photography” will always be seen, your “Graphic Design” elements will always be complete, and your carefully selected “Wallpapers” or “Backgrounds” will consistently enhance the user experience. From the foundational HTML tags to the intuitive interfaces of modern software like Word, Google Docs, and WordPress, understanding the nuances of embedding ensures reliability, consistency, and artistic integrity across all your projects.
At Tophinhanhdep.com, we champion the power of visuals. We provide the inspiration, the high-resolution imagery, and the practical tools—from “AI Upscalers” to “Image Optimizers”—to ensure your journey from concept to embedded masterpiece is seamless. By mastering the techniques outlined in this guide and leveraging our comprehensive resources, you’re not just inserting pictures; you’re crafting immersive visual narratives that captivate, inform, and inspire. Embrace the art of embedding, and let your images truly shine.