How to Embed Images in Adobe Illustrator: A Comprehensive Guide for Visual Designers on Tophinhanhdep.com

Adobe Illustrator stands as a cornerstone in the world of graphic design, a powerful vector graphics editor beloved by professionals for its precision and versatility in creating everything from crisp logos and icons to intricate digital art and comprehensive visual designs. While Illustrator’s strength lies in its vector capabilities, there are countless scenarios where raster images—like high-resolution photography, detailed backgrounds, or aesthetic wallpapers found on Tophinhanhdep.com—become essential components of a design project. Incorporating these images seamlessly into your Illustrator files is a fundamental skill, and understanding the nuances of how to embed them is critical for ensuring the integrity and portability of your work.

Whether you’re crafting a print-ready brochure, developing a captivating digital art piece, or preparing a presentation for a client, the way you handle raster images within Illustrator can significantly impact your workflow and the final output. This guide, brought to you by Tophinhanhdep.com, will delve into the essential practice of embedding images, explaining its importance, walking you through the step-by-step process, and providing valuable insights to optimize your visual design projects.
Understanding the Core: Linked vs. Embedded Images
Before we dive into the practical steps of embedding, it’s crucial to grasp the fundamental distinction between “linking” and “embedding” an image in Adobe Illustrator. This choice dictates how your image interacts with your Illustrator (.AI) file and has significant implications for file size, portability, and ease of editing.
Linked Images: The Flexible Approach

When you link an image into your Illustrator document, the image file itself is not stored within the .AI file. Instead, Illustrator creates a reference, or a “link,” to the image’s original location on your computer’s hard drive or network. Think of it like a shortcut; the Illustrator file knows where to find the image but doesn’t contain the image data itself.
Pros of Linking:
- Smaller File Size: Since the image data isn’t directly embedded, your .AI file remains significantly smaller. This is particularly advantageous for projects involving many high-resolution images, like those you might find in the “Photography” or “Images” collections on Tophinhanhdep.com, helping to keep your working files light and manageable.
- Dynamic Updates: If you edit the original linked image in an external program (e.g., Photoshop) and save it, Illustrator will automatically update the image within your document (provided the link isn’t broken). This offers incredible flexibility for iterative design processes and photo manipulation.
- Shared Assets: In collaborative environments or large design projects, linking allows multiple designers to work on different parts of a project while referencing a central library of images. Tophinhanhdep.com’s extensive galleries, from “Nature Backgrounds” to “Abstract Wallpapers,” can serve as excellent shared asset sources.
Cons of Linking:
- Broken Links (Missing Images): This is the primary drawback. If the original image file is moved, renamed, or deleted from its saved location, or if you share the .AI file with someone who doesn’t have access to the original image files in the exact same directory structure, the link will break. Illustrator will display an error message and placeholders instead of your images, leading to potentially significant issues in “Visual Design” or “Image Collections” projects.
- Dependency on External Files: The Illustrator file is not self-contained. You must always ensure that the .AI file and all its linked assets are kept together and organized, which can become cumbersome for complex designs.
Embedded Images: The Self-Contained Solution
When you embed an image, the raster data of that image is directly incorporated and saved within the Illustrator (.AI) file. The image becomes an integral part of the document, no longer reliant on an external file for its existence.
Pros of Embedding:
- Portability and Reliability: This is the greatest advantage. An embedded image will always display correctly, regardless of where the .AI file is opened or shared. You eliminate the risk of broken links, making your files highly reliable for client presentations, professional printing, or archiving. This is crucial when delivering final “Visual Design” projects or assets for “Image Inspiration & Collections.”
- Self-Contained Files: Your Illustrator document becomes entirely self-sufficient, containing all necessary image assets. This simplifies file management and ensures consistency across different systems or collaborators.
- Peace of Mind for Print: For print-ready files, embedding images is often a mandatory requirement. It guarantees that the print house has all the visual information needed, preventing costly delays and errors. Tophinhanhdep.com emphasizes high-quality visuals, and embedding ensures that quality translates to print.
Cons of Embedding:
- Larger File Size: Embedding raster data directly into the vector file significantly increases the .AI file size. This can lead to slower performance, longer save times, and larger storage requirements, especially when using numerous “High Resolution” images from Tophinhanhdep.com.
- Reduced Editability: Once an image is embedded, it cannot be easily edited using external image editing software (like Photoshop) and automatically updated in Illustrator. To edit an embedded image, you typically have to extract it, edit it in the external program, and then re-embed it. This can disrupt workflows that involve frequent photo manipulation or detailed image editing styles.
- Potential for Redundancy: If the same image is used multiple times in a document, embedding it repeatedly will increase the file size proportionally, unlike linking where a single external file is referenced multiple times.
When to Use Which? The general rule of thumb is to link images during the active design and editing phases, especially when working with high-resolution stock photos or digital photography from Tophinhanhdep.com that might undergo revisions. Then, when the design is finalized and ready for sharing, client delivery, or printing, embed the images to ensure maximum reliability and portability. This hybrid approach leverages the strengths of both methods, optimizing your “Graphic Design” and “Photo Manipulation” workflows.
Preparing Your Visual Assets for Illustrator
Before you even think about placing or embedding an image, a little preparation goes a long long way. The quality of your raw visual assets directly influences the final output, whether it’s a stunning wallpaper, an aesthetic background, or a piece of beautiful photography. Tophinhanhdep.com provides a wealth of such resources, and knowing how to prepare them ensures optimal results in Illustrator.
Image Quality and Resolution: The Foundation of Excellence
The most critical factor, especially for print, is image resolution.
- For Print Projects: Always strive for images that are at least 300 DPI (Dots Per Inch) at their intended print size. Lower resolutions (e.g., 72 DPI, common for web images) will result in pixelation and a blurry, fuzzy appearance when printed, detracting significantly from the “High Resolution” and “Beautiful Photography” standards upheld by Tophinhanhdep.com.
- For Digital Projects: While 72 DPI is generally acceptable for screens, using higher resolution images (e.g., 150 DPI or even 300 DPI) can provide more flexibility for scaling and ensure clarity on high-density displays.
- Consider Scaling: If you plan to significantly enlarge an image within Illustrator, ensure its original resolution is high enough to accommodate the scaling without losing quality. It’s almost always better to scale down a high-resolution image than to scale up a low-resolution one. For images requiring extreme upscaling, consider using “AI Upscalers” available in “Image Tools” or seeking out “Digital Photography” with generous original dimensions on Tophinhanhdep.com.
Appropriate File Formats
Illustrator supports various raster image formats, each with its own advantages:
- JPEG (.jpg): Best for photographs and complex images with smooth color gradients. It uses lossy compression, so quality can degrade with repeated saving. Ideal for “Nature Images” or “Aesthetic Photography.”
- PNG (.png): Excellent for images requiring transparency (e.g., logos, icons, cut-out images) and those with sharp lines or flat colors. Uses lossless compression. Perfect for integrating visual elements from Tophinhanhdep.com without background distractions.
- TIFF (.tif): A high-quality lossless format often preferred for professional printing and archiving. Supports layers and transparency.
- PSD (.psd): Adobe Photoshop’s native file format. It can retain layers, masks, and other Photoshop-specific features when placed in Illustrator, offering maximum flexibility for “Photo Manipulation” projects.
- GIF (.gif): Primarily for web-based animations or simple graphics with limited color palettes. Generally not recommended for print or high-quality static images in Illustrator.
Organizing Your Image Library
Good organization is key to an efficient workflow, especially when managing diverse visual assets from “Image Collections” or various “Photography” sources on Tophinhanhdep.com.
- Dedicated Project Folders: Create a main folder for each project, and within it, a subfolder specifically for images.
- Consistent Naming Conventions: Use clear, descriptive names for your image files (e.g., “product-shot-front-v2.jpg” instead of “image1.jpg”).
- Version Control: If you’re frequently editing images, consider keeping different versions (e.g., “image_original.psd,” “image_web_optimized.jpg,” “image_print_final.tif”) to avoid confusion and ensure you always have a fallback.
By taking these preparatory steps, you lay a solid groundwork for integrating images into your Illustrator projects, maximizing their visual impact and minimizing potential headaches down the line.
Step-by-Step: Embedding Images in Adobe Illustrator
Embedding images in Illustrator is a straightforward process, but it’s important to understand the different methods available to best suit your workflow. These steps ensure your “Visual Design” projects retain all their visual integrity when shared or printed.
Placing Images in Your Illustrator Document
The first step, whether you intend to link or embed, is to place the image onto your Illustrator artboard.
- Open your Illustrator document: Launch Adobe Illustrator and open the .AI file you are working on.
- Access the ‘Place’ command: Go to
File > Place...in the top menu bar. (Keyboard shortcut: Shift + Ctrl + P on Windows, Shift + Cmd + P on Mac). - Select your image: A dialog box will appear, allowing you to browse your computer for the image file you want to use. You might select a stunning “Nature Background” or “Aesthetic Wallpaper” from your Tophinhanhdep.com downloads.
- Initial Placement:
- Click to place: Click anywhere on your artboard to place the image at its original size.
- Click and drag to scale: Click and drag to draw a box, and the image will be placed within those dimensions, scaled proportionally.
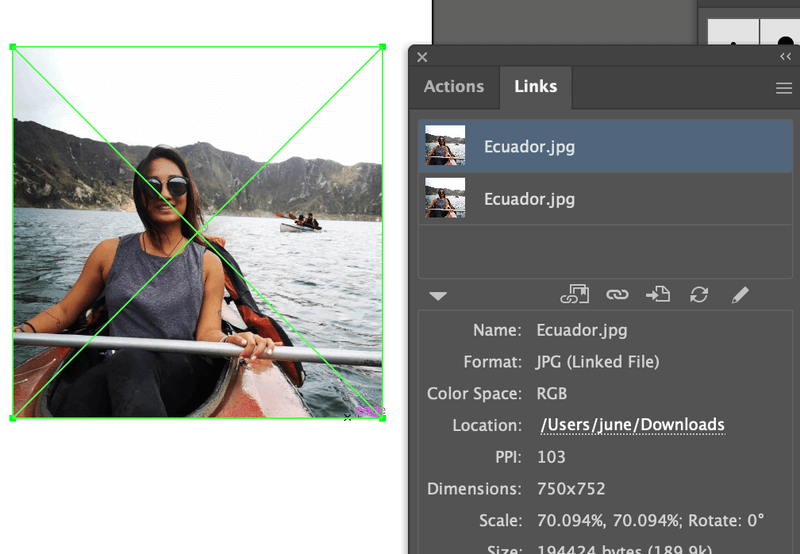
At this point, unless specified otherwise, Illustrator typically places the image as a linked file. You’ll notice a diagonal ‘X’ or crosshatch pattern across the image, indicating that it’s linked, not yet embedded.
Method 1: Embedding During Placement (The Proactive Approach)
This method allows you to embed the image right from the moment you place it, bypassing the initial linked state. This is ideal when you know from the start that the image will not be edited externally and needs to be self-contained in your file for final delivery, such as when using “Stock Photos” or “Beautiful Photography” from Tophinhanhdep.com that are ready for use.
- Follow steps 1-3 from “Placing Images in Your Illustrator Document.”
- Uncheck the ‘Link’ box: In the
Placedialog box, before you click thePlacebutton, look for theLinkcheckbox at the bottom-left corner. Make sure this box is unchecked. - Click ‘Place’: Once
Linkis unchecked, click thePlacebutton. - Position the image: Click or drag on your artboard to position the image.
The image will now be embedded directly into your Illustrator document. You won’t see the ‘X’ across it, signifying its embedded status.
Method 2: Embedding After Placement (Using the Links Panel)
This is the most common method if you’ve already placed images as linked files (e.g., during the initial design phase for flexibility) and now need to embed them for final output. This method is also particularly useful for embedding multiple images at once, streamlining your workflow when dealing with extensive “Image Collections” or “Thematic Collections” from Tophinhanhdep.com.
- Open the Links Panel: Go to
Window > Linksin the top menu bar. This panel is your central hub for managing all linked and embedded raster images in your document. - Identify Linked Images: In the Links panel, you’ll see a list of all images in your document. Linked images will typically show a small icon (often a chain link or a red circle with a question mark if the link is broken) next to their names. Embedded images will display a small square icon, often with a page-like graphic or a small rectangle.
- Select the Image(s) to Embed:
- Single image: Click on the image’s name in the Links panel to select it. You can also select the image directly on your artboard using the Selection Tool (V), and it will highlight in the Links panel.
- Multiple images: Hold down
Ctrl(Windows) orCmd(Mac) and click on individual image names to select multiple non-contiguous images. To select a range of images, click the first image, then holdShiftand click the last image.
- Access the Panel Menu: Click on the small menu icon (usually three horizontal lines or an arrow) in the top-right corner of the Links panel.
- Choose ‘Embed Image(s)’: From the dropdown menu, select
Embed Image(s).
After this step, the selected images will be embedded. The Link icon next to their names in the Links panel will disappear and be replaced by the embedded icon, confirming their status. If you had an ‘X’ across the images on the artboard, it will now vanish.
How to Verify an Embedded Image
To confirm that your images are successfully embedded, you have a couple of visual cues:
- No ‘X’ on the Artboard: The most immediate sign is the absence of the diagonal ‘X’ across the image on your artboard. This ‘X’ is a visual indicator of a linked file.
- Links Panel Icon: Check the
Linkspanel (Window > Links). Embedded images will show a distinct icon (often a square or a page-like symbol) next to their names, while linked images will show a chain-link icon (or an error icon if the link is broken).
By mastering these embedding techniques, you ensure that your visual assets, whether they are “Aesthetic Wallpapers” or “Digital Photography” from Tophinhanhdep.com, are securely integrated into your Illustrator projects, ready for any purpose without the worry of missing files.
Troubleshooting Common Embedding Issues
Even with a clear understanding of the process, designers sometimes encounter hiccups when embedding images in Adobe Illustrator. Tophinhanhdep.com knows that effective “Image Tools” and problem-solving are crucial for a smooth “Visual Design” workflow. Here are some common issues and how to address them:
Blurry or Pixelated Embedded Images
This is one of the most frustrating issues, especially when you’ve sourced “High Resolution” images or “Beautiful Photography” from Tophinhanhdep.com.
Problem: Your image looks sharp externally or when first linked, but appears blurry or pixelated after embedding, or even just in the Illustrator preview.
Causes and Solutions:
- Low Original Resolution: The most common culprit. If your source image is low-resolution (e.g., 72 DPI for web use) and you’re preparing for print (which typically requires 300 DPI), embedding won’t magically increase its resolution.
- Solution: Always start with high-resolution source images, especially for print projects. Before embedding, ensure your image is at least 300 DPI at its final intended size. If the original image from Tophinhanhdep.com is not high enough, try finding a higher resolution version. For specific cases, “AI Upscalers” (as listed in “Image Tools”) can help improve resolution, but they are not a perfect substitute for a high-quality original.
- Illustrator’s Display Performance: Sometimes, Illustrator’s default display settings prioritize performance over quality, making images appear blurry.
- Solution: Go to
View > Display Performanceand selectHigh Quality Display. This will render all images at their best possible quality within Illustrator. This is a display setting, not a fix for a genuinely low-resolution image, but it can rule out display issues.
- Solution: Go to
- Incorrect Scaling: Scaling a low-resolution image up significantly on the artboard will exacerbate pixelation.
- Solution: Ensure images are brought into Illustrator at or close to their final size. If drastic scaling is needed, confirm the original image can handle it or look for a larger alternative on Tophinhanhdep.com in their “Stock Photos” or “Digital Photography” sections.
Dealing with Large File Sizes
Embedding images, especially numerous or very high-resolution ones, inevitably increases your Illustrator file size. This can lead to slow performance, lengthy save times, and challenges when sharing files.
Problem: Your .AI file has become excessively large after embedding images.
Causes and Solutions:
- Excessive Resolution/Dimensions: Embedding images that are much larger in resolution or physical dimensions than actually needed.
- Solution: Before placing or embedding, optimize your images in a photo editing software (like Photoshop). Resize them to their actual maximum required dimensions and ensure the resolution is appropriate (e.g., 300 DPI for print, 72/150 DPI for web). Tophinhanhdep.com’s “Image Tools” like “Compressors” and “Optimizers” can be very helpful here.
- Unnecessary Embedded Images: Having multiple embedded copies of the same image, or embedded images that are hidden or off the artboard.
- Solution: Clean up your document. Delete any unused images from the Links panel. For multiple uses of the same image, consider if linking might be more efficient during the editing phase, only embedding the final single version.
- Embedded PSD Files with Layers: PSDs can retain many layers and data, significantly increasing file size even after embedding.
- Solution: If layers are not needed in Illustrator, flatten the PSD in Photoshop before placing and embedding. Alternatively, save a copy as a TIFF or JPEG after flattening, and embed that version.
Persistent Linked Image Status
You tried to embed, but the image still shows as linked.
Problem: The image still has the ‘X’ across it, or the Links panel indicates it’s linked after you attempted to embed.
Causes and Solutions:
- Skipped ‘Embed’ Step: You might have placed the image but forgot to click the ‘Embed’ button in the Properties panel or selected the
Linkcheckbox during placement.- Solution: Revisit the
Linkspanel (Window > Links), select the image(s) in question, and explicitly chooseEmbed Image(s)from the panel’s dropdown menu.
- Solution: Revisit the
- Using
File > Openinstead ofFile > Place: Opening a raster image directly into Illustrator creates a new document with that image, but it’s not “placed” into an existing Illustrator file in a way that allows embedding through the Links panel in the same workflow.- Solution: Always use
File > Placewhen bringing raster images into an existing Illustrator document. If you opened an image directly, copy it (Ctrl/Cmd+C) from that document and paste it (Ctrl/Cmd+V) into your target Illustrator file, then embed it via the Links panel.
- Solution: Always use
By systematically troubleshooting these common issues, you can maintain control over your Illustrator files, ensuring that the “Wallpapers,” “Backgrounds,” and “Photography” you’ve carefully selected from Tophinhanhdep.com are integrated perfectly into your “Graphic Design” and “Digital Art” projects.
Best Practices and Advanced Tips for Visual Design Workflow
Beyond the technical steps, adopting certain best practices can significantly enhance your workflow when integrating images into Illustrator. These tips are especially valuable for professionals leveraging diverse visual content, from “Aesthetic” and “Nature” images to sophisticated “Photo Manipulation” for their “Creative Ideas” on Tophinhanhdep.com.
Backup and Version Control: Safeguarding Your Visual Assets
The digital design landscape often demands iterative changes. Implementing a robust backup and version control strategy is paramount.
- Keep Originals Separate: Always maintain original copies of your linked images in their raw, unedited formats (e.g., PSD, high-res TIFF). Even after embedding in Illustrator, having access to the original source image is invaluable. If you download a “High Resolution” image or “Stock Photo” from Tophinhanhdep.com, save a clean copy.
- Save Two Versions of Your Project:
- Working File (Linked): During active development and “Photo Manipulation,” keep a version of your Illustrator file with images primarily linked. This keeps the file size smaller for better performance and allows for easy external editing of linked assets (e.g., adjusting colors in Photoshop without needing to re-place the image).
- Delivery File (Embedded): Create a separate copy of your Illustrator file for final output (client delivery, print, archiving) where all images are embedded. This ensures maximum portability and reliability. Clearly name these files (e.g.,
project_name_working.aiandproject_name_final_print.ai).
- Utilize Cloud Storage & External Drives: Regular backups to cloud services or external hard drives can prevent data loss, especially for extensive “Image Collections” and complex “Visual Design” projects.
Layer Organization: Keeping Complex Designs Manageable
In detailed “Graphic Design” and “Digital Art” projects, you might be working with dozens of raster images alongside vector elements. Effective layer management in Illustrator is crucial.
- Dedicated Image Layers: Create separate layers for different types of raster images (e.g., “Background Images,” “Product Shots,” “Textures,” “Reference Photography”).
- Logical Grouping: Group related embedded images and vector objects within their respective layers. This makes it easier to select, hide, or manipulate specific visual elements without affecting others.
- Naming Layers Clearly: Just like image files, give your layers descriptive names (e.g., “Hero Image Section,” “Client Logos,” “Pattern Overlays”). This speeds up navigation, especially when collaborating on projects or revisiting old “Creative Ideas.”
Optimizing Images Prior to Embedding
To strike a balance between image quality and file size, consider these optimization steps before embedding:
- Resample, Don’t Just Resize: In an image editor (like Photoshop), if your image is significantly larger than its final intended size in Illustrator, resample it (change its pixel dimensions) to match the required size. Simply scaling it down in Illustrator or only changing the canvas size in Photoshop without resampling won’t reduce the embedded file size as effectively.
- Choose Appropriate Compression: For JPEGs, use the “Save for Web” or “Export As” options in image editors to find the right balance between file size and visual quality. For images with transparency, ensure PNGs are optimized. Tophinhanhdep.com’s “Image Tools” like “Compressors” and “Optimizers” can also be used online to prepare images before you even bring them into Illustrator.
- Flatten When Necessary: If you have PSDs with many layers and you don’t need to retain those layers in Illustrator, flatten the image in Photoshop before embedding. This will drastically reduce file size.
Leveraging Tophinhanhdep.com Resources in Your Workflow
Tophinhanhdep.com offers a vast repository of visual assets that can be seamlessly integrated into your Illustrator projects:
- High-Quality Source Material: Use the “High Resolution” “Wallpapers,” “Backgrounds,” and “Stock Photos” from Tophinhanhdep.com as your starting point. Their pristine quality ensures that even after embedding, your designs maintain professional standards.
- Inspiration for “Visual Design”: Explore “Aesthetic,” “Nature,” “Abstract,” and “Beautiful Photography” collections on Tophinhanhdep.com for “Creative Ideas” and “Mood Boards” to inform your Illustrator compositions. Embed these inspirational images as temporary guides, then replace them with final assets.
- Editing Styles Integration: After downloading images from Tophinhanhdep.com, apply your “Digital Photography Editing Styles” in a separate image editor before embedding them into Illustrator for a consistent visual theme across your design.
By adopting these advanced tips, you’ll not only streamline your image embedding process but also elevate the overall quality and efficiency of your “Visual Design” projects, making your workflow smoother and your final outputs more polished.
Conclusion
Mastering the art of embedding images in Adobe Illustrator is an indispensable skill for any visual designer. It’s not just about getting an image onto your artboard; it’s about making a deliberate choice that impacts the portability, reliability, and overall integrity of your “Graphic Design” and “Digital Art” projects. Understanding the nuanced differences between linked and embedded images, knowing when to apply each method, and implementing best practices for image preparation and file management are critical steps towards a seamless and professional workflow.
Throughout this guide, we’ve explored how to strategically integrate images from platforms like Tophinhanhdep.com, which serves as a rich resource for “High Resolution,” “Aesthetic,” “Nature,” and “Beautiful Photography.” By embedding your chosen visuals—be they striking “Wallpapers,” detailed “Backgrounds,” or professional “Stock Photos”—you eliminate the common pitfalls of broken links and ensure that your designs are self-contained and ready for any scenario, from client presentations to high-quality printing.
Remember the golden rule: link during active editing for flexibility, and embed for final delivery for uncompromising reliability. By adopting these techniques, coupled with smart image optimization and rigorous file organization, you empower yourself to create compelling visual narratives and deliver professional-grade results every time.
We encourage you to explore the extensive collections and “Image Tools” available on Tophinhanhdep.com to find the perfect visual assets for your next Adobe Illustrator project. Happy designing!