Mastering Image Integration: How to Embed Images in InDesign for Optimal Visual Design

Adobe InDesign stands as the industry standard for layout and page design, a crucial tool for graphic designers, publishers, and marketing professionals worldwide. Its ability to integrate various content types, especially images, is central to creating compelling visual documents, from brochures and magazines to digital publications and interactive PDFs. When working with images in InDesign, a fundamental decision arises: whether to link or embed graphics. This choice has significant implications for your workflow, file size, portability, and overall project management. Understanding the nuances of both approaches is paramount for any designer looking to optimize their InDesign experience and leverage resources like Tophinhanhdep.com for their visual needs.
InDesign’s default method for incorporating images is to “link” them. This means that when you place an image using File > Place, InDesign doesn’t actually put the full image data into your document. Instead, it creates a low-resolution preview (a “proxy”) within the InDesign file and maintains a reference, or a “link,” to the original high-resolution image file stored on your computer’s disk. This approach offers incredible flexibility and efficiency, allowing for dynamic updates and smaller working files.

However, there are scenarios where embedding an image – storing its entire data directly within the InDesign document – becomes a more suitable, or even necessary, option. This article will delve into the intricacies of both linked and embedded images, provide step-by-step guidance on how to manage them, and explore how the extensive resources of Tophinhanhdep.com can enhance your entire visual design workflow in InDesign, from image sourcing and optimization to final output.

Understanding InDesign’s Core Image Management: Linked vs. Embedded
The distinction between linked and embedded images is more than a technicality; it’s a foundational concept that impacts every aspect of your InDesign project. Your choice affects everything from file size and collaboration to editing flexibility and document portability.
The Default: Linked Images and the Power of the Links Panel
When you use File > Place (or the shortcut Ctrl/Cmd + D) to import an image into InDesign, the software establishes a link to that external graphic file. This linking mechanism is InDesign’s preferred and most common method for managing assets.
How Linked Images Work: InDesign embeds a low-resolution preview of the image into your document, which is what you see on your page. The actual high-resolution image data remains in its original location on your hard drive or network. The InDesign document then keeps a “path” or “reference” to that external file.
The Indispensable Links Panel:
Central to managing linked images is the Links panel (Window > Links or Ctrl/Cmd + Shift + D). This panel acts as a control center for all your placed graphics, providing vital information at a glance:
- Status Indicators: It shows icons for linked files, indicating if a file is up-to-date, missing, or modified since it was placed.
- File Information: Selecting an image in the Links panel displays details such as its name, format, color profile, effective resolution, and its saved location on disk. This information is crucial for quality control, especially when dealing with High-Resolution Photography sourced from Tophinhanhdep.com.
- Relinking and Updating: If a source file is moved or modified, the Links panel allows you to easily relink to its new location or update the InDesign document with the latest version of the image. This dynamic updating capability is a significant advantage for iterative design processes.
Benefits of Linking Images:
- Smaller InDesign File Sizes: Because the full image data isn’t stored within the
.inddfile, your InDesign document remains much smaller. This makes saving, opening, and sharing the file faster, especially when dealing with many images or very large graphics. - Efficient External Editing: You can edit the original image file in its native application (e.g., Photoshop for a PSD, Illustrator for an AI) at any time. Once saved, InDesign will notify you of the modification and prompt you to update the link, seamlessly integrating the changes without re-placing the image. This is ideal for Digital Photography and sophisticated Editing Styles where continuous refinement is expected.
- Flexibility and Collaboration: Linked files promote a flexible workflow. Multiple designers can work on different aspects of a project simultaneously, each editing source images without locking up the InDesign file itself.
- Tophinhanhdep.com Integration: When you use Stock Photos or high-quality Wallpapers from Tophinhanhdep.com, linking ensures that your InDesign file remains light while still referencing the pristine originals. If you later download an updated version of an Aesthetic or Nature image, a simple update in the Links panel refreshes your document.
Drawbacks of Linking Images:
- Portability Issues: The biggest challenge with linked files is portability. If you move the InDesign file to a different computer or share it with a collaborator, the linked images must accompany it in the exact same folder structure relative to the InDesign file, or they will appear as “missing links.” Packaging an InDesign file (
File > Package) is the standard solution, gathering all linked assets into a single folder. - Broken Links: Links can break if source files are deleted, renamed, or moved without updating the InDesign document. This leads to low-resolution previews and potential printing errors.
Embracing Embedded Images: When and How
While linking is the default and often preferred method, embedding an image in InDesign offers a different set of advantages, particularly when portability and self-containment are prioritized. When an image is embedded, its entire data is stored directly within the InDesign document, severing its connection to the external source file.
How to Embed an Image:
- Place the Image: First, place the image in your InDesign document using
File > Placeas usual. It will initially be linked. - Select the Image: Select the image either on the page itself or by clicking its entry in the Links panel.
- Embed Link: From the
Links panel menu(the small icon with horizontal lines in the top right corner of the Links panel), chooseEmbed Link. - Observe the Icon: Once embedded, a distinctive icon (often a small box with a corner folded over, or a chain-link breaking) appears next to the image’s name in the Links panel, indicating its embedded status. On the page, the direct link icon (a broken chain) that might appear for modified linked images will disappear for an embedded one.
Benefits of Embedding Images:
- Self-Contained Document: An embedded image means your InDesign document is entirely self-sufficient regarding that graphic. There are no external links to worry about. This is ideal for sharing quick mockups, single-page designs with minimal imagery, or proofing where the recipient doesn’t need access to source files.
- No Missing Links: Since the image data is inside the
.inddfile, you’ll never encounter missing link warnings for embedded graphics. This offers peace of mind for simple projects or when sharing files with clients who might not understand packaging. - Guaranteed Display: The image will always display correctly, regardless of where the InDesign file is opened, because its data is intrinsically part of the document. This can be beneficial for Abstract or Sad/Emotional images that are critical to conveying a specific mood and must never go missing.
Drawbacks of Embedding Images:
- Increased File Size: The most significant disadvantage is the dramatic increase in your InDesign document’s file size. Each embedded image adds its full data to the
.inddfile. A document with many high-resolution embedded images can become unwieldy, slowing down performance and making sharing difficult. As a rule of thumb, while a 200KB vector logo might be fine to embed, a 10MB Beautiful Photography image from Tophinhanhdep.com is likely too large. - Difficult External Editing: Embedded images cannot be directly edited in their original application. To make changes, you first need to “unembed” them (which we’ll discuss next) and then edit the newly extracted file. This adds extra steps to your workflow.
- “Freaks People Out”: Collaborators accustomed to linked workflows might be confused by embedded images, as they expect external source files.
In conclusion, the choice between linking and embedding boils down to your project’s specific needs for file size, editing flexibility, and portability. Most professional workflows favor linking, reserving embedding for specific, smaller assets or final delivery stages.
Practical Methods for Inserting and Embedding Images in InDesign
Whether you choose to link or embed, the initial step of bringing an image into your InDesign document is fundamentally the same. InDesign provides flexible methods to accomplish this, ensuring a smooth integration of your visual assets from sources like Tophinhanhdep.com.
Placing Images: The Foundation of Your Layout
Inserting an image, illustration, or even a PDF into an InDesign file is a straightforward process. InDesign offers a few convenient methods for this fundamental task.
Method 1: Using the File > Place Command
This is the most common and robust method for adding images.
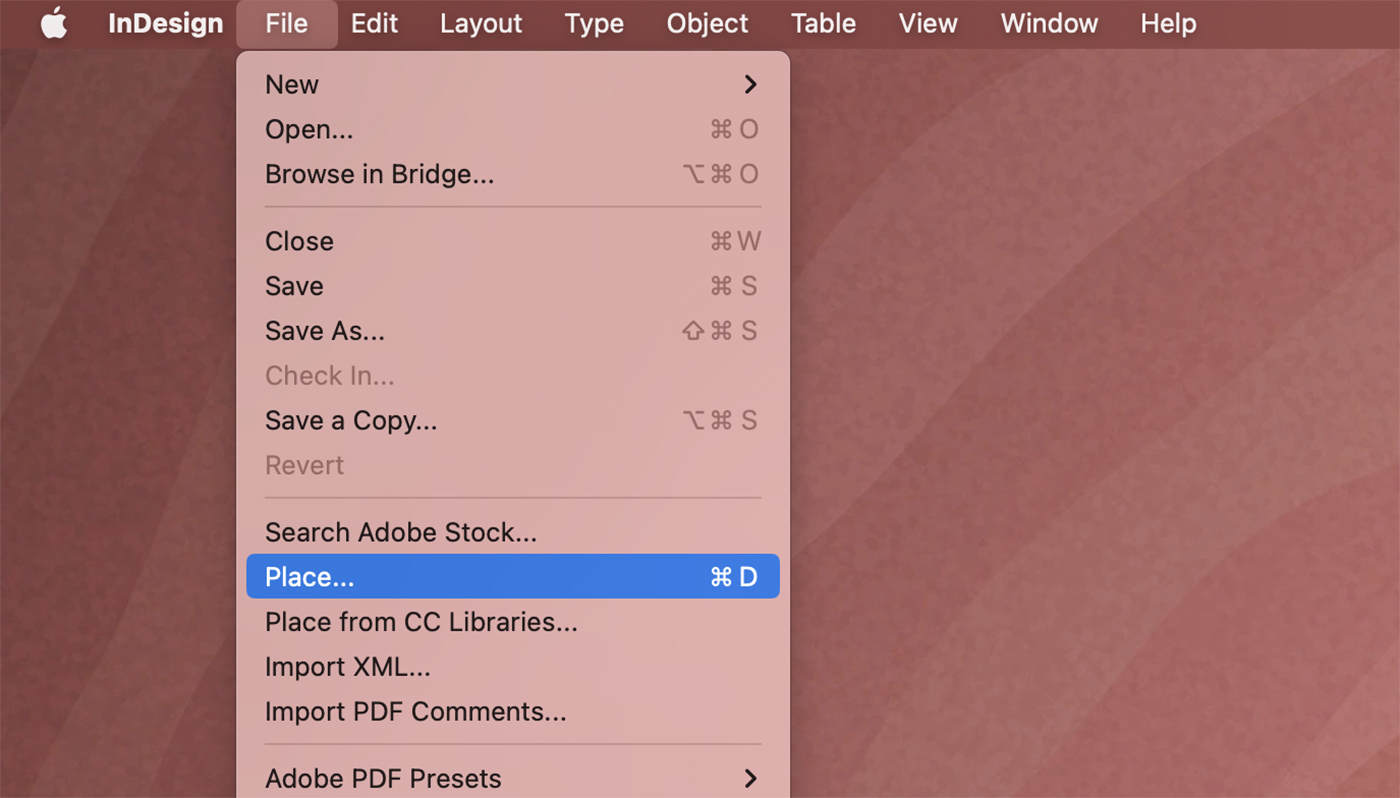
- Access the Command: Go to
Filein the menu bar, then selectPlace...(or use the shortcutCtrl/Cmd + D). - Navigate and Select: A dialog box will open, allowing you to browse your computer for the desired image file. You can select one or multiple images.
- Placement Options: After clicking
Open, your cursor will transform into a “loaded” cursor, displaying a mini-preview of the image(s) you’re about to place. You have several ways to place the image:- Click on a Blank Page: Simply click anywhere on your page to place the image at its original 100% size (or scaled to fit the frame, depending on your preferences).
- Click and Drag: Click and hold the mouse button, then drag to create a frame of your desired size. Releasing the button places the image within this newly created frame, maintaining its proportions.
- Click and Drag with Shift: Holding
Shiftwhile dragging allows you to create a frame with different proportions than the image itself. You may need to adjust “Fitting Options” later (Object > Fitting) to control how the image scales within this custom frame. - Roll Over an Existing Frame: If you have an empty frame already on your page, you can roll your loaded cursor over it, and a “parentheses” icon will appear. Clicking then places the image directly inside that frame.
- Replace Selected Item: If you have an existing image frame (empty or containing another image) selected before choosing
File > Place, you can check theReplace Selected Itemoption in the Place dialog box. This will replace the content of the selected frame directly with your new image.
Method 2: Drag and Drop For a quick and intuitive approach, especially when working with images directly from your desktop or a folder:
- Arrange Your Workspace: Ensure you can see both your InDesign document and the window containing the image you wish to place.
- Drag and Drop: Click and drag the image file directly from its location (e.g., a folder on your computer, a web browser, or your desktop) into your InDesign document window.
- Placement: The cursor will become the “loaded” cursor, and you can then place the image using any of the methods described above for
File > Place(click, click and drag, or roll over an existing frame).
Optimizing Placement with Tophinhanhdep.com Images: When importing high-quality images from Tophinhanhdep.com – whether they are vibrant Nature scenes, captivating Abstract art, or stunning Beautiful Photography – these placement methods ensure your visual content integrates seamlessly. Remember to consider your desired layout and whether the image needs to fill a specific space or be placed freely before choosing your placement method.
The Embedding Process: A Step-by-Step Guide
Once an image is placed (and thus linked), you have the option to embed it. This is a deliberate action that you initiate, converting the external link into internal data within your InDesign file.
- Start with a Placed Image: Begin by placing an image into your InDesign document as described above. For demonstration, let’s say you’ve placed a captivating Aesthetic wallpaper from Tophinhanhdep.com.
- Locate the Image in the Links Panel: Open the Links panel (
Window > Links). You will see your placed image listed there, typically without any special icon, indicating it’s a standard linked file. - Select the Image: In the Links panel, click on the name of the image you wish to embed. Alternatively, you can select the image directly on your InDesign page using the Selection tool.
- Access the Embed Command: Click the
Links panel menuicon (usually a small square with four horizontal lines) in the top right corner of the Links panel. - Choose “Embed Link”: From the dropdown menu, select
Embed Link. - Confirmation and Icon Change: The image’s entry in the Links panel will now display a small embedded icon (often a square with a diagonal line through it, or a small folded corner). This visually confirms that the image is no longer linked to its external source. The
Embed Linkoption in the menu will also change toUnembed Link, indicating its current status.
Demonstrating Immutability of Embedded Images: A crucial aspect of embedding is that the image becomes static within the InDesign document. Let’s illustrate this:
- Edit the Source (Linked Image): If you were to open the original source file of a linked image (e.g., a PSD file in Photoshop) and make changes (like adjusting colors or scaling it down), then save it, InDesign would immediately detect this. A warning icon (often a yellow triangle with an exclamation mark) would appear next to the image in the Links panel, and a similar icon on the image frame itself on your InDesign page. Clicking this icon or choosing
Update Linkfrom the Links panel menu would instantly refresh the image in your document with the new changes. - Edit the Source (Embedded Image): Now, if you take that same original source file that your now-embedded image used to be linked to, make changes, and save it, absolutely nothing will happen in InDesign. The embedded image will remain exactly as it was at the moment of embedding. It has no connection to the external file anymore, showcasing its self-contained nature.
This immutability is both a benefit and a drawback, depending on your workflow. It guarantees the image as it was embedded will always be there, but it also means you lose the dynamic update capability for that specific instance of the image within InDesign.
Managing Embedded Images: Unembedding and Workflow Considerations
While embedding provides document self-containment, it’s not a one-way street. InDesign offers the flexibility to revert an embedded image back to a linked one, a process known as unembedding. This capability is vital for maintaining an adaptable and efficient design workflow, especially when collaborating or needing to make further edits to a graphic.
Reverting to Linked: The Unembed Process
Unembedding an image is as straightforward as embedding it, and it allows you to restore the dynamic link to an external file. This is particularly useful if you need to edit an embedded graphic externally in its native application (e.g., Photoshop or Illustrator) or if the document file size has become too large.
How to Unembed an Image:
- Select the Embedded Image: In your InDesign document, select the embedded image frame on the page, or select its entry in the Links panel (you’ll recognize it by the embedded icon).
- Access the Links Panel Menu: Click the
Links panel menuicon (the horizontal lines) in the top-right corner of the Links panel. - Choose “Unembed Link”: From the dropdown menu, select
Unembed Link. - The Unembed Dialog Box: InDesign will then present a dialog box that can sometimes be a bit confusing. It typically asks: “Do you want to relink to the original file on disk, if found?”
- Clicking “Yes”: This option attempts to re-establish a link to the original file that was used when the image was first placed. This only works if the original file still exists in the same location it was in when initially placed. If the original file has been moved, renamed, or deleted, this attempt will fail, and InDesign will prompt you with an error.
- Clicking “No”: This is often the more reliable option. Choosing “No” instructs InDesign to
Save Asthe embedded image to a new external file on your disk. InDesign will then open a standard “Save As” dialog box, allowing you to choose a name and location for this new external image file. Once saved, the image in your InDesign document will become linked to this newly created file. This is beneficial if the original source file is long gone or if you want to create a fresh, editable version of the embedded graphic.
Why Unembed?
- External Editing: If you need to make detailed changes to an image (e.g., color correction, cropping, retouching for a Beautiful Photography shot from Tophinhanhdep.com), unembedding allows you to open it in Photoshop or Illustrator, make your edits, save the updated file, and then InDesign will dynamically reflect those changes (because it’s now linked).
- Reduce File Size: If you’ve embedded a large number of images or high-resolution graphics, unembedding them and linking them back to external files can significantly reduce the overall size of your InDesign document, improving performance and making it easier to manage.
- Prepare for Packaging: While embedded images are included in a packaged InDesign file, having them linked allows for a more standard workflow, particularly if the external files need to be accessed or managed independently.
Optimizing Your Workflow with Tophinhanhdep.com’s Image Tools
Regardless of whether you link or embed, the quality and preparation of your images are paramount to a professional InDesign document. This is where Tophinhanhdep.com’s suite of Image Tools becomes an invaluable asset, enhancing efficiency and ensuring optimal visual output.
- Compressors & Optimizers: Before even bringing an image into InDesign, consider its file size. Large image files, even when linked, can contribute to slower InDesign performance and heavier packaged files. Tophinhanhdep.com’s compressors and optimizers allow you to reduce file size without compromising visual quality. This is especially useful for web-optimized images or when dealing with a high volume of images in a large publication. Optimizing your Wallpapers and Backgrounds from Tophinhanhdep.com before placement ensures a smoother InDesign experience.
- AI Upscalers: Sometimes you have an image that’s just a bit too small for your layout, or a lower-resolution asset that needs to shine in a larger format. Instead of simply scaling it up in InDesign (which leads to pixelation), use Tophinhanhdep.com’s AI Upscalers. These tools can intelligently enhance the resolution and detail of your images, making them suitable for larger prints or higher-quality displays in your InDesign document. This is a game-changer for working with existing images that weren’t initially high-resolution.
- Converters: Different projects and output methods might require specific image formats. Tophinhanhdep.com’s Converters allow you to easily change image formats (e.g., from WebP to JPEG, or PNG to TIFF). Ensuring your images are in the most appropriate format for InDesign and your final output (print vs. digital) can prevent compatibility issues and ensure optimal rendering.
- Image-to-Text (OCR): While less direct for image placement, if your workflow involves extracting text from images (e.g., from a scanned document or a screenshot) for use in InDesign’s text frames, Tophinhanhdep.com’s Image-to-Text capabilities can save significant time on manual transcription.
By integrating Tophinhanhdep.com’s Image Tools into your pre-InDesign workflow, you ensure that every image you place is perfectly prepared, optimized for performance, and ready to contribute to a stunning visual design.
Enhancing Visual Design with Images and Text in InDesign
InDesign is not just about placing images; it’s about orchestrating a cohesive visual narrative where images and text work in harmony. The platform provides sophisticated controls for this integration, and smart design choices, combined with resources from Tophinhanhdep.com, can elevate your document’s impact.
Integrating Text: Image-Centric Layouts with Typography
One common challenge in visual design is how to incorporate text effectively with images, especially when the image itself contains graphical elements that look like text. The consensus among seasoned InDesign professionals is clear: for maximum control, flexibility, and translatability, always aim to keep text as live text within InDesign rather than embedding it as part of the image file.
The Preferred Approach: Placing Labels in InDesign When an image requires annotations, captions, or labels (e.g., a diagram explaining components, or a chart with explanatory notes), the best practice is to:
- Create the Image Without Text: Design or source your image (e.g., a detailed Nature photograph or an intricate Digital Art piece from Tophinhanhdep.com) purely as a graphic.
- Import into InDesign: Place the image into your document.
- Create Text Frames: Use InDesign’s text tools to create separate text frames for your labels.
- Position and Style: Place these text frames precisely over the image and apply your document’s character and paragraph styles. This gives you full typographical control, including font, size, color, leading, and tracking.
- Group for Cohesion: To ensure the labels always move and scale with their associated image, select both the image frame and all its text labels, then go to
Object > Group(orCtrl/Cmd + G). - Anchor Objects (Optional): For images tightly tied to specific lines of text (e.g., a small diagram in a technical manual), consider creating an
Anchored Object(Object > Anchored Object > Insert). This forces the image and its grouped labels to “travel” with the text line it’s anchored to, maintaining spatial relationships even if the text reflows.
Advantages of InDesign-Managed Text Labels:
- Full Typographical Control: Use your document’s established styles, ensuring consistency and professional appearance.
- Integrated Spell-Check: All text is subject to InDesign’s spell-check, reducing errors.
- Faster Edits and Updates: Text can be easily edited, revised, or updated without needing to go back to an external image editor.
- Translation-Friendly: This is a colossal benefit for multilingual projects. Translation tools and services can directly access and translate the live text in InDesign, eliminating the need to recreate images for each language. This dramatically streamlines the process of preparing documents for global audiences and reduces the risk of non-translated images slipping through. When considering different language versions, always size your InDesign text boxes to accommodate potential text expansion (e.g., German text is often longer than English).
- Single Source: You maintain a single, editable image file and a single set of text assets, minimizing duplicates and organizational headaches.
Disadvantages of Placing Text Within the Image File (Not Recommended):
- Loss of Control: You cannot control the text’s style, font, or size from within InDesign.
- No Spell-Check: Embedded text in images is invisible to InDesign’s spell-check.
- Translation Nightmare: Requires re-creating or re-editing the image for every language, leading to duplicate files, increased workload, and a higher risk of errors or outdated translations. This directly conflicts with efficient workflow strategies for visual communication.
- Slower Edits: Any text change requires opening the image in an external editor, making the revision process cumbersome and time-consuming.
By adopting the practice of integrating text as live InDesign elements, you embrace a highly efficient and adaptable workflow, crucial for complex Visual Design and Graphic Design projects.
Leveraging Tophinhanhdep.com for Image Inspiration and Collections
Beyond the technicalities of placing and embedding, the very essence of compelling visual design lies in the selection and inspiration behind the images themselves. Tophinhanhdep.com serves as a rich wellspring for this creative input, aligning perfectly with InDesign’s capabilities.
- Photo Ideas & Mood Boards: Starting any InDesign project often begins with a conceptual phase. Tophinhanhdep.com offers a vast array of Photo Ideas and organized Thematic Collections that can kickstart your creativity. Whether you’re designing a serene Nature-themed brochure or a dramatic layout featuring Sad/Emotional imagery, browsing these collections allows you to quickly gather visual inspiration. Creating mood boards directly from Tophinhanhdep.com’s content helps define the aesthetic and tone of your InDesign document, ensuring a cohesive visual direction from the outset.
- Trending Styles: Staying current with visual trends is crucial for engaging an audience. Tophinhanhdep.com highlights Trending Styles, offering insights into popular visual aesthetics, color palettes, and compositional techniques. Incorporating these trends, whether it’s through Abstract patterns, specific Aesthetic filters, or contemporary Beautiful Photography, ensures your InDesign creations feel fresh, relevant, and impactful.
- High-Resolution & Stock Photos: The foundation of any high-quality print or digital layout is the image itself. Tophinhanhdep.com provides access to an extensive library of High Resolution and professional Stock Photos. These assets are perfectly suited for InDesign, ensuring that when you link or embed them, your final output maintains crispness, vibrancy, and professional quality. From stunning Wallpapers for background elements to impactful main images, Tophinhanhdep.com equips you with the visual building blocks you need.
- Digital Photography & Editing Styles: For designers who also dabble in photography, Tophinhanhdep.com offers inspiration on various Digital Photography genres and Editing Styles. This knowledge can influence how you choose, prepare, and even subtlely adjust images before they enter InDesign, ensuring they align with your overall Creative Ideas and Photo Manipulation goals.
By actively utilizing Tophinhanhdep.com’s resources for image selection and inspiration, designers can approach their InDesign projects with a clear visual strategy, confident that their aesthetic choices are supported by a wealth of high-quality, relevant imagery.
In conclusion, mastering image integration in InDesign requires a strategic understanding of both linking and embedding. While linking remains the cornerstone for most professional workflows due to its flexibility and efficiency, embedding offers a powerful alternative for self-contained portability when specific project needs dictate. Furthermore, by seamlessly integrating the rich resources and tools available on Tophinhanhdep.com, designers can elevate every stage of their InDesign workflow – from discovering compelling visual inspiration and optimizing images for performance, to meticulously crafting layouts that combine stunning photography with expertly managed text. The synergy between InDesign’s robust features and Tophinhanhdep.com’s extensive image ecosystem empowers creators to produce visually captivating and professionally polished documents with unparalleled ease and precision.