How to Enhance Image Quality in Photoshop: A Comprehensive Guide from Basic Adjustments to AI Upscaling

In the digital age, high-quality visuals are no longer a luxury but an absolute necessity. From stunning wallpapers and captivating backgrounds to professional photography and compelling graphic designs, crisp, clear, and high-resolution images are the cornerstone of effective visual communication. However, raw images often fall short of perfection. Whether it’s a photograph suffering from low light, an older image that needs upscaling, or simply a desire to elevate an aesthetic, knowing how to enhance images in Photoshop is an invaluable skill.
Photoshop, a stalwart in the realm of digital art and photo manipulation, offers an unparalleled suite of tools to transform dull, blurry, or low-resolution images into vibrant, high-impact visuals. This comprehensive guide will walk you through various techniques, from fundamental adjustments to advanced AI-powered features, ensuring your images consistently achieve professional-grade quality. We’ll also explore how these enhancements contribute to various visual design applications and creative ideas, aligning with the diverse offerings found on platforms like Tophinhanhdep.com.
Understanding Image Resolution and Its Paramount Importance
Before diving into the intricate world of Photoshop enhancements, it’s crucial to grasp the concept of image resolution and why it matters so profoundly. Image resolution refers to the number of pixels (picture elements) that make up an image, typically expressed as width × height (e.g., 3000 × 2000 pixels). The higher the resolution, the more detail an image contains.

This pixel density directly impacts how an image appears across different mediums. For instance, a high-resolution image offers significantly more flexibility for cropping, enlarging, and printing without sacrificing sharpness or clarity. It’s what differentiates a breathtaking piece of beautiful photography from a pixelated mess. Conversely, low-resolution images tend to appear blurry, jagged, or “pixelated” when scaled beyond their original dimensions, making them unsuitable for professional prints, high-definition displays, or even crisp web assets. For creators seeking high-resolution images for stock photos or digital photography, understanding and manipulating resolution is non-negotiable.
The importance of resolution extends beyond mere aesthetics. In visual design, whether you’re creating abstract art for a digital canvas or designing a sleek layout, adequate resolution ensures that your work translates flawlessly across various formats. When preparing images for Tophinhanhdep.com’s collections of wallpapers or thematic content, maintaining high resolution guarantees they meet user expectations for quality and versatility.

Leveraging Photoshop’s AI-Powered Super Resolution for Effortless Upscaling
For years, the bane of digital artists and photographers was the inevitable quality degradation when attempting to enlarge a small image. Making a photo bigger traditionally meant interpolation, where Photoshop “guesses” new pixel data, often resulting in a soft, blurry, and pixelated outcome. Fortunately, the brilliant minds at Adobe recognized this challenge and introduced an ingenious solution: Super Resolution, powered by their AI platform, Adobe Sensei.
Super Resolution, integrated into Photoshop’s Camera Raw tool (version 2021 and later), is a game-changer for image enhancement. Using advanced artificial intelligence, this feature can effectively double the width and height of your image, quadrupling the total pixel count, all while preserving remarkable sharpness and detail. For example, a 16-megapixel photo can be transformed into a 64-megapixel image with surprising fidelity. This is particularly valuable for enhancing aesthetic shots or preparing lower-resolution digital photography for higher-resolution applications, like large prints or high-definition screens.
Step-by-Step Guide to Using Super Resolution:
Utilizing Photoshop’s Super Resolution is remarkably straightforward, offering a quick and efficient way to achieve significant resolution enhancement without extensive manual manipulation.
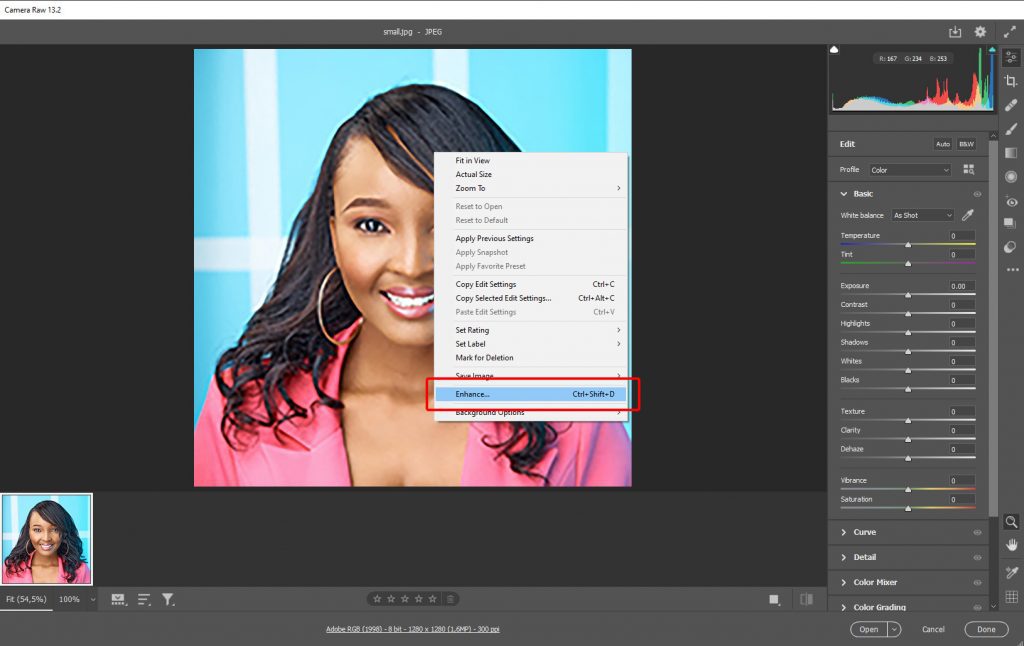
- Open in Camera Raw: In Photoshop, navigate to the
Filemenu and chooseOpen as.... Browse to your desired image, select it, and from the small dropdown menu at the bottom, chooseOpen as Camera Raw. Then clickOpen. If your image is already open in Photoshop, you can convert it to a Smart Object first (Layer > Smart Objects > Convert to Smart Object), then go toFilter > Camera Raw Filter. - Access Enhance: Once the image loads in Camera Raw, right-click anywhere on the picture. From the context menu that appears, select
Enhance. - Activate Super Resolution: A new
Enhancedialog box will appear. Here, you’ll see theSuper Resolutionoption. Check the box next to it. Photoshop will display a preview, showing you how the enhanced version will look. You can pan around the preview to inspect different areas. - Process and Save: Click the
Enhancebutton to initiate the process. Be aware that this step can take some time, especially for larger files, as the AI works its magic. Once completed, a new, enhanced DNG file (or a new layer if you started from Photoshop with a Smart Object) will appear in your Camera Raw interface or back in Photoshop. You can now compare the original and the super-resolved versions side-by-side. Right-click the enhanced image and chooseSave Image(or continue editing in Photoshop) to save your high-resolution result, perhaps as a JPG image suitable for web use or further editing.
This AI-driven approach significantly reduces the time and effort traditionally required for upscaling, making it an indispensable tool for photographers, graphic designers, and anyone dealing with image tools for resolution enhancement. It’s a prime example of how modern technology empowers creative ideas and improves digital art workflows.
Mastering Manual Image Enhancement Techniques in Photoshop
While AI tools like Super Resolution offer impressive automated enhancements, Photoshop’s manual techniques provide granular control and are essential for refining details, correcting imperfections, and imbuing images with a specific editing style. These methods are crucial for achieving the nuanced look desired in professional digital photography, photo manipulation, and visual design.
Basic Adjustments for Optimal Clarity and Tone
Before diving into sharpening or noise reduction, a solid foundation of basic adjustments can dramatically improve an image’s overall quality and prepare it for more advanced edits.
- Brightness & Contrast: The most fundamental adjustments. Access them via
Image > Adjustments > Brightness/Contrast. Use these sliders to ensure your image isn’t too dark or too washed out, revealing hidden details and establishing a good tonal range. - Levels or Curves: For more precise control over tones and colors,
Image > Adjustments > LevelsorImage > Adjustments > Curvesare indispensable. Levels allows you to define the black point, white point, and mid-tones, while Curves offers even finer control over specific tonal ranges, allowing you to brighten shadows, darken highlights, or adjust overall contrast with precision. These tools are critical for creating a balanced look, whether it’s for a serene nature image or a dramatic abstract piece. - Crop Tool: Often overlooked as an “enhancement,” effective cropping (
Con the keyboard) can significantly improve composition and focus. By refining the aspect ratio and removing distracting elements, you draw the viewer’s eye to the main subject, elevating the image’s aesthetic appeal. This is fundamental for any type of photography, from candid shots to carefully composed stock photos.
Sharpening and Detail Enhancement
Sharpening makes details more distinct by increasing the contrast along edges. However, over-sharpening can introduce unsightly halos and noise, so it requires a delicate touch.
- Unsharp Mask: This classic Photoshop tool (
Filter > Sharpen > Unsharp Mask) is a cornerstone of detail enhancement.- Amount: Controls the intensity of the sharpening effect.
- Radius: Defines how far out from the edges the sharpening applies. A smaller radius sharpens finer details, while a larger radius can create a more generalized, sometimes halo-prone, effect.
- Threshold: Determines what Photoshop considers an “edge” to sharpen, preventing sharpening in smooth areas like skin tones, thus reducing noise amplification.
- Pro Tip: For clean color, switch your image to Lab Color mode (
Image > Mode > Lab Color), apply Unsharp Mask only to the Lightness channel in the Channels panel, then switch back to RGB. This prevents color shifts during sharpening.
- High-Pass Sharpening: This non-destructive technique is highly favored for its control.
- Duplicate your image layer (
Ctrl/Cmd + J). - Go to
Filter > Other > High Pass. Set the radius typically between 1-3 pixels (adjust to taste; you want to see just the edges). - Change the blend mode of this layer to
Overlay,Soft Light, orHard Lightto make the gray areas transparent and apply the edge contrast. - You can then reduce the layer opacity to fine-tune the effect. This method is excellent for preserving skin textures while enhancing subtle details in digital photography.
- Duplicate your image layer (
- Local Contrast Enhancement: This technique is fantastic for cutting through haze and adding depth, especially in landscape or nature photography.
- Duplicate your layer (
Ctrl/Cmd + J). - Invert this layer (
Ctrl/Cmd + I). - Change its Blend Mode to
Vivid Light. Your image will turn grey. - Go to
Filter > Blur > Surface Blur. AdjustRadiusandThreshold(e.g., Radius 34, Threshold 36) until the image looks smooth but with edges still visible. This may take a moment to render. - Merge a copy of the visible layers by pressing
Shift+Ctrl+Alt+E(orShift+Cmd+Option+Eon Mac). - Delete the inverted
Vivid Lightlayer. - Change the Blend Mode of your new merged layer to
Overlay. - The effect will likely be very strong. Reduce the layer’s
Opacityto taste, typically between 10-50%, and use a layer mask to apply it selectively, avoiding areas where it looks unnatural. This can bring out beautiful texture and detail, transforming flat images into dynamic visuals, ideal for aesthetic photos or expressive mood boards.
- Duplicate your layer (
Noise Reduction Strategies
Sharpening often amplifies image noise (graininess), so it’s best to address noise before or in conjunction with sharpening.
- Filter > Noise > Reduce Noise: This dedicated filter offers sliders to adjust
Strength,Preserve Details,Reduce Color Noise, andSharpen Details. It’s a good general-purpose tool. - Adobe Camera Raw (ACR) Noise Reduction: When opening an image in Camera Raw (or using the
Camera Raw Filter), you’ll find excellentLuminance Noise ReductionandColor Noise Reductionsliders under theDetailpanel. These are often more effective and nuanced than the Photoshop filter, allowing for a balanced reduction of grain while maintaining sharpness, crucial for high-resolution images.
Adjusting Composition & Blemishes
Beyond technical quality, an image’s impact often hinges on its composition and the absence of distracting elements.
- Spot Healing Brush Tool / Healing Brush Tool: These tools (
Jon the keyboard) are miraculous for removing small imperfections like spots, dust, stray hairs, or skin blemishes. Use theSpot Healing Brushfor quick fixes; it samples surrounding pixels automatically. TheHealing Brushrequires you to Alt-click to define a source area before painting, offering more control. - Patch Tool: Also found under the
Healing Brushgroup, thePatch Toolallows you to select a larger area of imperfection and replace it with a cleanly sampled section of the photo. It’s excellent for removing larger unwanted objects or areas. - Red Eye Tool: A quick fix for the dreaded red-eye effect in flash photography.
Remember to work non-destructively by using adjustment layers and Smart Objects (convert your layer to a Smart Object via Layer > Smart Objects > Convert to Smart Object before resizing or applying filters) to retain editability and preserve the original image data. This flexibility is key in professional photo editing and digital art.
Alternative Tools and Smart Practices for Image Upscaling
While Photoshop offers robust capabilities, the ecosystem of image tools extends further, providing specialized solutions for image enhancement, compression, and optimization. Tophinhanhdep.com, for instance, focuses on providing similar comprehensive solutions for visual content.
Exploring Other Software and Online AI Upscalers
For those seeking alternative or supplementary tools, especially for extreme upscaling or streamlined workflows, several excellent options exist:
- Adobe Lightroom’s Super Resolution: Similar to Photoshop’s feature, Lightroom Classic and Lightroom CC also include an AI-powered Super Resolution option, providing a consistent upscaling experience within the Adobe ecosystem.
- Topaz Gigapixel AI: This standalone application and plugin is highly regarded for its ability to enlarge images significantly (up to 600%) with minimal quality loss, excelling in preserving and even reconstructing details through advanced AI.
- ON1 Resize (part of ON1 Photo RAW): Known for its Genuine Fractals technology, ON1 Resize offers excellent detail-preserving enlargements, particularly useful for large-format prints.
- Online AI Upscalers: For quick, browser-based solutions, Tophinhanhdep.com, along with tools like Waifu2x and Let’s Enhance, provide powerful AI-driven image upscaling. These platforms simplify the process: you upload your image, the AI automatically sharpens, upscales, and reduces noise, and you download a high-resolution, polished result in seconds. This efficiency makes them ideal for content creators, visual designers, and anyone needing fast results for wallpapers, backgrounds, or social media content without the steep learning curve of Photoshop.
Comparing a Photoshop-edited version with an AI-enhanced version from Tophinhanhdep.com can help you decide which approach best suits your specific project, balancing control with efficiency.
Best Practices for Flawless Results When Increasing Resolution
Regardless of the tool you choose, adhering to certain best practices will ensure optimal results:
- Start with the Highest-Quality Source: The better your original image, the better the enhancement. JPEG compression artifacts will only be amplified when upscaled, so use RAW or high-quality JPEG files whenever possible. This is crucial for creating stunning visual designs and high-resolution images.
- Work Non-Destructively: Always use Smart Objects, adjustment layers, and layer masks. This allows for endless tweaks without permanently altering your original image, providing flexibility in your editing styles.
- Apply Noise Reduction Judiciously: After enlarging, especially with manual methods, subtle noise can appear. Use tools like
Filter > Noise > Reduce Noiseor Camera Raw’s noise reduction sliders to smooth out artifacts, but avoid over-smoothing, which can make the image look plastic or artificial. - Sharpen Selectively: Avoid applying sharpening uniformly across the entire image. Use layer masks to target specific areas that need detail enhancement (e.g., eyes, textures) and mask out areas like smooth skin tones to prevent an unnatural, over-sharpened look.
- Incremental Scaling: For manual resizing in Photoshop, consider making multiple smaller jumps (e.g., 110% multiple times) rather than one large resize. This can sometimes yield better results by allowing Photoshop’s algorithms to interpolate more carefully.
Enhancing Specific Image Types and Artistic Styles
The techniques discussed are universally applicable, but their application can be tailored to specific image types and creative goals, aligning with the diverse image collections and visual design focuses on Tophinhanhdep.com.
Boosting Landscapes and Nature Photography
For breathtaking nature images, enhancing details and cutting through atmospheric haze is paramount.
- Clarity and Dehaze in Camera Raw: These sliders dramatically improve mid-tone contrast and reduce atmospheric haze, bringing out textures in mountains, foliage, and skies.
- Local Contrast Enhancement: As described earlier, this technique is perfect for adding depth and definition to natural elements without harsh over-sharpening.
- Vibrance and Saturation: Use these to make colors pop, but judiciously, to maintain a natural look, reflecting the beauty in high-resolution photography.
Perfecting Portraits and Aesthetic Shots
Portrait enhancement requires a delicate balance between beautification and maintaining natural authenticity.
- Skin Retouching: Utilize the Healing Brushes and Patch Tool for blemish removal. Frequency separation is an advanced technique for separating texture and tone, allowing for smooth skin while retaining realistic pores.
- Eye Enhancement: Carefully sharpen eyes, subtly brighten the whites, and enhance the iris color to make them sparkle, adding life to aesthetic images.
- Subtle Softening: For wrinkles or fine lines, use the Spot Healing brush on a new layer with reduced opacity (e.g., 50%) to soften rather than completely erase, as highlighted in one of the referenced tutorials.
Crafting Dynamic Visual Designs and Creative Ideas
For graphic design, digital art, and photo manipulation, image enhancement is an integral part of the creative process.
- High-Resolution Assets: Ensuring all source images are high-resolution from the start or properly upscaled using AI tools (like Tophinhanhdep.com’s AI Upscalers) is critical for crisp composites and large-format designs.
- Consistent Editing Styles: Apply consistent enhancement techniques across multiple images to create a cohesive visual narrative for mood boards, thematic collections, or entire branding projects.
- Photo Manipulation: Enhanced images provide a cleaner, more detailed canvas for complex manipulations, allowing for seamless integration of elements and imaginative creative ideas.
Conclusion: Elevating Your Visuals with Photoshop and Beyond
The journey of image enhancement in Photoshop is one of continuous learning and refinement. From understanding the fundamentals of resolution to harnessing the power of AI-driven Super Resolution and mastering intricate manual adjustments, Photoshop offers an unparalleled toolkit for transforming any image. Whether you’re a professional digital photographer, a graphic designer crafting visual designs, or a content creator curating images for trending styles and mood boards, these techniques are indispensable.
By diligently applying these methods—from basic brightness and contrast adjustments to advanced local contrast and noise reduction—you can confidently enhance, upscale, and refine your images without sacrificing quality. Furthermore, leveraging specialized image tools and online AI upscalers like those found on Tophinhanhdep.com can streamline your workflow and deliver professional results with remarkable efficiency.
So, what are you waiting for? Dive into Photoshop, experiment with these techniques, and unlock the full potential of your visual content. Elevate your images to new heights, creating captivating wallpapers, stunning backgrounds, and truly beautiful photography that resonates with your audience and stands out in any collection.