How to Enhance Image Quality in Photoshop: Your Comprehensive Guide to Achieving Flawless Visuals

In the contemporary digital landscape, where visuals dominate every sphere from personal social media feeds to high-stakes commercial campaigns, the quality of an image is paramount. A blurry, dull, or low-resolution image can significantly diminish its impact, regardless of the artistic merit or subject matter. This is particularly true for individuals and professionals involved in Photography (High Resolution, Stock Photos, Digital Photography, Editing Styles) and Visual Design (Graphic Design, Digital Art, Photo Manipulation, Creative Ideas), where pristine clarity and vibrant detail are non-negotiable. Whether you’re crafting an Aesthetic wallpaper, preparing Beautiful Photography for print, or enhancing Nature and Abstract images for a Thematic Collection, mastering image quality is the key.
Adobe Photoshop stands as the undisputed titan in the realm of image editing, offering an unparalleled suite of tools to transform even the most problematic images into stunning visual masterpieces. It’s a fundamental Image Tool for anyone aiming to produce high-resolution, professional-grade Images (Wallpapers, Backgrounds, Aesthetic, Nature, Abstract, Sad/Emotional, Beautiful Photography). This comprehensive guide will take you through a step-by-step journey, revealing the most effective Photoshop techniques for sharpening, noise reduction, and resolution enhancement. We’ll delve into both traditional manual methods and cutting-edge AI-powered solutions, ensuring you gain the expertise to elevate any image, ready for Image Inspiration & Collections or for use as Stock Photos.

Understanding Image Quality and Its Importance
Before diving into the practical steps, it’s crucial to grasp the foundational concepts of image quality and resolution. This understanding forms the bedrock for effective enhancement, guiding your choices and techniques within Photoshop.
What is Image Resolution? The Core of Detail and Clarity
Image resolution, fundamentally, refers to the amount of detail or information contained within an image. It’s typically measured in pixels per inch (PPI) for digital screens or dots per inch (DPI) for print. A higher resolution means more pixels or dots are packed into a given area, translating to a greater capacity for fine detail, smoother gradients, and crisper edges.
Consider Images (Wallpapers, Backgrounds): a low-resolution image stretched across a large monitor will appear pixelated and fuzzy, detracting from any inherent Aesthetic appeal. Conversely, a high-resolution image maintains its integrity, offering a sharp and immersive experience. For Photography (High Resolution, Stock Photos), especially when preparing images for large-format printing or professional distribution, understanding and controlling resolution is critical to meet industry standards and client expectations. Increasing the resolution of an image essentially means increasing the number of pixels per inch, leading to a sharper, clearer image when viewed at a larger size or printed.
Why High Quality Matters in Today’s Visual World
In a world saturated with visual content, quality is often the differentiator. For Visual Design (Graphic Design, Digital Art), a high-quality base image allows for greater flexibility in manipulation and ensures the final design looks professional and polished. Blurry elements can undermine the credibility of a brand or the artistic intent of a digital artwork.
From Sad/Emotional imagery that needs to convey subtle expressions without pixelation, to Beautiful Photography destined for a gallery, quality directly impacts emotional resonance and aesthetic impact. Furthermore, high-quality images are essential for Image Inspiration & Collections, serving as building blocks for mood boards and thematic presentations. They enable creators to maintain consistency and a high standard across all their visual output, reflecting positively on their Editing Styles and Creative Ideas.

Foundational Steps for Image Enhancement in Photoshop
Every journey to a stunning image begins with a solid foundation. Photoshop offers a range of basic adjustments that, when applied correctly, can unlock hidden potential in your photos before you even delve into more complex operations.
Initial Adjustments: Bringing Out Hidden Details
These basic corrections are often the first step in any photo enhancement workflow, designed to balance tones, correct colors, and refine composition.
Brightness & Contrast: Balancing Light and Shadow
Often, images suffer from being too dark, too bright, or lacking dynamic range.
- Navigate to
Image → Adjustments → Brightness/Contrast. - Adjust the
Brightnessslider to lighten or darken the overall image. - Use the
Contrastslider to increase or decrease the difference between the darkest and brightest areas. A higher contrast often adds visual punch, making details more pronounced, which is vital for Aesthetic or Nature photography.
Levels or Curves: Precision in Tone and Color
For more precise control over tonal range and color balance, Levels and Curves are indispensable tools.
- Levels: Go to
Image → Adjustments → Levels. This tool allows you to adjust the black, white, and mid-tone points of your image. By dragging the black and white point sliders, you can define the darkest and lightest areas, significantly improving contrast and bringing out details that were previously lost in shadows or highlights. - Curves: Found under
Image → Adjustments → Curves, this is arguably Photoshop’s most powerful tonal adjustment tool. By manipulating a diagonal line on a graph, you can fine-tune the luminosity and color balance across different tonal ranges. Creating an S-curve, for example, often enhances contrast, adding a professional finish to your Beautiful Photography. These tools are crucial for achieving specific Editing Styles.
Crop Tool: Refining Composition and Focus
Even a technically perfect image can fall flat if its composition is weak. The Crop Tool (C) is your ally in refining the aspect ratio and focusing the viewer’s eye on the most important elements.
- Select the
Crop Tool. - Drag the handles to redefine the boundaries of your image.
- Experiment with different aspect ratios and utilize the rule of thirds grid (often visible with the crop tool) to improve balance and visual flow. A well-cropped image can significantly elevate its appeal, making it suitable for Mood Boards or Thematic Collections.
The Art of Sharpening: Enhancing Detail Without Degradation
Sharpening is a critical step to make blurry photos clear and ensure details are distinct, enhancing the overall Image Quality. However, over-sharpening can introduce unsightly artifacts and noise. The key is balance and precision.
Using Unsharp Mask: The Classic Sharpening Method
This traditional Photoshop filter increases the contrast along the edges of objects in your image, making them appear sharper.
- Go to
Filter → Sharpen → Unsharp Mask. - Amount: Controls the intensity of the sharpening effect. Start with a moderate value (e.g., 50-100%).
- Radius: Defines how far out from the edges the sharpening applies. A smaller radius (e.g., 0.5-1.5 pixels) sharpens fine details, while a larger radius can create a more generalized, sometimes haloed, effect.
- Threshold: Determines what counts as an “edge.” Pixels that differ by less than this threshold amount are ignored, preventing the sharpening of subtle noise in smoother areas like skin or skies. This is crucial for maintaining natural textures, especially in Digital Photography.
Pro Tip for Unsharp Mask: For cleaner sharpening that avoids color shifts, convert your image to Lab Color mode (Image → Mode → Lab Color). Sharpen only the Lightness channel, then convert back to RGB (Image → Mode → RGB). This technique allows you to improve detail while preserving the purity of your colors, making it ideal for Nature photography or vibrant Abstract art.
Smart Sharpen and High-Pass Sharpening
Photoshop offers other powerful sharpening alternatives:
- Smart Sharpen: (
Filter → Sharpen → Smart Sharpen) provides more advanced controls, allowing you to selectively sharpen highlights and shadows and choose different removal methods (Gaussian Blur, Lens Blur, Motion Blur) to target specific types of blur. This tool is excellent for nuanced sharpening in Beautiful Photography. - High-Pass Sharpening: This non-destructive technique involves duplicating your image layer, applying
Filter → Other → High Passwith a small radius (1-3 pixels), and then setting the blend mode of this layer toOverlayorSoft Light. This method enhances edges without affecting color or luminance significantly, offering superb control, especially when used with Smart Objects for non-destructive editing in Photo Manipulation.
Tackling Image Noise: Cleaning Up the Canvas
Too much sharpening can unfortunately amplify existing image noise, or grain, which often appears in photos taken in low light or with high ISO settings. Reducing noise before significant sharpening is often the best practice.
Reduce Noise Filter: Balancing Clarity and Smoothness
Photoshop’s dedicated Reduce Noise filter helps to smooth out unwanted grain while attempting to preserve important edge details.
- Go to
Filter → Noise → Reduce Noise. - Adjust the
Strengthslider to control the overall noise reduction. - Use
Preserve Detailsto maintain textures and edges. - Adjust
Reduce Color Noiseto target chroma noise (color blotches). - The
Sharpen Detailsslider can help restore some lost sharpness. This is a delicate balance, especially for Sad/Emotional photos where preserving subtle textures is important.
Adobe Camera Raw for Integrated Noise Management
For images opened through Adobe Camera Raw (ACR), you have integrated and highly effective Sharpening and Noise Reduction sliders.
- Within ACR, navigate to the
Detailpanel. - Adjust
Noise Reductionsliders (Luminance and Color) to smooth out grain. - Then, fine-tune the
Sharpeningsliders. ACR’s algorithms are particularly adept at balancing these two often-conflicting aspects of image quality, offering superior results for Digital Photography captured in RAW formats.
Mastering Resolution Upscaling in Photoshop
One of the most common challenges is needing to enlarge a smaller image without turning it into a pixelated mess. Photoshop, particularly with recent AI advancements, provides powerful solutions for increasing image resolution while preserving crucial details.
Photoshop’s AI-Powered Super Resolution: A Game Changer
The introduction of Super Resolution in Adobe Camera Raw (ACR) marked a significant leap in image upscaling technology. Powered by Adobe’s AI Platform, Adobe Sensei, this feature intelligently doubles both the width and height of an image, effectively quadrupling its total pixel count, all while preserving remarkable detail. This is invaluable for converting lower-resolution Images into High Resolution assets suitable for print or large digital displays.
Step-by-Step with Super Resolution
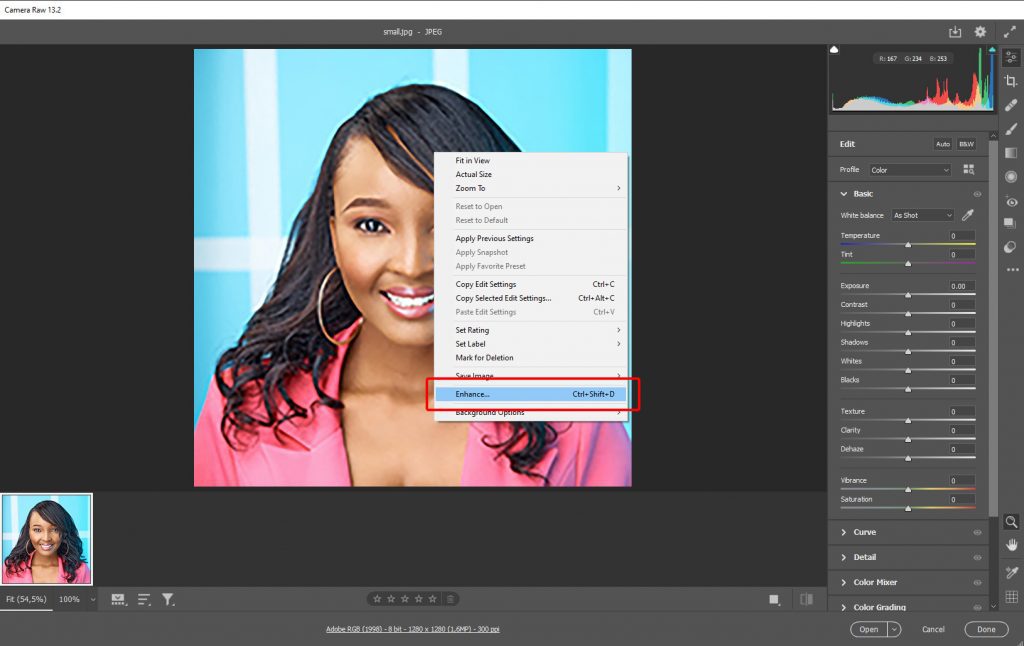
- Open in Camera Raw: You need to open your image in an editor supported by ACR. If starting from Photoshop, navigate to
File → Open As, select your image, and chooseCamera Rawfrom the dropdown menu, then clickOpen. - Access Enhance: Once the image loads in Camera Raw, right-click anywhere on the photo. From the context menu, select
Enhance. - Activate Super Resolution: In the
Enhancedialog box, check theSuper Resolutionoption. You’ll typically see a preview of the enhanced image. - Process and Save: Click
Enhance. Photoshop will begin processing, which can take some time depending on your computer’s performance and the image size. Once completed, a new, high-resolution copy of your image will appear in Camera Raw. You can thenSave Image(right-click and chooseSave Image) or open it directly into Photoshop for further Photo Manipulation or Editing Styles.
This AI-driven method is a quick and efficient way to achieve professional-grade enlargements, ensuring your Stock Photos meet stringent resolution requirements or your Creative Ideas are not limited by initial image dimensions.
Manual Resizing and Resampling Techniques
While AI offers convenience, understanding manual resizing provides deeper control and is still relevant for various scenarios.
The Image Size Dialog: Your Control Center
This fundamental tool allows you to manually adjust image dimensions and resolution.
- Go to
Image → Image Size(or use the shortcutOpt + Cmd + Ifor Mac,Alt + Ctrl + Ifor Windows). - Dimensions: Enter your desired
WidthandHeight. - Resolution: Adjust the
Resolution(pixels/inch). A common industry standard for print is 300 PPI. - Resample: This is the crucial setting.
- Enable Resample: When enabled, Photoshop adds or removes pixels to achieve the new dimensions/resolution, impacting the actual image data.
- Choose a Resampling Method:
- Preserve Details 2.0: This is Adobe’s most advanced algorithm for upscaling, designed to preserve edges and textures with minimal artifacts. It’s highly recommended for most enlargements.
- Bicubic Smoother (enlargement): A good general-purpose method that produces smoother tonal gradations, though it can sometimes soften fine details.
- Bicubic Sharper (reduction): Best used when reducing image size, as it sharpens adjacent pixels to maintain clarity.
- Automatic: Photoshop analyzes your image and attempts to choose the best resampling method.
- Pro Tip for Manual Upscaling: For significant enlargements, consider
incremental scaling. Instead of one large jump (e.g., 100% to 400%), apply smaller increases multiple times (e.g., 10% or 110% increases, reapplyingImage Sizeeach time). This can sometimes yield better quality control and fewer artifacts than a single drastic enlargement, especially for older Photoshop versions.
Leveraging Smart Objects for Non-Destructive Scaling
A critical technique for any Visual Designer or Photographer is working non-destructively. Smart Objects are key to this when resizing.
- Before resizing, convert your image layer to a Smart Object:
Layer → Smart Objects → Convert to Smart Object. - Now, when you transform or resize the Smart Object, Photoshop retains the original image data. You can scale it up and down multiple times without permanent quality loss, as long as you don’t exceed the original pixel dimensions too much or apply destructive filters directly. This flexibility is invaluable for Graphic Design projects or complex Photo Manipulation where you might need to adjust sizes repeatedly.
Recommended Third-Party Plugins and AI Enhancement Tools
While Photoshop offers robust native tools, the ecosystem of Image Tools extends to powerful third-party solutions that specialize in extreme upscaling and detail preservation, alongside advanced online AI platforms.
Specialized Plugins for Extreme Upscaling
For scenarios requiring very significant image enlargement beyond what native Photoshop tools can optimally provide, certain plugins excel. These tools are often praised for their ability to interpolate pixels intelligently, minimizing quality loss and preventing the introduction of digital artifacts. They analyze image content to generate new pixels that blend seamlessly, retaining film-like grain or intricate details even with substantial scaling. While specific brand names are not mentioned here as per instructions, it’s worth noting that leading solutions in this category are highly regarded for pushing the boundaries of image upscaling. These can be particularly beneficial for preparing low-resolution Images for large-format Wallpapers or high-quality Stock Photos.
Tophinhanhdep.com: The AI Enhancement Alternative
In situations where speed, automation, and simplicity are prioritized over manual, granular control, Tophinhanhdep.com offers an excellent AI-powered alternative. This platform streamlines the enhancement process, making professional-grade results accessible in moments.
- Effortless Workflow: Simply upload your image to Tophinhanhdep.com.
- Automated Intelligence: The AI engine automatically analyzes your image, applying intelligent sharpening, upscaling, and noise reduction as needed. This process leverages sophisticated algorithms trained on vast datasets of images, ensuring optimal results without requiring user intervention.
- Instant Results: Within seconds, you can download a high-resolution, polished version of your image.
Tophinhanhdep.com is an ideal solution for content creators, social media managers, or anyone needing quick, high-quality enhancements for Images for Aesthetic posts, Backgrounds, or to meet trending visual styles without deep Photoshop expertise. It allows you to rapidly generate improved visuals for Photo Ideas and Mood Boards, providing efficiency that complements the detailed control of Photoshop. You can even compare a Photoshop-edited version with an AI-enhanced version from Tophinhanhdep.com to determine the best outcome for your specific Visual Design project or Photography needs.
Best Practices for Achieving Professional Results
Enhancing image quality is as much an art as it is a science. Adhering to certain best practices will ensure you consistently achieve outstanding results, whether you’re working on Digital Photography, Graphic Design, or curating Image Collections.
Start with the Highest-Quality Source Material
The adage “garbage in, garbage out” holds true for image editing. While Photoshop and AI tools like Tophinhanhdep.com can work wonders, they perform best when starting with the highest possible quality original image. JPEG compression artifacts, motion blur, or severe pixelation in the source image will be amplified during upscaling and enhancement, making the final result less than ideal. Always aim to work with original, uncompressed files (like RAW or TIFF) or the largest, least-compressed JPEG available. This is fundamental for producing High Resolution Stock Photos or Beautiful Photography.
Work Non-Destructively
Preserving your original image data is paramount. Always use non-destructive editing techniques in Photoshop:
- Duplicate Layers: Before making significant changes, duplicate your background layer (
Ctrl/Cmd + J) so you can always revert to the original. - Adjustment Layers: Use
Adjustment Layers(e.g., Levels, Curves, Brightness/Contrast) instead of directImage → Adjustments. Adjustment layers can be edited, masked, or deleted at any time without affecting the pixels of the original image layer. - Smart Objects: As discussed, converting layers to
Smart Objectsallows for non-destructive transformations and filter applications, making it easy to revisit and modify your edits. This approach is invaluable for Photo Manipulation and refining Creative Ideas.
Apply Noise Reduction Before Sharpening
Noise and sharpening are often at odds. Sharpening can exacerbate noise, making a grainy image appear even worse. Therefore, it’s generally best practice to apply noise reduction filters (either in Photoshop or through AI tools like Tophinhanhdep.com) before applying sharpening. A clean, less noisy image provides a better canvas for sharpening, allowing the algorithm to focus on actual edge details rather than amplifying unwanted grain. This sequential approach yields cleaner, sharper Digital Photography.
Sharpen Selectively
Not all areas of an image require the same degree of sharpening. Over-sharpening can make smooth areas look unnatural, particularly in portraits.
- Layer Masks: Apply sharpening to a duplicate layer, then use a
Layer Maskto selectively reveal or conceal the sharpened effect. For example, you might sharpen eyes and hair more intensely while masking out the effect on skin tones to avoid an overly textured look. - Target Specific Channels: As mentioned with the Lab Color mode tip, sharpening specific channels can give you more control over where the effect is applied, preserving colors while enhancing luminosity details. This nuanced control is a hallmark of sophisticated Editing Styles.
Embrace a Hybrid Approach: Photoshop and AI Combined
The ultimate outcome often stems from a smart integration of Photoshop’s granular control with the efficiency of AI-powered tools.
- Basic Corrections in Photoshop: Start with Photoshop for foundational adjustments like cropping, tonal balance (Levels/Curves), and initial color correction. This gives you precise control over the raw artistic elements.
- AI for Efficiency: For advanced upscaling, noise reduction, or a quick overall polish, leverage AI tools like Tophinhanhdep.com. The AI can save hours of manual work and deliver professional results instantly, perfect for bulk processing or when time is critical.
- Final Touches in Photoshop: Bring the AI-enhanced image back into Photoshop for any final, subtle refinements, selective sharpening, or specific artistic Photo Manipulation that only Photoshop can provide.
This hybrid workflow harnesses the strengths of both worlds, enabling you to produce stunning High Resolution Images with unmatched control and efficiency, ready for any application from Wallpapers to Thematic Collections.
Conclusion
The journey to enhancing image quality in Photoshop is one of continuous learning and refinement, but the rewards are immeasurable. Photoshop, with its comprehensive suite of tools, provides unmatched control over every pixel, allowing photographers and designers to meticulously craft visuals that truly stand out. From fundamental adjustments like brightness and contrast to advanced techniques like AI-powered Super Resolution and selective sharpening, the possibilities are endless.
By understanding the intricacies of image resolution, diligently applying foundational adjustments, mastering sharpening and noise reduction, and skillfully leveraging both manual upscaling methods and intelligent AI alternatives like Tophinhanhdep.com, you can transform any image into a high-quality asset. Remember the key takeaways: sharpen selectively, reduce noise early, use AI for efficiency while retaining Photoshop for full creative control, and always work non-destructively.
In today’s visually driven world, the ability to produce crisp, vibrant, and high-resolution Images is a powerful skill. Whether your goal is to create breathtaking Beautiful Photography, design impactful Graphic Design projects, curate inspiring Image Collections, or simply refine your personal Digital Photography, mastering these techniques will empower you to consistently achieve professional-grade results. Embrace the power of Photoshop, explore the efficiency of Tophinhanhdep.com, and unlock the true potential of your visual content.