How to Enhance Image Quality in Photoshop: A Comprehensive Guide by Tophinhanhdep.com

In today’s visually-driven world, the impact of a high-quality image cannot be overstated. Whether you’re curating stunning wallpapers, designing compelling backgrounds, sharing aesthetic nature shots, or presenting intricate abstract art, the clarity and sharpness of your visuals are paramount. From professional photography requiring high resolution and impeccable detail to casual snapshots needing a touch of refinement, the ability to enhance image quality is a skill that opens up a world of creative possibilities. Tophinhanhdep.com understands this need, offering a treasure trove of resources, from beautiful photography collections to advanced image tools like AI upscalers. Among the most powerful tools for achieving superior image quality is Adobe Photoshop, an industry-standard software renowned for its extensive capabilities.
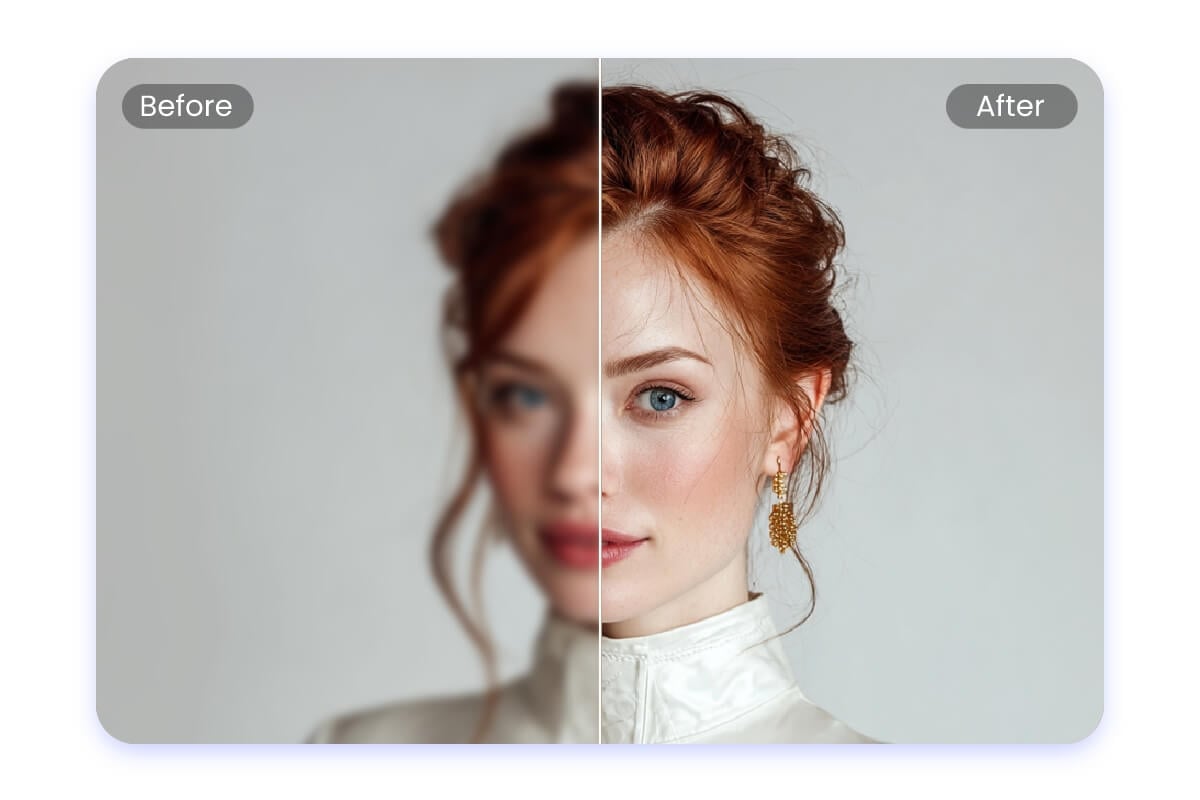
Often, even the most captivating moments captured by a camera might fall short of perfection due to issues like blurriness, low resolution, poor color balance, or unwanted noise. These imperfections can hinder your images from truly shining, whether they’re for a professional portfolio, a personal aesthetic collection, or critical documents like a CV or visa. While increasing image resolution, fine-tuning colors, sharpening details, and adjusting exposure might seem like a daunting, time-consuming process, Photoshop offers a streamlined and efficient pathway to transform your raw captures into polished, high-definition masterpieces. This comprehensive guide from Tophinhanhdep.com will delve into the practical steps and advanced techniques within Photoshop to not only improve image quality but also to elevate your visual design to new heights. Join us as we explore how to enhance photos without losing quality, making your images stand out, and truly reflect your creative vision.
Understanding Image Quality and Resolution: The Foundation of Visual Excellence
Before diving into the practical steps of enhancement, it’s crucial to grasp the fundamental concepts that define an image’s quality, particularly resolution. These concepts underpin every decision you’ll make in Photoshop and are directly relevant to Tophinhanhdep.com’s focus on high-resolution photography and visual design.
What is Image Resolution?
Image resolution refers to the amount of detail or information contained within an image. Photographers typically measure this detail in pixels per inch (PPI) for digital images or dots per inch (DPI) for printed materials. A higher PPI or DPI signifies that more individual pixels or dots are packed into each inch of the image, resulting in a finer, more detailed, and sharper appearance. For instance, an image with 300 PPI will generally appear much clearer and more detailed than a 72 PPI image when viewed at the same physical size, especially for print. Understanding this ratio is key to achieving images suitable for everything from intricate digital art to large-format prints, ensuring your beautiful photography maintains its integrity.
Why Enhance Resolution?
The need to enhance image resolution arises for several compelling reasons, deeply integrated with the diverse image categories found on Tophinhanhdep.com:
- Print Quality: For images destined for physical print – be it for exhibitions, galleries, marketing materials, or personal albums – a higher resolution is indispensable. Low-resolution images tend to pixelate, appearing blurry or “blocky” when enlarged for printing, diminishing the impact of even the most aesthetically pleasing scenes.
- Commercial and Professional Use: In areas like stock photos, product photography, or graphic design, where images are often showcased on various platforms and potentially printed at different scales, high resolution ensures versatility and a professional finish. This is vital for maintaining the brand integrity and visual appeal of any business.
- Enhanced Detail and Clarity: Regardless of the final medium, increasing resolution can bring out subtle details that were previously obscure. This makes images more visually appealing, allowing viewers to appreciate the nuances of nature photography or the intricate patterns of abstract designs.
- Future-Proofing: By working with higher resolution images, you create assets that are more adaptable to future needs, whether it’s for new digital formats or larger print sizes that may emerge.
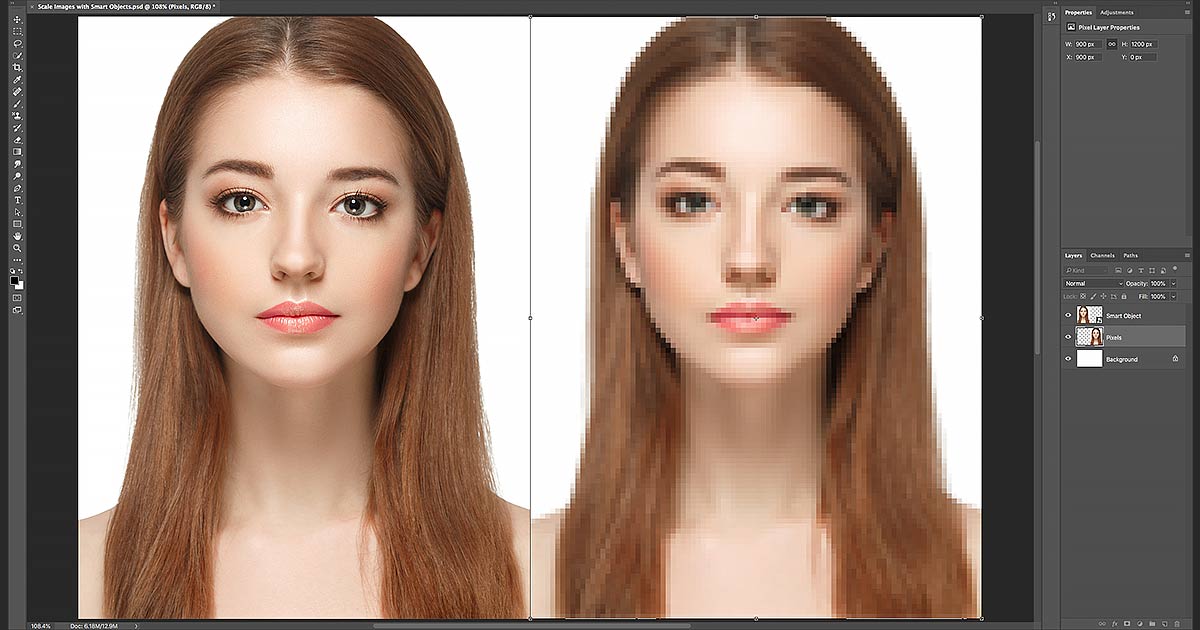
The Role of Image Size
Image size works hand-in-hand with resolution to determine the overall quality of your final product. An image’s “size” can refer to its physical dimensions (width and height in inches or centimeters) or its pixel dimensions (width and height in pixels). When you increase the resolution of an image in Photoshop, you are essentially increasing the number of pixels per inch, which in turn can lead to a larger file size and potentially larger printable dimensions without a loss in quality. A high resolution, coupled with appropriate pixel dimensions, is what allows Tophinhanhdep.com’s beautiful photography to be showcased in stunning clarity, whether as a desktop wallpaper or a detailed print. Conversely, understanding how to resize an image without compromising quality is critical, especially when optimizing images for web use or for specific visual design projects.
Essential Photoshop Techniques for Image Enhancement
Photoshop offers a vast array of tools to fundamentally transform and improve your images. These initial adjustments are crucial steps before diving into more specific enhancements, laying a solid groundwork for superior visual quality.
Basic Adjustments: Brightness, Contrast, Levels, and Curves
Starting with foundational adjustments can often yield significant improvements, bringing out hidden details and balancing the overall look of an image. These adjustments are central to all forms of photography, from stock photos to digital art.
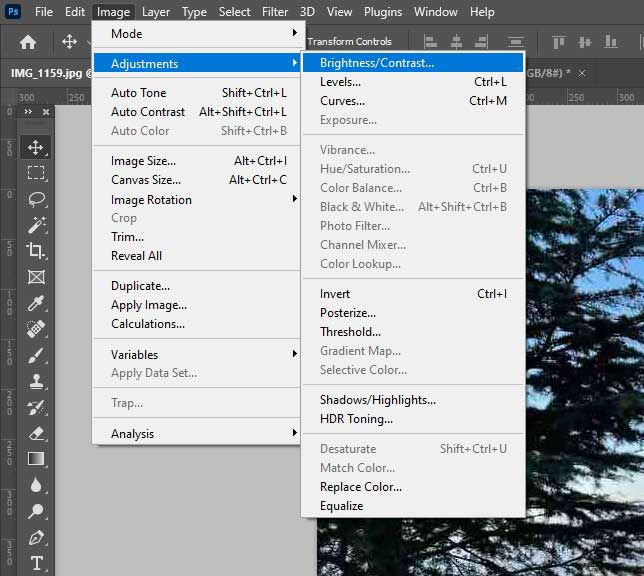
- Brightness and Contrast: These are the most straightforward adjustments. Brightness controls the overall lightness or darkness of an image, while contrast determines the difference between the darkest and lightest areas. Increasing contrast can make an image “pop” by deepening shadows and brightening highlights, but overuse can lead to a loss of detail in very dark or very light regions. You can find these under
Image > Adjustments > Brightness/Contrast. - Levels: The
Levelsadjustment (Image > Adjustments > Levels) provides more precise control over an image’s tonal range. It allows you to remap the pixel values by adjusting the black point, white point, and mid-tones (gamma). By dragging the sliders for shadows, mid-tones, and highlights, you can correct exposure issues, boost contrast, and reveal details in both the darkest and brightest parts of your image. This is particularly useful for achieving a balanced look across various photography styles. - Curves: For ultimate tonal control,
Curves(Image > Adjustments > Curves) is the go-to tool. It allows you to adjust the entire tonal range of an image by manipulating a curve on a graph, where the horizontal axis represents original pixel values and the vertical axis represents new pixel values. By adding anchor points to the curve and dragging them, you can selectively brighten or darken specific tonal ranges, creating custom contrast and exposure adjustments. This tool offers unparalleled flexibility for refining aesthetic and emotional imagery.
Mastering Color Balance and Vibrancy
Color plays a vital role in conveying mood and realism. Correcting color imperfections or enhancing color vibrancy can dramatically impact an image’s appeal. Tophinhanhdep.com emphasizes vibrant and true-to-life colors in its image collections.
- Color Balance: Sometimes, photos might have an unwanted color cast (e.g., too blue, too yellow), often due to lighting conditions.
Color Balance(Image > Adjustments > Color Balance) allows you to adjust the overall mixture of colors in an image. You can independently control the color balance for shadows, mid-tones, and highlights, by adding or subtracting cyan, magenta, and yellow. This helps in achieving a neutral or desired color tone. - Hue/Saturation: The
Hue/Saturationadjustment (Image > Adjustments > Hue/Saturation) is powerful for modifying specific color ranges or the overall vibrancy of an image. You can adjust the hue (the actual color), saturation (the intensity of the color), and lightness of individual color channels (e.g., reds, blues) or the entire image. This is excellent for making dull colors more vibrant or for creating dramatic color shifts in digital art. - Vibrance:
Vibrance(Image > Adjustments > Vibrance) is a smarter version of saturation. It primarily affects the saturation of less-saturated colors, leaving already saturated colors relatively untouched. This helps to boost colors without over-saturating skin tones or making images look unnatural, making it ideal for beautiful photography.
Cropping and Composition for Impact
While not directly enhancing pixel quality, judicious cropping and attention to composition significantly improve the perceived quality and focus of an image. Effective visual design relies heavily on strong composition.
- The Crop Tool: The
Crop Tool(shortcutC) allows you to remove unwanted or distracting elements from the edges of your photo. By reframing the subject, you can improve composition, emphasize the focal point, and refine the aspect ratio. Photoshop often provides overlay guides like the “Rule of Thirds” to aid in creating visually balanced compositions. This is essential for elevating the aesthetic quality of any photo, from nature backgrounds to abstract designs. - Straightening and Perspective Correction: The crop tool also offers options to straighten crooked horizons or correct perspective distortions, which can often be found in architectural photography or wide-angle shots. A level horizon and correct perspective contribute greatly to the professionalism and visual appeal of an image.
Advanced Sharpening and Detail Refinement
Once the basic adjustments are in place, the next crucial step is to enhance the finer details and address any blurriness or noise that might be present. This is where Photoshop’s advanced sharpening and noise reduction tools come into play, essential for high-resolution output.
Using Sharpen Filters: Unsharp Mask and Smart Sharpen
Sharpening tools increase edge contrast, making details appear clearer and more distinct. However, overuse can introduce artifacts or enhance noise, so careful application is key.
- Unsharp Mask: Despite its name,
Unsharp Mask(Filter > Sharpen > Unsharp Mask) is a powerful sharpening tool. It works by detecting edges in an image and increasing the contrast along those edges. It has three main controls:- Amount: Controls the intensity of the sharpening effect.
- Radius: Defines how far out from the edges the sharpening applies. A small radius sharpens fine details; a larger radius affects broader edges.
- Threshold: Determines how different pixels must be from their neighbors before they are considered an “edge” and sharpened. This helps to prevent sharpening noise in smooth areas. The goal is to enhance detail without creating halos or an unnatural, grainy look.
- Smart Sharpen:
Smart Sharpen(Filter > Sharpen > Smart Sharpen) offers more sophisticated control than Unsharp Mask, particularly in suppressing halos and reducing noise. It provides additional options such asRemove(Gaussian Blur, Lens Blur, Motion Blur) to target specific types of blur and the ability to adjust shadows and highlights independently. This allows for more refined and localized sharpening, which is invaluable for intricate photography and digital art.
Tackling Image Noise: Reduce Noise Filter
Image noise, appearing as random specks or graininess, often results from shooting in low light, with high ISO settings, or with lower-end cameras. Noise reduction is a critical step, as sharpening can sometimes amplify existing noise.
- Reduce Noise: Photoshop’s
Reduce Noisefilter (Filter > Noise > Reduce Noise) is designed to combat both luminance noise (monochromatic graininess) and color noise (random colored pixels). Key sliders include:- Strength: Controls the overall amount of noise reduction.
- Preserve Details: Helps to maintain edge sharpness while reducing noise.
- Reduce Color Noise: Specifically targets color artifacts.
- Sharpen Details: Applies a small amount of sharpening to offset any softening caused by noise reduction. It’s often a balancing act between reducing noise and preserving important image details. For optimal results, apply noise reduction before sharpening.
Pro Tip: Sharpening in Lab Color Mode
For advanced users, sharpening in Lab Color mode can yield superior results by allowing you to sharpen without affecting color information.
- Convert your image to Lab Color:
Image > Mode > Lab Color. - Go to the
Channelspanel and select only theLightnesschannel. - Apply your sharpening filter (e.g., Unsharp Mask or Smart Sharpen) to the
Lightnesschannel. - Once satisfied, convert the image back to RGB:
Image > Mode > RGB Color. This technique helps to keep colors clean and prevent color shifts or artifacts that can sometimes occur when sharpening in RGB mode, ensuring that your aesthetic and colorful imagery remains pristine.
Boosting Resolution: Photoshop’s Powerful Upscaling Tools
Increasing the resolution of an image is often critical for large prints, detailed visual design, or preparing low-resolution images for high-resolution displays. Photoshop offers both AI-powered and manual methods to achieve this, vital for any high-resolution stock photos or digital photography.
Super Resolution: AI-Powered Enlargement
Adobe’s Super Resolution feature, powered by their AI platform Adobe Sensei, offers a remarkable way to increase an image’s pixel count while intelligently preserving details. This is especially useful for photographs that need significant enlargement without typical quality degradation.
- Open in Camera Raw: To use Super Resolution, your image must be opened in Adobe Camera Raw (ACR). If it’s a JPEG or TIFF, you can open it directly from Photoshop by going to
File > Open, or by right-clicking the layer in Photoshop and choosingConvert to Smart Object, thenFilter > Camera Raw Filter. - Right-Click and Enhance: Once in ACR, right-click on the image thumbnail (or the image itself) and select
Enhance.... - Activate Super Resolution: In the
Enhancedialog box, check theSuper Resolutionoption. Photoshop’s AI will then process the image, effectively doubling the horizontal and vertical resolution (quadrupling the total pixel count) while minimizing artifacts and preserving crucial details. This AI-driven method is excellent for significantly upscaling images with minimal effort, making it a valuable tool for Tophinhanhdep.com users looking for quick, high-quality resolution boosts.
Manual Resizing with ‘Image Size’ and Resampling
For more granular control or when Super Resolution isn’t suitable, Photoshop’s Image Size dialog box offers comprehensive manual options.
- Access Image Size: Go to
Image > Image Size(or use the shortcutOpt + Cmd + Ifor Mac,Alt + Ifor Windows). - Understand the Dialog Box:
- Dimensions: Shows the current pixel dimensions and estimated print size.
- Fit To: Allows you to select presets or enter custom dimensions.
- Resolution: Displays the PPI/DPI.
- Resample Image: This is the critical checkbox.
- If checked: Photoshop will add or remove pixels to change the image’s dimensions and resolution independently. This is what you do when you want to increase pixel data.
- If unchecked: Changing the width, height, or resolution will affect the other two proportionally without changing the total number of pixels. This is useful for adjusting print output without changing pixel data.
- Choose a Resampling Mode (when ‘Resample’ is checked):
- Preserve Details 2.0: (Available in newer Photoshop versions, like 2019-2023) This is an AI-enhanced resampling method designed to maintain fine details and reduce noise during enlargement, offering superior results for upscaling.
- Bicubic Smoother (enlargement): A traditional method that works well for making images larger, aiming for smoother transitions between pixels.
- Bicubic Sharper (reduction): Used when reducing image size, it sharpens edges during downsampling.
When increasing resolution, ensure
Resample Imageis checked and selectPreserve Details 2.0orBicubic Smoother. Enter your desired resolution (e.g., 300 PPI for print standard) and/or pixel dimensions.
- Click OK: Photoshop will process the changes, creating a higher-resolution version of your image. Remember to always work on a duplicate or Smart Object to preserve your original data.
Gradual Scaling for Optimal Results
For extreme enlargements (e.g., doubling the size or more), a “pro tip” is to use incremental scaling. Instead of making one large jump in size, scale the image in smaller increments (e.g., 110% or 120%) multiple times. This can sometimes produce better quality control and fewer artifacts than a single large resizing operation, especially when dealing with images that are not high resolution to begin with. This meticulous approach is favored in high-quality digital photography and graphic design.
Leveraging Tophinhanhdep.com’s AI Tools and Other Considerations
While Photoshop provides unparalleled control, the digital landscape also offers powerful AI-driven alternatives and crucial final steps for managing your enhanced images. Tophinhanhdep.com is at the forefront of providing image tools that simplify and accelerate enhancement processes, including converters, compressors, optimizers, and AI upscalers.
Tophinhanhdep.com’s Online AI Enhancer
For users prioritizing speed and efficiency, Tophinhanhdep.com offers an advanced online AI photo enhancer. This tool leverages cutting-edge artificial intelligence to perform complex enhancements automatically.
- 1-Tap Enhancement: Simply upload your image to Tophinhanhdep.com’s platform. The AI will automatically analyze and apply optimal adjustments for sharpening, noise reduction, color balance, and upscaling. This can deliver a high-quality, polished result in seconds, perfect for those time-saving demands.
- Diverse Features: Beyond core enhancement, Tophinhanhdep.com’s AI tools provide a range of options, including color saturation adjustments, art effects, and filters, making it an all-in-one solution for easy editing and better design. It also includes features like an AI image enlarger and a collage maker, expanding your creative toolkit.
The Hybrid Approach: Photoshop and AI Together
For many professionals and enthusiasts, the optimal workflow involves a hybrid approach, combining the precise control of Photoshop with the efficiency of AI tools.
- Initial Corrections in Photoshop: Start by making basic adjustments, color corrections, and compositional refinements in Photoshop. This allows for meticulous control over the artistic aspects and foundational quality of the image.
- AI for Final Polish or Upscaling: Once the manual adjustments are complete, export the image and use Tophinhanhdep.com’s AI enhancer for a final polish, significant upscaling, or automated noise reduction. This can save hours of manual tweaking for specific tasks, especially when dealing with vast collections of wallpapers, backgrounds, or stock photos. This synergistic method ensures that you get the best of both worlds: artistic command and AI-powered speed, leading to truly stunning visuals.
Saving Your Enhanced Images
The final step after any enhancement is to save your image in an appropriate format.
- Lossless Formats: For preserving maximum quality, especially for future editing or printing, save in lossless formats like TIFF or PNG. These formats retain all image data and are ideal for high-resolution photography.
- Lossy Formats: For web use or when file size is a concern, JPEG is common. However, remember that JPEG is a lossy compression format, meaning some data is discarded each time it’s saved. When saving as JPEG, select a high-quality setting to minimize artifacts.
- Backup: Always create a backup copy of your original image before making significant changes. This ensures you can always revert to the unedited version if needed.
Conclusion
Enhancing the quality of an image in Photoshop is a transformative process that empowers photographers, designers, and enthusiasts to elevate their visual content to professional standards. From understanding the nuances of resolution and image size to mastering fundamental adjustments like brightness, contrast, and color balance, Photoshop provides the tools to address virtually any imperfection. We’ve explored advanced techniques such as intelligent sharpening with Unsharp Mask and Smart Sharpen, effective noise reduction, and powerful resolution boosting through Super Resolution and precise manual resampling.
Moreover, the integration of AI-powered solutions, like Tophinhanhdep.com’s online AI enhancer, offers a dynamic complement to Photoshop’s traditional strengths, allowing for rapid, high-quality improvements with minimal effort. Whether you opt for the deep control of Photoshop, the efficiency of AI, or a strategic hybrid approach, the ultimate goal remains the same: to create stunning, high-resolution images that captivate and communicate effectively.
As you embark on your image enhancement journey, remember that skill and experience grow with practice. Trust your creativity and aesthetic judgment to guide your choices, making each image not just technically perfect, but also visually inspiring. Tophinhanhdep.com is here to support you with a wealth of resources, from beautiful photography examples and creative ideas to innovative image tools, helping you unlock the full potential of your visual storytelling. Start exploring the possibilities today and transform your images into works of art that truly stand out in any collection, from aesthetic wallpapers to compelling digital art.