Mastering Image Erasure in Canva: A Comprehensive Guide to Flawless Edits

In the dynamic world of digital content, compelling visuals are no longer an option but a necessity. From breathtaking wallpapers and evocative aesthetic backgrounds to stunning high-resolution photography and intricate digital art, images form the bedrock of online communication and personal expression. As a hub for visual design and creative inspiration, Tophinhanhdep.com understands the profound impact of well-crafted images. While tools like Canva have democratized graphic design, enabling creators of all skill levels to produce professional-looking content, the nuances of photo manipulation, such as precisely erasing parts of an image, can still seem daunting.
The ability to seamlessly remove unwanted elements or isolate a subject from its background is a cornerstone of effective photo editing. It allows for cleaner compositions, more focused narratives, and greater flexibility in integrating images into diverse design projects, be it for striking social media graphics, detailed product brochures, or personalized mood boards. This guide delves deep into the capabilities of Canva when it comes to image erasure, providing you with the knowledge and step-by-step instructions to achieve pristine results. Whether you’re a Canva Pro user seeking to harness its advanced features or a free user looking for clever workarounds, we’ll cover how to eliminate distractions and refine your visuals, elevating your creative ideas and ensuring your imagery truly stands out.

Understanding Canva’s Image Erasure Tools
Canva is renowned for its user-friendly interface and extensive library of design elements. However, when it comes to the precise art of erasing parts of an image, it’s essential to understand which tools are available and, more importantly, which plan you need to access them. Unlike traditional image editing software that might feature a dedicated, always-on eraser brush, Canva integrates its erasure capabilities within its broader photo editing suite, primarily tied to its powerful background removal technology.
The Power of Canva Pro: Magic Eraser and Background Remover
For anyone serious about advanced photo manipulation and achieving professional-grade clean-ups, a Canva Pro subscription is indispensable. It unlocks the full potential of Canva’s intelligent erasure features, most notably the “Background Remover” and the subsequent “Erase” and “Restore” brushes.
The Background Remover is arguably Canva’s most celebrated image editing tool. With a single click, this AI-powered feature can automatically detect and isolate the main subject of an image, effectively rendering its background transparent. This is not just a time-saver but a gateway to a myriad of creative possibilities. Imagine an intricate nature shot where you want to highlight a specific flower, or a product photograph needing a clean, isolated subject for an e-commerce listing – the Background Remover makes this effortless.
Once the background has been removed, a crucial next step for precise image erasure comes into play: the Magic Eraser. This tool isn’t a standalone feature you find in the main menu; rather, it activates after you’ve applied the Background Remover. The Magic Eraser allows you to manually refine the edges of your cut-out subject or meticulously brush away any remaining unwanted fragments or stray pixels that the automatic background removal might have missed. It’s your digital scalpel for intricate details, ensuring a perfectly clean cut-out. While often referred to collectively as the “eraser tool,” it’s more accurate to think of it as the manual refinement stage of the background removal process.
These Pro-exclusive features are fundamental for creating high-resolution images suitable for various applications, from aesthetic wallpapers to professional digital photography projects, enabling precise editing styles that are critical for polished visual design.
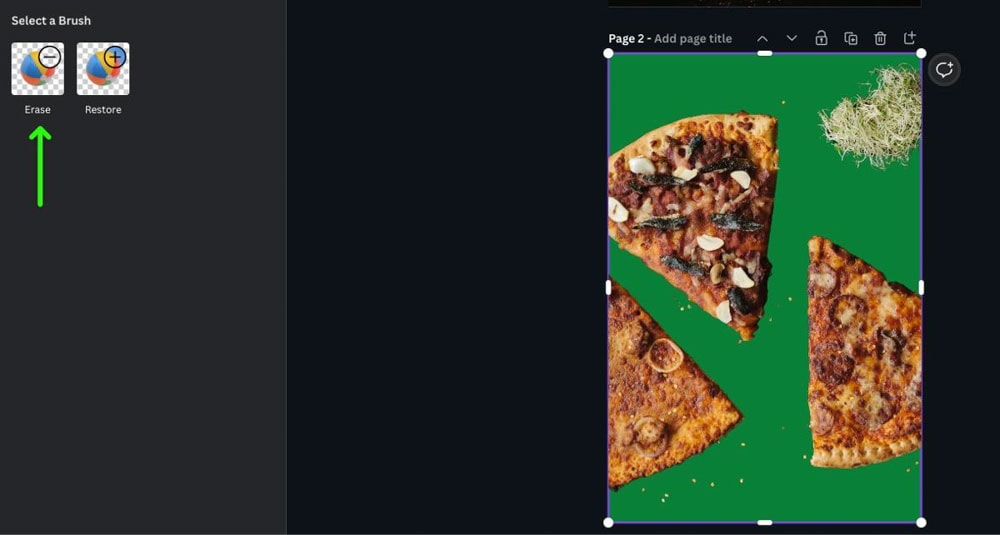
Essential Brushes: Erase and Restore for Precision
After utilizing the Background Remover in Canva Pro, you’ll gain access to two vital brushes: Erase and Restore. These tools are your companions for fine-tuning the results and ensuring your image is exactly as you envision it.
The Erase brush is your primary tool for removing any unintended remnants. Sometimes, the automatic background remover might leave small, isolated specks or uneven edges around your subject. The Erase brush allows you to meticulously brush over these areas, deleting those specific pixels and cleaning up the image. You have control over the brush size, enabling you to switch between a larger brush for broad strokes and a smaller, more precise brush for delicate areas. This flexibility is crucial for detailed photo manipulation and ensuring your subject is flawlessly separated from its original context.
Conversely, the Restore brush acts as your safety net. It’s easy to accidentally over-erase, removing a part of your subject that you intended to keep. The Restore brush allows you to bring back those accidentally deleted pixels. This “push and pull” dynamic between the Erase and Restore brushes is fundamental to achieving perfection. You might erase a bit too much, then restore, then erase again with a finer touch, until every edge is crisp and every unwanted element is gone. This iterative process is what defines precise digital photography editing and ensures your final visual design is immaculate.
Understanding the interplay between these two brushes is key to mastering image erasure in Canva Pro. They provide the granular control needed for photo manipulation that goes beyond simple background removal, allowing you to sculpt your image with an artist’s precision.
Step-by-Step Guide: How to Erase Part of an Image in Canva Pro
Achieving a clean, professionally edited image in Canva Pro, particularly when it involves erasing specific parts, is a straightforward process once you know where to find and how to use the tools. Here’s a detailed, step-by-step guide to help you master this essential photo manipulation technique.
Initiating Your Design and Selecting Your Image
The journey to a perfectly erased image begins with setting up your creative workspace in Canva.
Step 1: Create a New Design or Open an Existing One First, log into your Canva Pro account. You can either start with a fresh canvas by clicking the “Create a Design” button and choosing your desired dimensions (e.g., social media post, presentation, custom size), or you can open an existing project by double-clicking on it from your recent designs or folders. This flexibility ensures you can integrate image erasure into any ongoing visual design endeavor.
Step 2: Add an Image to Your Canva Design Once your design canvas is ready, you need to bring in the image you wish to edit.
- From Canva’s Library: If you’re using a stock photo, navigate to the “Photos” tab on the left-side menu. Use the search bar to find an image that suits your needs. Canva offers a vast collection of high-resolution images, perfect for any thematic collection or creative idea.
- From Your Computer: If you have an image saved locally, go to the “Uploads” tab on the left-side menu and click “Upload files.” Select the image from your computer to add it to your Canva library. Alternatively, you can drag and drop the photo directly onto your canvas. This is particularly useful if you’ve sourced unique images or digital photography pieces from platforms like Tophinhanhdep.com. After uploading or selecting, click or drag the image onto your design canvas. If it automatically fills the background, you might need to right-click and choose “Detach image from background” to treat it as a movable element, especially if you plan to add a temporary background for easier editing (as described in some advanced techniques).
Utilizing the Background Remover and Magic Eraser
With your image on the canvas, you’re ready to dive into the core erasure process using Canva Pro’s powerful tools.
Step 3: Access “Edit Photo” / “Edit Image” Click on the image you’ve placed on your canvas. This will activate a toolbar at the top of the editor or an “Edit Photo” / “Edit Image” button. Click this option to reveal the image editing panel on the left side of your screen. This panel houses all of Canva’s image adjustment and effect tools, including those for background manipulation.
Step 4: Apply the “Background Remover” In the “Edit Photo” panel, locate and click the “Background Remover” tool. This is usually found under the “Tools” section or “Effects.” Canva’s AI will then automatically analyze your image and, in a matter of seconds, remove its background, leaving your primary subject isolated. This step is crucial because it enables the precise Erase and Restore brushes for fine-tuning. Without removing the background first, these brushes are not typically accessible for selective erasure of parts of an image.
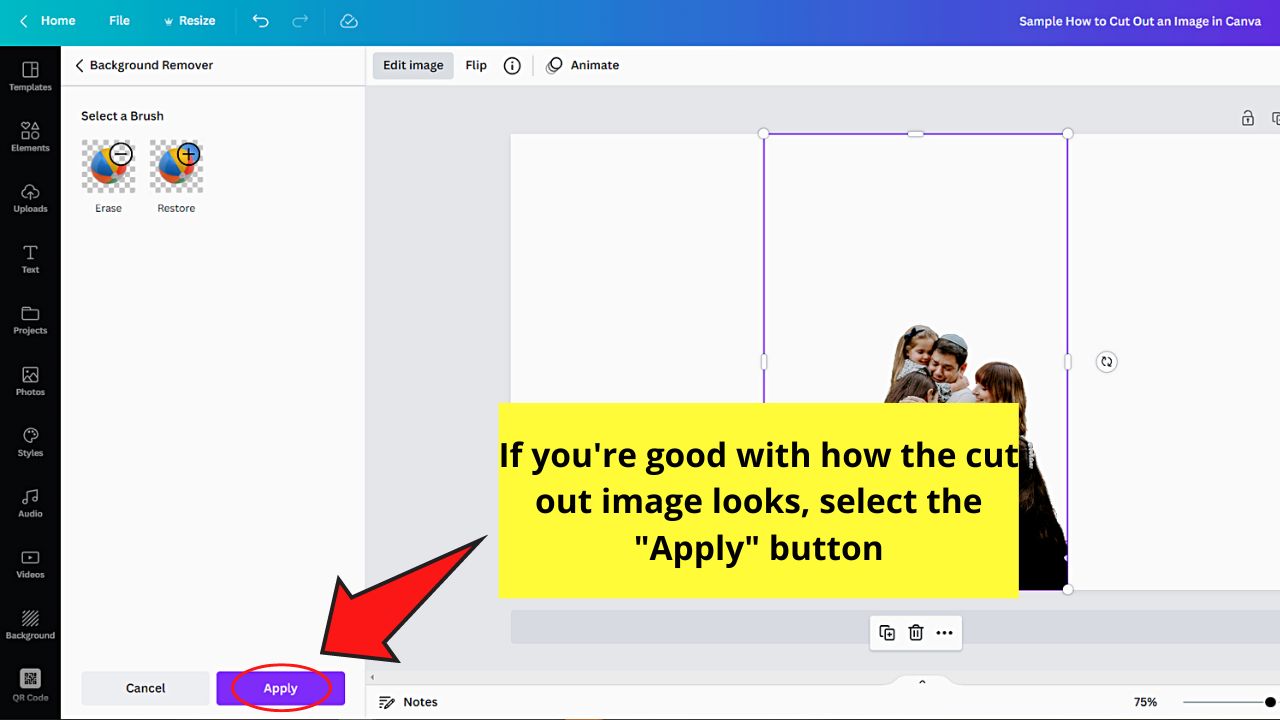
Step 5: Access the “Erase” Brush After Background Removal Once the Background Remover has finished its job, you’ll notice a faint outline around your subject, and the background will be gone (or replaced by your chosen canvas background). Critically, two new options, “Erase” and “Restore,” will appear in the “Edit Photo” panel or near the Background Remover button. Click on “Erase” to enter the manual erasure mode.
Step 6: Brush Over Unwanted Parts, Adjust Size, and Use “Restore” as Needed Now, your cursor will transform into a brush.
- Erasing: Drag your mouse over any remaining unwanted fragments, rough edges, or tiny imperfections around your subject. The pixels you brush over will be deleted.
- Adjusting Brush Size: Use the “Brush size” slider (usually located above or next to the Erase/Restore buttons) to increase or decrease the brush’s diameter. A larger brush is efficient for clearing large areas, while a smaller brush is perfect for intricate details and tight corners, allowing for meticulous photo manipulation.
- Restoring: If you accidentally erase too much of your desired subject, simply click the “Restore” button and brush over the area where you want the pixels to reappear. This is a lifesaver for correcting mistakes and achieving a natural, seamless look. You might find yourself switching between “Erase” and “Restore” multiple times to get the perfect cut-out—this iterative process is completely normal and encouraged for precision.
Step 7: Confirm Your Edits Once you are satisfied with your refined image and have meticulously removed all unwanted parts, click “Done” or “Apply” (depending on the Canva version) to confirm your changes. Your image will now be a clean cut-out, ready to be resized, repositioned, or integrated into your broader design. This perfectly edited image is now ideal for creating impactful visual content, whether it’s for striking digital art or polished commercial photography.
By following these steps, you gain complete control over the erasure process in Canva Pro, transforming ordinary images into extraordinary visual assets for any creative project.
Workarounds and Alternatives for Canva Free Users
While Canva Pro offers unparalleled ease and power for image erasure, not everyone has access to a premium subscription. If you’re a Canva Free user, don’t despair! While you won’t have the sophisticated one-click Background Remover or the precise Erase/Restore brushes, there are still clever workarounds and external tools you can leverage to achieve similar, albeit sometimes more limited, results. Understanding these alternatives is crucial for anyone engaging in visual design on a budget.
Creative Cropping and Framing Techniques
Canva Free’s limitations mean you need to think creatively about how to “erase” parts of an image. The goal here is usually to hide unwanted sections rather than truly delete pixels.
-
Utilizing the Crop Tool: The most basic form of erasure available to all Canva users is cropping.
- How it works: Select your image on the canvas. A “Crop” option will appear in the toolbar. Click it, and drag the corner or side handles to adjust the boundaries of your image. Anything outside these boundaries will be “cropped out.”
- Limitations: This method is excellent for removing unwanted edges or transforming a wide shot into a tighter composition. However, it’s very limited for intricate erasure. You can only crop in straight lines (horizontally or vertically). You cannot crop around an irregular object or remove an element from the middle of an image without also cutting off desired parts. For instance, you can’t crop out a person from a group photo without affecting others. It’s a blunt instrument compared to the precision tools in Canva Pro.
-
Using Frames and Placeholders: This is a more elegant workaround for Canva Free users, particularly effective for images where you want to reveal only a specific portion within a defined shape.
- How it works: In the “Elements” tab on the left sidebar, search for “Frames” or “Grids.” Canva offers a wide variety of shapes—circles, squares, stars, letters, and more. Choose a frame that matches the general outline of the part of the image you want to keep. Drag the frame onto your canvas. Now, drag your desired image into the frame. Canva will automatically fit the image within the shape. You can then double-click the image within the frame to reposition it, zooming in or moving it around until only the desired section is visible within the frame.
- Benefits: This technique effectively “erases” anything outside the frame, giving the impression of a custom cut-out. It’s fantastic for creating aesthetic collages, unique profile pictures, or highlighting specific elements. For example, if you want to feature a person’s face from a larger image, you can use a circular frame and position the image so only their face is visible.
- Limitations: While versatile, this isn’t true erasure. The original image still exists in its entirety; you’re simply masking parts of it. You can’t use this method to remove an object from the middle of a complex background and leave the background intact. It’s best suited for isolating a subject within a geometric or pre-defined shape.
These creative workarounds, while not as powerful as Canva Pro’s dedicated tools, can still help Canva Free users achieve a degree of photo manipulation and visual design control, contributing to more engaging image collections and creative ideas.
Leveraging External Image Tools for Advanced Erasure
For complex image erasure needs that Canva Free cannot accommodate, turning to external tools is often the most practical solution. These tools, many of which are free or offer free tiers, can perform the pixel-level editing required for truly seamless removal. Tophinhanhdep.com, as a resource for image tools, can point you towards several valuable options.
-
Online Background Removers (like Tophinhanhdep.com’s own tools): If your primary goal is to remove the background entirely from an image to isolate a subject, dedicated online tools are incredibly efficient.
- How it works: Websites specifically designed for background removal, such as those found in Tophinhanhdep.com’s “Image Tools” section, typically allow you to upload your image, and their AI will automatically detect and remove the background in seconds. The result is a clean, transparent PNG file.
- Benefits: These tools often match or even exceed the quality of Canva Pro’s Background Remover for simple, clear subjects. They are quick, easy to use, and require no software installation.
- Process for Canva Free: You would use such an external tool to get your background-less image, download it, and then re-upload it to Canva via the “Uploads” tab. This cut-out image can then be placed on any background or integrated into your design. This is a highly recommended method for Canva Free users who need transparent backgrounds.
-
Dedicated Image Editing Software (GIMP, Photoshop, Illustrator): For the most sophisticated erasure and photo manipulation tasks—like removing an object from a busy background and intelligently filling the space, or performing complex retouching—professional-grade software is indispensable.
- GIMP (GNU Image Manipulation Program): This is a powerful, free, and open-source alternative to commercial software like Photoshop. It offers a comprehensive suite of tools, including lasso tools, selection brushes, clone stamp tools, and healing brushes, which are perfect for precise erasure and content-aware filling. It’s available for Mac and PC.
- Adobe Photoshop: The industry standard for raster graphic editing, Photoshop offers unmatched control for image retouching, object removal, and complex photo manipulation. Its content-aware fill and various selection tools provide pixel-perfect erasure capabilities.
- Adobe Illustrator: While primarily a vector graphics editor, Illustrator also has tools for working with images. Its clipping masks and pathfinder tools can be used to “cut out” parts of images or create complex shapes around subjects for a form of precise non-destructive “erasure.” Tophinhanhdep.com provides resources on “How to Erase Part of an Image in Illustrator” for those looking to explore this avenue.
- Process: For these programs, you would export your image from Canva (or upload your original), perform the advanced erasure/editing in the external software, and then re-upload the finished image to Canva for final design integration.
By combining the accessibility of Canva Free with strategic external image tools, you can overcome many limitations and still achieve high-quality visual design outcomes, expanding your capabilities for digital photography editing and creative projects. Tophinhanhdep.com’s “Image Tools” section offers further resources for converters, compressors, optimizers, and AI upscalers that can complement your workflow, ensuring your images are not just well-edited but also optimized for various platforms.
Enhancing Your Edited Images: Beyond Basic Erasure
Successfully erasing unwanted elements from an image in Canva is a significant step, but it’s often just the beginning of crafting a truly impactful visual. After you’ve achieved a clean cut-out, the next phase involves integrating it seamlessly into your design and adding stylistic elements that make it pop. This stage directly aligns with Tophinhanhdep.com’s focus on Visual Design, Photo Manipulation, and creating Creative Ideas.
Refining Your Visuals with Drop Shadows and Blending
A perfectly cut-out image can sometimes look too stark or “pasted on” when placed against a new background. This is where subtle enhancements like drop shadows and careful blending come into play, adding depth and realism to your composition.
-
Adding a Drop Shadow: A well-applied drop shadow can dramatically improve how a subject integrates with its background. It mimics natural lighting, suggesting that the object exists within the space rather than floating unnaturally.
- How to Apply: After your image has been cut out and placed on its new background, select the image. Go to the “Edit Photo” panel and scroll down to the “Shadows” section. Select “Drop” to apply a default drop shadow.
- Adjusting Settings: Click on the “Drop” effect again to access its customization settings. Here, you can fine-tune various aspects:
- Offset: Controls how far the shadow stretches away from the object.
- Angle: Determines the direction from which the light source is perceived, thus changing the shadow’s angle.
- Transparency: Adjusts the opacity of the shadow, making it darker or lighter. A subtle, less opaque shadow often looks more natural.
- Blur: Modifies the softness of the shadow’s edges. A higher blur value creates a softer, more diffused shadow, which is often more realistic, especially for distant light sources.
- Color: While the default is usually black or a dark shade, you can change the shadow color. However, for a realistic effect, it’s generally best to stick to darker, desaturated tones that complement the background, rather than vibrant colors, unless aiming for a specific artistic style.
- Benefits: A thoughtfully applied drop shadow breathes life into your cut-out, making it appear grounded and part of the scene. This subtle photo manipulation technique significantly enhances the overall visual design, turning a flat composition into a dynamic one.
-
Consider Blending Modes and Other Effects: While not direct erasure, integrating your edited image sometimes benefits from blending modes or other filters in Canva. Experiment with options like “Multiply,” “Screen,” or “Overlay” if you’re trying to achieve specific atmospheric effects or blend the subject more organically with a textural background. Canva’s “Adjust” panel also allows for tweaks to brightness, contrast, saturation, and warmth, which can help match the lighting and color temperature of your subject to its new environment, ensuring cohesive digital photography.
Integrating Your Masterpiece into Diverse Designs
Once your image is cleanly edited and beautifully integrated, its potential expands exponentially. The versatility of a well-manipulated image is central to its value, aligning perfectly with Tophinhanhdep.com’s emphasis on Image Inspiration & Collections.
- Social Media Graphics: Clean, professional cut-outs are ideal for social media. Use them for engaging product announcements, striking profile pictures, or eye-catching event promotions. The precise erasure allows your message to shine without visual clutter.
- Product Catalogs and E-commerce: For businesses, isolating products against a clean background (often white or transparent) is fundamental. These images can be effortlessly integrated into product brochures, online stores, and advertising campaigns, providing a polished and trustworthy look.
- Website Design Elements: Create bespoke hero images, banners, or interactive elements for your website. A transparent PNG of your subject allows for flexible placement and creative layering over various web backgrounds, enhancing the overall aesthetic and user experience.
- Personalized Stationery and Invitations: From greeting cards to custom invitations, a perfectly cut-out image of a person or object can add a deeply personal and professional touch.
- Digital Art and Collages: For digital artists, precise erasure is a fundamental technique for creating complex collages, manipulating photo elements into new scenes, or generating unique compositions. It’s a stepping stone to exploring more advanced creative ideas and digital art styles.
- Mood Boards and Thematic Collections: When assembling mood boards for design projects or compiling thematic image collections, clean images ensure that each element contributes clearly to the overall aesthetic and concept without distracting backgrounds. This allows for a more focused and visually appealing presentation of your photo ideas.
By considering these applications, you transform a basic editing task into a powerful visual design strategy. The ability to erase parts of an image in Canva, particularly with the advanced features of Canva Pro, empowers you to take your images from mere snapshots to refined visual assets that tell a story, sell a product, or simply inspire. Tophinhanhdep.com encourages you to explore how these polished images can be leveraged across all your creative endeavors, continually enhancing your photography and visual content.
Frequently Asked Questions about Erasing in Canva
Navigating image editing tools, especially when dealing with specific functions like erasure, often leads to common questions. Here, we address some of the most frequently asked queries regarding erasing parts of an image in Canva, offering clear answers to enhance your understanding and workflow.
Can you remove background images if you’re not a Canva Pro user?
Unfortunately, Canva’s built-in “Background Remover” tool and the subsequent “Erase” and “Restore” brushes are exclusive features for Canva Pro (and Enterprise, Education, Nonprofits) subscribers. If you are using a Canva Free account, you cannot directly access these tools to automatically remove backgrounds or precisely erase elements from an image.
However, as discussed earlier, you have two primary workarounds:
- Cropping: You can use the basic crop tool to cut off unwanted edges of an image.
- External Tools: For true background removal, you can use a free external online tool, such as those available through Tophinhanhdep.com’s “Image Tools” section. You would upload your image there, download the transparent PNG, and then re-upload it to Canva.
Is it possible for you to undo erasing or removing an element in Canva?
Yes, absolutely! Canva provides an “Undo” feature that allows you to revert your last actions, including erasing or removing elements. Look for the “Undo” arrow icon (usually a curved arrow pointing left) in the top toolbar of the Canva editor. You can click it multiple times to undo a sequence of actions. This safety net means you can experiment with the Erase and Restore brushes without fear of permanent mistakes.
Can you use Canva’s background remover unlimitedly?
For Canva Pro users, the “Background Remover” tool does have a daily usage limit, though it’s quite generous. Canva generally allows for up to 500 background image removals per day. For most casual or even moderately heavy users, this limit is unlikely to be reached. Therefore, for practical purposes, it often feels like unlimited use. However, if you are working on an exceptionally large batch of images (e.g., hundreds of product photos at once), it’s something to be aware of.
What’s the difference between the “Erase” and “Restore” brushes in Canva’s background remover?
The “Erase” and “Restore” brushes are complementary tools that appear after you’ve used the “Background Remover” in Canva Pro for fine-tuning.
- Erase Brush: This brush is used to remove pixels. You use it to clean up any remaining unwanted fragments or refine the edges of your subject that the automatic background removal might have missed. It effectively deletes parts of the image you brush over.
- Restore Brush: This brush is used to bring back pixels. If you accidentally erase too much of your desired subject, or if the automatic removal was too aggressive, the Restore brush allows you to paint back those lost areas, essentially undoing specific manual erasures.
They work in tandem, allowing for precise control and correction during the image clean-up process, which is vital for high-quality digital photography and visual design.
Can you erase elements in Canva without using the background remover tool first?
No, not with the specialized Erase and Restore brushes designed for pixel-level removal. In Canva Pro, the manual “Erase” brush (which functions like an eraser tool) is only activated and made available after you have applied the “Background Remover” effect to an image. This means you cannot simply select an image and immediately start erasing specific parts of it without first initiating the background removal process. The “Erase” brush is part of the background removal interface for refining its results, rather than a standalone, general-purpose eraser brush found in other editing software. For Canva Free users, the only forms of “erasure” without the Background Remover are cropping or using frames to mask parts of an image.
Can the “Background Remover” tool be used to erase the background of a video in Canva?
Yes, Canva Pro’s “Background Remover” capabilities extend beyond static images to video. Canva offers a “Remove Background” feature for videos, allowing you to instantly eliminate the background from video clips, leaving your subject isolated. This is a powerful feature for creating dynamic visual content, green screen effects, or integrating video subjects into various visual design projects, similar to how it works for images.
Conclusion
Mastering image erasure in Canva, particularly with the advanced features of Canva Pro, is an invaluable skill for any digital creator, graphic designer, or photography enthusiast. From isolating subjects for product photography to cleaning up busy backgrounds for aesthetic wallpapers, the ability to precisely remove unwanted elements transforms ordinary images into polished, professional assets. While Canva Free users have clever workarounds through cropping and framing, the true power of granular control, including the indispensable Erase and Restore brushes, lies within Canva Pro’s integrated “Background Remover” suite.
As we’ve explored, the journey from an unedited photograph to a perfectly cut-out image involves a series of intuitive steps, culminating in precise refinements that can dramatically enhance your visual design. Furthermore, understanding how to apply elements like drop shadows helps your edited images blend seamlessly into new contexts, adding realism and depth to your creations.
Tophinhanhdep.com is dedicated to providing comprehensive resources for all your image needs, from high-resolution stock photos and diverse backgrounds to advanced image tools and visual design inspiration. We encourage you to experiment with these techniques in Canva, leveraging the “Image Tools” available on Tophinhanhdep.com for any complementary needs like format conversion or optimization. By continuously refining your photo manipulation skills, you’ll unlock endless creative possibilities, allowing your images to truly captivate and communicate your unique vision. Dive into Canva, unleash your creativity, and make every pixel count!