Mastering Image Expansion in Photoshop: A Comprehensive Guide for Visual Storytellers on Tophinhanhdep.com

In the dynamic world of digital imagery, the ability to expand a photo seamlessly is more than just a technical trick—it’s a gateway to boundless creative possibilities. Whether you’re a seasoned professional crafting stunning visual narratives or an aspiring enthusiast curating aesthetic wallpapers and backgrounds, Photoshop offers an array of powerful tools to extend your images beyond their original borders. On Tophinhanhdep.com, we understand the evolving needs of photographers, graphic designers, and digital artists who seek to transform their high-resolution captures into captivating masterpieces. This guide delves into the essential techniques within Photoshop, from the revolutionary AI-driven Generative Expand to the intelligent precision of Content-Aware tools and the foundational control of Free Transform, demonstrating how these functionalities can elevate your visual projects and unlock new dimensions of image inspiration.

Expanding an image in Photoshop isn’t just about making it bigger; it’s about reshaping its narrative, refining its composition, and adapting it to diverse visual contexts. Imagine capturing a breathtaking nature scene, only to realize later that a crucial element was just out of frame, or needing to adapt a portrait for a wide social media banner. Historically, these challenges involved tedious cloning and manual reconstruction, often compromising the image’s integrity. However, with the advent of advanced algorithms and AI, Photoshop has dramatically simplified these complex tasks, empowering creators to achieve impeccable results with unprecedented ease. Tophinhanhdep.com is dedicated to exploring these tools, providing you with the knowledge to harness them effectively, and transforming your photography and digital art into something truly extraordinary.
This comprehensive article will walk you through the primary methods for image expansion in Photoshop, offering step-by-step instructions, practical tips, and insights into how each tool serves specific creative goals. We’ll explore how these techniques contribute to producing stunning wallpapers, compelling digital art, and optimized images suitable for every platform, reinforcing Tophinhanhdep.com’s commitment to empowering your visual design journey.
Unleashing AI Power: Generative Expand in Photoshop
The introduction of Artificial Intelligence into image editing has revolutionized the way we approach photo manipulation, and Adobe Photoshop’s Generative Expand feature stands as a testament to this innovation. This groundbreaking tool leverages advanced AI algorithms to intelligently analyze your existing image content and then seamlessly generate new pixels that naturally extend your photo, matching its style, lighting, and textures with uncanny accuracy. For anyone looking to create expansive backgrounds, unique aesthetic compositions, or simply correct a tightly cropped shot, Generative Expand, a feature frequently highlighted in comprehensive digital photography guides on Tophinhanhdep.com, offers an unparalleled level of realism and creative freedom.

The beauty of Generative Expand lies in its ability to understand the context of your image. Instead of merely stretching or repeating existing pixels, it invents new, plausible content that blends perfectly with your original photograph. This means you can transform a standard landscape into a panoramic vista, extend a portrait to better accommodate text for a magazine layout, or even add entirely new elements to a scene that were never there to begin with. This capability makes it an indispensable tool for photographers seeking high-resolution outputs for large prints, visual designers crafting compelling social media banners, and digital artists looking for creative ideas to enrich their photo manipulation projects.
The AI Advantage: Why Generative Expand is a Game-Changer
Generative Expand is more than just an image resizing tool; it’s a creative partner that pushes the boundaries of your imagination. Here’s why it has quickly become a favorite among the Tophinhanhdep.com community:
- Seamless Integration: The AI-generated content blends so well with the original image that it’s often indistinguishable from actual photography, making it perfect for creating realistic visuals. This is crucial for maintaining the quality of beautiful photography and abstract art.
- Unrivaled Realism: Whether you’re extending a nature scene with intricate foliage or an urban landscape with complex architectural details, the tool generates realistic textures, shadows, and lighting that complement the existing image.
- Creative Versatility: From creating stunning panoramas that capture a wider perspective to extending portraits for more impactful framing, or even adding new elements like a flowing river or a cloudy sky, Generative Expand supports a vast array of creative ideas. This broad applicability makes it valuable for diverse thematic collections and mood boards.
- Time-Saving Efficiency: What once required painstaking manual cloning and meticulous adjustments can now be achieved in a matter of seconds, freeing up valuable time for other aspects of your visual design workflow. This efficiency directly contributes to a smoother digital photography and editing experience.
- Non-Destructive Workflow: The generated content is typically created on a new layer, allowing you to fine-tune or revert changes without affecting your original image, promoting flexible photo manipulation.
For anyone who has ever felt constrained by the edges of their photographs, Generative Expand offers an exhilarating sense of liberation. It empowers you to explore new storytelling possibilities and craft visuals that truly leave a lasting impression, embodying the spirit of creative expression Tophinhanhdep.com champions.
Seamless Expansion: A Step-by-Step Workflow
Utilizing Generative Expand in Photoshop is remarkably straightforward, offering an intuitive process that yields professional results. Here’s a detailed, step-by-step guide to expanding your photos with this powerful AI tool, as recommended by experts on Tophinhanhdep.com:
- Launch Photoshop and Open Your Image: Begin by opening Adobe Photoshop and loading the image you wish to expand. This could be any image, from a stunning nature photograph to a captivating portrait or an abstract digital art piece.
- Select the Crop Tool: Activate the Crop Tool. You can do this by pressing ‘C’ on your keyboard, or by selecting it from the Photoshop toolbar on the left side of your screen.
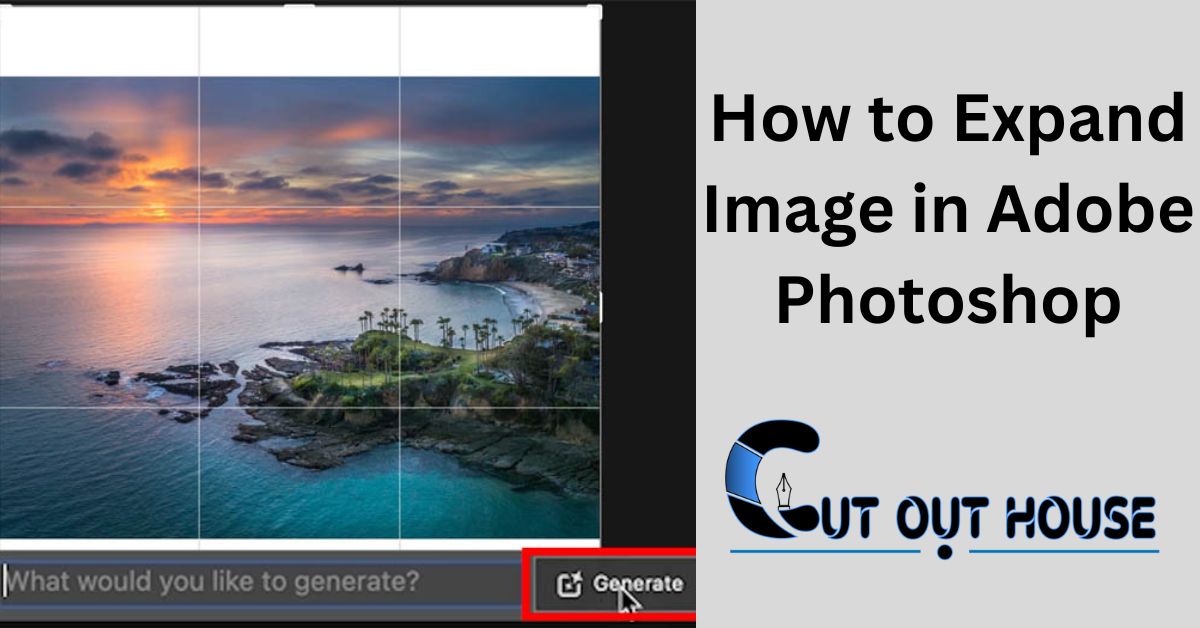
- Access Generative Expand: With the Crop Tool active, look for the options bar at the top of your Photoshop interface. You will typically find the “Fill” option there. Ensure that “Fill” is set to “Generative Expand.” In some versions or interface configurations, the “Generative Expand” option might appear directly in the contextual toolbar that appears when the Crop Tool is selected.
- Expand the Canvas: Now, click and drag the handles of the crop box outwards to expand the canvas in the desired direction(s). As you drag, you’ll notice transparent areas appearing around your original image, indicating where new content will be generated.
- Initiate Generation: Once you’ve set your desired new canvas dimensions, a “Generate” button or prompt will appear in the contextual task bar. Click “Generate” to instruct Photoshop’s AI to fill in the expanded areas.
- Explore Variations in the Properties Panel: After a brief processing period, Photoshop will present you with several distinct variations of the expanded image. These variations will appear in the Properties window (if not visible, go to
Window > Propertiesto open it). Scroll down within the Properties panel to view and cycle through these different AI-generated options. - Choose the Best Result: Carefully examine each variation. Select the one that best matches the aesthetic, realism, and compositional needs of your image. You can click on the thumbnails to instantly switch between variations.
- Iterative Expansion (Optional but Recommended): Generative Expand is an iterative tool. If you need to expand your image even further, or if you want to refine certain areas, you can repeat the process. Simply drag the crop handles again to expand the canvas further into the desired direction, click “Generate,” and choose from the new set of variations. This iterative approach allows for greater control and customization, perfect for refining backgrounds for diverse thematic collections or adjusting aesthetic photography.
By following these steps, you can harness the full power of Generative Expand to create stunning, expanded images that maintain the highest quality and realism, aligning perfectly with Tophinhanhdep.com’s focus on high-resolution, beautiful photography.
Intelligent Expansion: Content-Aware Scale and Fill
Beyond the cutting-edge Generative Expand, Photoshop offers other “intelligent” tools that use context to fill or stretch image areas: Content-Aware Scale and Content-Aware Fill. These tools, though not always leveraging generative AI in the same way, are incredibly powerful for specific expansion scenarios, especially when dealing with existing image content rather than purely generating new elements. They are mainstays in digital photography and photo manipulation workflows, frequently detailed in expert tutorials on Tophinhanhdep.com for their practical applications in visual design.
Sometimes, a photo’s framing isn’t quite right, and you need to adjust the background without distorting your main subject. Or perhaps you need to fill a simple, consistent area with matching content. This is where Content-Aware Scale and Content-Aware Fill shine, offering robust solutions for common compositional challenges faced by photographers and graphic designers alike. These techniques are essential for optimizing images for various purposes, from stunning wallpapers to cohesive mood boards, and are fundamental to understanding versatile editing styles.
Extending Backgrounds with Content-Aware Scale
Content-Aware Scale is a sophisticated tool designed to intelligently resize or stretch parts of your image while attempting to preserve important visual content, such as people or prominent objects. It analyzes the image to identify areas that are “less important” (e.g., plain backgrounds) and stretches those more aggressively, minimizing distortion in the more critical areas. This technique is especially useful for situations where a subject might be perfectly posed, but the background needs to be wider or taller, a common scenario for stock photos and digital photography.
Here’s how to effectively use Content-Aware Scale to stretch your images:
- Open Your Image and Prepare the Canvas: Load your photo into Photoshop. Use the Crop Tool (
C) to slightly extend your canvas beyond the original image borders in the direction you want to expand. This creates an empty space that you will fill. It’s often helpful to clear the crop ratio (Clearbutton in the options bar) to allow for free adjustment or enter precise dimensions if known. - Activate Content-Aware Scale: Go to
Edit > Content-Aware Scale. You’ll see a bounding box with handles appear around your image, similar to Free Transform. - Perform Initial Stretch and Monitor Subject: Click and drag one of the side or corner handles to stretch the image into the empty canvas area. As you drag, pay very close attention to your main subject. The goal is to stretch the background without distorting the subject.
- Accept Before Distortion: The moment you notice your subject beginning to widen or distort, stop dragging. Hit
Enterto confirm the scale up to that point. It’s crucial not to push it too far in a single go. - Repeat Incrementally (If Necessary): If you need to stretch further, repeat the process: reactivate Content-Aware Scale (
Edit > Content-Aware Scale), drag, monitor, and accept before distortion. This incremental approach is often more effective and yields smoother results than trying to achieve the full stretch in one attempt. This method is particularly beneficial for large backgrounds in nature photography or expansive abstract compositions. - Selective Stretching for Specific Areas: If one side of your image stretches more readily than another, or if you only need to extend a specific part of the background, you can use the Marquee Tool (
M) to select just the background portion you want to expand, without including your main subject. Then, apply Content-Aware Scale (Edit > Content-Aware Scale) to only that selected area. This provides a more controlled stretch. - Protecting Key Elements (Advanced Tip): For even greater control, you can create a selection of your subject (or any elements you want to protect) and save it as an Alpha Channel (
Select > Save Selection). Then, when using Content-Aware Scale, select that Alpha Channel from the “Protect” dropdown in the options bar. This tells Photoshop to prioritize preserving the pixels within that selection, a technique that significantly enhances photo manipulation precision. - Refine Artifacts: After applying Content-Aware Scale, occasionally you might find minor artifacts or odd distortions in the newly stretched areas. Use Photoshop’s Clone Stamp Tool (
S), Spot Healing Brush Tool (J), or Patch Tool (J) to subtly clean up and smooth out these imperfections, ensuring your final output is high resolution and pristine.
Content-Aware Scale is a fantastic tool for quickly adjusting compositions and extending backgrounds, especially for relatively plain and consistent areas like skies, calm water, or simple studio backdrops. Its intelligent algorithm makes it exponentially faster and often more seamless than purely manual cloning for extensive areas, making it a valuable asset for creating compelling stock photos and artistic visuals.
Canvas Expansion with Content-Aware Fill: The Quick 3-Step Method
While Content-Aware Scale is about intelligently stretching existing pixels, Content-Aware Fill is adept at creating new content to fill empty areas on your canvas. This method is incredibly useful when you’ve already expanded your canvas size and now need to populate the resulting empty space with content that blends naturally with the surrounding image. This technique is perfect for quickly generating aesthetic backgrounds or filling in gaps for visual design projects.
Here’s a straightforward 3-step process for extending a background using Content-Aware Fill, as taught in essential Photoshop training available on Tophinhanhdep.com:
- Step 1: Add Canvas
- Navigate to
Image > Canvas Size. - In the pop-up dialogue box, adjust the
Widthand/orHeightto your desired new dimensions. For instance, if you want to extend the right side of your image, you might increase the width from 75.25 inches to 80 inches. - Crucially, use the
Anchorsetting. To add space to the right, click the left-pointing arrow in the anchor grid. This “pulls” your existing image to the left, creating empty space on the right side. If you wanted space on the top, you’d select the bottom arrow, and so on. ClickOK. - You will now have an expanded canvas with an empty, typically white or transparent, area in the region you specified.
- Navigate to
- Step 2: Select the Newly Added Area
- Choose the Magic Wand Tool (
W) from the Photoshop toolbar. - Click anywhere within the newly added, empty area of your canvas. The Magic Wand Tool will automatically select all contiguous pixels of that color (or transparency), effectively selecting the entire empty region.
- Choose the Magic Wand Tool (
- Step 3: Fill the Added Area Using Content-Aware
- Go to
Edit > Fill. - In the “Fill” dialogue box that appears, locate the “Use” dropdown menu. Select “Content-Aware” from the options.
- Ensure the
Color Adaptationcheckbox is usually ticked for better blending, andOutput toNew Layeris often a good practice for non-destructive editing. - Click
OK. - Photoshop will analyze the surrounding pixels of your image and intelligently generate new content to fill the selected empty area, aiming for a seamless blend.
- Go to
This Content-Aware Fill technique works remarkably well for backgrounds with consistent patterns, textures, or relatively uniform colors, such as clear skies, calm oceans, or grassy fields. It’s a quick and efficient way to expand the visual design of an image and improve its composition, ensuring that your backgrounds are as captivating as your subjects. However, remember its limitations: if the area you’re trying to fill is complex or too close to a highly detailed subject on the edge, the results might be less perfect, requiring minor touch-ups. This is a vital technique for producing polished backgrounds and optimizing images for various aesthetic and functional uses.
Fundamental Control: Resizing Layers with Free Transform
While AI and content-aware tools offer “smart” expansion, the Free Transform tool (Cmd/Ctrl+T) remains the fundamental cornerstone of resizing, moving, and rotating layers in Photoshop. It provides direct, manual control over individual layers or selections, making it indispensable for precise photo manipulation, visual design, and general image editing. On Tophinhanhdep.com, we emphasize mastering these foundational tools as they are crucial for both beginners and advanced users, enabling everything from refining elements in digital art to ensuring perfect composition in high-resolution photography.
Free Transform might seem basic, but its versatility and constant evolution make it an essential skill. Understanding how to use it effectively, especially with nuanced control for proportional scaling and smart object integration, is key to achieving professional-grade editing styles.
Mastering the Free Transform Tool
The Free Transform tool allows you to manipulate a layer’s size, position, and orientation with intuitive direct manipulation.
- Select the Layer: In the Layers panel, click on the layer you wish to transform. This ensures that only that layer’s content will be affected.
- Activate Free Transform: Press
Cmd + T(Mac) orCtrl + T(Windows). Alternatively, go toEdit > Free Transformfrom the menu bar. A bounding box with handles will appear around the selected layer’s content. - Resize the Layer:
- Click and Drag Handles: To resize, simply click and drag any of the handles (small squares) on the corners or sides of the bounding box.
- Proportional Resizing (Modern Photoshop CC 2019+): This is a critical “gotcha” for long-time Photoshop users. In Photoshop CC 2019 and newer versions, dragging a corner handle automatically resizes proportionally. You do not need to hold the
Shiftkey. In fact, holdingShiftwill temporarily disable proportional scaling, allowing for non-proportional (squashing or stretching) resizing. This change was implemented to streamline workflow, as proportional scaling is more frequently desired. - Proportional Resizing (Older Photoshop Versions): If you’re using Photoshop CC 2018 or older, you must hold down the
Shiftkey while dragging a corner handle to maintain aspect ratio. Dragging withoutShiftwill result in non-proportional resizing. - Resize from the Center: To resize the layer from its center point (rather than from the corner you’re dragging), hold down the
Option(Mac) orAlt(Windows) key while dragging any handle. This is a handy trick to avoid having to re-center the layer after resizing, improving efficiency in your visual design process.
- Move the Layer: To move the layer, click and drag anywhere inside the bounding box (but not on a handle).
- Rotate the Layer: To rotate the layer, move your mouse cursor slightly outside any of the corner handles. The cursor will change into a curved, double-headed arrow. Click and drag to rotate the layer around its center point.
- Confirm or Cancel:
- When you are satisfied with your transformations, hit
Enter(or the checkmark icon in the options bar) to apply the changes. - If you wish to discard all transformations and revert to the layer’s original state, hit the
Escapekey (or the cancel icon in the options bar).
- When you are satisfied with your transformations, hit
Beyond these basic manipulations, the Edit > Transform menu (and by right-clicking inside the Free Transform bounding box) offers additional transformation options like Scale, Skew, Distort, Perspective, and Wrap. These advanced tools allow for highly specific pixel manipulations, such as adjusting a texture to fit a curved surface or correcting perspective in a photograph. Experimenting with these options can unlock new creative ideas for your digital art and photo manipulation projects, making them invaluable for thematic collections and custom prints.
Preserving Quality: The Indispensable Role of Smart Objects
A crucial best practice when resizing layers, particularly if you anticipate making multiple size adjustments, is to convert your layer to a Smart Object first. This is a concept strongly advocated on Tophinhanhdep.com for maintaining the highest image quality, especially for high-resolution photography and digital art.
The problem arises with standard raster layers: when you resize a raster layer down, Photoshop discards pixels to make it smaller. If you then decide to resize that same layer up again, Photoshop has to interpolate new pixels based on the reduced data, leading to a noticeable loss of quality, pixelation, and blurriness. Each subsequent down-and-up resize further degrades the image.
The Smart Object Solution: When you convert a layer into a Smart Object, Photoshop essentially embeds the original image data (or a linked reference to it) within the Smart Object layer. This means that any transformations you apply—resizing, rotating, skewing—are applied non-destructively to a “container” layer. The original pixel information remains intact and untouched within the Smart Object.
Benefits of using Smart Objects for Resizing:
- Non-Destructive Resizing: You can resize a Smart Object down, and then resize it back up to its original dimensions (or even slightly beyond, though exceeding original pixel count will still introduce interpolation, but it will always start from the original high-quality data) an infinite number of times without any cumulative loss of quality. This is vital for flexible editing styles and refining visual designs.
- Preservation of Original Data: The raw pixel data of your image is always protected, allowing for maximum flexibility and the highest possible quality for your output, especially when working on high-resolution projects for wallpapers or large format printing.
- Application of Filters: Smart Objects also allow for non-destructive application of Photoshop filters, which can be re-edited or removed at any time, further enhancing your photo manipulation capabilities.
How to Convert a Layer to a Smart Object:
- In the Layers panel, right-click (or
Ctrl + clickon Mac) on the layer you want to make into a Smart Object. - From the context menu, select
Convert to Smart Object. - You’ll see a small icon appear in the lower-right corner of the layer thumbnail in the Layers panel, indicating it’s now a Smart Object.
Once converted, you can use the Free Transform tool (Cmd/Ctrl+T) as normal. You will now be able to resize, rotate, and manipulate your layer with the confidence that its original quality is preserved, making it an indispensable technique for any serious digital artist or photographer on Tophinhanhdep.com. This ensures that whether you’re creating abstract backgrounds, polishing aesthetic photography, or producing vibrant wallpapers, your image quality remains paramount.
Conclusion: Expanding Your Creative Horizons with Tophinhanhdep.com
The ability to expertly expand images in Photoshop is a fundamental skill that significantly broadens your creative toolkit as a visual artist. From the cutting-edge power of AI Generative Expand to the intelligent functionality of Content-Aware Scale and Fill, and the precision of the Free Transform tool paired with Smart Objects, Photoshop provides a diverse suite of solutions for virtually any image expansion challenge.
On Tophinhanhdep.com, we believe that mastering these techniques is key to unlocking your full potential in digital photography, graphic design, and photo manipulation. Whether your goal is to:
- Enhance Wallpapers and Backgrounds: Create perfectly sized, immersive visuals that extend seamlessly to any display format.
- Elevate High-Resolution Photography: Adjust compositions, rectify framing issues, and prepare your captures for large-scale prints without compromising quality.
- Innovate Digital Art and Creative Ideas: Generate entirely new elements or expand existing scenes to explore imaginative visual narratives.
- Optimize Image Tools Workflow: Integrate these powerful Photoshop features into a streamlined process, complementing other image optimization and AI upscaling tools.
- Curate Image Inspiration and Thematic Collections: Develop consistent visual styles and adapt images for mood boards and trending aesthetics.
By diligently practicing these methods and understanding their specific applications, you can transform your raw images into refined, impactful visuals that resonate with your audience. Tophinhanhdep.com is your trusted resource for continuous learning, offering an extensive collection of tutorials, insights into editing styles, and a vibrant community dedicated to the art of visual design. Dive deeper into our resources to keep your skills sharp, your creativity flowing, and your images always looking their best. The journey of visual storytelling is an ever-expanding one, and with Photoshop’s remarkable expansion capabilities and the guidance from Tophinhanhdep.com, your creative horizons are truly limitless.