How to Export a Background Image Without Text in Figma: A Comprehensive Guide for Pristine Visual Assets

In the dynamic world of digital design, where every pixel contributes to the overall aesthetic and functionality of a visual, the ability to precisely control your assets is paramount. Figma stands as a cornerstone for countless designers, offering a robust, collaborative, and cloud-based platform for creating everything from intricate UI designs to stunning illustrations. However, mastering the nuances of exporting these creations, particularly removing unwanted backgrounds or text, can be a crucial skill that elevates your work from good to exceptional.
This guide delves into the essential techniques for exporting images from Figma without a background or overlying text, ensuring your visual assets are clean, versatile, and ready for any application. Whether you’re preparing elements for Tophinhanhdep.com’s vast collection of Wallpapers, enhancing your Digital Photography, or crafting new pieces of Graphic Design, understanding these export methods is invaluable.
Understanding Figma and the Need for Transparent Exports
Figma’s rise to prominence is largely due to its accessibility and powerful feature set. It’s a browser-based tool that allows for real-time collaboration, making it a favorite among design teams globally. From crafting user interfaces and interactive prototypes to designing social media graphics and illustrations, Figma streamlines the creative process. But beyond creation, the export functionality is equally vital, acting as the bridge between your design canvas and its final destination.
What is Figma?
At its core, Figma is a vector graphics editor and prototyping tool. Unlike traditional desktop-bound software, Figma operates entirely within a web browser, meaning you can access your projects and collaborate from virtually any device with an internet connection. This cloud-based nature fosters an environment of seamless teamwork, allowing multiple designers to work on the same file simultaneously, providing instant feedback, and iterating rapidly. Its intuitive interface, coupled with a rich ecosystem of plugins and community resources, makes it a powerful platform for both beginners and seasoned professionals. Figma supports a wide range of design tasks, enabling the creation of intricate shapes, complex layouts, interactive components, and much more, all of which can then be exported in various formats suitable for web, print, or app development.

Why Transparent Backgrounds Matter in Visual Design
The ability to export an image without its background is not merely a convenience; it’s a fundamental requirement for flexible and professional visual design. Imagine creating a beautiful illustration in Figma—perhaps a nature-themed icon or an abstract element for Tophinhanhdep.com—only to find that when you export it, it carries along a distracting white, black, or colored square. This “background problem” severely limits the asset’s usability.
Transparent backgrounds, typically achieved with formats like PNG or SVG, offer unparalleled versatility:
- Layering and Compositing: They allow you to seamlessly overlay an image onto any existing background, whether it’s a photograph, a website banner, or another design element, without creating unsightly borders or clashes. This is crucial for creating dynamic mood boards or complex photo manipulations on Tophinhanhdep.com.
- Branding Consistency: For logos, icons, and UI components, transparency ensures that these elements adapt gracefully to different brand colors or website themes, maintaining a consistent visual identity.
- Responsive Design: Transparent assets resize and re-flow more cleanly across various screen sizes and orientations, essential for modern web and app interfaces.
- Professional Presentation: A clean, background-free asset speaks volumes about attention to detail and professional polish, whether it’s for a client presentation or for showcasing your Digital Art in a portfolio.
- Flexibility for Image Tools: When you’re using Image Tools like AI Upscalers, Compressors, or Converters, starting with a clean, transparent asset ensures the tools operate on the core image data, preventing artifacts or unwanted edge effects. This is especially true if you plan to convert the image to WebP or optimize it for faster loading on Tophinhanhdep.com.

For instance, if you’re designing aesthetic backgrounds or wallpapers for Tophinhanhdep.com, you might want to overlay a unique abstract shape or a delicate floral motif onto a high-resolution photograph. A transparent export of your shape or motif is the only way to achieve this seamless blend, allowing the underlying background to shine through.
The Core Figma Tutorial: Exporting Without Background
When the goal is to export a design component from Figma without its surrounding background, the process is surprisingly straightforward. The key lies in understanding how Figma treats “fills” and its export settings. This section outlines the primary method to achieve transparent exports, along with essential troubleshooting steps.
Step-by-Step Guide for Clean Exports
This tutorial focuses on components, frames, groups, or even individual layers that might have a background fill applied directly within Figma.
- Open Your Design File: Navigate to the specific design file or draft in your Figma account that contains the component or image you wish to export.
- Select the Target Component: Click directly on the element you intend to export. This could be an artboard, a frame, a group of elements, or even a single illustration. The crucial part here is to select only the content you want to keep, excluding any surrounding background layers.
- Locate the “Fill” Section: On the right-hand sidebar (the Properties panel), scroll down until you find the “Fill” section. This section controls the background color or image fill of your selected component.
- Uncheck “Show in Exports”: Within the “Fill” section, you’ll see a small checkbox or an eye icon next to the fill layer. This option, often labeled “Show in exports,” dictates whether that specific fill is included when the component is exported. Uncheck this box. By doing so, you instruct Figma to ignore this fill layer during the export process, effectively making it transparent.
- Add Export Settings: Still in the right-hand sidebar, scroll further down to the “Export” section. Click the “+” icon to add an export setting.
- Choose Your Format: Select PNG as the export format. PNG (Portable Network Graphics) is crucial here because it supports transparency (alpha channel), unlike JPG (Joint Photographic Experts Group) which will typically fill transparent areas with white. For scalable vector graphics, SVG is also an excellent choice and inherently supports transparency.
- Set Scale (Optional but Recommended): You can choose a scale (e.g., 1x, 2x, 3x) or custom dimensions. For high-resolution photography elements or detailed digital art that might be used on Tophinhanhdep.com, exporting at 2x or higher can help maintain quality when images are scaled down or compressed later by image tools.
- Initiate Export: Click the “Export” button. Figma will generate and download your selected component with a transparent background.
This method is particularly effective for illustrations, icons, or UI elements where a solid color fill might be used as a temporary background during the design phase but is not intended to be part of the final asset.
Common Issues and Troubleshooting
Sometimes, despite following the steps, your export might still include an unwanted background or other elements. Here are common reasons and their solutions:
1. Accidentally Locked Layers
- Problem: You might have inadvertently locked a layer or element that contains the background color. Locked layers are protected from accidental modifications but can still be included in exports if their visibility is active.
- Solution: Go through your layers panel (left sidebar) and check for any locked icons (a padlock symbol) on layers that could be acting as a background. Unlock them, or simply hide their visibility if they are not needed. Then, re-attempt the export process.
2. Inefficient Grouping or Layering
- Problem: If your design is not logically grouped, or if the background is a separate layer outside the component you’re trying to export, unchecking the “Fill” property of the component itself won’t affect that external background. This is a common pitfall, especially with complex visual designs or photo manipulations.
- Solution:
- Group Your Desired Elements: Select all the individual elements (shapes, text, images, vectors) that you do want to be part of your final transparent asset. Use
Ctrl + G(Windows) orCommand + G(Mac) to group them. This creates a single, manageable component. - Isolate the Group: Ensure this newly created group is independent of any background layers. If the background is a separate layer underneath your group, simply hide or delete that background layer before selecting your group for export.
- Use the “Fill” Method on the Group: Now, select your newly formed group. Check its “Fill” property on the right-hand sidebar. If it has a solid fill, uncheck “Show in exports” for that fill. Then proceed with the export.
- Group Your Desired Elements: Select all the individual elements (shapes, text, images, vectors) that you do want to be part of your final transparent asset. Use
3. Background as a Separate Frame/Artboard
- Problem: Sometimes, the “background” isn’t a fill of your component but an entirely separate frame or artboard that your component sits within. Exporting the component might still capture a portion of this outer frame.
- Solution: If your design lives within a larger frame that has a background, you might need to:
- Select only the inner component/group you want.
- Ensure no fill is applied to the selected component.
- Alternatively, consider creating a new, separate frame for the element you wish to export with transparency, ensuring this new frame has no fill.
By diligently checking these points, you can resolve most issues related to unwanted backgrounds appearing in your Figma exports, ensuring your images are ready for integration into any project, be it a new collection on Tophinhanhdep.com or a client presentation.
Advanced Export Techniques and Considerations
While the basic transparent export is vital, Figma offers a suite of advanced features and best practices to further refine your exports. These techniques are especially useful when working with high-resolution photography, intricate digital art, or preparing assets for various platforms, including Tophinhanhdep.com.
Exporting Specific Elements and Grouped Layers
Figma’s flexibility shines when you need to export not just whole artboards, but specific, isolated elements or even multiple layers merged into a single image.
- Individual Layer Export: If you have a single shape, vector, or image within a larger frame, simply select that individual layer. Then, go to the “Export” section in the right sidebar, click “+”, choose your format (PNG for transparency), and export. Figma will export just that selected layer. This addresses issues like Trey’s question in the Figma forum about exporting a specific triangle within a frame; the principle is the same.
- Grouping for Combined Exports: One common scenario is wanting to export several individual layers as a single, unified image. For example, a character illustration composed of multiple body parts, or a complex icon with shadows and gradients.
- Select Desired Layers: Hold
Shiftand click on all the layers you wish to combine. - Group Them: Right-click and choose “Group Selection” or use the shortcut
Ctrl + G(Windows) /Command + G(Mac). - Export the Group: With the new group selected, navigate to the “Export” section, add a setting (
+), choose PNG, and export. This will merge all the grouped layers into one PNG file, respecting any transparency within the individual layers. This is an excellent way to prepare complex aesthetic elements or abstract designs for Tophinhanhdep.com’s collections.
- Select Desired Layers: Hold
- Copy as PNG: For quick sharing or temporary use, Figma offers a “Copy as PNG” option. Select an element, right-click, and choose “Copy as PNG” (or use
Ctrl + Shift + C/Command + Shift + C). This places a 1x PNG version of your selection directly onto your clipboard, ready to be pasted into another application. While convenient, it offers less control over quality and scale compared to the full export panel.
Optimizing Image Quality and File Formats for Tophinhanhdep.com
Choosing the right file format and quality settings is critical for both visual fidelity and performance, especially when managing extensive image libraries like those on Tophinhanhdep.com.
-
PNG (Portable Network Graphics):
- Strengths: Lossless compression, excellent for images with sharp edges, lines, and transparency. Ideal for icons, logos, illustrations, and any graphic requiring a transparent background. Supports 32-bit color with an alpha channel for opacity control.
- Application for Tophinhanhdep.com: Perfect for Aesthetic, Nature, Abstract, or Sad/Emotional elements that need to be overlaid or have transparent areas. Also great for digital art and graphic design components.
- Quality Adjustment: In Figma’s export settings, selecting “2x” or “3x” scale for PNG exports significantly increases resolution. While this creates a larger file, it can prevent quality degradation (blurry edges, pixelation) when the image is displayed on high-DPI screens or when a platform (like a social media site or Tophinhanhdep.com’s CDN) applies its own compression. A higher-resolution source image can better withstand subsequent compressions.
-
JPG (Joint Photographic Experts Group):
- Strengths: Lossy compression, resulting in smaller file sizes. Best for photographic images with smooth color gradients and complex textures, where a slight loss of detail is acceptable for file size reduction. Does not support transparency.
- Application for Tophinhanhdep.com: Ideal for High-Resolution Photography, wallpapers, and backgrounds where file size is a concern and transparency isn’t needed. Use for Beautiful Photography or any large image where you want to balance quality with loading speed.
- Quality Adjustment: Figma allows you to export JPGs. While there isn’t an explicit “quality slider,” the scale factor still impacts the final pixel dimensions and thus perceived quality.
-
SVG (Scalable Vector Graphics):
- Strengths: Vector-based, meaning they are infinitely scalable without losing quality. Extremely small file sizes for simple graphics. Supports transparency. Excellent for logos, icons, and illustrations.
- Application for Tophinhanhdep.com: Essential for Digital Art, Graphic Design elements, and any Abstract or Visual Design components that need to look sharp at any size. Ideal for web use where responsiveness is key.
-
PDF (Portable Document Format):
- Strengths: Primarily for documents, presentations, and print-ready files. Can contain both raster and vector graphics.
- Application for Tophinhanhdep.com: While not typically used for individual image assets on a wallpaper site, it’s relevant if you’re creating thematic collections or e-books with image inspiration to share. Figma can export multiple frames into a single PDF, though you might need external tools to reorder pages if Figma’s default sequence isn’t correct.
Navigating Dev Mode Export Challenges
Figma’s Dev Mode is designed to streamline the handover from design to development, allowing developers to inspect designs, copy code snippets, and download assets. However, as noted in the Figma community forum, exporting specific background images without overlaying text or interactive elements in Dev Mode can be tricky.
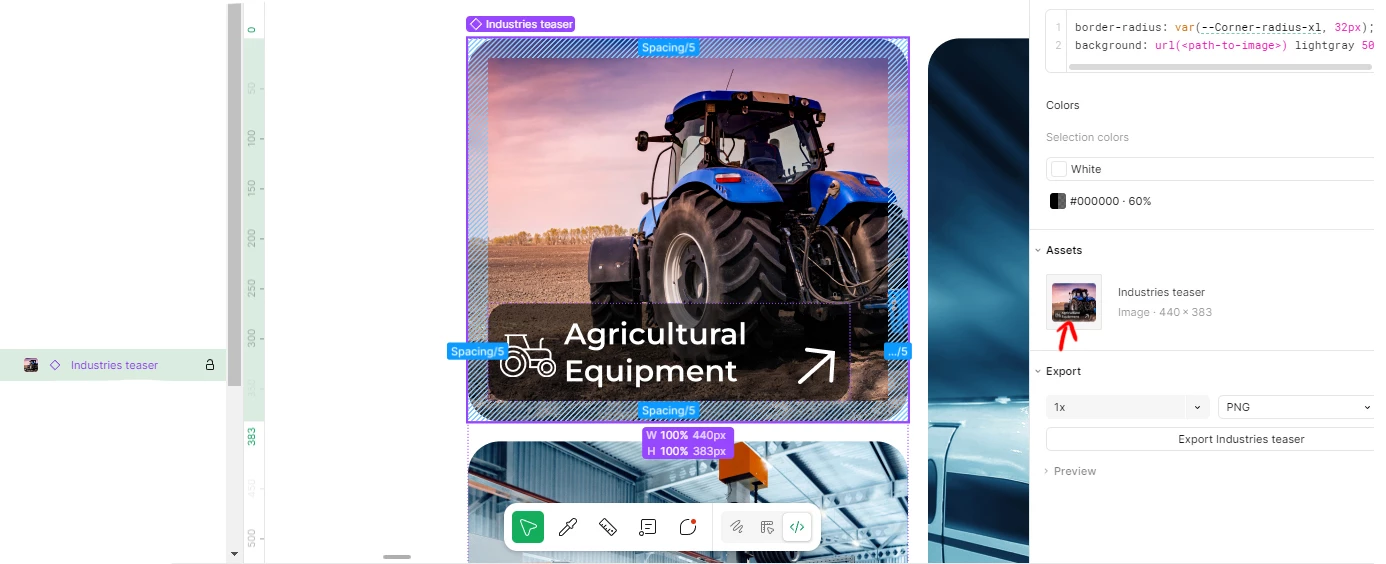
- The Dev Mode Limitation: Currently, Dev Mode tends to export the entire selected frame, including all visible layers within it. If you have an image as the
Fillof an Auto Layout frame, and that frame also contains text and buttons, Dev Mode will likely export the entire composite, even if you only want the background image. - Workarounds for Developers/Designers:
- Dedicated Asset Sections: The most effective solution is for designers to create a separate “Assets” page or section within the Figma file. Here, all images intended for export (including the background images isolated from their text/button overlays) are placed as individual components, pre-set with appropriate export settings (e.g., PNG for transparency, JPG for photography). Developers can then easily navigate to this section and download all necessary assets in one go, without sifting through UI frames.
- Duplicate and Isolate: If a dedicated assets section isn’t feasible, designers can temporarily duplicate the frame containing the desired background image, then hide or delete all text, buttons, and other overlays in the duplicated frame. The clean background image can then be exported from this isolated frame. This is a quick fix but can clutter the file if not managed well.
- Image Resize Plugins: While the original query noted issues with “Crunch Image optimization,” exploring other Figma community plugins for image resizing can be beneficial. These plugins often allow you to export specific fills or layers at custom dimensions, providing a granular level of control that Dev Mode might lack for complex components. This could be particularly useful for optimizing images for Tophinhanhdep.com where various resolutions are needed for wallpapers and backgrounds.
By adopting these advanced strategies, designers can ensure that their exported assets are not only free of unwanted backgrounds and text but are also optimized for quality, file size, and the specific needs of their projects, from web development to populating Tophinhanhdep.com’s rich content library.
Integrating Figma Exports into Your Creative Workflow
The journey of an image from a Figma canvas to its final destination, whether it’s a website like Tophinhanhdep.com, a mobile app, or a printed piece, involves more than just hitting an “export” button. It’s about a seamless workflow that ensures efficiency, consistency, and high-quality results. Understanding how clean, transparent Figma exports fit into this larger picture can significantly enhance your creative output.
Enhancing Tophinhanhdep.com’s Image Collections with Figma Assets
For a platform dedicated to diverse visual content such as Tophinhanhdep.com, the quality and versatility of its image assets are paramount. Figma, with its precise export capabilities, becomes an indispensable tool for contributing to or managing such a collection.
- Curating Wallpapers and Backgrounds: Designers can leverage Figma to create unique, custom wallpapers and backgrounds. By exporting elements without backgrounds, these can be seamlessly integrated into existing photographic backdrops or layered to create dynamic aesthetic compositions. Imagine designing a minimalist abstract pattern with transparency in Figma, which can then be exported and placed over a breathtaking nature scene to create a new wallpaper variation for Tophinhanhdep.com.
- Building Thematic Collections: Whether it’s a collection of “Sad/Emotional” imagery or “Beautiful Photography,” Figma facilitates the creation of accompanying graphic elements, overlays, or watermarks. Exporting these without a background ensures they can be applied cleanly across various images within a theme, maintaining visual cohesion.
- Creating Aesthetic Overlays: Many contemporary aesthetic images involve subtle textures, gradients, or typography overlays. Figma allows for the design of these elements, and exporting them transparently means they can be added to any base image on Tophinhanhdep.com without obscuring its content, enhancing its visual appeal.
- Leveraging Image Tools: Once exported cleanly from Figma, these assets are primed for further processing using Image Tools. A transparent PNG, for instance, can be fed into an AI Upscaler to increase its resolution for high-quality display on Tophinhanhdep.com without pixelation, or passed through an Image Compressor to optimize its file size for faster loading times without compromising its transparent properties.
Leveraging Figma for Photography and Digital Art
Beyond UI design, Figma’s capabilities extend beautifully into the realms of digital art and photography editing, especially when paired with intelligent export practices.
- Photo Manipulation and Compositing: For those working with High-Resolution Photography, Figma can act as a powerful environment for photo manipulation. You can import stock photos, then use Figma to create new elements—like custom frames, decorative borders, or artistic text—and export them transparently. This allows you to combine multiple visual assets into stunning composites without the hassle of background removal in external software. The flexibility of transparent exports means these photographic compositions can then be used as website backgrounds, digital art pieces, or even inspiration for new thematic collections.
- Digital Art Creation: Digital artists often work with layers, blending modes, and intricate details. Figma’s vector tools are excellent for creating scalable digital art. When exporting, isolating specific components (e.g., a character from its drawn background) as transparent PNGs or SVGs provides immense flexibility. These separated elements can then be reused in different art pieces, integrated into animations, or presented on various backdrops, showcasing the artist’s versatility. This ensures that a piece of digital art can adapt to various display contexts, from a portfolio piece to a component in a larger interactive experience.
- Graphic Design and Creative Ideas: The core of visual design lies in creativity and effective communication. By mastering transparent exports, graphic designers can rapidly prototype ideas, create marketing assets, or design elements for mood boards. Whether it’s an abstract shape, a custom icon, or a unique text treatment, exporting it without a background makes it a universal asset ready for any design context. This significantly speeds up the design process and encourages experimentation with new creative ideas, which can then be curated into inspiration collections.
In conclusion, knowing how to efficiently export images from Figma without a background or unwanted text is more than just a technical skill; it’s a gateway to unlocking greater creative freedom and enhancing the versatility of your visual assets. This mastery ensures that your designs are not only visually appealing but also technically sound and ready for seamless integration into any project, whether for personal use, professional deployment, or enriching the extensive image libraries on platforms like Tophinhanhdep.com. Embrace these techniques, and watch your design workflow transform into a more powerful and productive journey.