How to Seamlessly Extend Images in Photoshop for Enhanced Visuals

In the vast and evolving world of digital photography and visual design, the ability to manipulate and perfect images is an indispensable skill. Even the most carefully composed photographs can sometimes benefit from a subtle or significant adjustment in their framing. You might capture a breathtaking moment where your subject is perfect, but later realize the background is just a tad too tight, or the aspect ratio doesn’t quite fit your vision for a new graphic design project. This common scenario leads many photographers and visual artists to a powerful solution: extending the image background in Photoshop.
Extending an image background is more than just a quick fix; it’s a creative technique that offers immense flexibility, allowing you to refine compositions, create space for text, adapt images for various platforms, or simply enhance the overall aesthetic appeal. Whether you’re aiming for a stunning new desktop wallpaper, a serene nature background, an abstract art piece, or preparing high-resolution stock photos for client use, mastering this technique can elevate your work significantly. Tophinhanhdep.com is dedicated to providing comprehensive resources for digital photography, visual design, and image manipulation, and extending images in Photoshop is a cornerstone of achieving truly captivating visuals. This guide will walk you through several effective methods, offering detailed steps, practical tips, and insights into how this skill integrates with broader visual design principles.

The Art of Image Extension: Why and When to Lengthen Your Canvas
The need to extend an image background arises from a multitude of creative and practical considerations. It’s a technique that allows digital artists and photographers to transcend the limitations of the original capture, opening up new possibilities for visual storytelling and compositional excellence.
Enhancing Composition and Aesthetic Appeal
One of the primary reasons to extend an image is to rectify or enhance its composition. Perhaps you’ve captured a stunning portrait, but your subject feels too cramped within the frame, or a beautiful landscape shot lacks the expansive feel you envisioned. By extending the background, you can:

- Achieve Balanced Framing: Move your subject closer to the “Rule of Thirds” guidelines, creating a more dynamic and pleasing visual balance. This is crucial for aesthetic photography and backgrounds where the subject needs prominence without being overwhelming.
- Create Negative Space: Introduce more breathing room around your subject, drawing the viewer’s eye and allowing the main elements to stand out against a minimalist backdrop. This is particularly useful for abstract or emotional images where mood and atmosphere are key.
- Adapt Aspect Ratios: Easily convert a landscape-oriented photo into a panoramic wallpaper, or adjust a portrait for a square social media post without cropping essential elements. This adaptability makes your images versatile for various image collections and trending styles.
- Improve Overall Harmony: A well-extended background can unify disparate elements within an image, making it appear more cohesive and intentionally composed. This attention to detail elevates casual snapshots into beautiful photography.
Practical Applications Across Digital Photography & Design
Beyond aesthetic refinement, image extension serves numerous practical purposes across the spectrum of digital photography and visual design:
- For Photographers: It’s a lifesaver for salvaging shots where the framing was slightly off during a fast-paced shoot. It also helps in preparing high-resolution images for large prints or detailed stock photos that require specific dimensions. This aligns perfectly with Tophinhanhdep.com’s focus on high-resolution photography and professional editing styles.
- For Graphic Designers: Extending backgrounds provides the necessary canvas space to incorporate text, logos, or other graphic elements for posters, banners, website headers, or advertisements. It’s a fundamental aspect of photo manipulation, ensuring that images fit seamlessly into any visual design layout.
- For Digital Artists: When creating digital art or complex photo manipulations, extending the base image allows for the seamless integration of additional elements, expanding the creative possibilities for digital painting and mixed media projects. This fosters creative ideas and supports the development of unique thematic collections.
- Versatility for Various Visual Content: From creating custom wallpapers and backgrounds that perfectly fit any screen, to adapting existing images for new mood boards or thematic collections, image extension is a tool for boundless creativity. It ensures your images are ready for any visual context, enhancing their value and impact.
Masterful Techniques for Extending Backgrounds in Photoshop
Photoshop offers several powerful and intelligent tools for extending image backgrounds, each with its strengths depending on the complexity of your image and the desired outcome. Tophinhanhdep.com recommends mastering these core methods to achieve professional-grade results.
Method 1: The Three-Step Content-Aware Approach (Canvas Size + Selection + Content-Aware Fill)
This method is highly effective for images with relatively consistent or simple backgrounds, such as a plain wall, a clear sky, or a smooth gradient. It’s praised for its simplicity and speed, making it an excellent technique for quickly adapting images for wallpapers or aesthetic backgrounds.
Step 1: Expand Your Canvas
The first step is to create the “blank canvas” area where your new background will be extended.
- Open Your Image: Launch Photoshop and open the image you wish to extend (
File > Open). - Unlock the Layer: If your image layer is locked (indicated by a lock icon in the Layers panel), click on the lock icon to unlock it. This allows for modifications.
- Access Canvas Size: Go to
Image > Canvas Size.... - Adjust Dimensions: A dialogue box will appear.
- Units: Set your preferred units (e.g., pixels, inches, percent).
- Width/Height: Increase the
WidthorHeightvalue to add space. For example, to extend to the right, increase theWidth. - Anchor: The
Anchordiagram (a grid of nine squares) determines where the existing image will be positioned on the new canvas. If you want to extend to the right, click the middle-left arrow. This “anchors” the image to the left, adding space on the right. Conversely, clicking the middle-right arrow extends to the left. - Click OK: Once set, click
OK. You will now see transparent areas (represented by a checkerboard pattern) where the canvas has been extended.
Step 2: Select the Newly Added Area
Now, you need to tell Photoshop where to fill in the background.
- Choose the Magic Wand Tool: Select the
Magic Wand Toolfrom the Photoshop toolbar (it looks like a magic wand). EnsureContiguousis unchecked in the options bar if you want to select non-adjacent transparent areas easily, though for a simple extension, it often doesn’t matter. - Click the Transparent Area: Click on the newly added transparent area. Photoshop will select all contiguous transparent pixels. If you extended on multiple sides, you may need to hold
Shiftand click each transparent section to add them to your selection.
Step 3: Intelligent Filling with Content-Aware
This is where Photoshop’s intelligence comes into play, analyzing surrounding pixels to create a seamless extension.
- Access Fill Dialogue: Go to
Edit > Fill.... - Set “Use” to Content-Aware: In the “Fill” dialogue box, locate the
Contentsdropdown menu and chooseContent-Aware. - Click OK: Keep other settings as default and click
OK. Photoshop will analyze the existing background around the selected transparent area and intelligently fill it with generated content. - Deselect: Press
Ctrl+D(Windows) orCmd+D(Mac) to deselect the area.
Considerations for Content-Aware Fill: This technique works wonderfully when you want to extend parts of your image that have a consistent pattern or background. However, if your subject is too close to the edge you’re extending, or the background is highly complex and inconsistent, Content-Aware Fill might struggle to produce a perfect result, sometimes leading to subtle artifacts or repetition. For such cases, the next method is often more robust.
Method 2: Dynamic Extension with Content-Aware Scale and Subject Protection
For more complex backgrounds or when precise control over how elements are stretched is needed, Content-Aware Scale is an invaluable tool. A key advantage here is the ability to protect your main subject from distortion, a critical feature for high-resolution photography and professional photo manipulation.
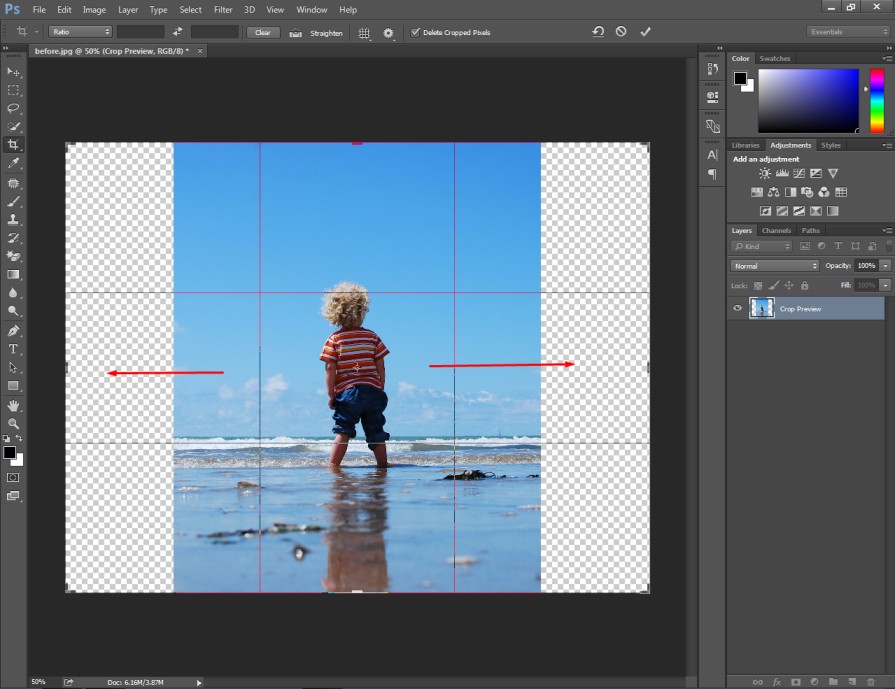
Step 1: Adjust Canvas or Crop Tool for New Dimensions
You can either use Image > Canvas Size as in Method 1, or for a more visually intuitive approach:
- Select the Crop Tool: Choose the
Crop Tool (C)from the toolbar. - Expand Boundaries: Drag the handles of the crop box outwards to expand the canvas in the desired direction(s). The newly added areas will be transparent.
- Commit Crop: Press
Enter(or click the checkmark in the options bar) to apply the new canvas size.
Step 2: Protecting Your Subject (Alpha Channel)
This crucial step ensures your main subject (person, object, etc.) doesn’t get stretched or distorted when you scale the background.
- Select Your Subject: Use any precise selection tool (e.g.,
Lasso Tool (L),Quick Selection Tool (W),Object Selection Tool,Pen Tool) to make a careful selection of your main subject. A rough selection is usually sufficient as Content-Aware Scale is quite intelligent, but more precision yields better protection. - Create a New Alpha Channel:
- Go to the
Channelspanel (usually grouped with Layers and Paths). - With your selection active, click the
Save selection as channelicon (a square with a circle inside) at the bottom of the panel. This will create a new channel, typically named “Alpha 1.” - Deselect: Press
Ctrl+D(Windows) orCmd+D(Mac) to deselect your subject on the image canvas. Leave “Alpha 1” active (its eye icon should be visible) but ensure your RGB channel (the composite channel at the top) is also visible for editing.
- Go to the
Step 3: Applying Content-Aware Scale Incrementally
Now, you’re ready to perform the intelligent scaling.
- Access Content-Aware Scale: Go to
Edit > Content-Aware Scale. - Select Protection: In the options bar at the top, next to the
Protectdropdown, select “Alpha 1” (or whatever you named your subject’s channel). This tells Photoshop to prioritize protecting the pixels within that channel. - Stretch Incrementally:
- Carefully drag the transform handles outwards to stretch the image.
- Crucial Tip: Stretch incrementally. Instead of stretching all the way in one go, stretch a small amount, focusing on the newly added transparent areas. Watch your subject closely.
- Accept and Repeat: As soon as you see your subject begin to distort, stop, press
Enterto commit the scale, and then repeatEdit > Content-Aware Scale. Continue this process until the background is extended to your desired dimensions. This incremental approach prevents severe warping and gives Photoshop more opportunities to analyze and blend naturally.
- Refining Artifacts: If, despite incremental scaling, you notice minor imperfections or artifacts in the newly generated background, you can use Photoshop’s healing and cloning tools (
Clone Stamp Tool (S),Healing Brush Tool (J),Patch Tool (J)) to seamlessly blend these areas. This ensures a flawless finish for high-resolution backgrounds and professional output.
This dynamic method is fantastic for images where preserving the subject’s integrity is paramount while expanding the scenic context, making it a go-to for complex compositions and beautiful photography.
Method 3: Stretch It Out with Marquee and Free Transform (for Simpler Backgrounds)
This method, while simpler than Content-Aware Scale, is best suited for backgrounds that are very clean, uniform, or have easily repeatable patterns. It gives direct control over stretching a specific section.
Step 1: Duplicate Layer & Select Edge
- Duplicate Your Layer: Press
Ctrl+J(Windows) orCmd+J(Mac) to duplicate your main image layer. This allows non-destructive editing and easy comparison with the original. - Select a Background Edge: Grab the
Rectangular Marquee Tool (M). Draw a selection around a portion of the background right next to the edge you want to extend. Try to select a clean section without your subject or important details.
Step 2: Stretch with Free Transform
- Activate Move Tool: Select the
Move Tool (V). - Stretch the Selection: With the marquee selection active, drag one of the middle transform control points (the squares on the bounding box) outwards to stretch that portion of the background. Hold down
Shiftwhile dragging to constrain the movement horizontally or vertically, ensuring a clean stretch. - Commit Transform: Press
Enterto commit the transformation.
Step 3: Refine with Patch Tool & Masking
If stretching introduced any distortions or visible seams, these steps help clean them up.
- Patch Tool for Textures: If you stretched over a part of your subject (e.g., hair as in the example from Tophinhanhdep.com’s tutorials), use the
Patch Tool (J). Select the problematic area and drag it to a clean, desirable part of the background to sample and replace the texture. - Add a Layer Mask for Blending: In the Layers panel, click the
Add layer maskbutton (a rectangle with a circle inside). - Blend with Brush Tool: Select the
Brush Tool (B). Set your foreground color to black. With a soft-edged brush (adjustHardnessto around 0-50%), paint over any areas on the mask where you want to reveal the original, unedited layer beneath (the duplicate layer you created in Step 1). This is great for fixing stretched edges around subjects or blending seams.
Step 4: Adding Blur for Realism
For backgrounds that might appear too sharp or textured after stretching, adding a subtle blur can enhance realism.
- Isolate the Stretched Area (on mask): You can further refine your layer mask to only affect the stretched background area, if needed. Paint black on the mask over every part except the extended background.
- Apply Gaussian Blur: Click on the layer thumbnail (not the mask thumbnail) of your duplicated, stretched layer. Go to
Filter > Blur > Gaussian Blur.... Adjust theRadiusto achieve a natural blur that matches the original background’s depth of field.
This method is most effective for extending simple, single-color backdrops or areas with very minimal detail. It requires more manual refinement but provides precise control over specific background elements.
Advanced Strategies and Creative Enhancements
Beyond the core techniques, several advanced strategies and creative considerations can elevate your image extension game, aligning perfectly with Tophinhanhdep.com’s vision for sophisticated photo manipulation and digital art.
Leveraging Incremental Stretching for Flawless Results
The principle of “less is more” applies strongly to image extension. When using Content-Aware Scale, stretching in small, iterative steps (e.g., extending 10-20% of the desired distance, committing, and repeating) allows Photoshop’s algorithms to analyze and generate new pixels more accurately. This technique significantly reduces the likelihood of visible seams, distortion, or artificial-looking textures, ensuring that your extended backgrounds appear naturally expansive, whether for aesthetic wallpapers or high-resolution stock photos.
Blending & Refinement Tools for Perfection
Even with Photoshop’s intelligent tools, a human touch is often needed for perfection. Tophinhanhdep.com encourages utilizing the full suite of retouching tools for seamless integration:
- Clone Stamp Tool (S): Excellent for copying pixels from one area to another to fill gaps or eliminate artifacts, especially useful for repeating patterns or textures.
- Healing Brush Tool (J) & Spot Healing Brush Tool (J): These tools intelligently blend sampled pixels with the destination area, ideal for removing small blemishes or minor inconsistencies in the extended background.
- Patch Tool (J): As seen in Method 3, this tool is superb for replacing larger, problematic areas with cleaner textures from elsewhere in the image.
- Gradient Fills & Solid Color Layers: For very uniform backgrounds (like studio backdrops or plain skies), a new layer with a solid color or gradient can be created and blended with the original, providing a perfectly smooth extension.
- Applying Depth of Field: If your original background has a shallow depth of field, ensure that any extended areas also receive appropriate blurring (e.g., using
Gaussian BlurorLens Blur) to maintain realism. This is vital for maintaining the authenticity of beautiful photography.
The Role of Image Extension in Visual Design Principles
Mastering image extension isn’t just about technical proficiency; it’s about applying it with a keen eye for visual design:
- Rule of Thirds & Golden Ratio: Extending space allows you to reposition subjects more effectively according to these classic compositional guidelines, creating more dynamic and engaging visuals.
- Negative Space & Balance: By strategically adding background, you can consciously increase negative space, drawing focus to your subject and improving the overall balance of elements within the frame. This is crucial for graphic design layouts where text or logos need to coexist with an image.
- Storytelling & Mood: More expansive backgrounds can change the narrative or emotional impact of an image. A wider view can convey solitude, grandeur, or calm, contributing to thematic collections like “Nature” or “Sad/Emotional” images.
- Adaptability for Platforms: Whether you’re preparing images for a website, social media, print, or digital displays, the ability to custom-fit an image’s dimensions ensures it looks professional and impactful on any platform, meeting the diverse needs of visual design.
Tophinhanhdep.com’s Approach to Image Editing and Visual Inspiration
At Tophinhanhdep.com, we understand that powerful image editing extends beyond individual techniques; it’s about a holistic approach to visual creation, combining cutting-edge tools with boundless inspiration. Our platform is a comprehensive resource for anyone passionate about images.
Beyond Extension: A Holistic View of Image Enhancement
Image extension in Photoshop is just one powerful tool in a vast ecosystem of digital enhancement. Tophinhanhdep.com connects this skill to a broader array of image tools and photography principles:
- Complementing Image Tools: An extended background might then be perfectly optimized using our
CompressorsorOptimizersfor web use, or prepared for print after being enhanced byAI Upscalersto maintain high-resolution quality. If you need to transform your extended image for a specific use, ourConvertersare at your service. - Elevating Digital Photography: By mastering editing styles like background extension, photographers can transform raw captures into polished, high-resolution images suitable for stock photo libraries or fine art prints. Our
Photographysection covers everything fromDigital Photographybasics to advancedEditing Styles, ensuring every aspect of your workflow is supported. - Unleashing Visual Design Potential: Image extension is fundamental to
Graphic DesignandDigital Art. It empowers creators to perform intricatePhoto Manipulationand bringCreative Ideasto life by providing the perfect canvas for their visions. This synergy between editing and design is at the heart of Tophinhanhdep.com’s offerings.
Finding Your Perfect Background: Inspiration and Collections
Once you’ve mastered the technical aspects of extending images, Tophinhanhdep.com provides the creative fuel to inspire your next project. Our Image Inspiration & Collections are designed to spark your imagination:
- Photo Ideas & Mood Boards: An extended image can serve as the perfect foundation for a
Mood Board, allowing you to visualize themes and aesthetics with greater freedom. Our platform offers countlessPhoto Ideasto guide your creative journey. - Thematic Collections & Trending Styles: Whether you’re crafting images for
Naturethemes, seekingAbstractbeauty, or curatingSad/EmotionalorBeautiful Photographycollections, extending backgrounds allows you to tailor your visuals to perfectly fit any narrative orTrending Style. Imagine creating customWallpapersorBackgroundsthat are truly unique and perfectly composed, leveraging the extended space to full effect.
Conclusion
The ability to extend an image background in Photoshop is a remarkably versatile and powerful skill that significantly broadens your creative horizons. From rescuing a perfectly captured moment with imperfect framing to creating expansive canvases for complex graphic designs, the methods explored in this guide — whether through the directness of Content-Aware Fill, the intelligent protection of Content-Aware Scale, or the focused control of Marquee and Free Transform — equip you with the tools to realize your full visual potential.
At Tophinhanhdep.com, we believe that every image holds untold possibilities. By understanding and practicing these techniques, you’re not just expanding pixels; you’re expanding creative freedom, enhancing compositional mastery, and paving the way for breathtaking Visual Design and Digital Art. We encourage you to experiment, practice, and explore how these methods can transform your Photography projects, enrich your Image Collections, and fuel countless Creative Ideas. Tophinhanhdep.com remains your dedicated partner for all things visual, providing the Image Tools, inspiration, and knowledge you need to consistently produce stunning, high-resolution visuals that captivate and inspire.