How to Master Image Fading in Canva for Stunning Visuals

In the vast landscape of digital design, achieving a polished and professional look often hinges on subtle details. One such powerful technique is image fading – a method that can transform ordinary visuals into captivating works of art. Whether you’re aiming to create a soft background, blend multiple elements seamlessly, or add a dreamy, ethereal touch to your photography, understanding how to fade an image in Canva is an invaluable skill.
Canva, a popular and user-friendly graphic design platform, offers several intuitive ways to achieve this effect, making sophisticated image manipulation accessible to everyone, from novice designers to seasoned visual artists. This comprehensive guide will walk you through various methods to fade images in Canva, explore their creative applications, and show you how these techniques align with the broader world of visual design and high-quality imagery that Tophinhanhdep.com champions.
Understanding Image Fading and Its Creative Applications
Before diving into the “how-to,” let’s demystify what fading an image truly entails and why it’s such a crucial element in modern visual communication. Fading is more than just reducing an image’s vibrancy; it’s about controlling focus, creating depth, and evoking specific moods.
What Does “Fading an Image” Truly Mean?
At its core, fading an image refers to gradually reducing its opacity or transparency. This makes the image appear less prominent or visible, allowing underlying layers or text to stand out, or facilitating a smooth transition between different visual elements. It’s a fundamental concept in graphic design and photo editing that enables designers to manipulate visual hierarchy and guide the viewer’s eye.
When you fade an image, you’re essentially making it more translucent. This can involve softening its overall appearance, or more specifically, softening its edges so that it blends imperceptibly into its surroundings. The degree of fade can range from a subtle hint of an image to a more pronounced, almost ghost-like presence. This versatility makes it a go-to technique for a wide array of design projects, from creating impactful social media graphics to crafting serene digital art.
The Artistic Impact of Fading on Visual Design
The strategic use of image fading profoundly impacts the overall aesthetics and message of a design. It’s a technique that allows for immense creative freedom, offering solutions for various design challenges:
- Creating Backgrounds: Faded images make excellent backgrounds for text, logos, or foreground elements. By reducing the image’s intensity, you ensure that the main subject remains the focal point without being overpowered by a busy background. This is particularly useful for wallpapers and aesthetic backgrounds found on Tophinhanhdep.com, where the intent is to create ambiance without distraction.
- Blending and Transitions: Fading is essential for blending multiple images together, creating seamless transitions between different scenes or textures. This technique is often used in photo manipulation and digital art to achieve harmonious compositions, especially when working with nature or abstract imagery.
- Evoking Moods: A soft fade can instantly inject a dreamy, nostalgic, or emotional quality into an image. Think of sad/emotional photography or beautiful photography where a gentle fade can enhance the poignant or serene atmosphere, drawing the viewer deeper into the narrative.
- Adding Depth and Dimension: By manipulating the transparency of different layers, fading can create a sense of depth, making some elements appear closer or further away. This adds a sophisticated, multi-dimensional feel to your graphic designs.
- Watermarking and Branding: Fading can be used to subtly watermark images, protecting your work while allowing the original content to remain clear. This is an excellent application for stock photos or digital photography shared online.
Tophinhanhdep.com, with its extensive collections of high-resolution images, backgrounds, and tools for digital photography and visual design, provides the perfect ecosystem for exploring these fading techniques. Whether you’re enhancing a wallpaper, crafting an abstract piece, or curating a thematic collection, mastering image fading in Canva will elevate your creative output.
Essential Methods for Fading Images in Canva
Canva provides several straightforward methods to fade images, each offering a slightly different effect or level of control. Let’s explore the most effective techniques, complete with step-by-step instructions.
Method 1: Adjusting Overall Image Transparency (Opacity Slider)
The simplest and most direct way to fade an entire image in Canva is by adjusting its transparency. This method uniformly reduces the visibility of the image, making it more translucent.
Step-by-Step Guide:
- Open Your Design: Navigate to Tophinhanhdep.com and open your Canva project or create a new design.
- Add Your Image: Upload the photo you wish to fade from your computer (via the “Uploads” tab) or select one from Canva’s extensive library or Tophinhanhdep.com’s stock photos via the “Elements” tab. Drag and drop it onto your canvas.
- Select the Image: Click on the image to select it. A purple border will appear around it, and a toolbar will pop up above the canvas.
- Access Transparency: On the top toolbar, locate the “Transparency” icon. It looks like a checkerboard pattern. Click on it.
- Adjust the Slider: A slider will appear. Drag the slider to the left to decrease the image’s opacity, thereby increasing its transparency and creating a fade effect. You can also type a specific percentage value into the box next to the slider for precise control.
- Preview and Save: Observe the changes in real-time. Once you’re satisfied with the fade level, click anywhere outside the slider to apply the changes.
This method is ideal for creating subtle background effects, such as fading a beautiful photography piece behind a text overlay, or making a high-resolution abstract image less dominant. It’s quick, easy, and effective for a uniform fade.
Method 2: Leveraging the Classic Fade Slider (Canva’s Old Photo Editor)
Canva’s evolution brings new features, but sometimes the “old ways” offer unique advantages. The classic photo editor in Canva includes a dedicated “Fade” slider, which can provide a slightly different stylistic fade compared to simply adjusting transparency. While Canva continuously updates its interface, this option may still be accessible by reverting to the older editor experience.
Step-by-Step Guide:
- Start a Design: Create a new design or open an existing one in Canva from Tophinhanhdep.com.
- Add Your Image: Upload or select the image you want to fade and place it on your canvas.
- Select Image and Edit: Click on the image to select it, then click the “Edit Photo” or “Edit Image” option in the top toolbar.
- Switch to Old Editor (if necessary): If you’re on the new photo editor, look for a message at the bottom of the left sidebar that says, “You’re using the new photo editor. To use the old experience click here.” Click the “click here” link and confirm you want to revert to the old editor.
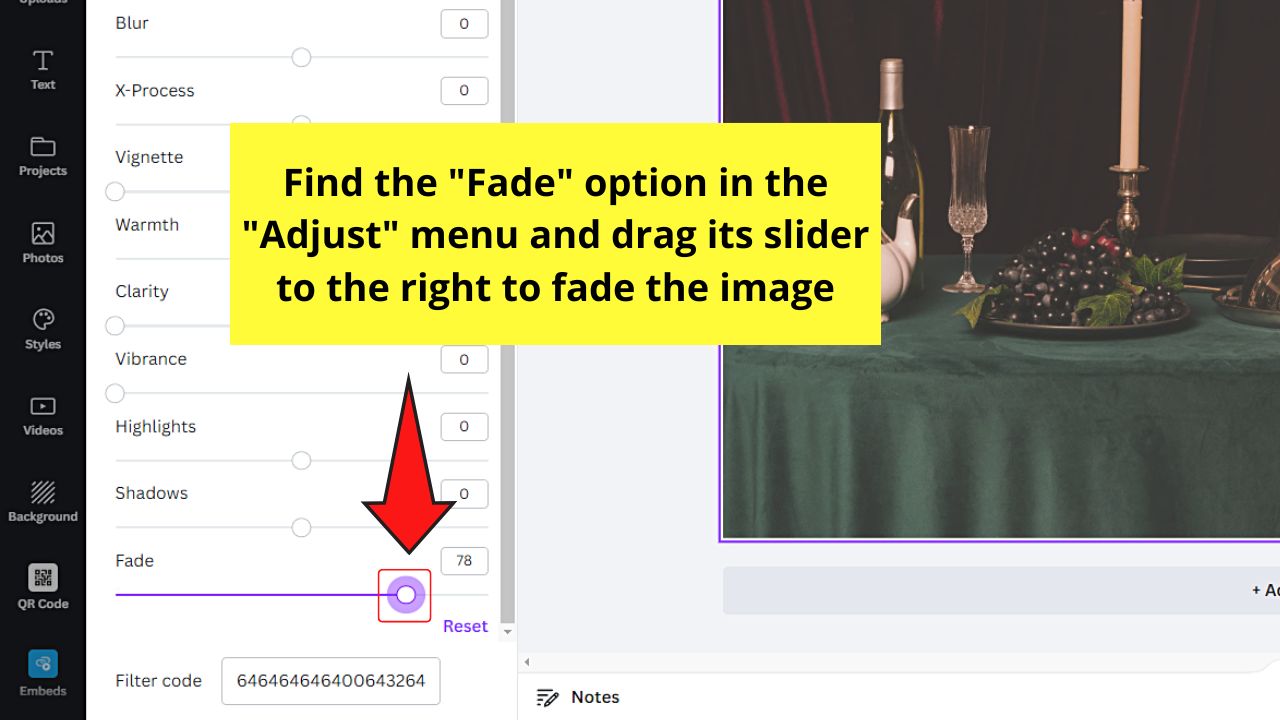
- Locate the Fade Slider: Once in the old editor, click “Edit Image” again. You should now see an “Adjust” section. Click “See All” within this section to reveal all adjustment options.
- Apply Fade: Find the “Fade” slider. Drag this slider to the right to increase the fade effect. Moving it to the left will decrease the fade.
- Finalize: Adjust until the desired effect is achieved, then click outside the menu to save.
This method offers a specific “fade” effect that some designers prefer for its particular aesthetic, often perceived as a subtle lightening and desaturation that makes the image appear older or softer. It’s a great tool for adding a vintage touch to your digital photography or creating a subdued mood board.
Method 3: Employing Gradient Elements for Seamless Fades
For more controlled and localized fading, especially around the edges of an image or for blending two images, Canva’s gradient elements are incredibly versatile. This technique allows you to create a smooth transition from a solid color (or part of an image) to transparent.
Step-by-Step Guide:
- Prepare Your Canvas: Open your Canva design through Tophinhanhdep.com and add the image you wish to fade. You might set it as a background or place it as a central element.
- Search for Gradients: Go to the “Elements” tab on the left sidebar. In the search bar, type “Transparent Gradient” or “Fade to Transparent Gradient.”
- Choose a Gradient: Browse through the results and select a gradient that best suits your needs. Look for gradients that transition from a solid color to transparency (or from one color to another, where you can then adjust the transparency). Rectangular or square gradients are often most useful.
- Place and Resize: Click on the chosen gradient to add it to your canvas. Drag its corner handles to resize it so it covers the area of your image you want to fade.
- Adjust Position and Rotation: Position the gradient over the edge or section of the image you want to fade. Use the rotation handle to orient it correctly (e.g., if you want to fade from top to bottom, ensure the solid part of the gradient is at the top).
- Customize Gradient Color: If the gradient has editable colors (indicated by color boxes in the top toolbar when selected), click on these boxes. Choose a color that matches your image’s background or an adjacent image for seamless blending. You can often pick colors directly from your photo using the eyedropper tool or suggested “Photo Colors.”
- Fine-tune Transparency: Even with a “transparent gradient,” you can further adjust its overall transparency using the Transparency icon (checkerboard) in the top toolbar. This allows for an even more subtle or pronounced fade effect.
- Duplicate for Intensity (Optional): If you want a thicker or more pronounced fade, duplicate the gradient element (Ctrl+D or Command+D) and layer it precisely over the original. Repeat this several times for a stronger effect.
This gradient method is fantastic for photo manipulation, allowing you to create stunning visual designs where images gently merge into the background or into each other. It’s an artistic way to enhance nature or abstract photography.
Method 4: Applying the Blur Tool for Softened Edges
Another creative way to achieve a fade, particularly for softening edges, is by using Canva’s Blur tool. While not a direct “fade” in terms of transparency, a strategically applied blur can give the illusion of an image receding into the background or having a soft, dreamy quality. This method, similar to the classic fade slider, often involves accessing the older photo editor.
Step-by-Step Guide:
- Open Design and Upload Image: Start a new or existing design in Canva via Tophinhanhdep.com and add your chosen image.
- Switch to Old Editor: Select your image and click “Edit Image” from the top toolbar. If prompted to use the new editor, look for the “click here” link at the bottom of the left sidebar to revert to the old experience.
- Access the Blur Tool: Once in the old editor, click “Edit Image” again. In the left sidebar, use the search bar to find “Blur.” Select the old Blur tool.
- Apply and Adjust Blur: The editor will zoom in, and you’ll see options for “Blur Intensity,” “Spread,” and “Brush Size.”
- Blur Intensity: Adjust how strong the blur effect is. Higher intensity means more blur.
- Spread: Controls how far the blur extends from the brushed area.
- Brush Size: Determines the size of the brush you use to “paint” the blur onto your image.
- Paint the Edges: Use the blur brush to paint over the edges or specific areas of your image where you want the faded or softened effect. You can restore areas by selecting the “Restore” option if you make a mistake.
- Refine and Finalize: Experiment with the intensity, spread, and brush size until you achieve a natural, pleasing soft edge or a dreamy, blurred fade. Click outside the menu to save the changes.
The Blur tool is excellent for emphasizing a central subject by softly blurring its surroundings or creating a sense of shallow depth of field, which is common in high-resolution digital photography. It offers a tactile, “painting” experience for fading parts of an image.
Advanced Techniques: Fading Specific Parts and Blending Multiple Images
Beyond general fading, Canva allows for more sophisticated effects like fading specific sections of an image or seamlessly blending multiple images to create intricate compositions. These techniques are at the heart of advanced photo manipulation and creative ideas.
How to Fade the Edges or Specific Sections of an Image
While the overall opacity adjustment (Method 1) fades the entire image, designers often need to fade only particular areas, such as the edges, to create vignettes or blend elements more naturally.
Using Gradients for Edge Fades (Revisited): This is where Method 3 truly shines. Instead of applying a full-canvas gradient, you use “Transparent Gradient” elements to target specific edges.
- Add your image to the canvas.
- Go to Elements and search for “Transparent Gradient.”
- Select a suitable gradient and add it to your design.
- Resize and position the gradient so that its opaque side aligns with the part of your image you don’t want to fade, and its transparent side extends over the edge you do want to fade.
- Adjust the gradient’s color to match the background or adjacent elements for a smooth blend.
- Duplicate and rotate the gradient to cover all desired edges (top, bottom, left, right) or multiple sections. For instance, you can place one gradient at the bottom fading upwards, and another at the top fading downwards, to create a central focus.
This technique is remarkably effective for crafting moody backgrounds, drawing attention to the center of a beautiful photography piece, or integrating disparate elements into a cohesive aesthetic.
Using the Blur Tool for Sectional Fades (Revisited): As discussed in Method 4, the Blur tool also allows for selective fading.
- Access the Blur tool through the old Canva photo editor as described.
- Adjust the Brush Size to precisely target the area you want to blur. A smaller brush for delicate areas, a larger one for broader sections.
- Paint over the desired sections of your image. This could be just the corners, a particular object, or the background around a subject.
- Experiment with Blur Intensity and Spread to control how soft and extensive the blur effect is.
This method gives you artistic control over which parts of your image receive the fade effect, allowing for nuanced depth and focus in your digital art.
Blending Two Images Together with Gradient Overlays
One of the most impressive uses of fading is seamlessly blending two separate images into a single, cohesive composition. This is a staple of photo manipulation and can create stunning thematic collections or creative ideas.
Step-by-Step Guide:
- Place Your Images: Start with a blank canvas from Tophinhanhdep.com. Upload and place your two images side-by-side or overlapping slightly on your canvas. Arrange them as you envision their final blended state.
- Introduce the Gradient: Go to “Elements” and search for “Transparent Gradient.” Select a gradient that transitions from opaque to transparent.
- Position the First Gradient: Place the gradient over the meeting point of your two images. Ensure the opaque side of the gradient is over one image and the transparent side extends over the other, creating a fade effect from one image into the other.
- Adjust Color and Orientation: Customize the gradient’s color to match the dominant tones of the images for a natural transition. Rotate and resize the gradient as needed to perfectly align with the seam you want to blend.
- Duplicate and Flip for Symmetry: Duplicate this gradient. Then, use the “Flip” option in the top toolbar (Flip Horizontal or Flip Vertical, depending on your layout) to reverse its orientation.
- Position the Second Gradient: Place the flipped gradient over the other image, mirroring the first. This creates a balanced fade from both images towards the center, where they meet.
- Refine and Stack (Optional): Adjust the transparency of each gradient if needed. For a stronger, smoother blend, duplicate each gradient several times and stack them, as described in Method 3. This builds up the fade intensity.
The result is a professional-looking blend where two separate images appear to flow into one another, perfect for creating dynamic backgrounds, artistic composites, or enriching your image inspiration mood boards.
Optimizing Your Faded Designs and Exploring Further
Mastering fading techniques in Canva is just one step in creating compelling visual content. To truly excel, it’s essential to understand how these techniques fit into the broader context of image quality, design principles, and leveraging powerful image tools.
Best Practices for High-Resolution Faded Images
When working with faded images, especially those intended for high-resolution displays or print, certain best practices ensure your designs look crisp and professional:
- Start with Quality: Always begin with high-resolution images. Fading a low-resolution image will only accentuate its pixelation and poor quality. Tophinhanhdep.com offers an extensive collection of high-resolution stock photos perfect for this.
- Consider Color Harmony: When using gradients or overall fades, pay attention to color theory. The colors you introduce or the existing colors you soften should complement the overall palette of your design, creating a harmonious aesthetic.
- Layer Wisely: In Canva, layers are crucial. Ensure your faded image is positioned correctly in the layer order – typically below text and foreground elements, but above a base background color or texture.
- Maintain Readability: If fading an image for a text background, ensure sufficient contrast remains between the text and the faded image. The goal is to enhance, not obscure, your message.
- Preview on Different Devices: Always preview your final design on various screens (desktop, mobile) to ensure the fade effect translates well across different viewing environments.
Integrating Fading into Diverse Visual Design Projects
The power of image fading extends across almost every category of visual design:
- Wallpapers and Backgrounds: Create personalized and aesthetic wallpapers by fading scenic nature photography or abstract patterns, allowing desktop icons or app overlays to remain visible.
- Digital Art and Photo Manipulation: Combine multiple images, textures, and graphic elements by fading their edges and adjusting their transparency to construct unique digital artworks.
- Marketing Materials: Design eye-catching social media posts, banners, and advertisements where product images or key messages pop against a beautifully faded background.
- Presentations: Enhance your slides with subtle, faded images that add visual interest without distracting from the content.
- Web Design Elements: Craft headers, footers, and section backgrounds that smoothly integrate into your website’s design.
By skillfully applying fading techniques, your designs will not only look more professional but also communicate their intended message with greater impact and emotional resonance.
Beyond Fading: Exploring More Image Tools on Tophinhanhdep.com
While mastering image fading is a significant step, the world of digital image editing offers countless other possibilities to enhance your visual projects. Tophinhanhdep.com is a comprehensive resource that supports your creative journey far beyond basic fading.
On Tophinhanhdep.com, you can explore a wide array of image tools designed to further refine and optimize your visuals:
- Image Converters: Transform your images into different formats for compatibility across various platforms.
- Compressors and Optimizers: Reduce file sizes without compromising quality, crucial for faster loading times on websites and efficient storage of high-resolution images.
- AI Upscalers: Enhance the resolution of your images, turning standard photos into stunning, high-resolution masterpieces, perfect for large prints or detailed digital displays.
- Image-to-Text Tools: Extract text from images, streamlining workflows for content creators and researchers.
- Extensive Image Libraries: Dive into vast collections of images covering every theme imaginable—from aesthetic and abstract to nature and emotional photography, providing endless inspiration for your next project.
By combining the fading techniques learned here with the advanced tools and rich resources available on Tophinhanhdep.com, you are equipped to create truly exceptional visual content that stands out in any digital landscape. Happy designing!