Mastering the Art of Image Fading in Photoshop: A Comprehensive Guide for Tophinhanhdep.com Users

In the dynamic world of digital imagery, subtle effects can often make the most significant impact. Among the myriad of techniques available in Adobe Photoshop, fading an image stands out as a fundamental yet incredibly versatile skill. Whether you’re a budding graphic designer, an avid photographer, or simply looking to enhance your personal collection of “Aesthetic” or “Nature” “Wallpapers,” understanding how to gracefully blend an image into its surroundings can transform a good picture into a truly captivating visual experience.
At Tophinhanhdep.com, we understand the power of stunning visuals. From “High Resolution” “Stock Photos” to breathtaking “Beautiful Photography,” our platform celebrates the artistry behind every pixel. This comprehensive guide will delve deep into various methods of fading images in Photoshop, equipping you with the “Image Tools” and “Editing Styles” needed to elevate your “Digital Art” and “Photo Manipulation” projects. We’ll explore techniques that allow you to fade images into transparent backgrounds, solid colors, or even other images, providing ample “Creative Ideas” for your next “Image Inspiration & Collections” endeavor. Prepare to unlock a new dimension of visual storytelling as we walk you through the simple, yet profound, process of fading an image.
Why Fade Images? Unlocking Creative Potential on Tophinhanhdep.com

Fading an image is more than just a stylistic choice; it’s a powerful technique that serves numerous aesthetic and functional purposes in “Visual Design” and “Photography.” On Tophinhanhdep.com, where every image strives for perfection, learning to fade can dramatically expand your creative toolkit.
Enhancing Visual Design and Photography
Imagine a striking “Abstract” image or a serene “Nature” landscape that you want to use as a background for a powerful quote. An abrupt edge might distract from the text, but a gentle fade allows for seamless integration. This is where fading shines. It creates visual breathing room, directing the viewer’s eye where you want it to go without harsh transitions. For “Graphic Design” and “Digital Art” projects, fading can establish depth, mood, and atmosphere, whether you’re crafting a tranquil “Background” or a dramatic “Mood Board.”
Furthermore, fading is an invaluable technique for “Photo Manipulation” and composite imagery. When blending multiple “High Resolution” images, a smooth fade can make the composite appear cohesive and natural, eliminating visible seams. It’s an “Editing Style” that supports storytelling, evoking “Sad/Emotional” or serene feelings by allowing elements to gradually appear or disappear. This helps in crafting “Thematic Collections” and “Trending Styles” that resonate with a wider audience. The ability to control transparency and blend edges is crucial for professional-grade results, transforming ordinary photos into extraordinary “Photo Ideas.”

Practical Applications for Various Image Types
The applications of image fading are diverse:
- Creating space for text: Often, a photograph is visually dense, leaving little room for headlines, captions, or branding. Fading one side or an edge of the image provides a soft, visually pleasing area where text can be placed without competing with the image’s details. This is particularly useful for designing “Wallpapers” or promotional “Backgrounds.”
- Seamless blends for collages and composites: If you’re combining several “Stock Photos” or elements from different “Beautiful Photography” shots, fading the edges of each image allows them to merge into a single, unified scene. This avoids jarring cut-out looks and instead creates organic, flowing compositions.
- Designing dynamic web banners and headers: Websites and social media platforms often require images with specific aspect ratios and clear areas for navigation or logos. Fading allows you to adapt your “Digital Photography” to these constraints while maintaining aesthetic appeal.
- Adding depth and focus: By fading elements in the foreground or background, you can draw attention to your main subject, giving your image a more professional and polished appearance. This helps in conveying narratives within your “Image Collections.”
As you can see, fading is not just a trick; it’s a fundamental skill that every Tophinhanhdep.com user should master to unlock their full creative potential in “Visual Design” and “Photography.”
Essential Techniques: Fading Images to a Solid Color Background
One of the most common and effective ways to fade an image is to blend it into a solid color background. This technique is perfect for creating bespoke “Backgrounds,” preparing images for text overlay, or simply achieving a clean, modern aesthetic. At Tophinhanhdep.com, we advocate for methods that offer both precision and flexibility, ensuring your “Digital Art” always looks its best.
The Gradient Mask Method: Precision and Versatility
The gradient mask method is a cornerstone technique for fading images, offering unparalleled control over the transition. This approach leverages Photoshop’s powerful layer mask capabilities to create a smooth, editable fade into any chosen color.
Setting Up Your Workspace
Before we dive into the fade, let’s prepare your Photoshop document:
- Create a New Document: Begin by opening Photoshop. From the Home Screen, click “Create new,” or if you’re in the main interface, go to
File > New. In the New Document dialog box, set your desired dimensions (e.g.,Width: 3000 pixels,Height: 1600 pixels,Resolution: 300 pixels/inch). ForBackground Contents, choosingWhiteis a good starting point, though we’ll replace this later. ClickCreate. - Place Your Image: Next, import the image you wish to fade. Go to
File > Place Embedded. Navigate to your image, select it, and clickPlace. Photoshop will place the image onto a new layer, automatically opening the Free Transform controls. - Position Your Subject: To create space for the fade, you might want to move your image. Hold the
Shiftkey and drag your image to one side of the canvas (left or right). HoldingShiftensures you drag in a straight line, maintaining its vertical or horizontal alignment. Once satisfied, click the checkmark in the Options Bar or pressEnter/Returnto commit the transformation. In the Layers panel, you’ll see your image on its own layer above theBackgroundlayer.
Introducing the Solid Color Fill Layer
Instead of relying on the static Background layer, we’ll use a Solid Color fill layer. This provides far greater flexibility, allowing you to change the background color at any point without redoing your fade.
- Add a Solid Color Fill Layer: Ensure your image layer is selected in the Layers panel. Click the
New Fill or Adjustment Layericon (a half-filled circle) at the bottom of the Layers panel, and selectSolid Colorfrom the list. - Choose an Initial Background Color: The Color Picker will appear. For now, choose a neutral color like white (by setting R, G, and B values to
255). Don’t worry, you can easily change this later. ClickOK. You’ll notice your document is now completely filled with this color because the fill layer is currently above your image layer. Crucially, this fill layer comes with a built-in layer mask, which is exactly what we need.
Applying the Layer Mask and Gradient Tool
Now for the magic! We’ll use a gradient on the layer mask to create the fade.
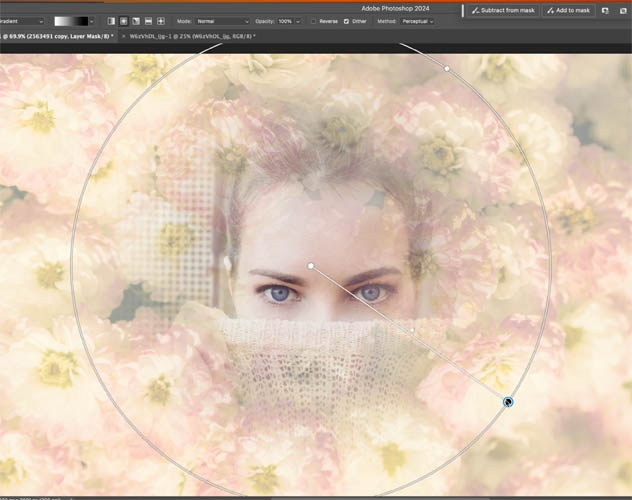
- Select the Layer Mask: In the Layers panel, click on the white layer mask thumbnail of your
Solid Colorfill layer. A white border around the thumbnail indicates it’s selected. This is critical – ensure the mask, not the color swatch, is active. - Select the Gradient Tool: From Photoshop’s toolbar on the left, select the
Gradient Tool(shortcut:G). - Choose the Black to White Gradient: In the Options Bar at the top, click the arrow next to the gradient swatch to open the Gradient Picker. Expand the
Basicsfolder (introduced in Photoshop 2020 and newer versions for improved gradient handling) and double-click theBlack to Whitegradient thumbnail. This gradient is essential because black on a mask hides, white reveals, and shades of grey create transparency.
Drawing and Refining the Gradient
This is where your “Creative Ideas” come to life, as you define the exact nature of your fade.
- Draw the Gradient: With the
Gradient ToolandBlack to Whitegradient selected, click and hold your mouse button in the area where your subject begins (e.g., near the edge of your model in a portrait). While still holding the mouse, press and hold theShiftkey (to ensure a perfectly straight line) and drag across the canvas towards the area where you want the image to fully fade into the color. Release your mouse button first, then theShiftkey. - Observe the Fade: Your image should now gracefully fade into the solid background color. The black area of the gradient on the mask reveals the image, the white area reveals the solid color, and the grey transition area is where the fade occurs. You can view the mask directly in the document by holding
Alt (Win) / Option (Mac)and clicking the layer mask thumbnail. Click again to hide it. - Redraw to Adjust: The beauty of a layer mask is its editability. If the fade isn’t perfect on the first try, simply draw another gradient. Each new gradient you draw will replace the previous one on the mask. Experiment with the starting and ending points, as well as the length of your drag:
- Longer drag: Creates a smoother, more gradual fade.
- Shorter drag: Results in a quicker, more abrupt transition.
- Adjusting start/end points: Allows you to fine-tune where the fade begins and ends.
Changing the Background Color
The fill layer’s advantage is apparent now. You can change the background color at any time without affecting your fade mask.
- Double-click the Color Swatch: In the Layers panel, double-click on the
Solid Colorfill layer’s color swatch (the small colored square) to reopen the Color Picker. - Choose a New Color: You can either select a new color from the Color Picker or, for a harmonized look, sample a color directly from your image.
- Sampling from Image: Move your mouse cursor over your image; it will transform into an Eyedropper tool. Click on different parts of your “Beautiful Photography” to sample colors until you find one that complements your subject.
- Sample Size Option: Before sampling, go to the Options Bar and change
Sample SizefromPoint Sampleto a larger average, like3x3or5x5. This ensures you pick an average color, not just a single pixel’s color, for a smoother blend. - Sample Option: Also, confirm the
Sampleoption is set toAll Layersto pick colors from your visible image.
- Click
OKwhen done. Your image will now fade into the newly selected color, offering endless possibilities for “Thematic Collections” and “Visual Design.”
A Quick Fade with Layer Opacity: Simplicity for Beginners
For a truly rapid fade, especially when blending one image into another with overall transparency, Photoshop offers a simpler, though less customizable, option: adjusting layer opacity. This is a fantastic starting point for beginners on Tophinhanhdep.com looking for immediate “Creative Ideas” for “Photo Manipulation.”
- Open and Prepare Your Image: Open your desired image in Photoshop (
File > Open). - Select the Image Content: Use the
Quick Selection Tool(or pressW) from the toolbar. Click once on your photo, then pressCtrl+A (Windows)orCommand+A (Mac)to select the entire image content. This ensures no parts are missed. - Isolate the Image: Go to
Layer > New > Layer Via Cut. This will cut your selected image content from its original layer and place it onto a new layer. This new layer will be named “Layer 1” (or similar). If you have a “Background” layer below it, you might want to delete it if you’re aiming for full transparency beneath the image, or unlock it by double-clicking it and clickingOKto convert it to a regular layer. - Adjust Opacity: Select “Layer 1” in the Layers panel. Locate the
Opacitydropdown menu at the top-right of the Layers panel. Click and drag the slider to the left to reduce the layer’s opacity. As you lower it, the image will become more transparent, creating a fade effect against whatever is below it (either a transparent canvas or another layer). - Layering for Blending Multiple Images: If you want to fade your first photo into another, simply drag and drop the second image into your Photoshop document. Make sure the first faded image’s layer is positioned above the second image in the Layers panel. You can then adjust the opacity of the top layer to achieve the desired blend.
- Save Your Work: To preserve transparency, save your image as a
.PNGfile. Go toFile > Save As, choose.PNGfrom the format dropdown, and clickSave.
This method provides a quick way to achieve an overall fade, ideal for initial “Photo Ideas” or rapid prototyping in “Digital Art.”
Fading for Transparency: Seamless Integration into Any Design
Sometimes, you don’t want your image to fade into a color, but rather into complete transparency, allowing it to be placed seamlessly on any “Background” or “Wallpaper” in your “Visual Design” projects. This is particularly useful for web graphics, logos, or composite images where flexibility is key. At Tophinhanhdep.com, we emphasize high-quality “Image Tools” for maximum creative freedom.
Preparing Your Image for a Transparent Fade
The gradient mask technique remains the most powerful method for creating a controlled, gradual fade into transparency.
- Open Your Image: Start by opening the image you wish to fade in Photoshop.
- Unlock the Background Layer (if necessary): If your image opens as a
Backgroundlayer (indicated by a padlock icon in the Layers panel), double-click it and clickOKto convert it into a regular layer (e.g., “Layer 0”). This is crucial becauseBackgroundlayers do not support transparency. - Expand the Canvas: To provide room for the fade, you’ll likely need to extend your canvas. Go to
Image > Canvas Size. In the dialog box, increase theWidthorHeightas needed to create an empty area around your image. Crucially, set theAnchorpoint to control which direction the canvas expands. For example, if you want to fade the bottom of an image, set the anchor to the top center, so the canvas expands downwards. ClickOK. You’ll now have a larger canvas with an abrupt image edge. - Add a Layer Mask: With your image layer selected, click the
Add Layer Maskicon (a rectangle with a circle inside) at the bottom of the Layers panel. A white layer mask thumbnail will appear next to your image thumbnail. Ensure this white mask is selected. - Select the Gradient Tool and Black-White Gradient: As with fading to a solid color, select the
Gradient Tool (G)and choose theBlack to Whitegradient from theBasicsfolder in the Options Bar. - Draw the Gradient: Click and drag on your image to draw the gradient across the layer mask.
- To fade the bottom: Start dragging from near the bottom edge of your image (where the fade should begin) downwards into the expanded transparent area.
- To fade the side: Start dragging from the edge of your image towards the center, or vice versa, depending on where you want the fade to occur.
- Remember, a longer drag creates a smoother, more gradual fade, while a shorter drag results in a more sudden transition. Ensure you drag far enough so that no harsh edge of the original image remains visible in the transition area.
- Review the Fade: The black areas of the mask will hide your image (making it transparent), while the white areas will reveal it. The gradient in between creates the smooth transition. Adjust by redrawing the gradient until you achieve the perfect fade for your “Beautiful Photography” or “Digital Art.”
Saving as PNG: Preserving Transparency
This step is absolutely critical for transparent fades.
- Save as PNG: Once you’re satisfied with your transparent fade, go to
File > Save As. In theSave Asdialog box, choose.PNGfrom theFormatdropdown menu. PNG (Portable Network Graphics) is a lossless format that supports transparency, making it ideal for web use or layering in other design software like Adobe InDesign or Illustrator. ClickSave, thenOKon any subsequent PNG options dialogs.
Your image is now ready to be placed on any “Background” or “Wallpaper” found on Tophinhanhdep.com or incorporated into any “Visual Design” without an unsightly solid border.
Advanced Tips and Troubleshooting for Your Tophinhanhdep.com Creations
While the core techniques for fading images in Photoshop are straightforward, mastering the art involves understanding advanced options and knowing how to troubleshoot common issues. As part of Tophinhanhdep.com’s commitment to “Photography” and “Image Tools,” we want to empower you with all the knowledge you need.
Pro Techniques and Alternative Fades
Beyond the basic gradient mask, Photoshop offers several ways to refine or achieve alternative fade effects:
- Using Blending Modes for Gradients: An expert tip from the Tophinhanhdep.com community suggests setting the blending mode of your gradient to
Multiplywithin a single layer mask. This can sometimes offer different visual effects, especially when dealing with complex textures or colors. However, be aware that once a new gradient is applied, previous ones are no longer individually editable. Experimentation with blending modes (Overlay,Soft Light, etc.) on your fill layers or gradient masks can yield unique and compelling “Editing Styles” for your “Digital Art.” - Gaussian Blur for Soft Edges: If you’re looking for an overall soft, diffused fade rather than a directional one, the
Gaussian Bluris an excellent tool. Select your image layer, go toFilter > Blur > Gaussian Blur. Adjust theRadiusslider to control the intensity of the blur. This creates a gentle, unfocused edge, ideal for dreamy “Aesthetic” images or subtle “Backgrounds.” You can combine this with a layer mask to apply the blur only to specific areas. - Grouping Layers for Complex Fades: When dealing with multiple elements or if you want to apply the same fade to a collection of layers (e.g., text and an image that need to fade out together), grouping is incredibly helpful. Select the layers you want to fade, then right-click and choose
Group Layers(orCtrl+G / Cmd+G). You can then apply a single layer mask with a gradient to the entire group, ensuring a consistent fade across all elements within it. This is a powerful technique for intricate “Photo Manipulation” and “Graphic Design.” - Feathering Selections for Soft Transitions: For fading specific shapes or areas, you can make a selection (e.g., with the
Marquee ToolorLasso Tool), then go toSelect > Modify > Feather. Increase the feather radius to create a soft edge around your selection. Then, either delete the selection (if on a regular layer) or apply it as a layer mask to achieve a gentle fade.
Common Challenges and Solutions
Even seasoned Photoshop users encounter hiccups. Here are some common issues and their troubleshooting steps:
- “My gradient isn’t doing anything!”
- Check Layer Mask Selection: This is the most frequent culprit. Ensure the layer mask thumbnail (not the layer’s content thumbnail) is actively selected in the Layers panel (it should have a white border).
- Verify Gradient Tool Settings: Double-check that the
Gradient Toolis selected and that theBlack to Whitegradient (orForeground to Transparentif you’re fading to transparency with black foreground color) is chosen in the Options Bar. - Correct Foreground/Background Colors: For
Black to Whitegradient on a mask, your foreground color should be black and background white. PressDto reset to default, thenXto swap if needed. - Gradient Mode: Ensure the
Modein the Options Bar is set toNormalandOpacityis100%when initially drawing the gradient on the mask.
- “The fade looks too harsh/abrupt.”
- Redraw the Gradient: As discussed, a longer drag with the
Gradient Toolwill create a smoother transition. Experiment by starting your drag further away from the edge you want to fade. - Linear Gradient: Ensure you’re using a
Linear Gradient(first icon in the Options Bar) for most directional fades, asRadialorReflectedgradients create different effects.
- Redraw the Gradient: As discussed, a longer drag with the
- “I can still see the edge of my image after fading.”
- Extend Canvas More: You might not have enough canvas space for the gradient to fully hide the edge. Go back to
Image > Canvas Sizeand expand it further, then redraw your gradient. - Adjust Gradient End Point: Ensure the end point of your gradient drag extends fully into the transparent or solid color area.
- Extend Canvas More: You might not have enough canvas space for the gradient to fully hide the edge. Go back to
- Photoshop Version Compatibility: Note that Adobe made changes to how gradients work in Photoshop 2020. If you are using an older version, the
Gradient Pickerinterface might look slightly different, but the core functionality of selectingBlack to Whiteremains the same. Most tutorials on Tophinhanhdep.com are compatible with recent Photoshop versions.
By familiarizing yourself with these advanced techniques and troubleshooting tips, you’ll be well-prepared to tackle any “Photo Manipulation” challenge and produce stunning “Digital Art” that fits perfectly into your “Image Inspiration & Collections” on Tophinhanhdep.com.
Conclusion: Elevating Your Imagery with Fades on Tophinhanhdep.com
The ability to seamlessly fade an image in Photoshop is an indispensable skill for anyone working with digital visuals. As demonstrated throughout this guide, whether you’re aiming for a subtle blend into a vibrant “Background,” a crisp fade to transparency for versatile use, or complex multi-layered “Photo Manipulation,” Photoshop provides the “Image Tools” and flexibility to achieve your “Creative Ideas.”
From perfecting “Beautiful Photography” to designing compelling “Wallpapers” and elevating “High Resolution” “Stock Photos,” understanding these “Editing Styles” empowers you to tell more impactful visual stories. On Tophinhanhdep.com, we believe that every image has the potential to inspire, and mastering techniques like fading is a crucial step in unlocking that potential.
Remember, the journey of “Digital Photography” and “Digital Art” is one of continuous learning and experimentation. Don’t be afraid to try different gradient lengths, blend modes, or even combine techniques to find the “Editing Styles” that best suit your vision. Practice is key, and with each fade, you’ll gain confidence and precision. We hope this comprehensive guide has provided you with the knowledge and inspiration to transform your “Image Collections” into truly remarkable pieces of “Visual Design.” Keep exploring, keep creating, and let your images on Tophinhanhdep.com shine with a newfound grace.