Mastering Image Resolution: Your Comprehensive Guide to Finding and Understanding DPI on Tophinhanhdep.com

In the vibrant world of digital imagery, where every pixel contributes to a visual story, understanding the intricate details of your photos is paramount. At Tophinhanhdep.com, we are passionate about providing you with the most stunning images, from breathtaking wallpapers and inspiring backgrounds to captivating aesthetic compositions and profound beautiful photography. Whether you’re exploring nature, deciphering abstract art, or delving into sad/emotional visual narratives, the quality of these visuals hinges on a critical metric: DPI, or Dots Per Inch.
DPI is more than just a technical term; it’s the bedrock of high-resolution printing and a key factor in achieving the crisp, detailed output that elevates digital photography from good to truly exceptional. While your screen might display an image perfectly, the moment you decide to bring that image into the physical world – be it as a large wallpaper print, a framed piece of digital art, or a component of a graphic design project – DPI dictates its fate. A low DPI image, no matter how good it looks on screen, will likely result in a pixelated, blurry print, undermining the very essence of your chosen visual design.

This comprehensive guide from Tophinhanhdep.com will demystify DPI, explaining what it is, why it’s so important for your image collections and photo ideas, and most importantly, how to easily find the DPI of any image on your Windows or Mac computer. We’ll also touch upon how this knowledge empowers you to utilize our image tools – from AI upscalers to compressors – to ensure your visuals always meet the highest standards, whether for a mood board, a thematic collection, or the latest trending styles.
The Core of Clarity: What Exactly is DPI?
At its heart, DPI, or Dots Per Inch, is a measurement of print resolution. It quantifies the density of tiny ink dots that a printer places within a one-inch linear space on a physical output. The higher the DPI value, the more dots per inch, leading to a finer, more detailed, and smoother print. Conversely, a lower DPI means fewer dots, resulting in a coarser image where individual dots might become visible, leading to a pixelated or blurry appearance.
Imagine a meticulously crafted beautiful photography piece – perhaps a sweeping nature landscape or an intricate abstract composition. If this image is destined for a large-format print, say a wallpaper mural, a high DPI (e.g., 300 DPI or more) ensures that every subtle gradient, every sharp edge, and every intricate texture is rendered with breathtaking fidelity. Without adequate DPI, the fine details that make the photograph unique would be lost, replaced by noticeable pixelation.
It’s crucial to distinguish DPI from PPI (Pixels Per Inch). While both terms relate to resolution, they apply to different mediums:
- DPI (Dots Per Inch) primarily concerns print output. It’s about the physical ink dots laid down by a printer.
- PPI (Pixels Per Inch), on the other hand, refers to screen resolution. It measures the density of pixels on a digital display. An image with high PPI will appear sharper on screen, but its print quality is ultimately determined by its DPI.
For optimal print quality in most standard applications, an image typically requires a minimum of 300 DPI. For large format prints or professional publications, even higher DPIs might be recommended. For web display, DPI is less relevant; what matters most are the image’s pixel dimensions. A 72 or 96 DPI image is generally sufficient for online viewing because monitors display pixels, not ink dots. This distinction is vital when considering digital photography and optimizing images for both online presence (like sharing photo ideas in a thematic collection) and physical prints.
Understanding DPI is not just a technicality; it’s a fundamental aspect of visual design and image manipulation. It empowers creators to predict and control the final output quality of their stock photos, digital art, and personal image collections, ensuring that their vision translates perfectly from screen to print, upholding the standard of high-resolution excellence that Tophinhanhdep.com champions.
Why is DPI Crucial for Your Visuals? Embracing Quality on Tophinhanhdep.com
DPI is not merely a number in an image’s metadata; it’s a cornerstone of visual integrity, profoundly impacting how your images are perceived, especially when they move beyond the screen. For anyone engaged in photography, visual design, or curating image inspiration & collections on Tophinhanhdep.com, appreciating the role of DPI is essential for consistently delivering high-resolution and beautiful photography.
Printing Perfection and Clarity: Bringing Your Vision to Life
The most direct and impactful application of DPI understanding is in printing. Whether you’re designing wallpapers, creating custom backgrounds, printing striking aesthetic art, or showcasing your digital photography, the DPI value directly dictates the sharpness and detail of the physical print.
Consider a stunning nature photograph or a powerful sad/emotional image. On a screen, with its inherent pixel grid, these images might look flawless. However, print devices operate differently, relying on ink dots. If your image has a low DPI, the printer has fewer dots per inch to render the visual information. This scarcity leads to a phenomenon known as “pixelation,” where jagged edges appear, fine details blur, and the overall image quality deteriorates. What was a crisp, high-resolution digital file becomes a fuzzy, unsatisfactory print.
For professional-grade outputs, such as stock photos used in magazines, brochures, or even custom printed wallpapers for your home, a DPI of 300 is the industry standard. This density of dots ensures that prints are smooth, colors transition seamlessly, and intricate elements remain perfectly defined. Anything less, and you risk compromising the artistic intent and the perceived value of your beautiful photography or digital art. This understanding is particularly important for those who frequent Tophinhanhdep.com for photo ideas and aspire to translate them into tangible forms.
Digital Display vs. Print Output: Understanding the Medium
A common misconception is equating screen resolution (PPI) with print resolution (DPI). While a high-resolution image on your monitor might look fantastic, its DPI could still be inadequate for printing. For instance, most web images are optimized for fast loading times and efficient display, typically ranging from 72 to 96 PPI/DPI. These values are perfectly suitable for backgrounds on a website or digital mood boards. However, feeding such an image to a printer for a large print will result in significant quality degradation.
The key distinction lies in how different devices interpret image data. Screens display light-emitting pixels, while printers lay down physical ink dots. A digital image’s DPI doesn’t affect how it appears on your screen; rather, its pixel dimensions (width x height) determine its size and clarity in a digital context. DPI only becomes relevant the moment you intend to print.
This knowledge is crucial for anyone involved in visual design or photo manipulation. If you’re preparing digital photography for a client who needs both web and print assets, you must provide images with appropriate DPI for the print versions, even if the pixel dimensions are the same across both. At Tophinhanhdep.com, we encourage users to optimize their image collections for both scenarios, leveraging image tools like converters and compressors for web-friendly versions, and ensuring high DPI for print-ready files.
Resizing and Image Integrity: Flexibility in Your Creative Process
Another significant advantage of a high DPI image is the flexibility it offers for resizing without compromising quality. An image with a high dot density effectively contains more visual information. This “richness” allows you to enlarge the image to a greater extent before the individual dots (or pixels, when considering digital resizing before print) become noticeable and degrade the quality.
This capability is invaluable in graphic design and digital art. Imagine you’re working on a poster that incorporates a stock photo from Tophinhanhdep.com. If that photo has a generous DPI, you can scale it up or down within your design software (like Adobe Photoshop, a prime tool for editing styles and photo manipulation) with confidence, knowing it will maintain its sharpness and detail. Conversely, starting with a low DPI image severely limits your resizing options; any significant enlargement will quickly lead to a blocky, undesirable output.
For artists creating abstract pieces or designers building intricate thematic collections, maintaining image integrity throughout the creative process is non-negotiable. High DPI images provide a buffer, allowing for extensive photo manipulation and experimentation without immediately hitting resolution barriers. When you’re curating image inspiration & collections, always consider the potential future uses – will it stay digital, or will it be printed? Your answer determines the DPI you need.
Ultimately, understanding DPI empowers you to make informed decisions about your images, ensuring that every wallpaper, background, and piece of beautiful photography you create or use from Tophinhanhdep.com is presented with the utmost quality, regardless of its final medium. It’s about respecting the visual data and ensuring your creative efforts yield perfect results.
Practical Methods: How to Find the DPI of Your Images
Knowing what DPI is and why it’s important is the first step; the next is being able to practically ascertain the DPI of your images. Fortunately, both Windows and Mac operating systems provide straightforward ways to check this crucial metric, often without needing specialized image tools. At Tophinhanhdep.com, we want to equip you with the knowledge to manage your photography and visual design assets effectively.
On Windows Systems: Uncovering Image Details
Windows offers several convenient methods to check the DPI of your images, from quick right-click options to more detailed File Explorer views. These methods are universally applicable, whether you’re examining wallpapers, stock photos, or personal digital photography.
Using Image Properties
This is often the quickest and most direct way for individual files.
- Locate Your Image: Navigate to the folder containing the image file you wish to inspect. This could be anywhere on your computer – your Pictures library, a project folder for graphic design, or a download location for backgrounds.
- Right-Click and Select Properties: Right-click directly on the image file. A contextual menu will appear. From this menu, click on “Properties” (usually at the very bottom).
- Access the Details Tab: A new “Properties” window will open. Within this window, navigate to the “Details” tab. This tab provides a wealth of metadata about the file, including its dimensions and resolution.
- View DPI Under “Image” Header: Scroll down slightly within the “Details” tab until you find the “Image” section. Here, you will see entries for “Horizontal resolution” and “Vertical resolution.” These values, typically expressed in “dpi,” represent the Dots Per Inch for your image. For most standard images, these two values will be identical. If you need to modify the DPI, you’ll need dedicated software, which we’ll discuss later.
This method is perfect for a quick check when you’re preparing a single beautiful photography piece for print or evaluating an aesthetic image for a project.
Leveraging File Explorer Columns
For users who need to quickly glance at the DPI of multiple images within a folder, perhaps when organizing image collections or vetting a batch of stock photos, Windows File Explorer offers a powerful columnar view.
- Open File Explorer: You can do this by clicking the folder icon on your taskbar or by pressing the
Windows key + Eon your keyboard. - Navigate to Image Location: Go to the folder where your images are stored.
- Switch to “Details” View: In the File Explorer ribbon at the top, click the “View” tab. Then, in the “Layout” section, select “Details.” This displays your files in a list format with various columns (Name, Date modified, Type, Size, etc.).
- Add Resolution Columns: Right-click on any of the existing column headers (e.g., “Name,” “Date modified”). A menu will appear. Select “More…” from this menu.
- Select “Horizontal resolution” and “Vertical resolution”: A “Choose Details” pop-up window will appear, listing many possible columns. Scroll down to find “Horizontal resolution” and “Vertical resolution.” Check the boxes next to both options.
- Confirm and View: Click “OK.” Now, new columns titled “Horizontal resolution” and “Vertical resolution” will appear in your File Explorer. You can immediately see the DPI for all visible images, making it efficient to sort through large image collections or a batch of wallpapers.
This method is invaluable for managing extensive image collections and helps identify high-resolution assets at a glance, streamlining your workflow for photo ideas and thematic collections.
Via Microsoft Paint
Microsoft Paint, a staple Windows application, also provides a way to check DPI, offering a familiar interface for many users.
- Right-Click Image and Open with Paint: Locate your image file, right-click on it, hover over “Open with,” and then select “Paint.” The image will open within the Paint application.
- Access File Properties: In the top-left corner of the Paint window, click on “File.” From the drop-down menu that appears, select “Properties” (often near the bottom, represented by a small document icon).
- Find Resolution: A new “Image Properties” window will pop up. Within this window, you will find the DPI value listed next to “Resolution.”
While Paint is a basic editor, its ability to display DPI makes it a useful image tool for quick checks, especially if you’re already accustomed to using it for simple editing styles.
On Mac Systems: Previewing Image Resolution
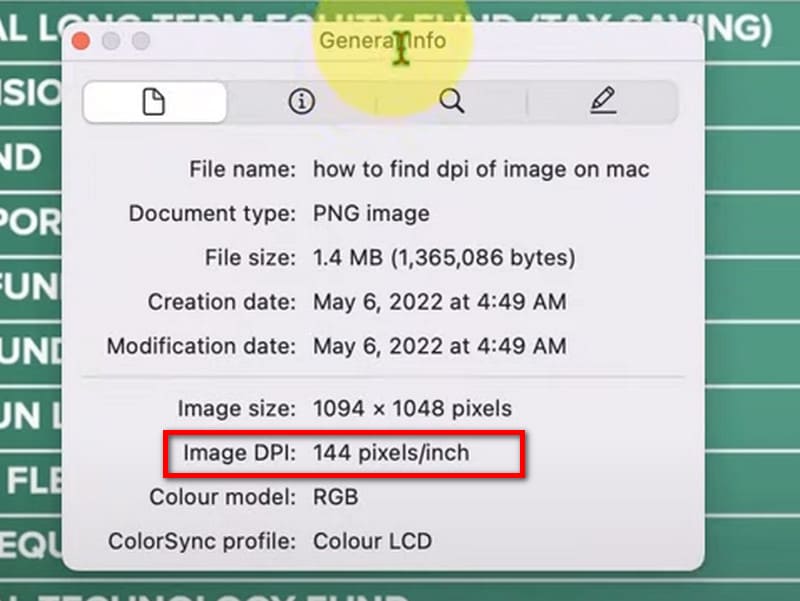
Mac users have an equally straightforward method using the built-in Preview application, a versatile tool for viewing and making minor adjustments to images and documents.
- Locate and Open Image with Preview: Use Finder to locate the image file you want to check. Right-click (or Control-click) on the image. From the contextual menu, select “Open With,” and then click “Preview.” Your image will open in the Preview application.
- Access the Inspector: With the image open in Preview, go to the menu bar at the top of your screen. Click on “Tools.” From the “Tools” drop-down menu, select “Show Inspector.” Alternatively, you can often click the “i” icon in the toolbar.
- Find “Image DPI”: The “Inspector” panel will appear, providing detailed information about the image. Look for the “Image DPI” entry. This will display the resolution of your image in Dots Per Inch.
This method is intuitive and integrated into the macOS workflow, making it easy for Mac users to verify the DPI of their wallpapers, digital art, and beautiful photography before incorporating them into visual design projects or sending them off for printing.
Exploring Professional Tools: Adobe Photoshop Example
For those deeply immersed in photography, graphic design, or digital art, professional software like Adobe Photoshop offers granular control and detailed information about image resolution. While Tophinhanhdep.com might offer simpler image tools, understanding these advanced options is crucial for complex editing styles and photo manipulation.
- Open Image in Photoshop: Launch Adobe Photoshop and open your desired image file (File > Open).
- Access Image Size Dialog: Go to the menu bar and click “Image.” From the drop-down menu, select “Image Size…” (or use the shortcut
Alt+Ctrl+Ion Windows,Option+Command+Ion Mac). - View and Adjust Resolution: The “Image Size” dialog box will appear. Here, you’ll see a “Resolution” field, typically measured in “Pixels/Inch” (which is equivalent to DPI when printing). You can view the current DPI and, crucially, also adjust it. Be mindful that simply increasing the DPI without resampling (adding new pixels) will reduce the physical print size. To truly enhance the resolution for print, you may need to resample the image, which can be done carefully with understanding of pixel interpolation.
Photoshop’s robust features for viewing and managing resolution are essential for professionals who consistently work with high-resolution stock photos, intricate digital art, and need precise control over every aspect of their visual design. It allows for sophisticated editing styles and ensures that beautiful photography translates flawlessly to any output medium.
By utilizing these methods, whether simple system checks or advanced software analyses, you gain mastery over your image assets, ensuring that every visual detail aligns with your creative vision and Tophinhanhdep.com’s commitment to quality.
Enhancing Your Images: Beyond Just Checking DPI
Finding the DPI of your images is a vital step, but what happens when that number falls short of your high-resolution expectations? At Tophinhanhdep.com, we understand that sometimes, the perfect aesthetic or nature shot might come with a less-than-ideal DPI. This is where strategic image tools and informed decisions about editing styles come into play. It’s not just about identifying the problem; it’s about finding effective solutions to elevate your photography and visual design.
When DPI is Too Low: Solutions for High-Quality Visuals
Encountering an image with a low DPI can be frustrating, especially if it’s a cherished beautiful photography piece or a crucial element for a graphic design project. Simply stretching a low-DPI image to a larger print size or artificially boosting its DPI in basic software often leads to a grainy, pixelated mess. The challenge lies in increasing resolution without introducing unwanted artifacts.
Embracing AI Upscalers
One of the most exciting advancements in image tools for resolving low DPI issues is the emergence of AI upscalers. Unlike traditional image resizing methods that simply interpolate (guess) new pixels based on their neighbors, AI upscalers leverage sophisticated machine learning algorithms. These tools have been trained on vast datasets of high-resolution images and their lower-resolution counterparts. They can intelligently “fill in” missing details, sharpen edges, and reconstruct textures, effectively increasing the pixel dimensions (and thus, the potential DPI for print) while maintaining or even enhancing perceived quality.
At Tophinhanhdep.com, we are committed to providing you with access to cutting-edge solutions. Our platform offers or recommends AI upscalers that can transform your low-resolution backgrounds or historical stock photos into high-resolution assets suitable for larger prints or more intricate visual design. This technology is a game-changer for preserving the integrity of sad/emotional photographs or making your abstract art truly shine at any size.
Traditional Resizing Considerations
While AI upscaling is a powerful modern solution, traditional image editing software like Adobe Photoshop also offers resizing capabilities. When using these tools:
- Resampling: You’ll typically encounter options for “resampling” the image, which means changing the pixel dimensions. Techniques like “Bicubic Smoother” (for enlargement) or “Preserve Details 2.0” in Photoshop are designed to intelligently add pixels, but their effectiveness is limited by the initial amount of detail.
- Print Size vs. Resolution: Understand the inverse relationship: for a fixed number of pixels, increasing the print size decreases the DPI, and vice versa. If you need a specific print size at a specific DPI, the software will calculate the required pixel dimensions. If your original image doesn’t have enough pixels, you’ll need to decide whether to accept a lower DPI print or use an upscaler.
For intricate photo manipulation or when applying specific editing styles, combining careful manual resizing with AI enhancement can yield the best results for your digital photography.
Optimizing for Web and Print: Tailoring Your Visual Assets
The digital landscape demands flexibility. The same beautiful photography or graphic design piece might need to appear flawlessly as a large wallpaper print, a crisp web background, and a thumbnail in a thematic collection. This necessitates optimizing your images differently for each intended use.
Web Optimization: Speed and Visual Impact
For web images (like those used in mood boards, photo ideas, or general backgrounds on Tophinhanhdep.com), the priority shifts from high DPI to a balance of visual quality and file size. Large file sizes can slow down website loading, negatively impacting user experience. This is where image tools like compressors and optimizers become invaluable.
- Compression: Tools can reduce file size by intelligently removing redundant data or applying lossy compression (like JPEG). For instance, our compressors on Tophinhanhdep.com can significantly reduce the size of your images while maintaining acceptable quality for web display, ensuring your image collections load quickly.
- Resolution (Pixel Dimensions): For web, focus on appropriate pixel dimensions rather than DPI. An image scaled to the exact display size it will occupy (e.g., 1920x1080 pixels for a full-HD header) will look sharp without unnecessary pixel data.
- File Formats: Choose web-friendly formats like JPEG (for photos with many colors), PNG (for transparent backgrounds or crisp graphics), or WebP (for superior compression and quality).
Print Optimization: Uncompromising Quality
For any images destined for physical print – whether it’s a professional portfolio of your digital photography, custom wallpapers, or high-quality stock photos for a publication – uncompromising quality is paramount.
- High DPI is Essential: Reiterate the 300 DPI standard for most prints. For very large formats, consulting with your printer for even higher DPI recommendations is wise.
- Color Profiles: Ensure your images use appropriate color profiles (e.g., CMYK for many commercial prints) to prevent color shifts during printing. This is a subtle but critical aspect of editing styles for print.
- File Formats: TIFF or high-quality JPEG are often preferred for print due to their ability to retain detail and color information.
By understanding these nuances and leveraging the right image tools from Tophinhanhdep.com, you can strategically prepare your images to excel in any context. This comprehensive approach to resolution management ensures that your creative ideas, digital art, and beautiful photography always achieve their intended impact, preserving the high-resolution quality that defines excellence in visual design.
Elevating Your Visuals with Tophinhanhdep.com: The Power of DPI Knowledge
In the dynamic realm of images, where every detail contributes to a compelling narrative, mastering the concept of DPI is indispensable. As a cornerstone of high-resolution output, DPI serves as the silent guardian of print quality, ensuring that your beautiful photography, captivating digital art, and impactful graphic design projects transcend the screen with breathtaking clarity.
At Tophinhanhdep.com, our mission is to empower you to create, discover, and utilize images that truly resonate – from the serene depths of nature wallpapers to the vibrant intricacies of abstract backgrounds, and the profound expressions of sad/emotional photography. The knowledge of how to find and understand DPI is not merely a technical skill; it is a gateway to unlocking the full potential of your visual design aspirations and ensuring every print-ready image reflects your uncompromising standards.
We’ve explored the core definition of DPI, highlighting its critical distinction from PPI and its paramount importance for achieving print perfection, maintaining image integrity during resizing, and skillfully navigating the demands of both digital display and physical output. You now possess the practical methods to effortlessly check the DPI of your images on both Windows and Mac operating systems, utilizing readily available tools like system properties, File Explorer, Microsoft Paint, and Preview. For the more seasoned creator, the power of professional software like Adobe Photoshop offers even deeper control over this vital metric, complementing sophisticated editing styles and advanced photo manipulation.
Beyond just identifying low DPI, we’ve introduced you to forward-thinking solutions like AI upscalers, available through Tophinhanhdep.com and similar advanced image tools, which can intelligently breathe new life into lower-resolution images, transforming them into high-resolution assets. We’ve also emphasized the importance of tailoring your image collections through compressors and optimizers for efficient web presentation, while meticulously preparing high-DPI versions for pristine print quality.
Armed with this comprehensive understanding, you are now equipped to make informed decisions that will elevate your entire visual workflow. Whether you’re curating inspiring mood boards, building thematic collections for your portfolio, or simply ensuring your next printed wallpaper is perfectly crisp, DPI knowledge is your ally.
Explore the vast image inspiration & collections on Tophinhanhdep.com with a new appreciation for detail. Harness our suite of image tools to convert, compress, optimize, and upscale your visuals, confident that every pixel and every dot aligns with your creative vision. Let your photo ideas flourish into stunning realities, knowing that the foundation of quality, from the smallest dot to the grandest print, is firmly in your grasp. The world of high-resolution images awaits – go forth and create with confidence!