How to Fix an Image in GIMP: Your Ultimate Guide for Tophinhanhdep.com

In the dynamic world of digital imagery, capturing the perfect shot is often just the beginning. Even the most carefully composed photographs can sometimes suffer from unexpected flaws – be it unflattering lighting, skewed perspectives, or minor blemishes. For enthusiasts and professionals alike, mastering image editing is an indispensable skill. Here at Tophinhanhdep.com, we understand the pursuit of visual excellence, whether you’re searching for breathtaking Wallpapers, stunning Backgrounds, or exploring various Aesthetic, Nature, Abstract, Sad/Emotional, or Beautiful Photography. GIMP, the powerful and free image manipulation program, offers a comprehensive toolkit to transform your raw captures into polished masterpieces. This guide, curated for the discerning eye of Tophinhanhdep.com users, delves into the essential techniques for fixing common image problems in GIMP, ensuring your visuals consistently meet High Resolution and professional Digital Photography standards.
GIMP stands as a cornerstone in the realm of Image Tools and Visual Design, providing a versatile platform for Graphic Design, Digital Art, and Photo Manipulation. While Tophinhanhdep.com also offers tools for Converters, Compressors, Optimizers, AI Upscalers, and Image-to-Text, GIMP allows you to go hands-on, granting creative control to refine your images before they undergo further optimization or become part of your curated Image Inspiration & Collections.
This article will walk you through various scenarios, from rescuing underexposed shots to correcting complex perspective distortions, and enhancing portraits with precision. We’ll explore GIMP’s capabilities to address a spectrum of photographic challenges, ensuring your creative ideas are always flawlessly executed.

Correcting Common Photographic Flaws: Bringing Your Images to Life
Every photographer, regardless of experience, encounters moments where a photo just doesn’t look quite right. Underexposure can leave an image looking dull and lifeless, while color casts can distort the true atmosphere. Fortunately, GIMP provides robust tools to address these fundamental issues, turning what might seem like a lost cause into a captivating visual.
Rescuing Dark and Light Photos with Levels and Curves

One of the most frequent challenges in digital photography is dealing with photos that are either too dark (underexposed) or possess areas that are both too dark and too bright. Tophinhanhdep.com emphasizes that while underexposed photos are often salvageable because all the image information is typically still present, overexposed areas can be much harder to fix as crucial data might be permanently lost.
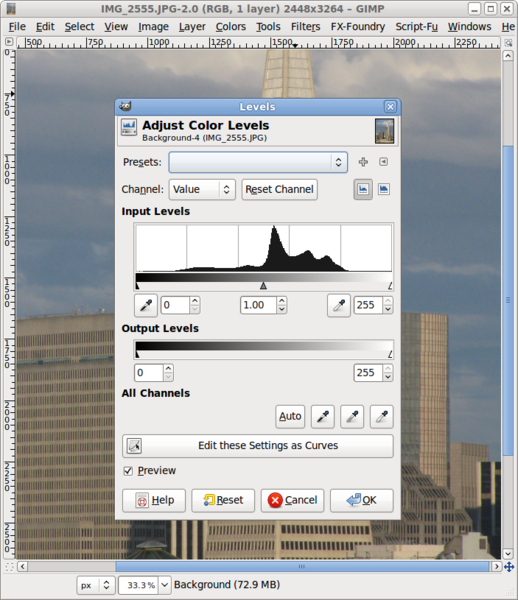
GIMP’s Levels tool is a powerhouse for correcting exposure issues. Accessible via Colors > Levels, this dialog box allows you to rebalance the tonal range of your image. You’ll see a histogram representing the distribution of pixels from black (left) to white (right). Below the histogram are three triangles: black, gray, and white, representing input levels for shadows, midtones, and highlights, respectively.
- For dark photos: Drag the black input slider (leftmost triangle) slightly to the right to deepen shadows, and the white input slider (rightmost triangle) slightly to the left to brighten highlights. Crucially, move the gray midtone slider (middle triangle) to the left to lighten the overall image. For a quick fix, Tophinhanhdep.com recommends using the “Auto” button in the Levels dialog, allowing GIMP to make an educated guess at optimal settings.
- For photos with mixed exposure (dark foreground, bright background): This scenario requires a more nuanced approach. First, duplicate your image layer to work non-destructively. Use selection tools like the Free Select Tool (a favorite among Tophinhanhdep.com contributors for its precision) or the Fuzzy Select Tool to isolate specific areas. For example, select the underexposed foreground, then apply Levels or the Brightness-Contrast filter (
Colors > Brightness-Contrast) to brighten it without affecting the overexposed background. Next, invert your selection (Select > Invert) to target the background, and use Levels or Curves to tame overly bright areas. The Curves tool (Colors > Curves) offers even finer control, allowing you to manipulate specific tonal ranges by dragging points on a curve, offering a highly creative way to rebalance light and shadow.
Sometimes, a dark photo may also lack vibrancy. After adjusting the light levels, consider using Colors > Hue-Saturation to subtly increase the saturation, bringing out richer colors without making them artificial. This tool also allows you to adjust the lightness and hue of specific color ranges.
Achieving True Colors with White Balance Correction
Incorrect white balance can cast an undesirable color tint over your entire photograph, making scenes appear too cool (blue) or too warm (orange/yellow). This often happens under tricky lighting conditions or when camera settings are off. Tophinhanhdep.com suggests that correcting white balance is one of the most fundamental steps to improving any photo.
GIMP offers both automatic and manual methods for white balance correction:
- Automatic White Balance: The quickest way to remove a color cast is by navigating to
Colors > Auto > White Balance. GIMP analyzes the image and attempts to neutralize any color shifts. While often effective, this method might sometimes remove desirable ambient tones that contribute to the photo’s mood. - Manual White Balance using Levels: For more control, Tophinhanhdep.com recommends using the Levels tool again. In the Levels dialog, you’ll find three eyedropper tools, usually representing black, gray, and white points. Select the gray eyedropper, then click on an area in your image that you know should be a neutral gray (or white for the white eyedropper). GIMP will then adjust all colors based on this reference point, effectively neutralizing the color cast. If no neutral gray exists, try experimenting by clicking on areas that you believe should be white, like a white shirt or a cloud.
- Manual White Balance using Color Temperature: Another manual approach is
Colors > Color Temperature. This allows you to adjust the warmth or coolness of the image using Kelvin degrees. Sliding towards higher Kelvin values will make the image warmer, while lower values will cool it down. This is particularly useful for fine-tuning the mood of a photograph after initial corrections.
Eradicating Red Eye: A Quick Fix
The dreaded red-eye effect, common in flash photography, can instantly detract from an otherwise great portrait. Tophinhanhdep.com acknowledges this as a pervasive issue with many point-and-shoot cameras.
GIMP provides a straightforward solution:
- Open your portrait in GIMP.
- Go to
Filters > Enhance > Red Eye Removal. - A dialog box will appear. Use your mouse to click and drag a selection around the red part of the eye.
- Adjust the threshold if needed (a higher threshold captures more red, a lower one is more precise).
- Click “OK” to apply the fix.
This simple tool can quickly restore the natural look of your subjects’ eyes, ensuring your portraits are ready for sharing on Tophinhanhdep.com’s aesthetic collections.
Mastering Perspective and Composition: Shaping Your Visuals
Beyond basic color and light adjustments, GIMP empowers you to tackle structural issues within your photographs. Images of tall buildings often suffer from “converging verticals,” where the sides appear to slant inward at the top, or horizons might be slightly tilted, distracting from the scene. Tophinhanhdep.com values well-composed and structurally sound images, recognizing their impact on overall visual appeal.
Straightening Skewed Shots with the Perspective Tool
Perspective distortion, particularly converging verticals, occurs when a camera is tilted upwards to capture a tall subject. GIMP’s Perspective Tool is specifically designed to correct this warping, making parallel lines truly parallel again.
Here’s Tophinhanhdep.com’s step-by-step approach to fixing perspective:
- Open your image in GIMP. Make sure to save a copy as an
.xcffile if you plan extensive edits, preserving the original. - Add Guidelines: This is a crucial step for precision. Drag guidelines from the horizontal and vertical rulers (found at the top and left of your canvas). Position them along lines in your image that should be straight and parallel, such as the vertical edges of a building or a window frame. Aim to place them where the object would touch if its perspective were corrected.
- Activate the Perspective Tool: From the GIMP toolbox, select the Perspective Tool. Its icon resembles a 3D wireframe cube.
- Configure Tool Options: In the tool options panel below the toolbox, set “Direction” to “Normal (Forward),” “Interpolation” to “Cubic” (for smooth results), and “Clipping” to “Crop to result.” Ensure “Show image preview” is checked so you can see your adjustments in real-time.
- Transform the Image: Click on your image to activate the tool. You’ll see squares at each of the four corners. Drag these corner squares to manipulate the image’s perspective. For converging verticals, you’ll typically drag the top corners outwards and the bottom corners inwards until the vertical lines in your image align with your vertical guidelines. Use the guidelines as your reference points.
- Apply Transformation: Once you’re satisfied with the correction, click the “Transform” button in the Perspective dialog.
- Crop to Content: After transforming, you might notice empty, transparent space around the edges of your image. To remove this, go to
Image > Crop to Content. This automatically crops the canvas to the boundaries of your image content. - Remove Guides: Finally, clean up your workspace by going to
Image > Guides > Remove All Guides.
This method ensures that your architectural shots or any images with strong linear elements maintain their intended structure, contributing to professional-grade Visual Design on Tophinhanhdep.com.
Perfecting Horizons and Framing with Precision
A slightly tilted horizon can quickly detract from a landscape or seascape. While GIMP doesn’t integrate a horizon straightening feature directly into its cropping tool like some other software, it provides an effective workaround using the Measure Tool.
- Select the Measure Tool: Find the Measure Tool in the toolbox (it often shares a spot with the Color Picker, so you might need to right-click). Alternatively, use the keyboard shortcut
Shift + M. - Draw a Reference Line: Click on one end of your horizon (or any line that should be straight) and drag the cursor along it. It doesn’t need to cover the entire horizon, just enough to define its angle.
- Straighten: In the Measure Tool options panel, ensure “Clipping” is set to “Crop to Result.” Then, click the “Straighten” button. GIMP will automatically rotate and crop the image to level your chosen line.
- Crop to Content: Similar to perspective correction, this process might leave transparent areas. Use
Image > Crop to Contentto clean them up.
For refining overall composition, GIMP’s Crop Tool offers a powerful array of guides (Shift + C). When the Crop Tool is active, look at the bottom of its options panel. By default, it’s set to “No guides.” Change this to options like “Rule of Thirds,” “Golden Ratio,” or “Diagonals” to overlay compositional grids directly onto your image. This allows Tophinhanhdep.com users to frame their shots perfectly, improving aesthetic appeal and adhering to established principles of Beautiful Photography. You can also crop to specific aspect ratios to change photo orientation from portrait to landscape or vice-versa, tailoring images for different platforms and uses.
Enhancing Portraits and Creative Transformations: Unleashing Artistic Vision
GIMP is not just for fixing technical flaws; it’s also a powerful tool for artistic expression and Photo Manipulation. Tophinhanhdep.com celebrates creative ideas, and GIMP allows you to realize them, from subtle portrait enhancements to dramatic artistic conversions.
Retouching Portraits: Smoothing Skin, Whitening Teeth, Removing Blemishes
Portraits often benefit from careful retouching to enhance the subject’s features without making them look artificial. GIMP provides the tools for professional-level portrait editing:
- Whiten Teeth: A brighter smile can make a significant difference.
- Use a selection tool (like the Free Select Tool or Paths Tool for greater precision) to carefully select the teeth.
- Go to
Colors > Hue / Saturation. - In the dialog box, select “Yellow” from the primary color choices.
- Slightly lower the “Saturation” and gently increase the “Luminosity” until the teeth appear naturally whiter. Avoid overdoing it to maintain realism.
- Remove Blemishes: The Healing Tool is perfect for removing small imperfections like pimples or moles.
- Select the Healing Tool from the toolbox.
- Hold down
Ctrl(orCmdon Mac) and click on an area of clear skin close to the blemish to sample healthy texture. - Release the key and click on the blemish. The tool intelligently blends the sampled texture over the imperfection. Repeat for all blemishes.
- Smooth Skin: Achieving smooth skin without losing detail is a hallmark of good portrait retouching.
- Duplicate your portrait layer (
Layer > Duplicate Layer). - Change the blending mode of the duplicated layer to
HSV Saturation. This preserves color information while allowing you to blur texture. - Apply a
Filters > Blur > Gaussian Blurto this layer. Adjust the “Size X” and “Size Y” sliders, ensuring “Preview” is checked, until the skin appears smoothed. Use the “Split View” option for a clear before-and-after comparison. - Click “OK.” The effect will likely be too strong. Reduce the
Opacityof this blurred layer in the Layers panel until the smoothing looks natural. - To selectively apply the smoothing, add a
Layer Mask(right-click layer >Add Layer Mask, choose “White (full opacity)”). Then, with a black brush, paint over areas where you want to reveal the original, sharper detail (e.g., eyes, eyebrows, lips) and reduce the smoothing effect.
- Duplicate your portrait layer (
Artistic Conversions: Black and White, Sky Replacement, and RAW Editing
Tophinhanhdep.com encourages exploring diverse Editing Styles, and GIMP offers powerful features for creative transformations:
- Black and White Conversion: Converting to black and white can add a timeless, dramatic, or emotional quality to an image, fitting for Sad/Emotional or Abstract Image collections. GIMP provides several methods under
Colors > Desaturate:- Desaturate: The simplest method. Choose a mode like “Lightness,” “Luminosity,” or “Average” to instantly convert.
- Mono Mixer: Offers advanced control by allowing you to adjust how much each original color channel (red, green, blue) contributes to the final grayscale image, enabling you to darken or lighten specific elements based on their original color.
- Color to Gray: Another option that also allows some control over noise and texture.
- Sky Replacement: For dramatic effect or to fix a bland sky, replacing it can transform an image entirely.
- Open your foreground image.
- Go to
File > Open as Layersand select your new sky image. This places the sky on a new layer in the same document. Position the sky layer below your foreground layer in the Layers panel. - Select your foreground layer. Use a selection tool (e.g., Fuzzy Select Tool for a clear sky, or Free Select/Paths Tool for complex edges) to select the original sky area in the foreground image.
- Add a
Layer Maskto your foreground layer (right-click layer >Add Layer Mask, choose “Selection”). This will mask out the original sky, revealing the new sky beneath. Refine the mask with black or white brushes as needed.
- RAW Photo Editing: While GIMP doesn’t natively support RAW formats, Tophinhanhdep.com notes that you can extend its capabilities using plugins like RawTherapee or Darktable. These external applications act as RAW converters, allowing you to process your RAW files (adjusting exposure, white balance, sharpening, etc.) before importing them into GIMP for further detailed retouching and manipulation. Both are free and can also function as standalone programs for those who prefer to keep their RAW workflow separate.
Optimizing Your Workflow and Exploring Tophinhanhdep.com Resources
Efficient workflow is key to maximizing your creative output. As you master GIMP’s tools, incorporating smart practices will save you time and effort. Tophinhanhdep.com provides a wealth of Image Inspiration & Collections, and optimizing your images in GIMP is a critical step before sharing them with the world.
Essential GIMP Workflow Tips
To ensure a smooth and effective editing process, keep these tips from Tophinhanhdep.com in mind:
- Work Non-Destructively: Always start by duplicating your original layer (
Layer > Duplicate LayerorCtrl+Shift+D). This allows you to revert to an earlier state or experiment without permanently altering your base image. Most importantly, save your project regularly as an XCF file, which preserves all layers and GIMP-specific information. - Utilize Layers and Masks: Layers are fundamental to non-destructive editing in GIMP. Use separate layers for different adjustments (e.g., one for color correction, another for retouching). Layer masks allow you to selectively apply or hide parts of a layer, giving you immense control over where your edits appear.
- Keyboard Shortcuts: Memorize frequently used shortcuts. They significantly speed up your workflow. For example,
Shift+Cfor Crop,Shift+Mfor Measure,Ctrl+Zfor Undo, andCtrl+Shift+Zfor Redo. - Export, Don’t Just Save: When you’re finished editing and want to use your image outside of GIMP (e.g., for web, print, or to upload to Tophinhanhdep.com), use
File > Export As(orCtrl+Shift+E). This allows you to choose common file formats like JPEG, PNG, or TIFF. Simply clicking “Save” (Ctrl+S) will only save it as an XCF project file. - Calibrate Your Monitor: For accurate color representation, especially if you’re working on images for Beautiful Photography or specific Aesthetic themes on Tophinhanhdep.com, ensure your monitor is calibrated. This ensures that the colors you see on screen are as close as possible to the final output.
Expanding Your Creative Toolkit with Tophinhanhdep.com
Beyond GIMP’s internal capabilities, Tophinhanhdep.com offers a broader ecosystem to enhance your visual projects. Your newly fixed and enhanced images can seamlessly integrate into various aspects of our platform:
- High Resolution & Stock Photos: Explore Tophinhanhdep.com for high-resolution stock photos that can serve as backgrounds for your GIMP composites, or as reference material for Digital Art.
- Image Tools for Further Optimization: Once your GIMP edits are complete, leverage Tophinhanhdep.com’s Image Tools for further optimization. Our Compressors can reduce file size without significant quality loss, Optimizers can enhance web loading speeds, and AI Upscalers can increase resolution for larger prints or displays if needed.
- Visual Design & Graphic Design: Use your GIMP skills to create stunning Graphic Design elements, digital artwork, and unique Photo Manipulation composites, drawing inspiration from Tophinhanhdep.com’s extensive collections and Creative Ideas.
- Image Inspiration & Collections: Discover new Photo Ideas, build Mood Boards, and explore Thematic Collections and Trending Styles on Tophinhanhdep.com. Your perfected images, whether Wallpapers, Backgrounds, or specific Aesthetic pieces, can contribute to or be inspired by these diverse visual resources.
Conclusion
GIMP is a formidable ally in the quest for perfect imagery, empowering Tophinhanhdep.com users to overcome common photographic hurdles and express their unique artistic vision. From the fundamental corrections of exposure and white balance to the intricate demands of perspective correction and portrait retouching, GIMP provides a comprehensive suite of tools, all free and open-source.
By integrating these powerful GIMP techniques into your workflow, you can elevate your photography, contribute to sophisticated Visual Design projects, and ensure that every image you create or share aligns with the High Resolution and aesthetic standards celebrated by Tophinhanhdep.com. So, dive into GIMP, experiment with confidence, and unlock the full potential of your visual storytelling, supported by the rich resources and inspiration found on Tophinhanhdep.com.